Are you eager to establish a flourishing reef tank? Curing live rock is essential for success, and at rockscapes.net, we’re here to guide you through the process. Properly curing live rock ensures a healthy aquarium environment, free from unwanted elements and rich in beneficial bacteria. Dive into our comprehensive guide to master live rock preparation, optimize your tank’s ecosystem, and discover stunning aquascaping ideas. Let’s unlock the secrets to a vibrant reef tank, exploring essential elements, and reef ecosystems!
Table of Contents
- What is Live Rock Curing and Why Is It Important?
- Understanding the Different Types of Live Rock
- How Long Does It Take to Cure Live Rock?
- Step-by-Step Guide to Curing Live Rock
- Curing Wet or “Live” Rock: A Detailed Process
- Curing Dry Rock: A Comprehensive Guide
- Essential Equipment for Curing Live Rock
- Monitoring Water Parameters During Curing
- Troubleshooting Common Issues in Live Rock Curing
- Tips for Accelerating the Curing Process Safely
- Integrating Cured Live Rock into Your Reef Tank
- The Role of Live Rock in Maintaining a Healthy Reef Ecosystem
- Advanced Techniques for Enhancing Live Rock’s Biological Filtration
- Combining Wet and Dry Rock: A Balanced Approach
- How to Aquascape with Live Rock: Design Ideas and Best Practices
- Maintaining Your Live Rock for Long-Term Reef Health
- The Economic and Environmental Benefits of Using Live Rock
- Live Rock Curing: Common Mistakes to Avoid
- Staying Updated: The Latest Trends in Live Rock Curing Techniques
- FAQ: Frequently Asked Questions About Curing Live Rock
1. What is Live Rock Curing and Why Is It Important?
Live rock curing is the process of preparing newly acquired live rock for use in a saltwater aquarium by removing dead or decaying organic material. This step is vital as uncured rock can release harmful substances like ammonia and nitrites, which are toxic to marine life. Curing live rock establishes a stable biological filter, fostering a thriving reef ecosystem within your aquarium. Properly cured rock supports a balanced reef aquarium, encouraging a stable environment, and promoting healthy coral reefs.
Why is Curing Live Rock So Important?
- Removes Decaying Matter: Live rock often contains dead organisms that decompose during transit.
- Establishes Biological Filtration: Beneficial bacteria colonize the rock, converting harmful substances into less toxic forms.
- Prevents Ammonia Spikes: Curing prevents the release of ammonia, protecting fish and invertebrates.
- Promotes Stability: A cured rock base contributes to long-term aquarium stability and reduces the risk of imbalances.
2. Understanding the Different Types of Live Rock
Choosing the right type of live rock is crucial for a successful reef tank. Each type offers unique benefits and requires specific curing methods. From freshly collected “live” rock to man-made alternatives, understanding these differences will help you make an informed decision. Selecting live rock ensures a reef environment, provides varied reef structures, and sustains diverse reef inhabitants.
Types of Live Rock
| Type of Live Rock | Description | Pros | Cons |
|---|---|---|---|
| “Live” or Wet Rock | Freshly collected from the ocean, teeming with beneficial bacteria and organisms. | Rapid cycling, natural look, introduces biodiversity. | Risk of introducing pests and parasites, requires careful curing. |
| Dry Rock | Previously “live” rock that has been dried out, free from living organisms. | No risk of pests, easier to handle, lightweight. | Requires longer cycling, needs to be seeded with beneficial bacteria. |
| Man-Made Rock | Artificially created from various materials, designed to mimic natural live rock. | Environmentally friendly, consistent quality, customizable shapes. | May lack the biodiversity of natural rock, requires careful selection of reputable brands. |
| Aquacultured Live Rock | Grown in controlled environments, offering a sustainable alternative to wild-collected rock. | Environmentally responsible, fewer pests, pre-colonized with beneficial bacteria. | Can be more expensive, availability may vary. |
| Base Rock | Inexpensive, dense rock used as a foundation for aquascaping. | Affordable, provides structure, can be combined with other types of rock. | Lacks the porosity and biological activity of true live rock, requires longer to colonize with bacteria. |
3. How Long Does It Take to Cure Live Rock?
The duration of the live rock curing process varies depending on the type and condition of the rock. “Live” rock typically takes 1 to 4 weeks, while dry rock can take 4 to 8 weeks to fully cycle. Regular monitoring of water parameters is essential to determine when the curing process is complete. The time to cure live rock influences tank stability, affects the reef ecosystem maturation, and determines the biological balance period.
Factors Affecting Curing Time
- Type of Rock: “Live” rock cures faster than dry rock due to existing bacteria.
- Initial Condition: Heavily soiled rock takes longer to cure.
- Water Temperature: Higher temperatures (75-80°F or 24-27°C) accelerate the process.
- Water Flow: Good water circulation promotes bacterial growth and waste removal.
- Nutrient Levels: High initial nutrient levels extend the curing time.
4. Step-by-Step Guide to Curing Live Rock
Curing live rock involves a series of steps to ensure the rock is safe and beneficial for your reef tank. From initial inspection to final testing, each step plays a critical role in the success of your aquarium. Properly curing live rock helps establish a healthy aquarium, encourages stable water parameters, and supports a thriving reef ecosystem.
Steps to Curing Live Rock
- Initial Inspection: Examine the rock for unwanted pests and remove any visible dead organisms.
- Preparation: Place the rock in a container with saltwater, ensuring good water flow and temperature control.
- Monitoring: Regularly test water parameters for ammonia, nitrite, and nitrate levels.
- Water Changes: Perform water changes to reduce nutrient levels and maintain water quality.
- Completion: The curing process is complete when ammonia and nitrite levels consistently read zero.
5. Curing Wet or “Live” Rock: A Detailed Process
Curing wet or “live” rock involves removing dead organisms and excess organic matter to prevent harmful ammonia spikes in your aquarium. This process is crucial for establishing a stable biological filter and a healthy reef environment. Effective curing of wet rock helps prevent ammonia spikes, supports biological filter establishment, and creates a healthy reef environment.
Detailed Steps for Curing Wet Rock
-
Initial Cleaning:
-
Inspect the Rock: Carefully examine each piece of rock for any visible signs of dead or decaying organisms.
-
Remove Debris: Use a stiff brush to scrub off any loose debris, algae, or sponges that are likely to die.
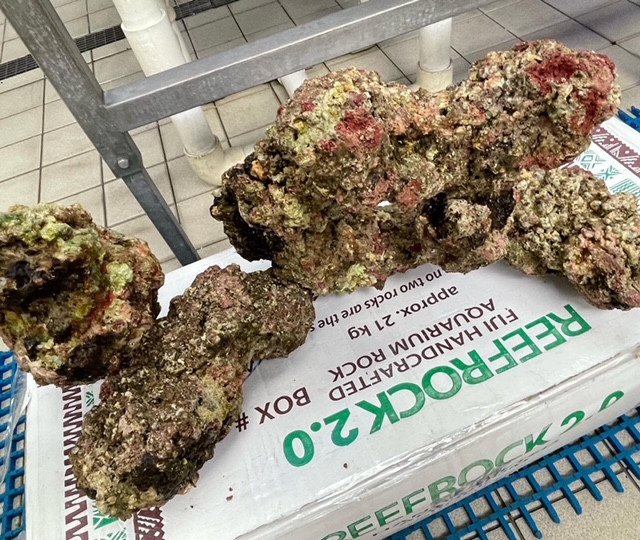 Inspecting Live Rock
-
-
Preparation:
-
Curing Container: Place the rock in a clean container such as a plastic tub or your display tank (if it’s not already in use).
-
Saltwater: Fill the container with aged saltwater made from RO/DI water to avoid introducing chloramines or phosphates.
-
Placement: Arrange the rock to maximize surface area exposure and prevent it from resting directly against other rocks to avoid anaerobic pockets.
-
-
Equipment Setup:
-
Powerheads: Add powerheads to create strong water flow around the rock, which helps to oxygenate the water and remove waste.
-
Heater: Use a heater to maintain a stable temperature between 75-80°F (24-27°C), accelerating the curing process.
-
Protein Skimmer (Optional): A protein skimmer can help remove excess nutrients and dissolved organics released by the rock.
-
-
Monitoring Water Parameters:
-
Testing Frequency: Test the water two to three times per week for ammonia and nitrite levels.
-
Ammonia Levels: High ammonia levels indicate active decomposition.
-
Nitrite Levels: As ammonia is processed, nitrite levels will rise and then fall as the bacteria colonize the rock.
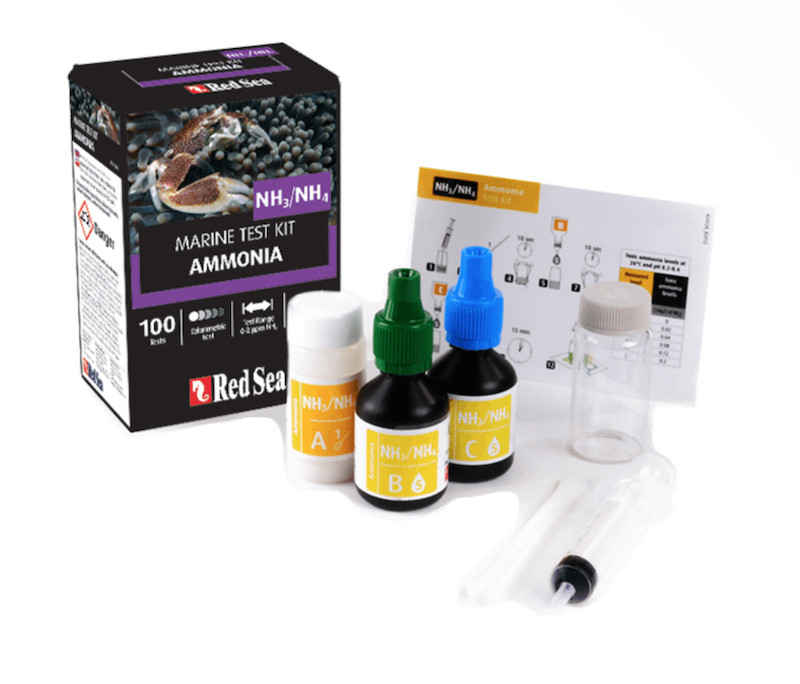 Ammonia Test Kit
-
-
Water Changes:
-
Frequency: Perform a 100% water change if ammonia levels exceed 5-6ppm, typically around the two-week mark.
-
Detritus Removal: During water changes, remove any accumulated detritus or dead material from the bottom of the container.
-
Subsequent Changes: Continue with water changes every 5-7 days as needed, based on water parameter readings.
-
-
Completion:
-
Zero Readings: The curing process is complete when ammonia and nitrite levels consistently read 0 ppm, and nitrate levels stabilize.
-
Duration: This process can take from one week to several months, depending on the rock’s quality and initial condition.
-
6. Curing Dry Rock: A Comprehensive Guide
Curing dry rock involves preparing previously “live” rock or new artificial rock for aquarium use by removing any residual organic material and then cycling it to establish a healthy bacterial population. This ensures the rock can effectively act as a biological filter in your reef tank. Efficient curing of dry rock facilitates bacterial colonization, ensures a stable biological filter, and prepares the rock for reef tank use.
Detailed Steps for Curing Dry Rock
-
Initial Cleaning (Curing):
-
Bleach Solution (Optional): For previously used dry rock, soak the rock in a dilute bleach solution (600-700ml of unscented bleach per 10L of freshwater) for 7-10 days to kill any remaining organic material. Consult your supplier to see if this step is necessary.
-
Rinsing: Thoroughly rinse the rock with clean saltwater to remove any residual bleach.
-
-
Cycling Process:
-
Cycling Container: Place the rock in a clean container with saltwater.
-
Equipment Setup: Add powerheads for water flow and a heater to maintain a temperature of 75-80°F (24-27°C).
-
Bacterial Additives: Introduce bottled bacteria and substrate from an established tank to seed the rock with beneficial bacteria.
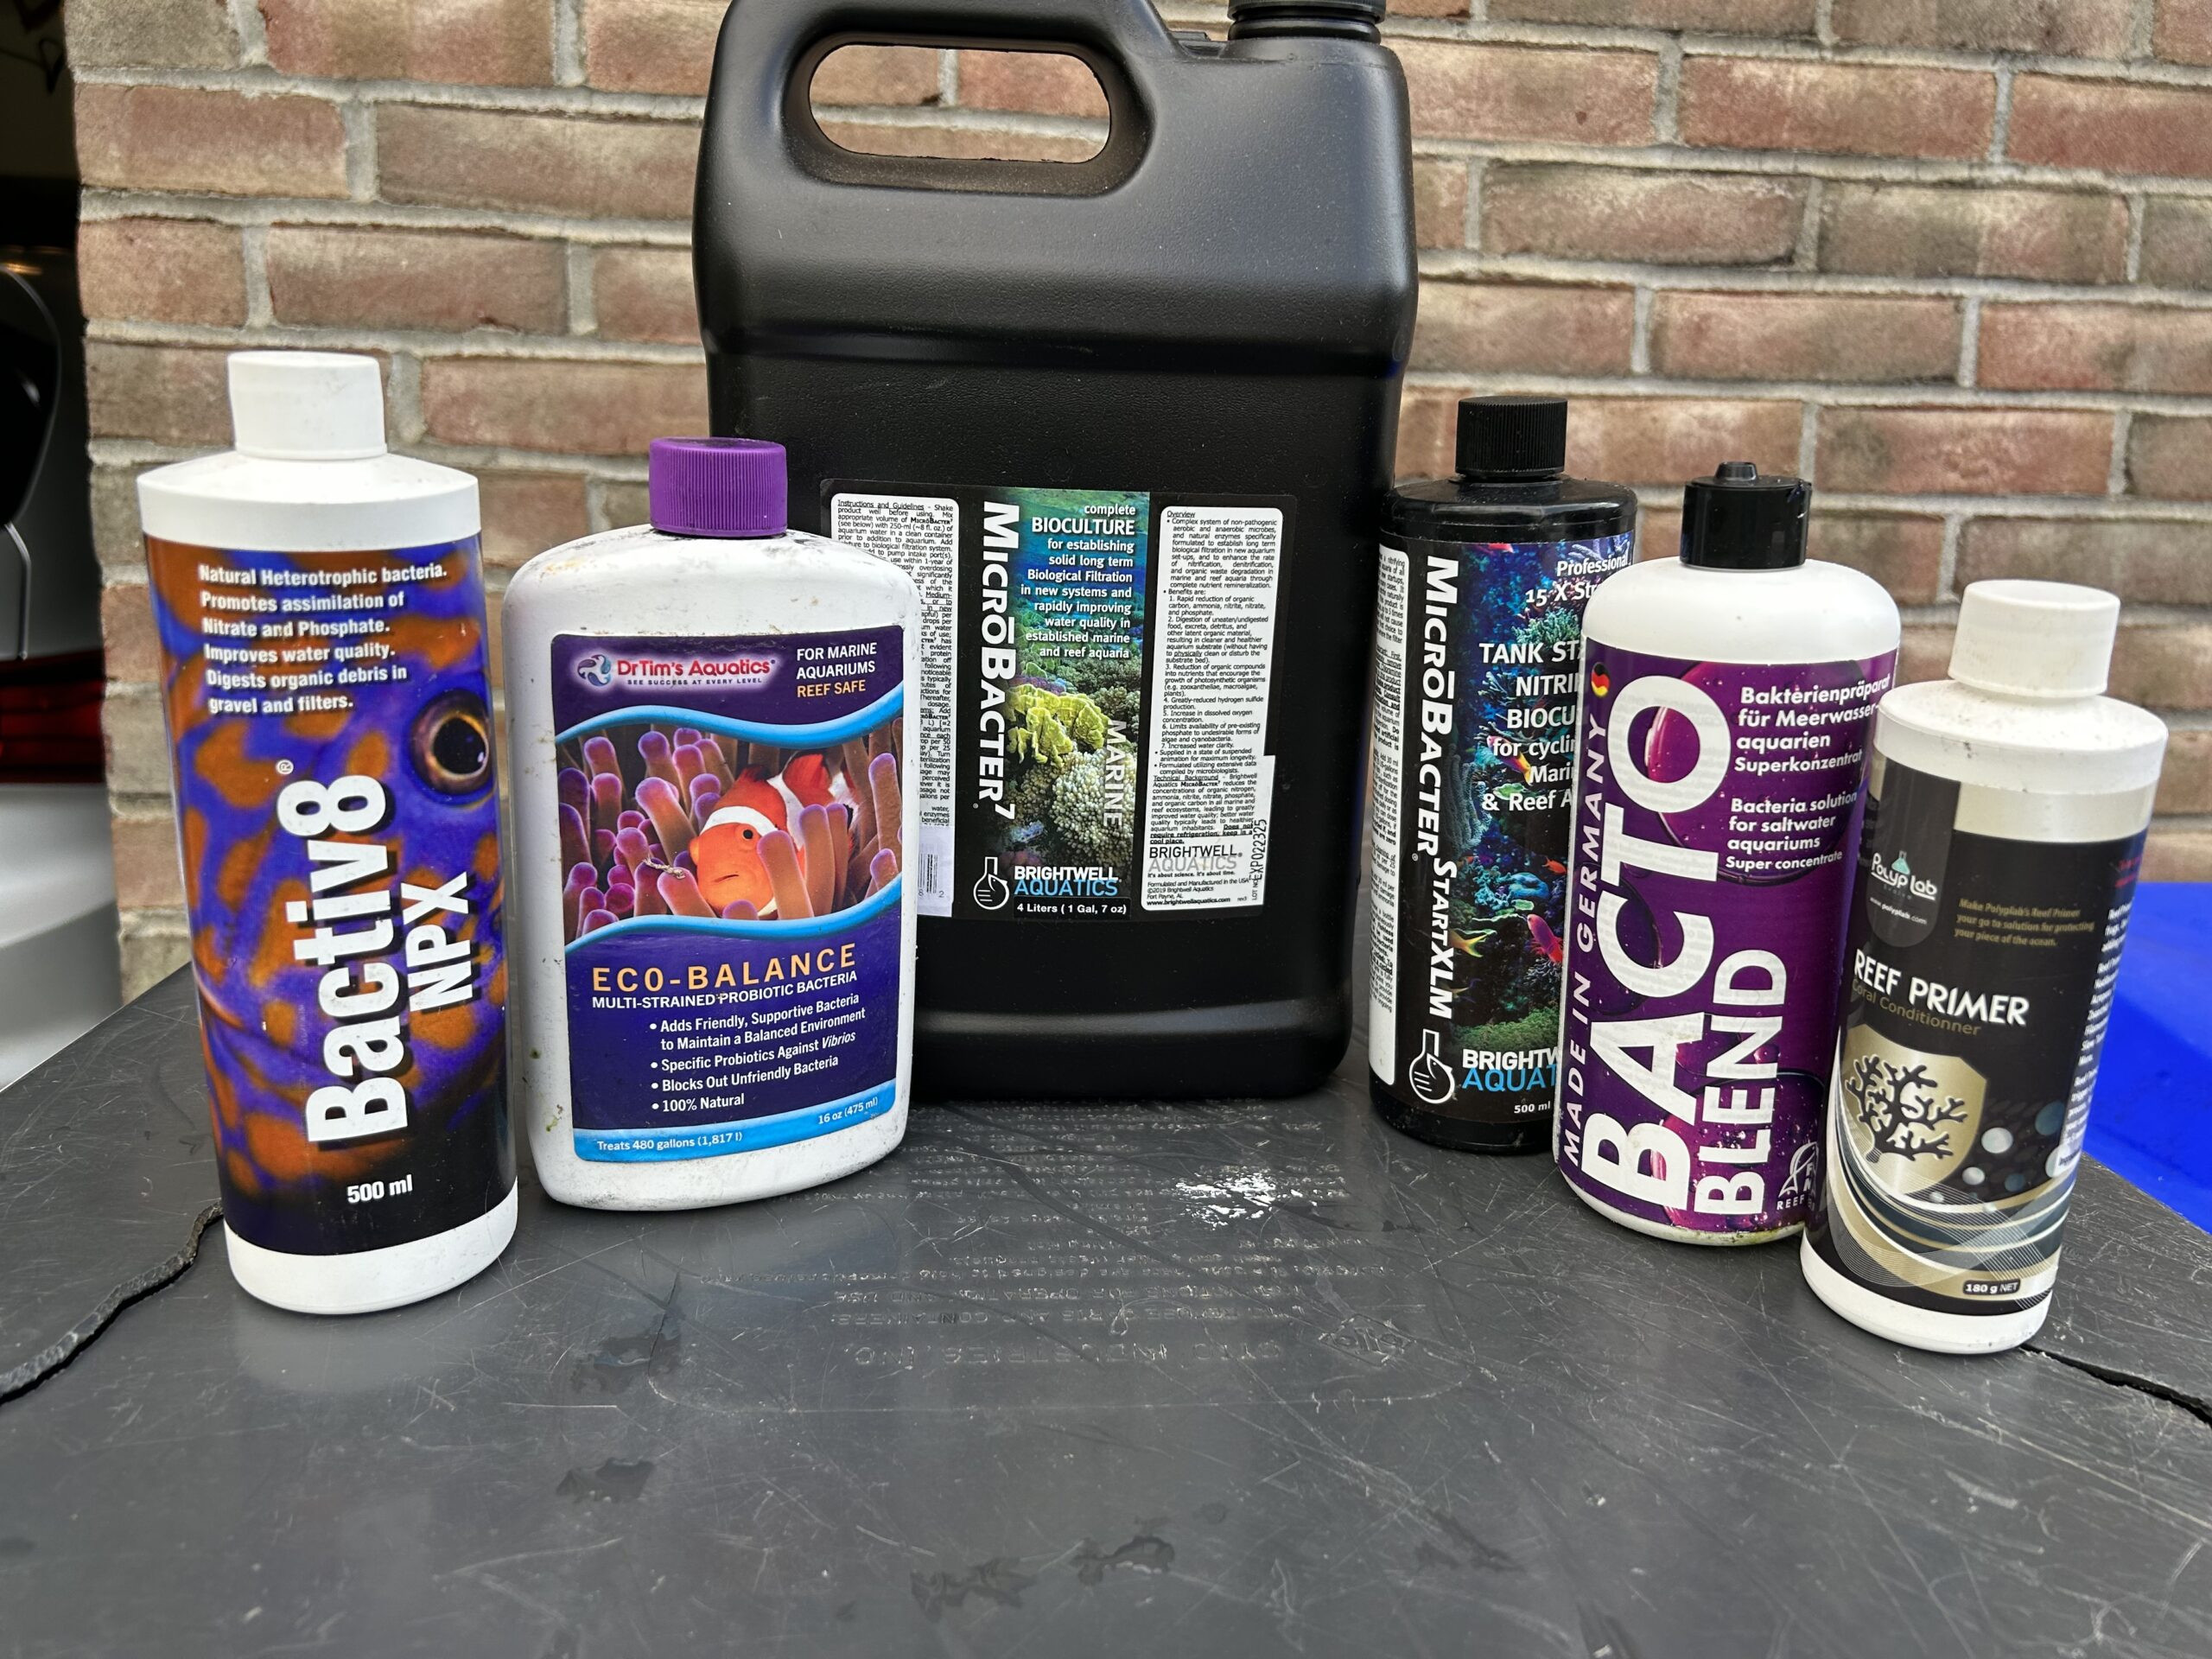 Bottled Bacteria
-
-
Ammonia Introduction:
-
Source of Ammonia: Add a source of ammonia, such as ammonia hydroxide, a pinch of food, or a piece of frozen shrimp, to feed the bacteria.
-
Monitoring: Test the water daily for ammonia levels. If no ammonia is detected, add more ammonia until a reading is obtained.
-
-
Monitoring Water Parameters:
-
Testing Frequency: Test the water every other day for ammonia, nitrite, and nitrate levels.
-
Ammonia and Nitrite: Continue adding ammonia until both ammonia and nitrite levels reach 0 ppm.
-
Nitrate: Monitor nitrate levels, which should increase as ammonia and nitrite are processed.
-
-
Water Changes:
-
Frequency: After one month, perform a 50-100% water change to remove any accumulated detritus.
-
Subsequent Cycling: Some hobbyists recommend a second cycle with the addition of cured wet rock to further inoculate the dry rock.
-
-
Completion:
-
Zero Readings: The cycling process is complete when ammonia and nitrite levels consistently read 0 ppm, and nitrate levels are stable.
-
Duration: This process can take from a few weeks to several months.
-
7. Essential Equipment for Curing Live Rock
Having the right equipment is essential for effectively curing live rock. These tools help maintain optimal conditions for bacterial growth and waste removal, ensuring a successful curing process. Equipping yourself with the right tools enhances curing efficiency, maintains optimal water conditions, and promotes successful bacterial colonization.
Key Equipment for Curing Live Rock
| Equipment | Purpose | Benefits |
|---|---|---|
| Curing Container | A large, clean container (e.g., plastic tub or unused aquarium) to hold the live rock and saltwater. | Provides a dedicated space for curing, preventing contamination of the main display tank. |
| Powerheads | Submersible pumps that create strong water flow within the curing container. | Ensures adequate oxygenation, promotes bacterial growth, and removes waste products. |
| Heater | A submersible heater to maintain a consistent water temperature. | Accelerates the curing process by promoting bacterial activity. |
| Thermometer | To monitor the water temperature in the curing container. | Ensures the water temperature remains within the optimal range (75-80°F or 24-27°C). |
| Test Kits | Ammonia, nitrite, and nitrate test kits to monitor water parameters. | Provides essential data to track the progress of the curing process and determine when the rock is fully cured. |
| Protein Skimmer | (Optional) A device that removes organic waste and dissolved pollutants from the water. | Helps maintain water quality by removing excess nutrients and reducing the risk of ammonia spikes. |
| RO/DI System | A water purification system that removes impurities from tap water. | Ensures the saltwater used for curing is free from harmful contaminants such as chloramines, phosphates, and heavy metals. |
| Salt Mix | A high-quality salt mix to create saltwater for the curing process. | Provides the necessary minerals and trace elements for beneficial bacteria and marine life. |
| Stiff Brush | A brush with stiff bristles for scrubbing the live rock. | Helps remove loose debris, algae, and dead organisms from the surface of the rock. |
| Buckets | For mixing saltwater and performing water changes. | Provides a convenient and safe way to handle water during the curing process. |
8. Monitoring Water Parameters During Curing
Regularly monitoring water parameters is crucial during the live rock curing process. Testing for ammonia, nitrite, and nitrate levels helps track the progress of bacterial colonization and ensures the rock is safe for your reef tank. Monitoring water parameters ensures accurate curing progress, helps prevent imbalances, and promotes a healthy reef environment.
Key Water Parameters to Monitor
| Parameter | Ideal Levels During Curing | Importance | Action if Levels are Too High |
|---|---|---|---|
| Ammonia | Should start high and gradually decrease to 0 ppm. | High levels indicate active decomposition of organic matter. | Perform a water change to reduce ammonia levels. |
| Nitrite | Will rise as ammonia is processed, then decrease to 0 ppm. | Indicates the second stage of the nitrogen cycle, where ammonia is converted to nitrite. | Continue monitoring and perform water changes as needed. |
| Nitrate | Will increase as nitrite is processed. | The end product of the nitrogen cycle, less toxic than ammonia and nitrite. | Perform water changes to control nitrate levels. |
| pH | Maintain between 8.1 and 8.4. | Ensures a stable environment for beneficial bacteria. | Use a buffer to adjust pH levels. |
| Temperature | Maintain between 75-80°F (24-27°C). | Promotes bacterial activity and accelerates the curing process. | Adjust the heater as needed to maintain the correct temperature. |
| Salinity | Maintain between 1.024 and 1.026 SG. | Ensures the correct salt concentration for the bacteria and prevents osmotic stress. | Add freshwater or salt mix to adjust salinity levels. |
9. Troubleshooting Common Issues in Live Rock Curing
Even with careful preparation, issues can arise during the live rock curing process. Addressing these problems promptly can prevent setbacks and ensure a successful outcome. Effective troubleshooting minimizes curing delays, helps maintain water quality, and ensures a healthy start for your reef tank.
Common Problems and Solutions
| Problem | Possible Cause(s) | Solution(s) |
|---|---|---|
| Persistent High Ammonia Levels | Excessive organic matter, insufficient water flow, low temperature. | Perform larger or more frequent water changes, increase water flow with additional powerheads, ensure the water temperature is within the optimal range (75-80°F or 24-27°C). |
| Foul Odor | Anaerobic pockets, decomposition of trapped organic matter. | Ensure adequate water flow to prevent anaerobic pockets, remove any trapped debris, and consider using a protein skimmer to remove dissolved organics. |
| Algae Bloom | High nutrient levels, excessive lighting. | Reduce or eliminate lighting, perform water changes to lower nutrient levels, and consider using a phosphate remover if phosphate levels are high. |
| Slow Cycling Process | Insufficient bacterial seeding, low temperature, inadequate water flow. | Add bottled bacteria to boost the bacterial population, ensure the water temperature is within the optimal range, increase water flow, and add a small source of ammonia to feed the bacteria. |
| Unstable pH | Insufficient buffering capacity, high CO2 levels. | Use a buffer to stabilize pH, ensure adequate aeration to remove excess CO2, and check the alkalinity of the water. |
| Introduction of Pests (with Live Rock) | Aiptasia anemones, bristle worms, nuisance algae. | Manually remove pests, use natural predators (e.g., peppermint shrimp for aiptasia), and quarantine the rock in a separate container with appropriate treatments before introducing it to the main curing tank. |
| Cloudy Water | Bacterial bloom, particulate matter. | Perform a water change, use a filter sock to remove particulate matter, and allow the bacterial bloom to subside naturally. |
| White Film on Rock | Die-off of organisms, calcium precipitation. | Scrub the rock with a brush, perform a water change, and ensure the water parameters are within the correct range. The film should dissipate as the curing process progresses. |
10. Tips for Accelerating the Curing Process Safely
While patience is key, there are safe methods to expedite the live rock curing process. These tips can help reduce the curing time without compromising the health of your future reef tank. Employing these strategies reduces curing time, supports bacterial growth, and ensures a healthy reef environment.
Strategies for Faster Curing
- Maintain Optimal Temperature: Keeping the water temperature consistently between 75-80°F (24-27°C) accelerates bacterial activity.
- Ensure Strong Water Flow: Adequate water circulation provides oxygen and removes waste products, promoting faster bacterial growth.
- Use a Protein Skimmer: A protein skimmer efficiently removes organic waste, reducing the bioload and speeding up the curing process.
- Seed with Established Bacteria: Adding bottled bacteria or substrate from a healthy aquarium introduces beneficial bacteria and kick-starts the nitrogen cycle.
- Regular Water Changes: Performing frequent water changes helps remove accumulated waste and maintains optimal water quality.
- Use High-Quality Salt Mix: A salt mix with the necessary trace elements supports bacterial growth and overall water quality.
11. Integrating Cured Live Rock into Your Reef Tank
Once the live rock is fully cured, integrating it into your reef tank requires careful planning. Proper placement and aquascaping techniques ensure a stable and visually appealing environment for your marine inhabitants. Skillful integration ensures tank stability, promotes a natural aesthetic, and provides a healthy habitat for reef inhabitants.
Steps for Integrating Cured Rock
-
Aquascaping Plan: Design the layout of your reef tank before adding the cured live rock. Consider water flow, coral placement, and aesthetic appeal.
-
Placement: Carefully place the rock in the tank, ensuring stability and avoiding dead spots where detritus can accumulate.
-
Secure the Rock: Use reef-safe epoxy or zip ties to secure the rock and prevent it from shifting.
-
Acclimation: Gradually acclimate the rock to the tank environment by floating it in a bag of tank water for about 30 minutes.
-
Monitor Water Parameters: After adding the rock, monitor water parameters closely for any signs of ammonia or nitrite spikes.
12. The Role of Live Rock in Maintaining a Healthy Reef Ecosystem
Live rock is more than just decoration; it’s a cornerstone of a healthy reef aquarium. It provides biological filtration, habitat for beneficial organisms, and contributes to the overall stability of the ecosystem. Recognizing its pivotal role bolsters ecosystem health, supports biological filtration, and provides habitats for marine life.
Key Roles of Live Rock
- Biological Filtration: Live rock serves as a natural filter, housing bacteria that convert harmful ammonia and nitrite into less toxic nitrate.
- Habitat for Beneficial Organisms: It provides a home for copepods, amphipods, and other microfauna that contribute to the food web.
- Nutrient Cycling: Live rock aids in nutrient cycling by absorbing and releasing essential elements.
- pH Buffering: It helps maintain stable pH levels in the aquarium.
13. Advanced Techniques for Enhancing Live Rock’s Biological Filtration
To maximize the benefits of live rock, consider advanced techniques that enhance its biological filtration capabilities. These methods can lead to a more stable and efficient reef ecosystem. By implementing advanced techniques, you enhance filtration efficiency, support a stable ecosystem, and promote optimal water quality.
Techniques for Enhancing Biological Filtration
- Deep Sand Bed (DSB): A deep sand bed in the aquarium provides additional surface area for anaerobic bacteria to process nitrate.
- Refugium: A separate tank connected to the main display tank that houses macroalgae and invertebrates, aiding in nutrient export.
- Bio-Pellets: Bio-pellets provide a carbon source for bacteria, enhancing nitrate and phosphate reduction.
- নিয়মিত Dosing Carbon Sources: Regular dosing of carbon sources like vodka or vinegar promotes bacterial growth and nutrient removal.
- Sponge Filtration: Introducing sponges to the live rock enhances its filtration capacity by providing additional surface area for beneficial bacteria.
14. Combining Wet and Dry Rock: A Balanced Approach
Many reefkeepers find success by combining wet and dry rock in their aquariums. This approach balances the benefits of rapid cycling with the reduced risk of pests and parasites. Utilizing a balanced approach combines benefits, reduces pest risks, and optimizes reef tank stability.
Advantages of Combining Rock Types
-
Rapid Cycling: Wet rock introduces beneficial bacteria, speeding up the initial cycling process.
-
Reduced Pest Risk: Dry rock eliminates the risk of introducing unwanted pests and parasites.
-
Cost-Effective: Dry rock is typically less expensive than wet rock, reducing the overall cost of setting up the aquarium.
-
Flexibility: Combining rock types allows for greater flexibility in aquascaping and tank design.
 Wet and Dry Rock Combination
15. How to Aquascape with Live Rock: Design Ideas and Best Practices
Aquascaping with live rock is an art that combines aesthetics with functionality. A well-designed aquascape provides a visually appealing environment while promoting healthy water flow and providing habitats for marine life. Skillful aquascaping balances aesthetics and functionality, promotes healthy water flow, and provides diverse habitats.
Aquascaping Design Ideas
- Island Style: Create a central rock structure with open space around it, allowing for good water flow and easy access for maintenance.
- Wall Reef: Build a rock wall along the back of the tank, providing ample surface area for corals and creating a dramatic backdrop.
- Archway: Construct an archway using live rock, creating a unique and visually appealing focal point.
- Terraced Levels: Create terraced levels using flat pieces of live rock, providing different depths and habitats for various marine species.
- Minimalist Design: Use only a few carefully selected pieces of live rock to create a simple and elegant aquascape.
Best Practices for Aquascaping
- Plan Ahead: Sketch out your aquascaping design before placing the rock in the tank.
- Ensure Stability: Use reef-safe epoxy or zip ties to secure the rock and prevent it from shifting.
- Consider Water Flow: Arrange the rock to promote good water circulation throughout the tank.
- Create Hiding Places: Provide caves and crevices for fish and invertebrates to hide and feel secure.
- Leave Room for Growth: Allow ample space for corals to grow and expand.
16. Maintaining Your Live Rock for Long-Term Reef Health
Maintaining live rock is an ongoing process that ensures its continued health and effectiveness. Regular maintenance helps prevent issues such as algae growth and detritus buildup, keeping your reef tank thriving. Consistent maintenance ensures long-term health, prevents algae and detritus buildup, and sustains a thriving reef.
Maintenance Tips for Live Rock
- Regular Water Changes: Perform regular water changes to maintain water quality and remove accumulated waste.
- Gently Vacuum the Substrate: Use a gravel vacuum to remove detritus from the substrate around the live rock.
- Brush the Rock: Periodically brush the live rock to remove algae and detritus buildup.
- Control Algae Growth: Implement measures to control algae growth, such as using a refugium or introducing algae-eating invertebrates.
- Monitor Water Parameters: Regularly test water parameters to ensure they remain within the optimal range.
17. The Economic and Environmental Benefits of Using Live Rock
Using live rock in reef aquariums offers both economic and environmental advantages. Environmentally, aquacultured rock provides a sustainable alternative to wild-collected rock, reducing the impact on natural reef ecosystems. Economically, a well-maintained system can reduce the need for expensive filtration equipment. Utilizing live rock sustainably benefits the environment, promotes cost savings, and supports long-term reef health.
Benefits of Using Live Rock
- Sustainable Option: Aquacultured live rock is an environmentally responsible choice.
- Cost Savings: Reduces the need for expensive filtration systems.
- Natural Ecosystem: Promotes a balanced and natural reef environment.
- Biodiversity: Introduces a variety of beneficial organisms to the aquarium.
18. Live Rock Curing: Common Mistakes to Avoid
Avoiding common mistakes during the live rock curing process is crucial for a successful reef tank setup. These errors can lead to prolonged curing times, water quality issues, and potential harm to your marine life. Preventing common mistakes optimizes curing, prevents water quality issues, and ensures the health of marine life.
Mistakes to Avoid
-
Rushing the Curing Process: Patience is key. Rushing the process can lead to unstable water parameters and harm to marine life.
-
Using Tap Water: Tap water contains chloramines and other harmful substances that can inhibit bacterial growth. Always use RO/DI water.
-
Neglecting Water Changes: Regular water changes are essential for removing accumulated waste and maintaining water quality.
-
Ignoring Water Parameters: Monitoring water parameters is crucial for tracking the progress of the curing process and identifying potential issues.
-
Using Too Much Light: Excessive light can promote algae growth, which can slow down the curing process.
19. Staying Updated: The Latest Trends in Live Rock Curing Techniques
The field of reef keeping is constantly evolving, with new techniques and technologies emerging regularly. Staying updated on the latest trends in live rock curing can help you achieve even greater success with your reef tank. Keeping up with trends ensures efficient curing, promotes a healthy reef, and optimizes tank management.
Emerging Trends in Curing Techniques
- Probiotic Curing: Using probiotic supplements to enhance bacterial colonization and nutrient cycling.
- Advanced Filtration: Incorporating advanced filtration methods such as ozone and UV sterilization to improve water quality.
- Sustainable Sourcing: Prioritizing aquacultured and ethically sourced live rock to support sustainable reef keeping practices.
- DIY Curing Systems: Creating custom curing systems using innovative materials and designs to optimize the curing process.
FAQ: Frequently Asked Questions About Curing Live Rock
Navigating the live rock curing process can raise many questions. Here are some frequently asked questions to help you understand the process and address common concerns.
Frequently Asked Questions
-
What is the difference between live rock and base rock?
Live rock is rock that has been colonized by beneficial bacteria and other organisms, while base rock is just rock without these organisms. Live rock provides biological filtration, while base rock is primarily used for aquascaping.
-
Can I cure live rock in my display tank?
It is generally not recommended to cure live rock in your display tank, as the process can release harmful substances that can harm existing marine life.
-
How do I know if my live rock is fully cured?
Your live rock is fully cured when ammonia and nitrite levels consistently read 0 ppm, and nitrate levels are stable.
-
What should I do if my ammonia levels are too high during curing?
Perform a water change to reduce ammonia levels. You may also need to increase water flow or reduce the amount of organic matter in the curing container.
-
Can I use tap water to cure live rock?
No, tap water contains chloramines and other harmful substances that can inhibit bacterial growth. Always use RO/DI water.
-
How often should I perform water changes during the curing process?
Perform water changes as needed to maintain water quality, typically every 5-7 days or whenever ammonia levels are high.
-
What is the ideal temperature for curing live rock?
The ideal temperature for curing live rock is between 75-80°F (24-27°C).
-
Can I use a protein skimmer during the curing process?
Yes, a protein skimmer can help remove excess nutrients and dissolved organics, speeding up the curing process.
-
How long does it take to cycle dry rock?
Cycling dry rock can take 4-8 weeks, depending on the method used and the amount of beneficial bacteria added.
-
Is it necessary to use live rock in a reef tank?
While not strictly necessary, live rock provides numerous benefits, including biological filtration, habitat for beneficial organisms, and nutrient cycling.
Ready to transform your aquarium with stunning and biologically rich live rock? Explore the vast selection and expert advice at rockscapes.net! Let us help you create the reef tank of your dreams. Visit our website today for inspiration, detailed product information, and personalized support. Contact us at 1151 S Forest Ave, Tempe, AZ 85281, United States, or call +1 (480) 965-9011. Discover the difference with rockscapes.net!