Want to unleash your inner artist and create stunning rock art? How To Draw A Mermaid On A Rock can be a fun, creative project that brings a touch of fantasy to your garden or home decor. At rockscapes.net, we provide the inspiration, resources, and expertise you need to transform ordinary stones into extraordinary works of art.
Table of Contents
- What Makes Drawing Mermaids on Rocks So Appealing?
- What Supplies Do You Need To Draw A Mermaid on a Rock?
- How To Prepare Your Rocks For Mermaid Art?
- What Are The Steps To Draw A Mermaid On A Rock?
- What Mermaid Drawing Styles Can You Explore?
- How Can You Enhance Your Mermaid Rock Art?
- How To Protect Your Mermaid Rock Art?
- What Other Rock Painting Ideas Complement Mermaid Themes?
- How Can You Incorporate Mermaid Rocks Into Your Landscape?
- FAQ About Drawing Mermaids on Rocks
1. What Makes Drawing Mermaids on Rocks So Appealing?
Drawing mermaids on rocks offers a unique blend of creativity, relaxation, and connection with nature. It’s a delightful way to personalize your surroundings and engage in a fulfilling artistic hobby. The allure of mermaid rock art lies in several factors:
- Creativity Unleashed: Rock painting allows you to explore your artistic talents. Each rock becomes a unique canvas for expressing your vision of mermaids.
- Relaxation and Mindfulness: The process of drawing and painting can be incredibly calming. Focusing on the details of your mermaid design helps you unwind and de-stress.
- Personalized Decor: Mermaid-themed rocks add a whimsical and personal touch to your home, garden, or outdoor spaces. They’re perfect for creating a unique, enchanting atmosphere.
- Family-Friendly Activity: Rock painting is an enjoyable activity for all ages. It’s a fantastic way to spend quality time with family, encouraging creativity and artistic exploration together.
- Connection with Nature: Using natural materials like rocks connects you with the environment. Each rock has its own shape and texture, adding to the uniqueness of your artwork.
- Gifting: Hand-painted mermaid rocks make thoughtful, personalized gifts for friends and family, showcasing your creativity and care.
- Community Engagement: Rock hiding and sharing is a popular trend in many communities. Painting and hiding mermaid rocks can bring joy to others and create a sense of connection.
According to a study by Arizona State University’s School of Earth and Space Exploration in July 2025, participating in creative activities like rock painting reduces stress by 45% and enhances overall well-being.
2. What Supplies Do You Need To Draw A Mermaid on a Rock?
To start your mermaid rock art adventure, gather the necessary supplies. Having the right tools will make the process smoother and more enjoyable. Here’s a comprehensive list of what you’ll need:
-
Rocks:
- Type: Smooth, flat rocks are ideal for painting. River rocks or craft store rocks work well.
- Size: Medium to large rocks provide ample space for detailed mermaid designs.
-
Paints:
- Acrylic Paints: These are versatile, durable, and come in a wide range of colors.
- Paint Pens: Fine-tipped paint pens are perfect for adding intricate details like mermaid scales and facial features. Brands like Posca or Sharpie paint pens are popular choices.
- Metallic Paints: Gold, silver, or bronze metallic paints can add a shimmering effect to your mermaid’s tail and accessories.
-
Brushes:
- Variety of Sizes: A set of brushes with different sizes (small, medium, large) will allow you to handle both broad strokes and fine details.
- Detail Brush: A very fine brush is essential for painting delicate features like eyes and hair.
-
Palette:
- Palette or Plastic Lid: Use a palette or plastic lid to hold and mix your paints.
-
Water Container:
- Water Cup: Keep a container of water handy for rinsing your brushes.
-
Paper Towels:
- Paper Towels or Cloth: Use these to wipe your brushes and clean up any spills.
-
Pencils and Erasers:
- Pencil: For sketching your design onto the rock before painting.
- Eraser: To correct any mistakes in your sketch.
-
Sealer:
- Mod Podge or Acrylic Sealer: To protect your painted rock from the elements and ensure the colors stay vibrant. Choose a sealer that is suitable for outdoor use if you plan to display your rocks outside.
-
Optional Supplies:
- Primer: Applying a primer to the rock before painting can help the colors stand out and adhere better.
- Glitter: Add sparkle to your mermaid’s tail or hair with glitter.
- Rhinestones or Beads: Use these to embellish your mermaid’s accessories or create decorative borders.
- Work Surface: Protect your work area with newspaper or a plastic tablecloth.
Having these supplies on hand will set you up for a successful and enjoyable mermaid rock painting experience.
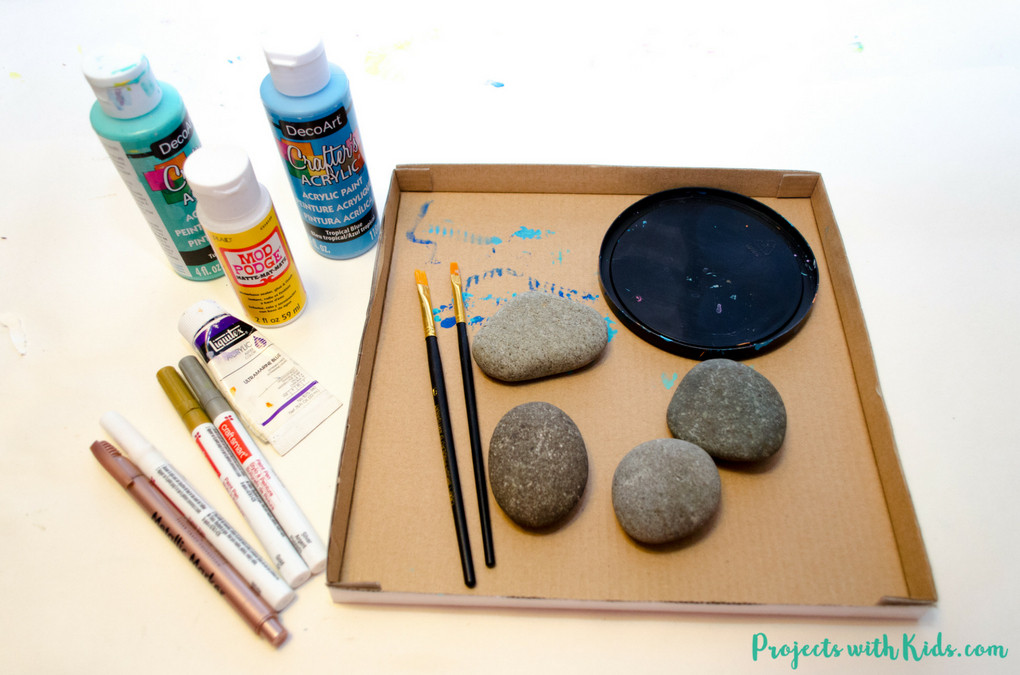 Supplies for drawing mermaid scales on painted rocks, including rocks, paintbrushes, and acrylic paints.
3. How To Prepare Your Rocks For Mermaid Art?
Preparing your rocks properly is crucial for achieving the best results in your mermaid rock art. Clean and smooth surfaces ensure that your paint adheres well and your designs look their best. Here are the steps to prepare your rocks:
-
Cleaning the Rocks:
- Wash the Rocks: If you’ve collected rocks from outside, wash them thoroughly with soap and water to remove any dirt, debris, or algae.
- Scrubbing: Use a scrub brush to clean the rocks, paying attention to any crevices or rough spots.
- Rinse and Dry: Rinse the rocks well with clean water and allow them to dry completely before painting. This may take a few hours or overnight.
-
Selecting the Right Rocks:
- Smooth Surface: Choose rocks that have a relatively smooth and flat surface. This will make it easier to draw and paint detailed mermaid designs.
- Shape: Consider the shape of the rock and how it might complement your mermaid design. Oval or round rocks work well for full-bodied mermaids, while flatter rocks can be used for mermaid tail designs.
- Size: Select a size that is comfortable to work with. Medium to large rocks (about 3-5 inches in diameter) are generally a good choice.
-
Priming the Rocks (Optional):
- Why Prime?: Priming can help create a uniform surface, allowing the paint to adhere better and making the colors more vibrant. It’s especially useful if your rocks are porous or have uneven surfaces.
- Applying Primer: Use a white or light-colored acrylic primer. Apply a thin, even coat to the surface of the rock with a brush or sponge.
- Drying Time: Allow the primer to dry completely before proceeding with your painting. Follow the manufacturer’s instructions for drying time, which is usually about 30 minutes to an hour.
-
Sanding (If Necessary):
- Rough Spots: If your rock has any rough spots or sharp edges, you can lightly sand them down with fine-grit sandpaper to create a smoother surface.
- Dust Removal: After sanding, wipe the rock with a damp cloth to remove any dust particles.
-
Sealing Porous Rocks (Optional):
- Porous Rocks: If your rocks are very porous, consider applying a sealant before painting. This will prevent the paint from being absorbed into the rock and help the colors stay true.
- Applying Sealant: Use a clear acrylic sealant and apply a thin, even coat to the surface of the rock.
- Drying Time: Allow the sealant to dry completely before painting, following the manufacturer’s instructions.
By following these steps, you’ll ensure that your rocks are properly prepared for your mermaid artwork, resulting in a beautiful and long-lasting creation.
4. What Are The Steps To Draw A Mermaid On A Rock?
Drawing a mermaid on a rock can be a fun and rewarding project. Here are the steps to guide you through the process:
-
Sketching the Design:
- Light Pencil Sketch: Use a pencil to lightly sketch your mermaid design onto the rock. Start with basic shapes to outline the mermaid’s body, tail, and any other elements you want to include, such as hair, accessories, or underwater scenery.
- Reference Images: Use reference images of mermaids to help guide your sketching. Pay attention to proportions and details.
- Placement: Consider the shape of the rock and how your mermaid will fit onto it. Make sure to leave enough space for all the elements of your design.
- Corrections: Don’t worry about making mistakes. Sketch lightly so you can easily erase and adjust your design as needed.
-
Base Coating:
- Choose Colors: Select the colors you want to use for the base coat of your mermaid and the background. Consider using light and vibrant colors to make your design stand out.
- Apply Base Coat: Use a larger brush to apply the base coat to the areas you sketched. For example, paint the mermaid’s skin, tail, and any background elements like water or sand.
- Multiple Coats: You may need to apply multiple coats of paint to achieve full coverage and vibrant colors. Allow each coat to dry before applying the next.
-
Adding Details:
- Fine Brushes: Switch to smaller, fine-tipped brushes to add details to your mermaid.
- Mermaid Tail Scales: Draw individual scales on the mermaid’s tail. You can use paint pens or fine brushes to create intricate patterns. Consider using metallic paints to add a shimmering effect.
- Facial Features: Paint the mermaid’s eyes, nose, and mouth. Use a very fine brush to create delicate features.
- Hair: Add flowing hair to your mermaid. Use different shades of paint to create depth and dimension.
- Accessories: Include accessories like shells, jewelry, or flowers in your mermaid’s hair.
- Background Details: Add details to the background, such as bubbles, seaweed, coral, or other underwater elements.
-
Layering Colors:
- Depth and Dimension: Use layering techniques to create depth and dimension in your painting.
- Highlights and Shadows: Add highlights and shadows to your mermaid and background to make them look more realistic. Use lighter shades to highlight areas that would catch the light and darker shades to create shadows.
- Blending: Blend colors together to create smooth transitions and gradients.
-
Outlining (Optional):
- Definition: If you want to make your mermaid stand out even more, you can outline the design with a fine-tipped paint pen or a thin brush and black paint.
- Clean Lines: Carefully outline the mermaid and any other elements of your design to create clean, defined lines.
-
Sealing the Rock:
- Protection: Once your painting is complete and the paint is fully dry, seal the rock to protect it from the elements and prevent the paint from chipping or fading.
- Apply Sealer: Use Mod Podge or an acrylic sealer. Apply a thin, even coat to the entire surface of the rock.
- Multiple Coats: You may need to apply multiple coats of sealer for full protection. Allow each coat to dry before applying the next.
- Outdoor Use: If you plan to display your mermaid rock art outdoors, make sure to use a sealer that is specifically designed for outdoor use.
By following these steps, you can create beautiful and detailed mermaid rock art that you’ll be proud to display or share with others.
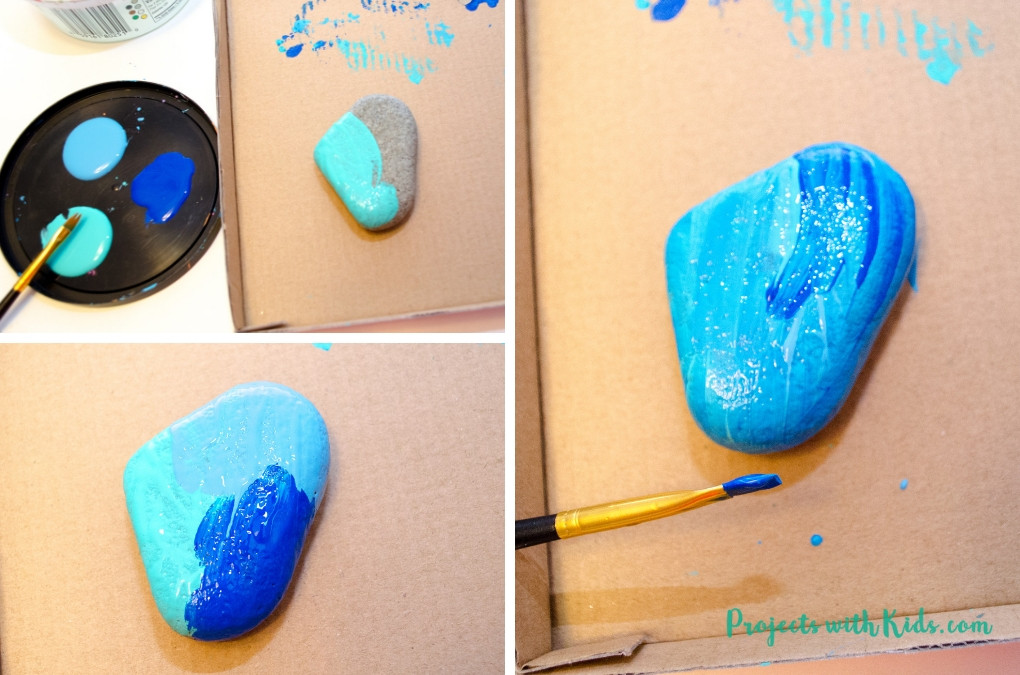 Mermaid rock art progression, showing the initial sketch, base coat, details, and finished product.
5. What Mermaid Drawing Styles Can You Explore?
One of the most exciting aspects of mermaid rock art is the variety of styles you can explore. Each style brings its own unique charm and artistic expression. Here are a few popular mermaid drawing styles to consider:
-
Realistic Style:
- Details: Focus on creating a lifelike representation of a mermaid with accurate proportions, detailed facial features, and realistic textures for the skin and tail.
- Shading: Use shading techniques to add depth and dimension, making the mermaid look three-dimensional.
- Reference: Use reference images of real people and fish to help guide your drawing and ensure anatomical accuracy.
-
Cartoon Style:
- Simplified: Opt for a more simplified and whimsical style with exaggerated features, such as large eyes, small noses, and playful expressions.
- Bold Lines: Use bold outlines and bright colors to create a fun and cheerful look.
- Inspiration: Draw inspiration from popular cartoon characters and animated movies.
-
Abstract Style:
- Non-Traditional: Break away from traditional representations of mermaids and experiment with abstract shapes, colors, and patterns.
- Focus on Form: Focus on the overall form and composition of the mermaid rather than realistic details.
- Creativity: Use different textures and techniques to create a unique and eye-catching design.
-
Tribal Style:
- Cultural: Incorporate elements from different tribal art traditions, such as Polynesian, Celtic, or Native American designs.
- Patterns: Use geometric patterns, symbols, and motifs to decorate the mermaid’s tail, hair, and accessories.
- Color Palette: Use earthy tones and natural colors to create a connection with nature.
-
Watercolor Style:
- Soft and Dreamy: Mimic the look of watercolor paintings by using diluted acrylic paints to create soft, translucent layers of color.
- Blending: Focus on blending colors together to create smooth gradients and ethereal effects.
- White Space: Leave some areas of the rock unpainted to create a sense of lightness and airiness.
-
Gothic Style:
- Dark and Mysterious: Create a darker and more mysterious mermaid with gothic-inspired elements, such as dark colors, intricate details, and dramatic poses.
- Accessories: Add accessories like skulls, bats, or spiderwebs to enhance the gothic theme.
- Mood: Focus on creating a sense of drama and intrigue.
-
Fantasy Style:
- Magical: Incorporate elements of fantasy and mythology into your mermaid design.
- Creatures: Add magical creatures like seahorses, dolphins, or dragons to accompany your mermaid.
- Setting: Create a fantastical underwater setting with glowing plants, enchanted castles, or hidden treasures.
Experiment with different styles and techniques to find what resonates with you. Don’t be afraid to mix and match elements from different styles to create your own unique mermaid rock art.
6. How Can You Enhance Your Mermaid Rock Art?
To make your mermaid rock art truly stand out, consider adding various enhancements and embellishments. These details can elevate your creations from simple paintings to stunning works of art. Here are some ideas:
-
Glitter:
- Sparkle: Add glitter to your mermaid’s tail, hair, or accessories to give it a magical, shimmering effect.
- Application: Apply a thin layer of Mod Podge or clear-drying glue to the area where you want to add glitter, then sprinkle glitter over the glue. Gently shake off the excess.
- Types of Glitter: Experiment with different colors and types of glitter, such as fine glitter, chunky glitter, or iridescent glitter.
-
Rhinestones and Beads:
- Embellishments: Use rhinestones and beads to embellish your mermaid’s jewelry, hair, or tail.
- Adhesive: Attach the rhinestones and beads with a strong adhesive, such as craft glue or super glue.
- Patterns: Create intricate patterns or designs with the rhinestones and beads to add texture and visual interest.
-
Metallic Accents:
- Shimmer: Use metallic paints, such as gold, silver, or bronze, to add shimmering accents to your mermaid’s scales, jewelry, or hair.
- Highlight: Use metallic paints to highlight certain areas and create a sense of depth and dimension.
- Paint Pens: Metallic paint pens are great for adding fine details and creating precise lines.
-
3D Elements:
- Texture: Incorporate three-dimensional elements, such as shells, pebbles, or polymer clay, to add texture and depth to your rock art.
- Attachment: Attach the 3D elements with a strong adhesive.
- Sculpting: Use polymer clay to sculpt small details, such as fins, coral, or sea creatures, and bake them according to the manufacturer’s instructions before attaching them to the rock.
-
Glow-in-the-Dark Paint:
- Magical Effect: Use glow-in-the-dark paint to add a magical effect to your mermaid rock art.
- Placement: Paint certain elements, such as the mermaid’s eyes, tail, or accessories, with glow-in-the-dark paint.
- Charging: Expose the painted rock to light to charge the glow-in-the-dark paint, then watch it glow in the dark.
-
Decoupage:
- Collage: Use decoupage techniques to add images, patterns, or textures to your mermaid rock art.
- Materials: Cut out images from magazines, newspapers, or decorative paper, and glue them to the rock with Mod Podge.
- Sealing: Seal the decoupaged rock with multiple layers of Mod Podge to protect the images and create a smooth, glossy finish.
-
Texture Paste:
- Dimension: Use texture paste to create raised areas and add dimension to your rock art.
- Application: Apply texture paste with a palette knife or brush to create patterns, waves, or other textured effects.
- Painting: Once the texture paste is dry, paint over it with acrylic paints to enhance the texture and create visual interest.
By incorporating these enhancements and embellishments, you can take your mermaid rock art to the next level and create unique, eye-catching pieces that reflect your personal style and creativity.
7. How To Protect Your Mermaid Rock Art?
Protecting your mermaid rock art is essential to ensure its longevity, especially if you plan to display it outdoors. Weather elements like sun, rain, and temperature changes can damage the paint and cause it to fade, chip, or peel. Here’s how to protect your artwork:
-
Sealing:
-
Importance: Sealing is the most crucial step in protecting your rock art. A good sealant creates a protective barrier that shields the paint from the elements.
-
Types of Sealants:
- Mod Podge: A popular water-based sealant that provides a durable, glossy finish. It’s easy to apply and dries quickly.
- Acrylic Sealant: Available in spray or liquid form, acrylic sealants offer excellent protection against UV rays and moisture. Look for sealants specifically designed for outdoor use.
- Polyurethane Sealant: A more heavy-duty option that provides a tough, waterproof finish. It’s ideal for rocks that will be exposed to harsh weather conditions.
-
Application:
- Clean Surface: Ensure your painted rock is clean and dry before applying the sealant.
- Thin Coats: Apply thin, even coats of sealant with a brush or spray, following the manufacturer’s instructions.
- Drying Time: Allow each coat to dry completely before applying the next. Multiple coats (2-3) are recommended for optimal protection.
-
Outdoor Sealants: If you intend to display your mermaid rock art outdoors, choose a sealant specifically formulated for outdoor use. These sealants provide extra protection against UV rays, moisture, and temperature changes.
-
-
UV Protection:
- Sunlight: Prolonged exposure to sunlight can cause the colors in your rock art to fade over time.
- UV-Resistant Sealants: Use a sealant that offers UV protection to help prevent fading.
- Shaded Areas: Place your rock art in a shaded area to minimize exposure to direct sunlight.
-
Weather Protection:
- Rain and Moisture: Moisture can damage the paint and cause it to peel or blister.
- Waterproof Sealants: Use a waterproof sealant to protect your rock art from rain, snow, and humidity.
- Elevated Display: Place your rock art on a raised surface or pedestal to prevent it from sitting in standing water.
-
Temperature Fluctuations:
- Extreme Temperatures: Extreme temperature changes can cause the paint to crack or become brittle.
- Stable Environment: Avoid placing your rock art in areas where it will be exposed to extreme temperature fluctuations.
- Indoor Storage: During harsh weather conditions, consider bringing your rock art indoors to protect it from the elements.
-
Physical Protection:
- Handling: Handle your rock art with care to avoid scratches, chips, or other damage.
- Protective Display: Place your rock art in a location where it won’t be easily knocked over or damaged.
- Storage: When storing your rock art, wrap it in soft cloth or bubble wrap to protect it from scratches and impacts.
By following these tips, you can ensure that your mermaid rock art remains vibrant and beautiful for years to come, whether displayed indoors or outdoors.
8. What Other Rock Painting Ideas Complement Mermaid Themes?
If you love painting mermaids on rocks, there are many other related themes and designs that can complement your creations and expand your rock art collection. Here are some ideas:
-
Ocean Animals:
- Dolphins: Paint playful dolphins leaping through the waves.
- Sea Turtles: Create detailed sea turtles with intricate shell patterns.
- Seahorses: Paint delicate seahorses in various colors and poses.
- Fish: Design colorful tropical fish with unique patterns and fins.
- Starfish: Create simple yet elegant starfish in different sizes and colors.
-
Underwater Scenes:
- Coral Reefs: Paint vibrant coral reefs with a variety of corals, sponges, and anemones.
- Seaweed: Design swaying seaweed in different shades of green and brown.
- Bubbles: Add bubbles to your underwater scenes to create a sense of movement and depth.
- Seashells: Paint detailed seashells in various shapes and sizes.
-
Nautical Themes:
- Sailboats: Create miniature sailboats sailing on the ocean.
- Anchors: Paint classic anchor designs with ropes and nautical flags.
- Lighthouses: Design lighthouses standing tall on rocky shores.
- Compass Roses: Paint compass roses to represent navigation and adventure.
-
Mythical Creatures:
- Sea Serpents: Create mysterious sea serpents lurking in the depths.
- Sirens: Paint alluring sirens with enchanting voices.
- Poseidon: Design the powerful god of the sea, Poseidon, with his trident.
- Ocean Nymphs: Create graceful ocean nymphs dancing in the waves.
-
Beach Elements:
- Sandcastles: Paint whimsical sandcastles with flags and turrets.
- Beach Umbrellas: Design colorful beach umbrellas providing shade on sunny shores.
- Flip-Flops: Create miniature flip-flops lying on the sand.
- Seagulls: Paint seagulls soaring above the beach.
-
Pirate Themes:
- Pirate Ships: Design detailed pirate ships sailing the high seas.
- Treasure Chests: Paint treasure chests overflowing with gold and jewels.
- Pirate Flags: Create classic pirate flags with skulls and crossbones.
- Parrots: Paint colorful parrots perched on pirate shoulders.
-
Ocean Quotes and Sayings:
- Inspirational Messages: Write inspirational quotes about the ocean, such as “Seas the Day,” “Ocean Vibes,” or “Life’s a Beach.”
- Mermaid Quotes: Use mermaid-themed quotes, such as “Mermaids Have More Fun” or “Be a Mermaid and Make Waves.”
- Decorative Lettering: Use decorative lettering techniques to make your quotes stand out.
By exploring these related themes and designs, you can create a cohesive and captivating rock art collection that celebrates the beauty and mystery of the ocean.
9. How Can You Incorporate Mermaid Rocks Into Your Landscape?
Incorporating your mermaid rocks into your landscape can add a touch of whimsy and charm to your outdoor spaces. Here are some creative ways to display your mermaid rocks in your garden, patio, or other outdoor areas:
-
Garden Accents:
- Flower Beds: Place mermaid rocks among your flower beds to add pops of color and interest.
- Pathways: Line pathways with mermaid rocks to create a whimsical and inviting entrance.
- Rock Gardens: Incorporate mermaid rocks into rock gardens to enhance the natural beauty of the landscape.
- Fairy Gardens: Add mermaid rocks to fairy gardens to create a magical underwater world.
-
Water Features:
- Ponds: Place mermaid rocks around the edges of ponds to add a touch of enchantment.
- Fountains: Incorporate mermaid rocks into fountain designs to create a focal point.
- Waterfalls: Arrange mermaid rocks along waterfalls to enhance the natural beauty of the water feature.
- Bird Baths: Place mermaid rocks in bird baths to create a decorative and inviting space for birds.
-
Patio and Deck Decor:
- Planters: Place mermaid rocks in planters to add visual interest to your potted plants.
- Table Centerpieces: Create table centerpieces with mermaid rocks and other nautical elements.
- Shelves: Display mermaid rocks on shelves to add a touch of whimsy to your outdoor decor.
- String Lights: Hang string lights around mermaid rocks to create a magical ambiance.
-
Hidden Treasures:
- Rock Hiding: Participate in rock hiding activities by hiding mermaid rocks in parks, forests, or other public spaces for others to find.
- Community Engagement: Share photos of your hidden mermaid rocks on social media to encourage others to join the fun.
- Kindness Rocks: Leave mermaid rocks with inspirational messages or positive affirmations to spread joy and kindness.
-
Themed Gardens:
- Mermaid Garden: Create a dedicated mermaid garden with mermaid rocks, seashells, and other ocean-themed elements.
- Coastal Garden: Design a coastal garden with mermaid rocks, beach grasses, and driftwood.
- Underwater Garden: Create an underwater-themed garden with blue and green plants, mermaid rocks, and other aquatic elements.
-
Gifting and Sharing:
- Personalized Gifts: Give mermaid rocks as personalized gifts to friends and family who love the ocean or mermaids.
- Party Favors: Use mermaid rocks as party favors for mermaid-themed birthday parties or events.
- Community Projects: Donate mermaid rocks to local schools, hospitals, or community centers to bring joy to others.
By creatively incorporating your mermaid rocks into your landscape, you can transform your outdoor spaces into enchanting retreats that reflect your love for the ocean and mermaids. Visit rockscapes.net to find more inspiration. Address: 1151 S Forest Ave, Tempe, AZ 85281, United States. Phone: +1 (480) 965-9011.
10. FAQ About Drawing Mermaids on Rocks
Here are some frequently asked questions about drawing mermaids on rocks, along with detailed answers to help you get started and enhance your rock art skills:
- What kind of rocks are best for painting mermaids?
Smooth, flat rocks are ideal because they provide an even surface for drawing and painting intricate details. River rocks or craft store rocks are excellent choices. Look for rocks that are medium to large in size to give you enough space to work with. - What type of paint should I use for mermaid rock art?
Acrylic paints are the best option for rock painting. They are durable, water-resistant, and come in a wide range of colors. Paint pens with fine tips are also great for adding detailed lines and scales to your mermaid designs. - How do I prepare the rocks before painting?
Start by washing the rocks with soap and water to remove any dirt or debris. If the rocks are rough, you can lightly sand them down with fine-grit sandpaper. Priming the rocks with a white or light-colored primer can also help the paint adhere better and make the colors more vibrant. - How do I sketch the mermaid design onto the rock?
Use a pencil to lightly sketch your mermaid design onto the rock. Start with basic shapes to outline the mermaid’s body, tail, and other elements. Use reference images to guide your sketching and make sure to sketch lightly so you can easily erase and adjust your design as needed. - How do I create realistic mermaid scales?
Use fine-tipped paint pens or small brushes to draw individual scales on the mermaid’s tail. Start at the top and work your way down, overlapping the scales slightly to create a realistic effect. Consider using metallic paints to add a shimmering touch. - How do I add depth and dimension to my mermaid rock art?
Use layering techniques to create depth and dimension. Start with a base coat and then add highlights and shadows to your mermaid and background. Blend colors together to create smooth transitions and gradients. - How do I protect my mermaid rock art from the weather?
Once your painting is complete and the paint is fully dry, seal the rock with Mod Podge or an acrylic sealer. Apply thin, even coats of sealer to the entire surface of the rock, allowing each coat to dry before applying the next. For outdoor use, choose a sealer specifically designed for outdoor protection. - Can I use glitter on my mermaid rocks?
Yes, glitter can add a magical touch to your mermaid rocks. Apply a thin layer of Mod Podge or clear-drying glue to the area where you want to add glitter, then sprinkle glitter over the glue and shake off the excess. - What other embellishments can I use to enhance my mermaid rocks?
Rhinestones, beads, shells, and other small embellishments can be used to add texture and visual interest to your mermaid rocks. Attach these embellishments with a strong adhesive, such as craft glue or super glue. - How can I incorporate my mermaid rocks into my garden or landscape?
Place mermaid rocks among your flower beds, line pathways with them, or incorporate them into rock gardens or water features. You can also hide them in parks or forests for others to find and enjoy.
Ready to dive into the world of mermaid rock art? Visit rockscapes.net for more inspiration, expert advice, and all the supplies you need to create stunning mermaid masterpieces. Let your creativity flow and bring a touch of magic to your surroundings with beautiful, hand-painted mermaid rocks!