What To Paint Rocks is a common question, and at rockscapes.net, we’re here to unlock the colorful world of rock painting for you! Discover the best paints, creative ideas, and essential techniques to transform ordinary stones into stunning works of art. Explore diverse inspirations and elevate your rock painting projects with our comprehensive guidance.
1. Gathering Your Canvas: Finding and Preparing Rocks
One of the first steps of “what to paint rocks” is finding the perfect canvas. Every rock painting artist knows the importance of having a steady supply of rocks. Let’s explore the best sources and preparation methods to ensure your rocks are ready for their artistic transformation.
1.1. Sourcing Your Rocks
Where can you find these essential building blocks for your art?
-
Nature’s Bounty: If you are collecting rocks in nature, be mindful of local regulations. Taking a few may be acceptable, but avoid depleting natural areas, follow leave no trace behind.
-
Landscaping Supply Shops: This is often the most economical way to acquire a collection of rocks. Here, you’ll find a variety of sizes and natural colors. While you’ll need to sort through the piles, the hunt can be part of the fun. Prices vary by location, and some shops may even offer them for free.
-
Online Retailers: When sourcing rocks online, you have the advantage of convenience and a selection of higher-quality painting surfaces.
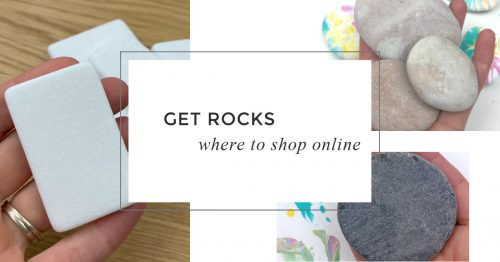 Rocks available for purchase online, showcasing various shapes and sizes
 -
Crafting Your Own: For those seeking uniformity, making rocks to paint is an excellent choice. You can control the size, shape, and color, making them ideal for specific projects.
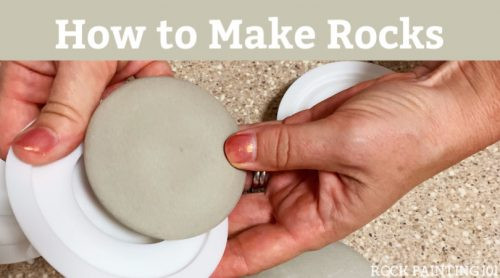 Tutorial on creating rocks for painting projects, featuring a step-by-step guide
1.2. Preparing Your Rocks
Once you have your rocks, preparation is key.
- Cleaning: Use a vegetable brush and warm, running water to scrub the rocks. This removes dirt and debris, ensuring better paint adhesion. According to geologists at Arizona State University’s School of Earth and Space Exploration, a clean surface is crucial for any painting medium to properly bond.
- Drying: Allow the rocks to dry completely on a towel. The drying time depends on the rock’s size and thickness.
2. Unleashing Creativity: Painting Techniques and Ideas
What to paint rocks involves a vast array of techniques, mediums, and designs. It’s time to delve into the heart of rock painting, exploring different methods and materials to bring your visions to life. The possibilities are as limitless as your imagination!
2.1. Essential Painting Supplies
The right tools can significantly enhance your rock painting experience. Here are some must-have supplies:
- Acrylic Paints: Versatile and widely available, acrylics are a staple for rock painting. They dry quickly and adhere well to stone surfaces. High-quality acrylic paints offer rich pigmentation and excellent coverage.
- Paint Pens: Perfect for detailed work, paint pens come in various tip sizes. They provide precision and control, allowing you to create intricate designs and fine lines. Popular brands like Posca offer a wide range of colors and finishes.
- Brushes: A selection of brushes is essential for applying paint and creating different effects. Choose synthetic brushes for acrylics, as they are durable and easy to clean. Flat brushes are great for base coats, while fine-tipped brushes are ideal for detailing.
- Sealant: To protect your painted rocks from the elements, a good sealant is crucial. Options include spray-on sealants, brush-on sealants, and resin coatings. Select a sealant that provides a durable, weather-resistant finish.
- Primer: Applying a primer before painting can improve adhesion and create a smoother surface. This is especially useful for porous or rough rocks.
- Other Supplies: Additional useful items include:
- Water container for cleaning brushes
- Palette or paint tray
- Paper towels
- Pencils for sketching designs
- Erasers
- Blending tools
2.2. Rock Painting Techniques
Mastering various techniques opens up a world of artistic possibilities.
-
Base Coating: Applying a base coat of paint provides a smooth, even surface for your design. Choose a color that complements your artwork. Let the base coat dry completely before adding details.
-
Layering: Build up your design by layering colors. This technique adds depth and dimension to your painting. Allow each layer to dry before applying the next.
-
Blending: Create smooth transitions between colors by blending them together. Use a soft brush or blending tool to achieve a seamless effect.
-
Dot Painting: This technique involves creating intricate patterns using dots of paint. Use dotting tools or the end of a paintbrush to create dots of varying sizes.
-
Hand Lettering: Add text to your rocks using paint pens or fine-tipped brushes. Practice your lettering skills to create neat, legible designs.
 Example of hand-lettering on painted rocks, showcasing various fonts and styles
 -
Mandala Art: Create stunning mandala designs on rocks using dot painting techniques. Mandalas are intricate, symmetrical patterns that are both visually appealing and meditative to create.
 Intricate mandala designs on painted rocks, featuring symmetrical patterns and vibrant colors
 -
Pour Painting: Achieve unique, abstract effects by pouring paint onto rocks. Experiment with different colors and pouring techniques to create stunning patterns.
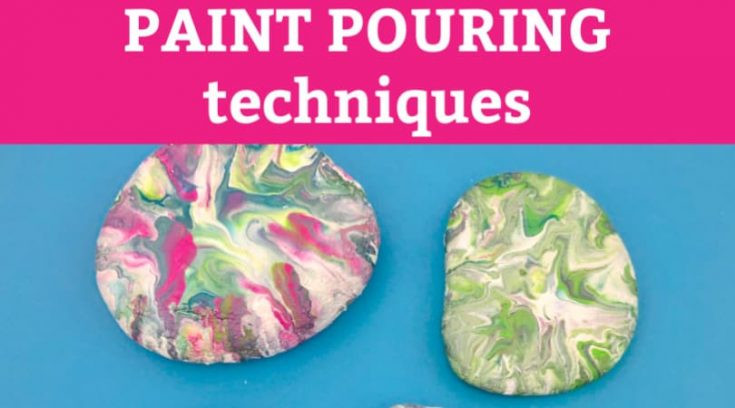 Pour painting techniques on rocks, creating abstract patterns and colorful effects
 -
Alcohol Ink Art: Create vibrant, translucent effects using alcohol inks. Apply the inks to the rock surface and manipulate them with a brush or blending tool.
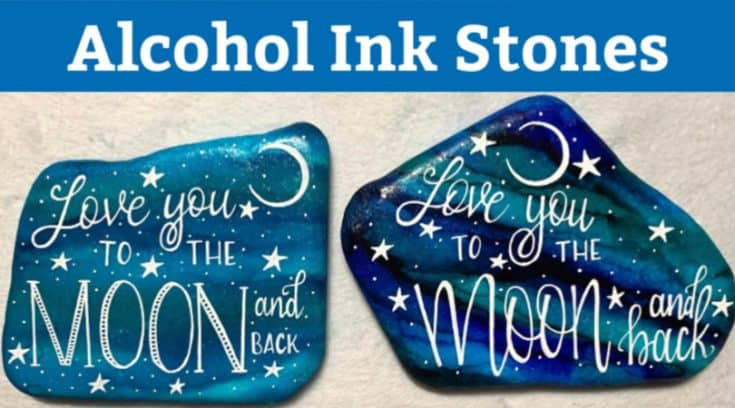 Vibrant alcohol ink art on rocks, showcasing translucent effects and colorful blends
2.3. Design Ideas
Need some inspiration? Here are some popular design themes:
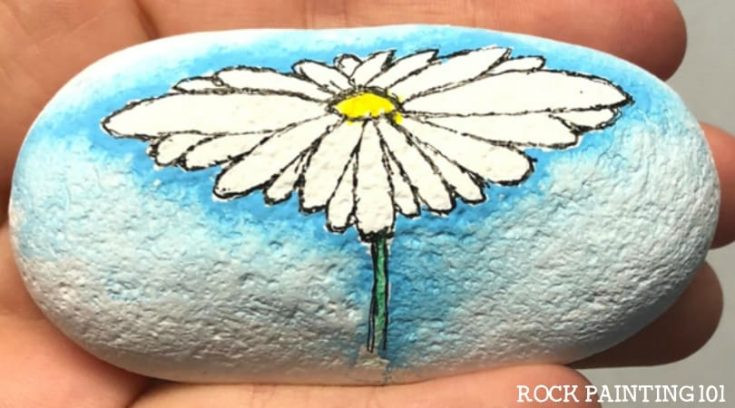
- Nature Scenes: Paint landscapes, flowers, animals, or insects. These designs bring the beauty of the outdoors to your rocks.
- Inspirational Quotes: Add uplifting messages or quotes to your rocks. These make great gifts or additions to your own garden.
- Abstract Art: Experiment with colors, shapes, and patterns to create unique abstract designs. Let your creativity flow without constraints.
- Cartoon Characters: Paint beloved cartoon characters or create your own whimsical designs.
- Holiday Themes: Create festive rocks for holidays like Halloween, Christmas, or Easter.
- Personalized Designs: Paint rocks with names, initials, or special dates. These make thoughtful, personalized gifts.
3. Protecting Your Art: Sealing Techniques
Sealing is a crucial step in rock painting. It protects your artwork from the elements, ensuring its longevity and vibrancy.
3.1. Choosing the Right Sealant
Selecting the appropriate sealant depends on the desired finish and environmental conditions.
-
Spray-On Sealants: Ideal for sealing large quantities of rocks, spray-on sealants provide a quick, even coating. They are available in matte, satin, and gloss finishes.
-
Brush-On Sealants: Brush-on sealants offer more control over the application process. They are a good choice for detailed work or sealing individual rocks.
-
Resin Coatings: For a glossy, glass-like finish, resin coatings are an excellent option. They provide a durable, waterproof seal that enhances the colors of your artwork.
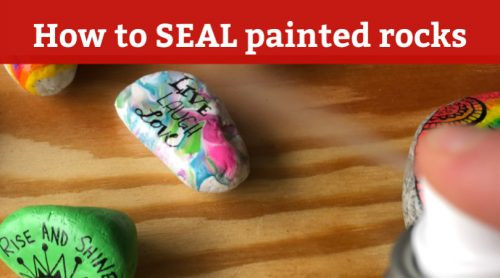 Learn how to seal painted rocks with these simple techniques
3.2. Sealing Process
Follow these steps to properly seal your painted rocks:
- Clean the Rocks: Ensure the rocks are clean and dry before applying sealant.
- Apply Sealant: Apply the sealant in thin, even coats. Follow the manufacturer’s instructions for application.
- Drying Time: Allow the sealant to dry completely between coats. The drying time varies depending on the type of sealant used.
- Multiple Coats: Apply multiple coats of sealant for added protection. This is especially important for rocks that will be placed outdoors.
3.3. Safety Precautions
When working with sealants, take the necessary safety precautions:
- Ventilation: Work in a well-ventilated area to avoid inhaling fumes.
- Protective Gear: Wear gloves and a mask to protect your skin and respiratory system.
- Read Instructions: Always read and follow the manufacturer’s instructions for the sealant.
4. Sharing Your Creations: Displaying and Hiding Painted Rocks
Now that you’ve created your masterpieces, it’s time to share them with the world. Here are some fun and creative ways to display and hide your painted rocks.
4.1. Displaying Your Rocks
- Garden Art: Place your painted rocks in your garden to add color and personality. Arrange them among plants, along pathways, or in rock gardens.
- Home Decor: Use painted rocks as decorative accents in your home. Display them on shelves, mantels, or coffee tables.
- Gifts: Give painted rocks as thoughtful, handmade gifts. Personalize them with names, quotes, or special designs.
- Rock Gardens: Create a dedicated rock garden featuring your painted creations. This is a great way to showcase your artistic talents.
4.2. Hiding Your Rocks
Hiding painted rocks is a fun way to spread joy and surprise others.
-
Community Rock Hunts: Join local rock-hiding groups and hide your rocks in public places for others to find.
-
Random Acts of Kindness: Leave painted rocks in unexpected places to brighten someone’s day.
-
Travel Souvenirs: Leave painted rocks as unique souvenirs when you travel. This is a great way to share your art with people around the world.
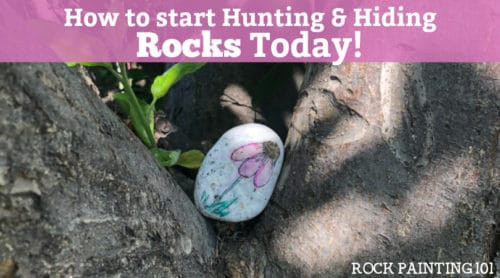 Rock hunting is all the rage and these tips will have you collecting like a pro
4.3. Rock Hiding Etiquette
Follow these guidelines when hiding painted rocks:
-
Safety: Avoid hiding rocks in dangerous locations, such as near roads or on private property.
-
Respect: Be mindful of the environment and avoid disturbing natural habitats.
-
Hashtags: Add a hashtag to your rocks so finders can share their discoveries on social media.
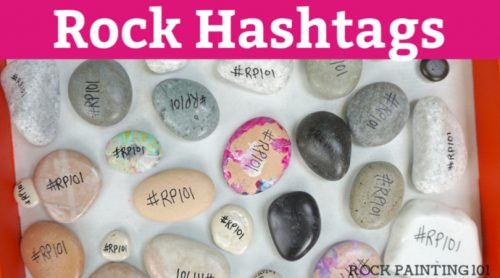 Learn what and why you should put a hashtag on rocks you paint
5. Advanced Techniques and Special Effects
Ready to take your rock painting to the next level? Explore these advanced techniques and special effects.
5.1. Blending Paints
Mastering the art of blending paints can add depth and dimension to your rock paintings. Use soft brushes and blending tools to create seamless transitions between colors. Experiment with different blending techniques to achieve unique effects.
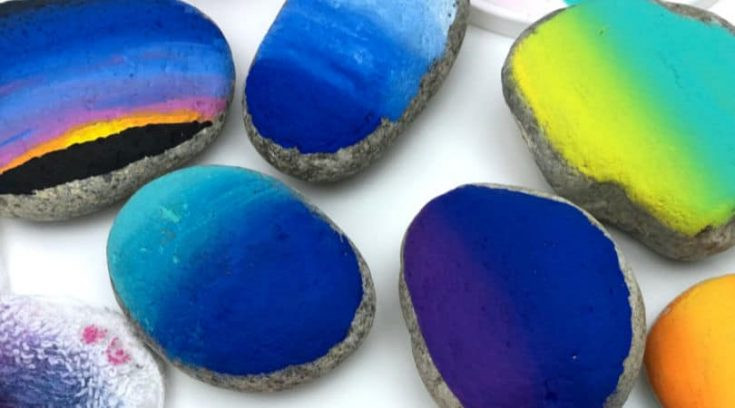 Blending paints on rocks, creating smooth transitions and colorful effects
5.2. Glow-in-the-Dark Effects
Create magical, glowing rocks using glow-in-the-dark paint. Apply the paint in layers to achieve a bright, long-lasting glow. These rocks are perfect for adding a touch of enchantment to your garden or home decor.
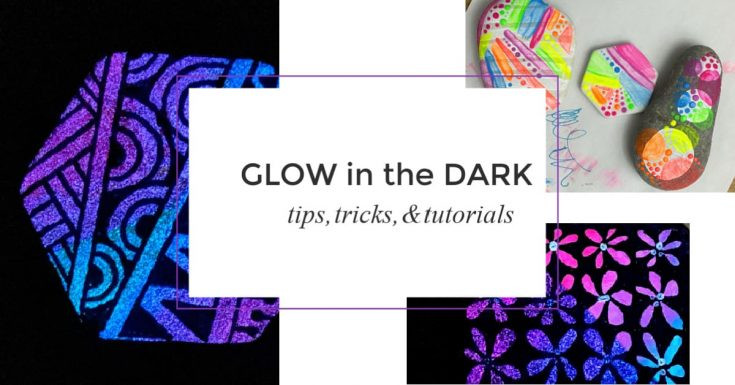 How to make Glow in the Dark Painted Rocks
5.3. Watercolor Effects
Achieve a delicate, watercolor effect using paint pens. Dilute the paint with water and apply it in thin layers to create a soft, translucent finish. This technique is ideal for painting floral designs or landscapes.
 How to make a simple watercolor effect on a rock
5.4. Colored Pencils
Add fine details and shading to your rock paintings using colored pencils. Sharpen the pencils to a fine point for precise lines. Seal the rocks with a protective coating to prevent smudging.
 How to use colored pencils to paint rock
6. Rock Painting 101: Tutorials and Inspiration
Explore a wealth of tutorials and inspiration to fuel your rock painting journey.
6.1. Hand Lettering on Painted Rocks
Learn tips and techniques for adding beautiful hand lettering to your rock paintings. Practice different fonts and styles to create personalized messages and quotes.
6.2. Dot Painting for Beginners
Discover the art of dot painting and create intricate patterns using simple dotting tools. This technique is perfect for creating mandalas and other decorative designs.
6.3. Drawing Mandala Rocks
Explore the steps involved in drawing mandala rocks, offering tips for all skill levels to create these intricate and symmetrical designs.
6.4. Blending Paints on Rocks
Find out how to master blending paints on rocks, creating smooth transitions and vibrant color combinations for stunning visual effects.
6.5. Pour Painting Techniques
Learn about pour painting techniques that can create beautiful, abstract designs on painted rocks, offering a unique and artistic approach to rock decorating.
6.6. Making Glow in the Dark Painted Rocks
Explore the tips and tricks for using glow in the dark paint to create glowing rock art, perfect for adding a whimsical touch to any garden or indoor space.
6.7. Alcohol Ink Rocks Base Coat
Discover techniques for using alcohol inks as a base coat on rocks, providing a vibrant and colorful foundation for more detailed painting and designs.
6.8. Reasons to Use Posca Paint Pens
Understand the reasons why Posca paint pens are highly sought after for creating fantastic rock art, including their ease of use, versatility, and vibrant color options.
6.9. Using Colored Pencils for Rock Painting
Learn how to effectively use colored pencils to add fine details and shading to your rock paintings, enhancing the overall look and texture of your art.
6.10. Creating a Watercolor Effect on a Rock
Find out how to create a stunning watercolor effect on rocks using paint pens, achieving a soft and delicate look that mimics the traditional watercolor technique.
7. Rockscapes.net: Your Destination for Rock Painting Inspiration and Supplies
At rockscapes.net, we’re passionate about helping you discover the beauty and creativity of rock painting. Our website offers a wealth of resources, including:
- Design Ideas: Explore a vast gallery of rock painting designs to inspire your next project.
- Material Information: Access detailed information about different types of rocks, paints, and sealants.
- Step-by-Step Tutorials: Follow our easy-to-understand tutorials to master various rock painting techniques.
- Community Forum: Connect with other rock painting enthusiasts, share your creations, and ask questions.
Whether you’re a beginner or an experienced artist, rockscapes.net is your go-to destination for all things rock painting.
8. Addressing Common Challenges in Rock Painting
Even seasoned rock painters face challenges. Here’s how to overcome them:
8.1. Choosing the Right Rock
Challenge: Selecting a rock that is suitable for painting.
Solution: Look for rocks with smooth surfaces, minimal cracks, and a size that is comfortable to work with.
8.2. Paint Adhesion
Challenge: Paint not adhering properly to the rock surface.
Solution: Clean the rocks thoroughly before painting. Apply a primer to improve adhesion.
8.3. Smudging and Bleeding
Challenge: Paint smudging or bleeding, especially when using paint pens.
Solution: Allow each layer of paint to dry completely before adding details. Use a light hand when applying paint pens.
8.4. Weather Resistance
Challenge: Protecting painted rocks from the elements.
Solution: Use a high-quality sealant that is designed for outdoor use. Apply multiple coats of sealant for added protection.
8.5. Design Inspiration
Challenge: Running out of design ideas.
Solution: Explore online resources, join rock painting groups, and experiment with different techniques to spark your creativity.
9. The Environmental Impact of Rock Painting
As artists, it’s important to be mindful of our environmental impact. Here are some ways to minimize your footprint when rock painting:
- Sustainable Sourcing: Collect rocks responsibly, avoiding sensitive natural areas.
- Eco-Friendly Materials: Use non-toxic paints and sealants.
- Recycling: Recycle paint containers and other materials whenever possible.
- Community Cleanup: Participate in community cleanup events to remove litter and protect natural habitats.
10. FAQ: Your Rock Painting Questions Answered
Let’s address some frequently asked questions about rock painting:
10.1. What kind of paint is best for painting rocks?
Acrylic paints are generally considered the best for painting rocks due to their durability, vibrant colors, and ability to adhere well to stone surfaces.
10.2. Do I need to seal my painted rocks?
Yes, sealing your painted rocks is essential to protect them from the elements and ensure the longevity of your artwork.
10.3. What is the best sealant for painted rocks?
The best sealant for painted rocks depends on your desired finish and environmental conditions. Options include spray-on sealants, brush-on sealants, and resin coatings.
10.4. How do I clean rocks before painting them?
Use a vegetable brush and warm, running water to scrub the rocks. This removes dirt and debris, ensuring better paint adhesion.
10.5. Can I use paint pens on rocks?
Yes, paint pens are great for adding fine details and intricate designs to your rock paintings.
10.6. How do I prevent paint from smudging on rocks?
Allow each layer of paint to dry completely before adding details. Use a light hand when applying paint pens.
10.7. Where can I find design inspiration for rock painting?
Explore online resources, join rock painting groups, and experiment with different techniques to spark your creativity.
10.8. Is rock painting a good hobby for beginners?
Yes, rock painting is a fun and accessible hobby for beginners. It requires minimal supplies and offers endless creative possibilities.
10.9. How can I share my painted rocks with others?
Join local rock-hiding groups and hide your rocks in public places for others to find. You can also display your rocks in your garden or home decor.
10.10. What are some safety precautions to take when rock painting?
Work in a well-ventilated area when using sealants. Wear gloves and a mask to protect your skin and respiratory system.
Unlock your artistic potential with rock painting! Visit rockscapes.net today for endless inspiration, expert guidance, and top-quality supplies. Let’s transform ordinary rocks into extraordinary works of art together. Are you looking for design ideas, details on materials, or step-by-step tutorials? rockscapes.net has you covered. Explore our diverse content and take your rock painting to new heights. Contact us at Address: 1151 S Forest Ave, Tempe, AZ 85281, United States or Phone: +1 (480) 965-9011. Start your rock painting adventure now.