Cleaning rocks without a tumbler might seem daunting, but it’s achievable with the right techniques; rockscapes.net offers easy methods to transform your dull stones into gleaming beauties. Discover effective ways to clean and polish rocks, ensuring they enhance your landscape, garden, or rock collection, revealing their natural beauty with these tips on rock cleaning and polishing techniques.
1. Understanding the Basics of Cleaning Rocks Without a Tumbler
Cleaning rocks without a tumbler involves several manual methods that are effective for different types of rocks and levels of dirt. The primary goal is to remove any surface debris, stains, and imperfections, preparing the rocks for potential polishing or simply enhancing their natural appearance.
1.1. Why Choose to Clean Rocks Without a Tumbler?
Choosing to clean rocks without a tumbler offers several benefits. First, it provides more control over the process, especially crucial for delicate or valuable specimens. Second, it’s a cost-effective solution, as it eliminates the need for specialized equipment like tumblers. Third, manual cleaning can be a therapeutic and engaging activity.
1.2. Identifying Your Rocks and Their Needs
Before starting the cleaning process, it’s essential to identify the types of rocks you have and assess their specific needs. Are they covered in mud, algae, or mineral deposits? Different types of rocks may require different cleaning approaches. For instance, softer stones like sandstone need gentle cleaning, while harder stones like quartz can withstand more rigorous methods. Understanding your rocks helps tailor the cleaning process for the best results.
1.3. Essential Supplies for Manual Rock Cleaning
To effectively clean rocks manually, gather the necessary supplies. These typically include:
- Buckets: For soaking and rinsing the rocks.
- Water: Preferably warm water for better cleaning.
- Mild Soap: Such as dish soap, to help remove dirt and grime.
- Brushes: A variety of brushes, including soft-bristled brushes for delicate stones and stiff-bristled brushes for tougher debris.
- Sponges: For gentle scrubbing and wiping.
- Toothpicks or Dental Picks: For cleaning crevices and hard-to-reach areas.
- Protective Gear: Gloves to protect your hands and eyewear to prevent splashes.
- Soft Cloths: For drying and polishing.
- Optional Cleaning Solutions: Vinegar, lemon juice, or specialized rock cleaners for specific stains.
- Address: 1151 S Forest Ave, Tempe, AZ 85281, United States.
- Phone: +1 (480) 965-9011.
- Website: rockscapes.net.
1.4. Understanding User Search Intent
Here are five user search intents related to “How To Clean Rocks Without Tumbler”:
- Practical DIY Cleaning Methods: Users want step-by-step instructions on how to clean rocks effectively at home using simple tools and household items.
- Best Solutions by Rock Type: Users seek specific cleaning solutions tailored to different types of rocks, such as quartz, sandstone, or geodes, to avoid damage.
- Stain Removal Techniques: Users are looking for ways to remove stubborn stains like rust, algae, or mineral deposits from rocks without using a tumbler.
- Eco-Friendly Cleaning Options: Users prefer natural and environmentally friendly cleaning methods that do not involve harsh chemicals.
- Polishing Tips: Users want to know how to achieve a polished look on their rocks after cleaning them manually, without the use of a rock tumbler.
2. Step-by-Step Guide to Cleaning Rocks Manually
Cleaning rocks manually is a straightforward process when you follow a systematic approach. Here’s a step-by-step guide:
2.1. Initial Cleaning: Removing Loose Debris
Start by removing any loose debris from the rocks. Use a dry brush to sweep off dirt, leaves, and other particles. For rocks with caked-on mud, gently tap them against a hard surface to loosen the debris before brushing.
2.2. Soaking the Rocks
Soak the rocks in a bucket of warm, soapy water. Let them soak for at least 30 minutes to soften any remaining dirt. For heavily soiled rocks, you may need to soak them for several hours or even overnight. According to research from Arizona State University’s School of Earth and Space Exploration, soaking rocks helps dissolve organic matter, making it easier to remove during the scrubbing process.
2.3. Scrubbing the Rocks
After soaking, scrub each rock individually. Use a soft-bristled brush for delicate stones and a stiff-bristled brush for tougher rocks. Pay close attention to crevices and textured surfaces, using toothpicks or dental picks to remove dirt from hard-to-reach areas. Rinse the rocks frequently to check your progress.
2.4. Rinsing Thoroughly
Once you’ve scrubbed all the rocks, rinse them thoroughly with clean water. Ensure that all traces of soap and dislodged dirt are removed. You may need to rinse them multiple times to achieve this.
2.5. Drying the Rocks
Dry the rocks with a soft cloth or allow them to air dry. If air drying, place them on a clean surface away from direct sunlight to prevent water spots.
 Brushing rocks helps remove the more obvious dirt and debris
2.6. Inspecting and Repeating if Necessary
After drying, inspect the rocks to see if any areas still need cleaning. If necessary, repeat the soaking and scrubbing process until the rocks are thoroughly clean.
3. Advanced Cleaning Techniques for Stubborn Stains
Sometimes, basic cleaning methods aren’t enough to remove stubborn stains. Here are some advanced techniques to tackle these challenges:
3.1. Using Vinegar to Remove Mineral Deposits
Vinegar is effective for removing mineral deposits like calcium or lime. Soak the affected rocks in a solution of equal parts white vinegar and water for several hours. After soaking, scrub the rocks with a stiff-bristled brush and rinse thoroughly. Vinegar’s acidity helps dissolve mineral buildup without harming most types of rocks.
3.2. Lemon Juice for Rust Stains
Lemon juice is a natural and mild acid that can help remove rust stains. Apply lemon juice directly to the rust-stained areas and let it sit for 15-30 minutes. Scrub with a brush and rinse. The citric acid in lemon juice breaks down the rust, making it easier to remove.
3.3. Baking Soda Paste for General Stains
Create a paste of baking soda and water to tackle general stains. Apply the paste to the stained areas, let it dry, and then scrub with a brush. Baking soda is a mild abrasive that can lift stains without damaging the rock’s surface.
3.4. Commercial Rock Cleaners
For particularly stubborn stains, consider using commercial rock cleaners. These products are specifically formulated to remove various types of stains from rocks. Always follow the manufacturer’s instructions and test the cleaner on a small, inconspicuous area first to ensure it doesn’t damage the rock.
3.5. Safety Precautions
When using any cleaning solution, wear gloves and eye protection. Work in a well-ventilated area to avoid inhaling fumes. Always rinse the rocks thoroughly after using cleaning solutions to remove any residue.
4. Polishing Rocks Without a Tumbler: Achieving a Shiny Finish
After cleaning your rocks, you may want to enhance their appearance further by polishing them. While a tumbler is a common tool for polishing, it’s possible to achieve a shiny finish without one.
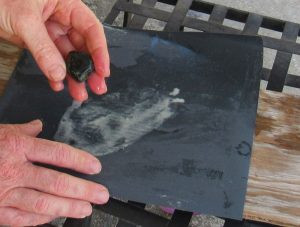
4.1. Hand Polishing with Sandpaper
Hand polishing with sandpaper is a meticulous but effective method. Start with a coarse grit sandpaper (e.g., 220 grit) to remove any remaining imperfections and smooth the surface. Gradually move to finer grits (e.g., 400, 600, 800, and 1200 grit) to refine the polish. Wet the sandpaper and the rock during the process to prevent dust and improve the polishing action.
4.2. Using a Dremel Tool
A Dremel tool with polishing attachments can significantly speed up the polishing process. Use a series of polishing pads with different grits, starting with a coarser pad to smooth the surface and gradually moving to finer pads for a high-gloss finish. Always wear safety glasses and a dust mask when using a Dremel tool. According to experts in Rock & Gem magazine, Dremel tools offer precision and control, making them ideal for polishing intricate rock shapes.
4.3. Polishing Compounds
Polishing compounds, such as cerium oxide or aluminum oxide, can enhance the shine of your rocks. Apply a small amount of polishing compound to a soft cloth or polishing pad and rub it onto the rock in a circular motion. Continue polishing until the desired shine is achieved.
4.4. Toothpaste as a Polishing Agent
Toothpaste can also be used as a mild polishing agent. Apply a dab of toothpaste to a soft cloth and rub it onto the rock. The mild abrasives in toothpaste can help buff the surface and create a subtle shine.
4.5. Final Touches: Applying a Sealant
After polishing, consider applying a sealant to protect the finish and enhance the color of the rock. Commercial rock sealants are available, or you can use mineral oil. Apply a thin coat of sealant and buff the rock with a soft cloth.
5. Specific Cleaning Methods for Different Types of Rocks
Different types of rocks require different cleaning approaches to ensure they are cleaned effectively without causing damage.
5.1. Quartz
Quartz is a hard and durable mineral, making it relatively easy to clean. Use warm, soapy water and a stiff-bristled brush to remove dirt and debris. For mineral deposits, soak the quartz in vinegar or use a commercial quartz cleaner. Quartz is chemically inert, so it is unharmed by diluted acid solutions.
5.2. Sandstone
Sandstone is a porous and relatively soft rock, so it requires a gentle cleaning approach. Use a soft-bristled brush and mild soap to avoid scratching the surface. Avoid harsh chemicals and abrasive cleaners, as they can damage the sandstone.
5.3. Geodes
Geodes often have intricate interiors that can be difficult to clean. Use a combination of soaking, gentle scrubbing, and the use of toothpicks or dental picks to remove dirt from crevices. For mineral deposits, use a diluted vinegar solution.
5.4. Agate
Agate is a durable and beautiful stone that can be cleaned with warm, soapy water and a soft brush. For stubborn stains, use a polishing compound or a Dremel tool with polishing attachments to enhance its shine.
5.5. Obsidian
Obsidian, a volcanic glass, is relatively easy to clean. Use warm, soapy water and a soft cloth. Avoid abrasive cleaners, as they can scratch the surface. Obsidian’s glossy surface is best maintained by gentle buffing with a clean cloth.
| Rock Type | Cleaning Method | Additional Tips |
|---|---|---|
| Quartz | Warm soapy water, stiff brush | Vinegar for mineral deposits |
| Sandstone | Soft brush, mild soap | Avoid harsh chemicals |
| Geodes | Soaking, toothpicks, diluted vinegar | Gentle handling of interior crystals |
| Agate | Warm soapy water, soft brush | Polishing compound for enhanced shine |
| Obsidian | Warm soapy water, soft cloth | Avoid abrasive cleaners |
6. Maintaining Your Clean Rocks: Tips and Best Practices
Once you’ve cleaned and polished your rocks, proper maintenance is essential to keep them looking their best.
6.1. Regular Dusting
Dust your rocks regularly with a soft cloth to prevent buildup. This is especially important for rocks displayed indoors.
6.2. Avoiding Harsh Environments
Avoid exposing your rocks to harsh environments, such as direct sunlight, extreme temperatures, or high humidity. These conditions can cause discoloration, cracking, or other damage.
6.3. Protective Coatings
Apply a protective coating, such as a sealant or mineral oil, to help protect the surface of the rocks and enhance their color. Reapply the coating periodically as needed.
6.4. Proper Storage
Store your rocks in a cool, dry place when they are not on display. Use soft cloths or padded containers to prevent scratches and damage.
6.5. Periodic Cleaning
Even with regular maintenance, your rocks may eventually require cleaning. Repeat the cleaning process as needed to keep them looking their best.
7. Incorporating Clean Rocks into Your Landscape and Garden
Clean and polished rocks can add beauty and interest to your landscape and garden. Here are some ideas for incorporating them:
7.1. Rock Gardens
Create a rock garden featuring a variety of clean and polished rocks. Arrange the rocks in a visually appealing way, and complement them with drought-tolerant plants.
7.2. Pathways and Borders
Use clean rocks to create pathways or borders in your garden. This adds a natural and elegant touch to your outdoor space.
7.3. Water Features
Incorporate rocks into water features, such as ponds or fountains. The rocks provide a natural and attractive setting for the water.
7.4. Decorative Accents
Use clean and polished rocks as decorative accents in your garden or landscape. Place them strategically to highlight focal points or add visual interest.
7.5. Mulch Alternative
Consider using rocks as a mulch alternative around plants. Rocks help retain moisture in the soil and prevent weed growth, while also adding a decorative element.
 Using a soft cloth to buff and polish rocks can bring out their luster
8. The Environmental Benefits of Cleaning and Using Natural Rocks
Cleaning and using natural rocks in your landscape and garden offers several environmental benefits:
8.1. Sustainable Landscaping
Using natural rocks promotes sustainable landscaping by reducing the need for manufactured materials. Rocks are a natural and renewable resource that can be used to create beautiful and eco-friendly landscapes.
8.2. Reducing Water Consumption
Rock gardens and rock mulches can help reduce water consumption in your landscape. Rocks help retain moisture in the soil, reducing the need for frequent watering.
8.3. Preventing Soil Erosion
Rocks can help prevent soil erosion by providing a protective barrier against wind and water. This is particularly important in areas with sloped terrain.
8.4. Supporting Biodiversity
Rock gardens can provide habitat for beneficial insects and other wildlife. The rocks create microclimates that support a variety of plant and animal species.
8.5. Reducing Chemical Use
By using natural rocks in your landscape, you can reduce the need for chemical fertilizers and pesticides. Rocks provide a natural and sustainable way to enhance the beauty and health of your garden.
9. Common Mistakes to Avoid When Cleaning Rocks
To ensure you clean your rocks effectively and safely, avoid these common mistakes:
9.1. Using Harsh Chemicals
Avoid using harsh chemicals, such as bleach or strong acids, as they can damage the rocks and harm the environment.
9.2. Abrasive Cleaners on Soft Rocks
Avoid using abrasive cleaners on soft rocks, as they can scratch the surface and dull the finish.
9.3. Over-Soaking Porous Rocks
Avoid over-soaking porous rocks, as they can absorb too much water and become damaged.
9.4. Neglecting Safety Precautions
Always wear gloves and eye protection when using cleaning solutions. Work in a well-ventilated area to avoid inhaling fumes.
9.5. Improper Drying
Avoid drying rocks in direct sunlight, as this can cause water spots and discoloration.
10. Frequently Asked Questions (FAQs) About Cleaning Rocks Without a Tumbler
10.1. Can I use a pressure washer to clean rocks?
Yes, a pressure washer can be used to clean rocks, especially for removing heavy dirt and debris, but use a low-pressure setting to avoid damaging softer stones. Ensure you rinse thoroughly afterward.
10.2. What is the best way to remove algae from rocks?
The best way to remove algae is to soak the rocks in a solution of water and bleach (10:1 ratio) for a few hours, then scrub with a stiff brush and rinse thoroughly.
10.3. How do I clean geodes without damaging the crystals inside?
Clean geodes by gently scrubbing the exterior with warm, soapy water and using a soft brush to avoid scratching the crystals. For the interior, use a toothpick or dental pick to carefully remove dirt from crevices.
10.4. Can I use vinegar on all types of rocks?
While vinegar is effective for removing mineral deposits, it should be used with caution on certain types of rocks like marble and limestone, as it can etch the surface.
10.5. What type of sealant should I use on my polished rocks?
Use a commercial rock sealant or mineral oil to protect the finish and enhance the color of polished rocks. Apply a thin coat and buff with a soft cloth.
10.6. How often should I clean my outdoor rocks?
Outdoor rocks should be cleaned as needed, depending on the environment and weather conditions. A good practice is to clean them at least once a year to maintain their appearance.
10.7. Is it safe to use muriatic acid to clean rocks?
Muriatic acid is a strong acid and should be used with extreme caution. It is best to avoid it unless you have experience and proper safety equipment. Always dilute it and test on a small area first.
10.8. How can I make my rocks look wet without actually wetting them?
Apply a thin coat of mineral oil to the rocks to give them a wet look without the water. This also enhances their color and shine.
10.9. What is the best way to clean rocks before painting them?
Clean rocks with warm, soapy water and a brush to remove any dirt and debris. Rinse thoroughly and let them dry completely before painting.
10.10. Can I clean rocks with dish soap?
Yes, dish soap is a safe and effective way to clean most types of rocks. Use a mild soap and rinse thoroughly to remove any residue.
Cleaning rocks without a tumbler is a rewarding process that allows you to appreciate the natural beauty of these geological treasures. By following the techniques outlined in this guide, you can effectively clean and polish your rocks, enhancing their appearance and incorporating them into your landscape and garden. Remember to visit rockscapes.net for more inspiration and resources on creating stunning rock features in your outdoor spaces. Let rockscapes.net inspire your designs, educate you on stone types, and guide you through construction, turning your vision into reality.
