Drawing rocks easy might seem daunting, but with the right approach, it can be a rewarding skill. At rockscapes.net, we break down the process into manageable steps, turning the complexity of geological formations into simple, understandable techniques.
1. Understanding the Basics of Rock Drawing
1.1. Why is Learning to Draw Rocks Important?
Learning to draw rocks is important because rocks are fundamental elements in landscape art. They add realism, depth, and texture to any natural scene, making the artwork more compelling and believable. Mastering rock drawing enhances overall artistic skill, improving the ability to depict diverse environments accurately.
Rocks feature prominently in landscapes, from grand mountains to simple garden stones. Knowing how to draw them well adds depth and authenticity to your artwork. This skill is especially valuable for:
- Landscape Artists: Creating realistic and engaging scenes.
- Illustrators: Adding detail and texture to drawings.
- Hobbyists: Enhancing personal art projects with natural elements.
1.2. What are the Key Elements of Realistic Rock Drawings?
The key elements of realistic rock drawings are accurate depiction of planes, effective use of shading, inclusion of cracks and fissures, and grounding the rocks with appropriate shadows. These elements work together to create depth, volume, and a sense of realism. Paying attention to these details will make your rock drawings look more authentic and three-dimensional.
Realistic rock drawings hinge on understanding and portraying several key elements. These include:
- Planes: Recognizing and illustrating the angled surfaces.
- Shading: Using light and shadow to define form and volume.
- Cracks and Textures: Adding details that enhance realism.
- Value Scale: Applying a range of tones from light to dark.
1.3. What Materials Do I Need to Start Drawing Rocks?
To start drawing rocks, you need basic materials like pencils (HB, 2B, 4B), erasers, drawing paper, and a blending stump or tortillon. Optional materials include charcoal, colored pencils, and fine-tipped pens for adding details. Having these materials will allow you to create a range of effects and textures, bringing your rock drawings to life.
To begin your rock-drawing journey, gather these essential supplies:
- Pencils: A range of hardness (HB, 2B, 4B) for different values.
- Eraser: For correcting mistakes and creating highlights.
- Drawing Paper: Choose a textured paper for better results.
- Blending Tools: Stump or tortillon for smooth shading.
2. Step-by-Step Guide to Drawing Rocks
2.1. How Do I Start With Basic Shapes and Outlines?
Start by observing the rock you want to draw and breaking it down into simple geometric shapes such as cubes, cylinders, or spheres. Lightly sketch these shapes to create the basic outline of the rock. This initial step helps establish the overall form and proportions before adding details. Keep the lines light and loose, allowing for easy adjustments as you refine the drawing.
Begin by observing the rock’s overall shape and lightly sketch its basic form. This establishes the foundation for adding details and structure later on. Here’s how:
- Observe: Study the rock’s overall shape and structure.
- Sketch Lightly: Use light, erasable lines to create the basic form.
- Refine: Adjust the outline to better match the rock’s unique shape.
 boulder pencil
A sketch of a boulder using pencil shows basic shapes and outlines, emphasizing the initial steps in creating a realistic drawing of rocks.
2.2. How Can I Define Planes and Surfaces on the Rock?
To define planes and surfaces on a rock, identify the different angled surfaces and lightly draw lines to separate them. Use shading to emphasize these planes, making some surfaces darker to indicate they are turned away from the light. Varying the tone on each plane helps create a sense of depth and three-dimensionality. This technique is crucial for making the rock appear solid and realistic.
Identifying and defining planes is crucial for creating realistic rocks. Follow these steps:
- Identify Planes: Look for flat or angled surfaces on the rock.
- Outline: Lightly draw lines to separate these planes.
- Shade: Use shading to emphasize the depth and angle of each plane.
2.3. What Shading Techniques Work Best for Rocks?
The best shading techniques for rocks include hatching, cross-hatching, and blending. Hatching involves drawing parallel lines to create tone, while cross-hatching uses intersecting lines for darker areas. Blending softens the shading for a smoother appearance. Experiment with these techniques to achieve the desired level of depth and realism. Consider the light source and how it affects the shadows on the rock.
Effective shading brings your rock drawings to life. Try these techniques:
- Hatching: Use parallel lines to create light shading.
- Cross-Hatching: Intersect lines for darker areas and deeper shadows.
- Blending: Smooth out the shading for a more gradual transition.
2.4. How Do I Add Cracks, Textures, and Other Details?
To add cracks, textures, and other details, use a sharp pencil to draw fine lines that follow the contours of the rock. Vary the pressure to create different depths and widths of cracks. Add small dots and scratches to simulate texture, focusing on areas where light and shadow meet. Including these details enhances the realism and character of your rock drawing.
Adding details like cracks and textures gives your rocks character. Here’s how:
- Cracks: Draw fine, irregular lines that follow the rock’s form.
- Textures: Add small dots, scratches, and indentations.
- Details: Include moss, lichen, or other natural elements for added realism.
2.5. How Important is Value and Contrast in Rock Drawing?
Value and contrast are extremely important in rock drawing as they create depth and form. Using a full range of values from light highlights to dark shadows makes the rock appear three-dimensional. High contrast in areas where light meets shadow emphasizes the rock’s texture and angularity, making it look more realistic. Mastering value and contrast is essential for convincing rock drawings.
Value and contrast are key to creating depth and realism. Consider these points:
- Value Scale: Use a full range of tones from light to dark.
- Contrast: Emphasize the difference between light and shadow.
- Highlights: Add bright highlights to reflect light and define form.
 edges contour
The contour edges are emphasized in a drawing of various shapes, showing how lines and shading can define the forms of rocks.
3. Advanced Techniques for Drawing Rocks
3.1. How Can I Create Realistic Rock Textures?
Creating realistic rock textures involves layering different shading techniques and using specialized tools. Start with a base layer of hatching or cross-hatching, then add texture with small, irregular strokes. Use a blending stump to soften some areas and a sharp eraser to lift out highlights. Experiment with different pencil grades and pressures to achieve varied textures.
Mastering rock textures enhances the realism of your drawings. Here’s how:
- Layering: Apply multiple layers of shading to build depth.
- Tools: Use blending stumps, erasers, and textured paper.
- Experimentation: Try different techniques to achieve unique textures.
3.2. What is the Role of Light and Shadow in Defining Rock Forms?
Light and shadow are crucial in defining rock forms by creating the illusion of depth and volume. Observing how light falls on a rock helps determine the placement and intensity of shadows, which in turn defines the rock’s structure and texture. Accurate rendering of light and shadow transforms a flat drawing into a three-dimensional representation.
Light and shadow define the form and volume of rocks. Keep these principles in mind:
- Light Source: Determine the direction and intensity of the light.
- Shadow Placement: Shade areas that are turned away from the light.
- Highlighting: Add bright highlights to emphasize form and texture.
3.3. How Do I Depict Different Types of Rocks?
Depicting different types of rocks involves understanding their unique textures and formations. For example, granite may have a rough, granular texture, while slate is smooth and layered. Observe real-life examples or reference photos to accurately capture these differences. Use appropriate shading and detailing techniques to convey the specific characteristics of each rock type.
Each rock type has unique characteristics. Here’s how to depict them:
- Granite: Use a rough, granular texture with varied shading.
- Slate: Show smooth, layered surfaces with subtle variations.
- Sandstone: Depict porous, textured surfaces with soft shading.
3.4. What are Common Mistakes to Avoid When Drawing Rocks?
Common mistakes to avoid when drawing rocks include using uniform shading, ignoring planes, and over-detailing without establishing basic forms. Uniform shading makes the rock look flat, while ignoring planes results in a lack of structure. Over-detailing can make the drawing appear cluttered if the basic forms are not well-defined. Always focus on establishing the overall shape and structure before adding intricate details.
Avoid these common mistakes to improve your rock drawings:
- Uniform Shading: Vary your shading to create depth and form.
- Ignoring Planes: Define the angled surfaces to add structure.
- Over-Detailing: Focus on basic forms before adding intricate details.
3.5. How Can I Use References Effectively?
To use references effectively, start by studying the overall structure and form of the rock in the reference image. Break it down into simple shapes and planes. Pay attention to the lighting and how it affects the shadows and highlights. Use the reference as a guide for proportions, textures, and details, but also add your own artistic interpretation. Avoid copying the reference exactly; instead, use it to inform your drawing and enhance your understanding of rock forms.
Effective use of references can greatly improve your drawings. Follow these tips:
- Study: Analyze the rock’s form, texture, and lighting.
- Guide: Use the reference for proportions and details.
- Interpret: Add your own artistic style to the drawing.
 platonic solids shadow
The solid shadows of various platonic shapes are depicted to illustrate how shading and form can define the structure of rocks.
4. Integrating Rocks into Landscapes
4.1. How Do Rocks Enhance a Landscape Drawing?
Rocks enhance a landscape drawing by adding texture, depth, and a sense of realism. They provide visual interest and contrast to softer elements like trees and grass. Rocks also help define the composition of the landscape, leading the viewer’s eye and creating a more dynamic and engaging scene.
Rocks add depth, texture, and realism to landscape drawings. Consider these benefits:
- Texture: Adds visual interest and variety.
- Depth: Creates a sense of space and dimension.
- Realism: Enhances the natural feel of the landscape.
4.2. What Should I Consider When Placing Rocks in a Landscape?
When placing rocks in a landscape, consider their size, shape, and arrangement to create a natural and balanced composition. Vary the sizes and types of rocks to avoid a monotonous look. Think about the geological context and how the rocks would naturally occur in that environment. Use overlapping and grouping to create depth and visual interest.
Consider these factors when placing rocks in a landscape:
- Size and Shape: Vary the sizes and shapes for visual interest.
- Arrangement: Create natural groupings and arrangements.
- Context: Consider the geological context of the landscape.
4.3. How Do I Draw Rocks in Different Perspective Views?
To draw rocks in different perspective views, understand how their shapes change based on the viewer’s position. In one-point perspective, rocks may appear smaller and closer together as they recede into the distance. In two-point perspective, their edges will converge towards two vanishing points. Practice drawing simple shapes in perspective to understand these principles before applying them to rock drawings.
Drawing rocks in perspective requires understanding how shapes change with distance. Here’s how:
- One-Point Perspective: Rocks appear smaller and closer together as they recede.
- Two-Point Perspective: Edges converge towards two vanishing points.
- Practice: Draw simple shapes in perspective to understand the principles.
4.4. How Can I Show the Interaction Between Rocks and Vegetation?
To show the interaction between rocks and vegetation, draw plants growing in cracks and crevices, or vines climbing over the rocks. Add moss and lichen to the rock surfaces to indicate moisture and age. Use shading to show how plants cast shadows on the rocks and vice versa. This integration creates a more natural and cohesive landscape.
Show the interaction between rocks and vegetation by:
- Growth: Draw plants growing in cracks and crevices.
- Coverage: Add moss, lichen, and vines on the rock surfaces.
- Shading: Show how plants and rocks cast shadows on each other.
4.5. What Role Do Rocks Play in Composing a Landscape?
Rocks play a significant role in composing a landscape by providing structure, balance, and visual interest. They can act as focal points, lead the viewer’s eye through the scene, and create a sense of depth and scale. Rocks also provide contrast to softer elements, enhancing the overall composition and making the landscape more dynamic and engaging.
Rocks contribute to the composition of a landscape by:
- Structure: Providing a solid foundation for the scene.
- Balance: Creating visual balance with other elements.
- Focal Points: Acting as points of interest to draw the viewer’s eye.
 paltonic sections
Sections of paltonic solids show the intersections and angles, demonstrating how cracks and textures can enhance the depth and realism of rock drawings.
5. Rock Drawing for Different Purposes
5.1. How Does Rock Drawing Differ for Scientific Illustration?
Rock drawing for scientific illustration requires a high degree of accuracy and attention to detail. The goal is to depict the rock’s features precisely, including its mineral composition, texture, and geological formations. Scientific illustrations often include labels and annotations to identify specific features. The focus is on clarity and informative representation rather than artistic interpretation.
Scientific illustration requires precise depiction of rock features. Here’s how it differs:
- Accuracy: Emphasizes precise representation of features.
- Detail: Focuses on mineral composition and geological formations.
- Labels: Includes annotations to identify specific features.
5.2. What Techniques Are Used for Rock Drawing in Cartography?
In cartography, rock drawing is used to represent geological features on maps. Techniques include using standardized symbols and patterns to indicate different rock types and formations. Contour lines and shading are used to show elevation and topography. The goal is to provide a clear and concise representation of the landscape for navigational and informational purposes.
Cartography uses rock drawing to represent geological features on maps. Techniques include:
- Symbols: Using standardized symbols for different rock types.
- Contour Lines: Showing elevation and topography.
- Shading: Adding depth and dimension to the landscape.
5.3. How is Rock Drawing Applied in Architectural Design?
In architectural design, rock drawing is used to visualize how natural rock formations can be integrated into building designs and landscapes. Architects use rock drawings to explore the aesthetic possibilities of incorporating natural elements, such as rock walls, stone pathways, and rock gardens. These drawings help communicate design ideas and create visually appealing presentations.
Architectural design uses rock drawing to visualize natural rock formations in building designs. Applications include:
- Integration: Visualizing rock walls, stone pathways, and rock gardens.
- Aesthetics: Exploring the aesthetic possibilities of natural elements.
- Communication: Communicating design ideas and creating presentations.
5.4. How Can Rock Drawing Be Used in Game Design?
Rock drawing is used in game design to create realistic and immersive environments. Concept artists create detailed drawings of rocks and rock formations to serve as references for 3D modelers. These drawings help define the look and feel of the game world, adding depth and believability to the virtual landscape.
Game design uses rock drawing to create realistic and immersive environments. Benefits include:
- References: Providing detailed references for 3D modelers.
- Environment: Defining the look and feel of the game world.
- Immersion: Adding depth and believability to the virtual landscape.
5.5. What Role Does Rock Drawing Play in Fine Art?
In fine art, rock drawing is used to explore the aesthetic qualities of natural forms. Artists use rock drawings to create expressive and evocative works that capture the beauty and grandeur of the natural world. Rock drawings can be realistic or abstract, depending on the artist’s style and vision. They are often used to convey themes of nature, time, and the human relationship with the environment.
Fine art uses rock drawing to explore the aesthetic qualities of natural forms. Applications include:
- Expression: Creating expressive and evocative works.
- Themes: Conveying themes of nature, time, and the environment.
- Style: Allowing for realistic or abstract interpretations.
 boulder sbs 1b
The first step in drawing a boulder is outlined, demonstrating how to lightly sketch the basic shapes and shadows.
6. Inspiration and Resources for Rock Drawing
6.1. Where Can I Find Inspirational Examples of Rock Drawings?
You can find inspirational examples of rock drawings in art books, museums, online art galleries, and nature photography websites. Look for works by artists known for their landscape drawings and geological illustrations. Observing a variety of styles and techniques can help you develop your own unique approach to rock drawing.
Find inspiration for rock drawings in:
- Art Books: Explore works by landscape artists and geological illustrators.
- Museums: Visit art museums to see rock drawings in person.
- Online Galleries: Browse online art galleries for contemporary examples.
6.2. What Online Tutorials and Courses Are Available?
Many online tutorials and courses are available for learning rock drawing, ranging from beginner to advanced levels. Websites like Skillshare, Udemy, and YouTube offer a variety of instructional videos and courses. Look for tutorials that cover basic techniques, shading, texture, and perspective.
Learn rock drawing with online tutorials and courses from:
- Skillshare: Offers a variety of art and illustration courses.
- Udemy: Provides courses for beginner to advanced levels.
- YouTube: Features free tutorials on basic techniques and shading.
6.3. Are There Any Books That Can Help Me Improve My Rock Drawing Skills?
Yes, many books can help improve your rock drawing skills. Look for books that cover the fundamentals of drawing, shading, and perspective, as well as those specifically focused on landscape drawing and geological illustration. Some recommended titles include “Drawing on the Right Side of the Brain” by Betty Edwards and “The Natural Way to Draw” by Kimon Nicolaïdes.
Improve your rock drawing skills with these books:
- “Drawing on the Right Side of the Brain” by Betty Edwards: Covers the fundamentals of drawing.
- “The Natural Way to Draw” by Kimon Nicolaïdes: Focuses on drawing from observation.
- Books on Landscape Drawing: Provide specific techniques for drawing rocks and natural elements.
6.4. How Can I Join a Community of Rock Drawing Enthusiasts?
You can join a community of rock drawing enthusiasts by participating in online forums, art groups, and social media platforms. Websites like DeviantArt, Reddit (r/drawing), and Facebook groups dedicated to art offer opportunities to share your work, receive feedback, and connect with other artists.
Connect with rock drawing enthusiasts by joining:
- Online Forums: Participate in art forums to share your work and receive feedback.
- Art Groups: Join local or online art groups to connect with other artists.
- Social Media: Use platforms like DeviantArt, Reddit, and Facebook to share and discuss art.
6.5. What Are Some Good Nature Reserves and Parks for Studying Rocks?
Good nature reserves and parks for studying rocks include national parks like the Grand Canyon, Yosemite, and Zion, as well as geological sites like the Giant’s Causeway and the White Cliffs of Dover. These locations offer a variety of rock formations and landscapes to observe and draw, providing valuable real-world experience.
Study rocks in their natural environment at:
- National Parks: Visit parks like the Grand Canyon, Yosemite, and Zion.
- Geological Sites: Explore sites like the Giant’s Causeway and the White Cliffs of Dover.
- Local Reserves: Visit local nature reserves and parks for accessible rock formations.
 boulder sbs 2
Shading lines are drawn to create the major shadows and define the planes of the rocks.
7. Understanding Rock Formations
7.1. What are the Different Types of Rock Formations?
The different types of rock formations include igneous, sedimentary, and metamorphic rocks. Igneous rocks are formed from cooled magma or lava, sedimentary rocks are formed from accumulated sediments, and metamorphic rocks are formed from existing rocks altered by heat and pressure. Each type has unique characteristics and textures that can be depicted in drawings.
Different rock formations include:
- Igneous Rocks: Formed from cooled magma or lava.
- Sedimentary Rocks: Formed from accumulated sediments.
- Metamorphic Rocks: Formed from existing rocks altered by heat and pressure.
7.2. How are Mountains Formed and What Types of Rocks Are Found There?
Mountains are formed through tectonic plate collisions, volcanic activity, and erosion. The types of rocks found in mountains vary depending on their formation process. Igneous rocks are common in volcanic mountains, while sedimentary and metamorphic rocks are found in fold and thrust mountains. Understanding mountain formation helps in accurately depicting rock structures.
Mountains are formed by:
- Tectonic Plate Collisions: Creating fold and thrust mountains.
- Volcanic Activity: Forming volcanic mountains.
- Erosion: Shaping mountains over time.
7.3. What are the Characteristics of Rocks in Deserts?
Rocks in deserts are often exposed to extreme temperatures, wind erosion, and occasional flash floods, resulting in distinctive characteristics such as weathered surfaces, desert varnish (a dark coating of iron and manganese oxides), and sculpted formations. Drawing desert rocks involves capturing these unique textures and features.
Rocks in deserts have characteristics like:
- Weathered Surfaces: Resulting from extreme temperatures.
- Desert Varnish: A dark coating of iron and manganese oxides.
- Sculpted Formations: Shaped by wind erosion and flash floods.
7.4. How Does Weathering Affect Rock Formations?
Weathering affects rock formations through physical and chemical processes that break down rocks over time. Physical weathering includes processes like freeze-thaw cycles and wind abrasion, while chemical weathering involves reactions with water and atmospheric gases. These processes create unique textures, cracks, and formations that add character to rock drawings.
Weathering affects rock formations through:
- Physical Weathering: Processes like freeze-thaw cycles and wind abrasion.
- Chemical Weathering: Reactions with water and atmospheric gases.
- Unique Textures: Creating distinctive cracks and formations.
7.5. What Role Does Erosion Play in Shaping Rock Landscapes?
Erosion plays a significant role in shaping rock landscapes by wearing away rock material through the action of wind, water, and ice. This process creates valleys, canyons, cliffs, and other distinctive landforms. Understanding erosion helps in accurately depicting the dynamic and ever-changing nature of rock landscapes.
Erosion shapes rock landscapes by:
- Wind Action: Wearing away rock material over time.
- Water Action: Creating valleys, canyons, and cliffs.
- Ice Action: Shaping landscapes through glacial processes.
 boulder sbs 3
Light and dark wedges are added along the edges of the shadows, enhancing the shape and depth of the rocks.
8. Tips for Practicing Rock Drawing
8.1. How Often Should I Practice to Improve My Rock Drawing Skills?
To improve your rock drawing skills, aim to practice regularly, ideally several times a week. Consistent practice helps reinforce techniques and develop your eye for detail. Even short, focused sessions can be effective if you concentrate on specific aspects of rock drawing, such as shading or texture.
Practice rock drawing:
- Regularly: Aim to practice several times a week.
- Consistently: Reinforce techniques and develop your eye for detail.
- Focus: Concentrate on specific aspects like shading or texture.
8.2. What Exercises Can Help Me Develop My Shading Techniques?
Exercises to develop shading techniques include creating value scales, drawing simple geometric shapes with full tonal range, and practicing different shading methods like hatching, cross-hatching, and blending. Focus on achieving smooth transitions and accurate representation of light and shadow.
Develop shading techniques with exercises like:
- Value Scales: Creating scales from light to dark.
- Geometric Shapes: Drawing shapes with full tonal range.
- Shading Methods: Practicing hatching, cross-hatching, and blending.
8.3. How Can I Improve My Accuracy When Drawing Rocks?
Improve your accuracy when drawing rocks by carefully observing real-life examples or reference photos. Break down complex shapes into simpler forms and focus on accurately representing proportions, angles, and textures. Use a viewfinder to isolate specific areas and compare them to your drawing.
Improve your accuracy by:
- Observation: Carefully observing real-life examples or photos.
- Simplification: Breaking down complex shapes into simpler forms.
- Comparison: Using a viewfinder to isolate areas and compare them to your drawing.
8.4. What Can I Learn from Studying Master Artists?
Studying master artists can provide valuable insights into rock drawing techniques, composition, and artistic expression. Look for artists known for their landscape drawings, such as Leonardo da Vinci, Albrecht Dürer, and John Constable. Analyze their use of line, shading, and texture to create realistic and evocative depictions of rocks and landscapes.
Learn from master artists by:
- Analyzing Techniques: Studying their use of line, shading, and texture.
- Studying Composition: Observing how they arrange elements in the landscape.
- Understanding Expression: Learning how they convey mood and emotion in their drawings.
8.5. How Can I Stay Motivated While Learning to Draw Rocks?
Stay motivated while learning to draw rocks by setting realistic goals, celebrating small achievements, and finding a supportive community of artists. Experiment with different materials and techniques to keep things interesting, and focus on the joy of creating rather than perfection.
Stay motivated by:
- Setting Goals: Establishing realistic and achievable goals.
- Celebrating Achievements: Recognizing and celebrating your progress.
- Finding Community: Connecting with other artists for support and encouragement.
 boulder sbs 4
Adding cracks to the boulder drawing to enhance the planes and overall structure of the rock.
9. Geology for Artists
9.1. What is the Importance of Understanding Basic Geology for Artists?
Understanding basic geology is important for artists as it provides a deeper insight into the formation, structure, and characteristics of rocks and landscapes. This knowledge helps artists create more accurate and realistic depictions of natural environments, adding depth and authenticity to their work.
Understanding basic geology is important because it:
- Provides Insight: Offers deeper understanding of rock formation and structure.
- Enhances Accuracy: Helps create more realistic depictions of natural environments.
- Adds Authenticity: Lends depth and believability to artwork.
9.2. How Can I Learn About the Geological History of a Specific Area?
You can learn about the geological history of a specific area by consulting geological surveys, maps, and reports. Websites of geological societies and government agencies often provide detailed information about the rocks, formations, and geological events that have shaped the landscape.
Learn about geological history by:
- Consulting Surveys: Reviewing geological surveys, maps, and reports.
- Visiting Websites: Exploring websites of geological societies and government agencies.
- Visiting Local Museums: Learning about the geological history of the region.
9.3. What are the Main Rock Types and Their Characteristics?
The main rock types are igneous, sedimentary, and metamorphic rocks. Igneous rocks are formed from cooled magma or lava and have crystalline textures. Sedimentary rocks are formed from accumulated sediments and have layered structures. Metamorphic rocks are formed from existing rocks altered by heat and pressure and have foliated or banded textures.
The main rock types and their characteristics:
- Igneous Rocks: Formed from cooled magma or lava with crystalline textures.
- Sedimentary Rocks: Formed from accumulated sediments with layered structures.
- Metamorphic Rocks: Formed from existing rocks altered by heat and pressure with foliated or banded textures.
9.4. How Does the Mineral Composition Affect the Appearance of Rocks?
The mineral composition of rocks affects their color, texture, and overall appearance. Different minerals have different colors and physical properties, which combine to create a wide variety of rock appearances. Understanding mineral composition helps artists accurately depict the subtle variations in rock colors and textures.
Mineral composition affects rock appearance by influencing:
- Color: Different minerals have different colors.
- Texture: Mineral size and arrangement affect texture.
- Overall Appearance: Combining to create a variety of rock appearances.
9.5. What is the Rock Cycle and How Does it Influence Landscapes?
The rock cycle is a continuous process in which rocks are transformed from one type to another through geological processes such as weathering, erosion, sedimentation, metamorphism, and melting. This cycle influences landscapes by creating diverse rock formations, shaping landforms, and determining the distribution of different rock types.
The rock cycle influences landscapes by:
- Creating Formations: Forming diverse rock formations.
- Shaping Landforms: Influencing the shape of the land.
- Determining Distribution: Dictating the distribution of different rock types.
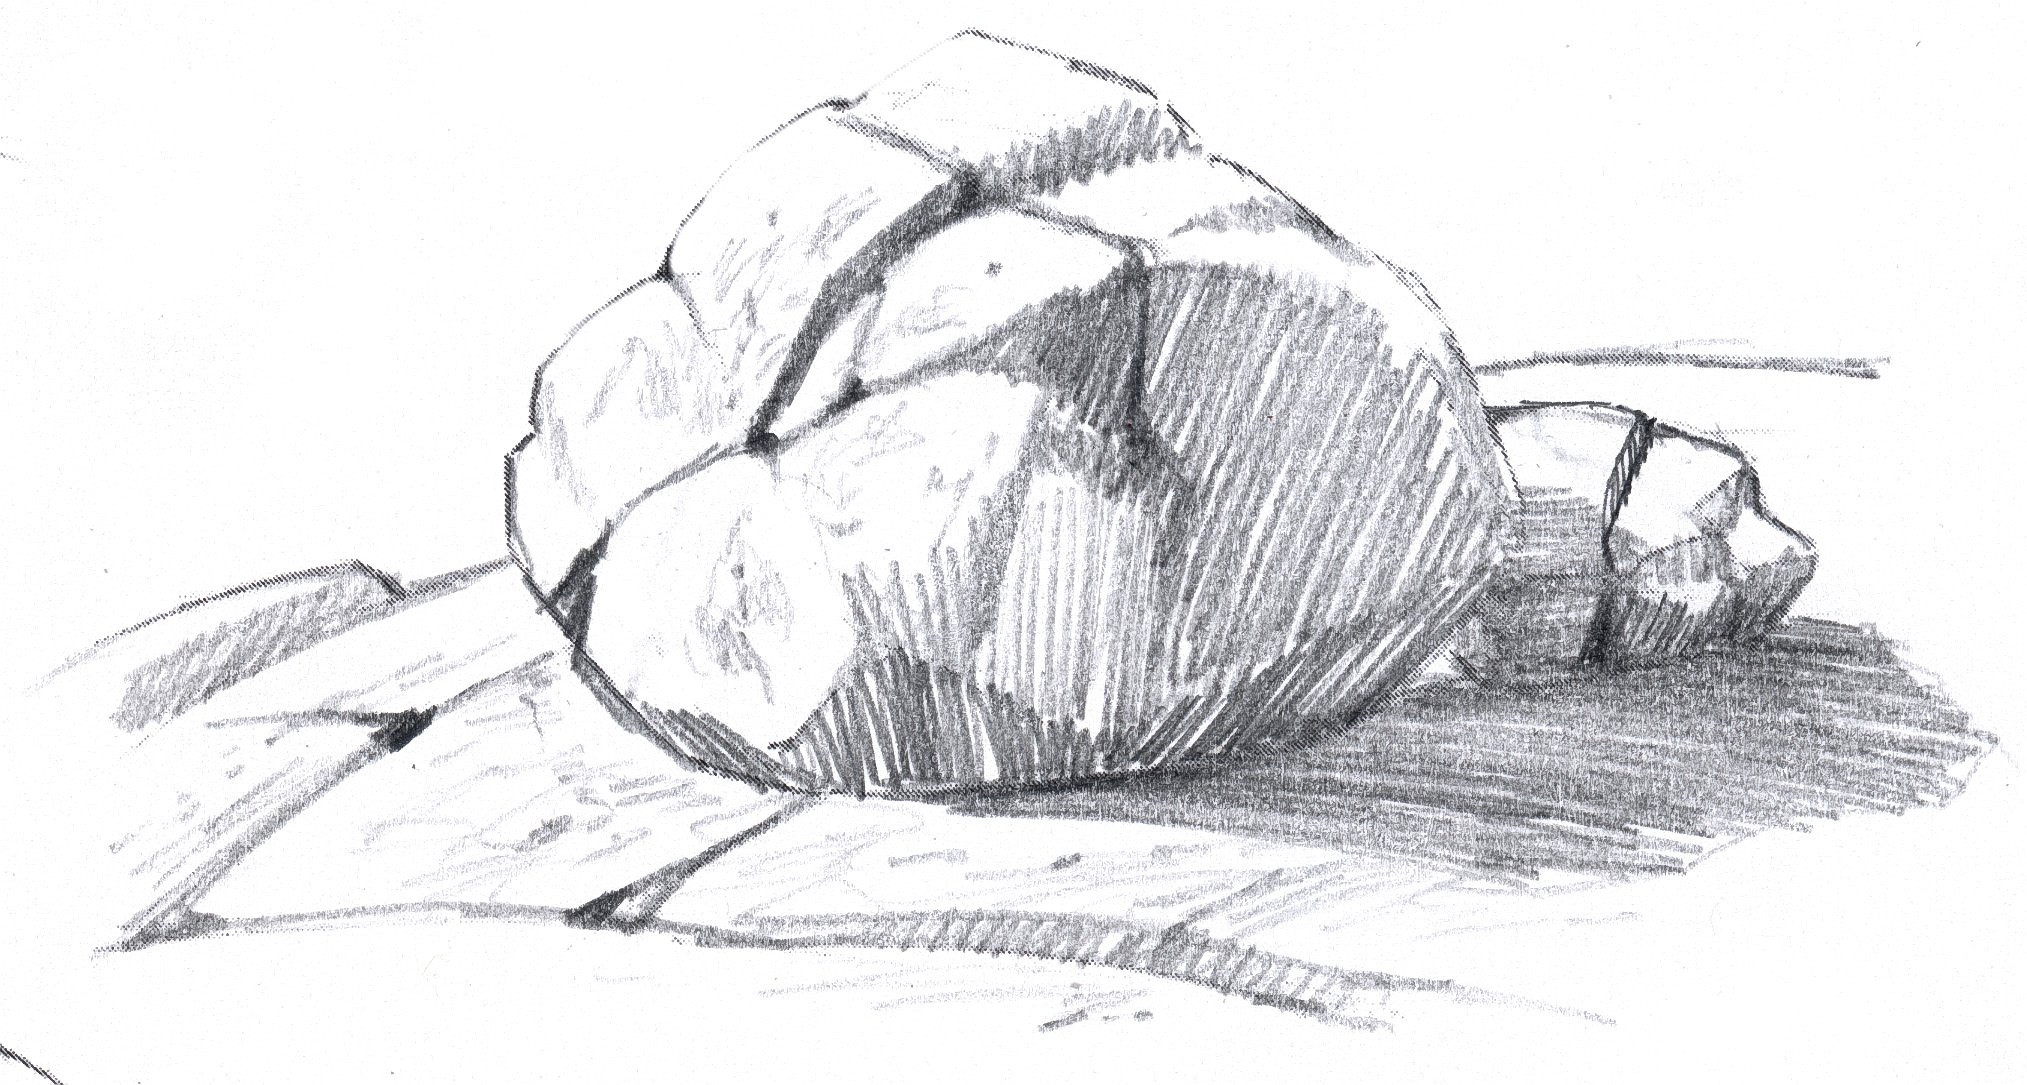
 boulder sbs 7
Texture is added to the rock drawing, especially in areas where shadow transitions to highlight, enhancing the overall depth and realism.
10. FAQ: How To Draw Rocks Easy
10.1. What is the easiest way to draw rocks?
The easiest way to draw rocks is to start with simple shapes, define planes, add shading, and include cracks and textures. Break down the process into manageable steps for best results.
10.2. What are the key techniques for shading rocks effectively?
Key techniques for shading rocks effectively include hatching, cross-hatching, and blending. Varying the pressure and direction of your lines will create depth and realism.
10.3. How do I make my rock drawings look more realistic?
To make your rock drawings look more realistic, focus on accurate shading, detailed textures, and proper perspective. Use real-life references to guide your drawing.
10.4. What materials are best for drawing rocks?
The best materials for drawing rocks include a range of pencils (HB, 2B, 4B), erasers, drawing paper, and blending tools. Experiment to find what works best for you.
10.5. How do I draw different types of rocks?
To draw different types of rocks, study their unique characteristics, such as texture and layering. Use appropriate shading and detailing techniques to capture these differences.
10.6. Can you explain the importance of value and contrast in rock drawing?
Value and contrast create depth and form in rock drawings. Using a full range of values from light to dark enhances realism.
10.7. How do I incorporate rocks into a landscape drawing?
Incorporate rocks into a landscape drawing by considering their size, shape, and arrangement. Use overlapping and grouping to create depth and visual interest.
10.8. What are some common mistakes to avoid when drawing rocks?
Common mistakes to avoid include uniform shading, ignoring planes, and over-detailing. Focus on establishing basic forms before adding details.
10.9. How can I use references effectively to draw rocks?
Use references effectively by studying the overall structure and form, paying attention to lighting, and adding your artistic interpretation.
10.10. What resources are available to improve my rock drawing skills?
Resources to improve your rock drawing skills include online tutorials, courses, art books, and communities of artists.
Drawing rocks easy is a skill that enhances your ability to create realistic and engaging landscapes. By following this step-by-step guide, you can master the techniques needed to bring depth, texture, and character to your artwork. For more inspiration, detailed guides, and expert advice, visit rockscapes.net today and discover the beauty of rock drawing.
Ready to take your landscape art to the next level? Explore rockscapes.net for a wealth of inspiration, detailed guides, and expert advice on drawing and incorporating rocks into your artwork. Don’t just draw rocks – bring them to life! Visit us today and transform your artistic vision into stunning reality. Address: 1151 S Forest Ave, Tempe, AZ 85281, United States. Phone: +1 (480) 965-9011. Website: rockscapes.