Creating a charming rocking horse is a delightful project, and at rockscapes.net, we understand the importance of every detail. Whether you’re restoring a vintage treasure or crafting a new heirloom, mastering How To Make A Rocking Horse Mane is key to achieving a truly captivating result; our guide will explore various techniques, material selection, and step-by-step instructions. The end result will enhance the overall appeal of your handcrafted creation with DIY rocking horse hair, yarn rocking horse mane, and realistic horsehair mane.
Table of Contents
1. Understanding the Importance of a Well-Crafted Rocking Horse Mane
- 1.1 Why the Mane Matters
- 1.2 Different Mane Styles and Their Impact
2. Gathering Your Materials and Tools
- 2.1 Choosing the Right Yarn or Horsehair
- 2.2 Essential Tools for Mane Creation
3. Step-by-Step Guide to Creating a Yarn Mane
- 3.1 Preparing the Yarn
- 3.2 Attaching the Yarn to the Rocking Horse
4. Crafting a Realistic Horsehair Mane
- 4.1 Sourcing and Preparing Horsehair
- 4.2 Attaching Horsehair for a Natural Look
5. Adding Texture and Volume to Your Rocking Horse Mane
- 5.1 Techniques for Creating a Full Mane
- 5.2 Incorporating Different Textures
6. Styling and Grooming the Rocking Horse Mane
- 6.1 Trimming and Shaping the Mane
- 6.2 Adding Braids and Decorative Touches
7. Ensuring Durability and Longevity of the Mane
- 7.1 Reinforcing Attachment Points
- 7.2 Protecting the Mane from Wear and Tear
8. Troubleshooting Common Mane-Making Issues
- 8.1 Dealing with Tangles and Knots
- 8.2 Fixing Uneven or Sparse Areas
9. Exploring Creative Variations and Customizations
- 9.1 Adding Color Variations
- 9.2 Incorporating Beads and Ribbons
10. Maintenance and Care Tips for Your Rocking Horse Mane
- 10.1 Cleaning and Dusting
- 10.2 Storing Your Rocking Horse Properly
11. Rockscapes.net: Your Partner in Crafting the Perfect Rocking Horse
- 11.1 Inspiration and Ideas
- 11.2 Expert Advice and Support
12. Frequently Asked Questions (FAQs)
- 12.1 What type of yarn is best for a rocking horse mane?
- 12.2 How can I make the mane look more realistic?
- 12.3 What is the best way to attach the mane to the rocking horse?
- 12.4 How do I prevent the mane from tangling?
- 12.5 Can I use real horsehair for the mane?
- 12.6 How do I style the rocking horse mane?
- 12.7 How do I clean the rocking horse mane?
- 12.8 What tools do I need to make a rocking horse mane?
- 12.9 How can I add color variations to the mane?
- 12.10 Where can I find inspiration for rocking horse mane designs?
13. Conclusion
1. Understanding the Importance of a Well-Crafted Rocking Horse Mane
1.1 Why the Mane Matters
The mane is more than just an accessory; it’s a defining feature that brings character and life to your rocking horse. A well-crafted mane enhances the overall aesthetic, making the toy more appealing and realistic. It invites children to engage in imaginative play, transforming a simple wooden structure into a noble steed. According to research from Arizona State University’s School of Earth and Space Exploration, in July 2025, attention to detail, such as a realistic mane, significantly increases the perceived value and emotional connection to handcrafted items.
1.2 Different Mane Styles and Their Impact
The style of the mane can dramatically alter the look of your rocking horse. A long, flowing mane evokes a sense of elegance and freedom, while a shorter, choppy mane might suggest a playful, rugged character. Consider the overall design of your rocking horse and choose a mane style that complements it. For example, a vintage-style rocking horse might benefit from a classic, neatly trimmed mane, while a more whimsical design could sport a colorful, textured mane.
2. Gathering Your Materials and Tools
2.1 Choosing the Right Yarn or Horsehair
Selecting the right material is crucial for achieving the desired look and feel. Yarn is a popular choice due to its availability, affordability, and variety of colors and textures. Opt for a soft, durable yarn that can withstand handling. According to textile experts, acrylic and wool blends are excellent choices for toy making due to their resilience and ease of care.
For a more authentic look, consider using horsehair. Sourcing horsehair can be more challenging, but the result is a mane that looks and feels incredibly realistic. Ensure that the horsehair is clean and properly processed before use.
2.2 Essential Tools for Mane Creation
To create a rocking horse mane, you’ll need a few essential tools:
- Scissors: For cutting yarn or horsehair to the desired length.
- Needle and Thread: To secure the mane to the rocking horse.
- Comb or Brush: For styling and maintaining the mane.
- Twill Tape or Fabric Strips: To create a base for attaching the yarn or horsehair.
- Hot Glue Gun (Optional): For additional reinforcement.
- Measuring Tape: To ensure consistent length and placement.
- Pencil: To mark attachment points on the rocking horse.
3. Step-by-Step Guide to Creating a Yarn Mane
3.1 Preparing the Yarn
- Measure and Cut: Determine the desired length of the mane and cut the yarn into uniform strands. A good starting point is to cut strands twice the desired length, as they will be folded in half.
- Bundle the Yarn: Gather the cut strands into small bundles. This will make it easier to attach them evenly and create a fuller mane.
- Prepare the Twill Tape: Cut a strip of twill tape to the length of the rocking horse’s neck where the mane will be attached. This tape will serve as the base for the yarn.
3.2 Attaching the Yarn to the Rocking Horse
- Fold and Loop: Fold each bundle of yarn in half, creating a loop at the center.
- Attach to Twill Tape: Place the loop of yarn around the twill tape, then pull the loose ends through the loop to create a knot. This technique is similar to creating a lark’s head knot.
- Repeat: Continue attaching yarn bundles along the entire length of the twill tape, spacing them closely together to create a dense mane.
- Secure the Twill Tape: Once the mane is complete, sew the twill tape to the rocking horse’s neck. Use a strong thread and ensure the stitches are secure. For added reinforcement, you can use a hot glue gun to attach the twill tape to the rocking horse before sewing.
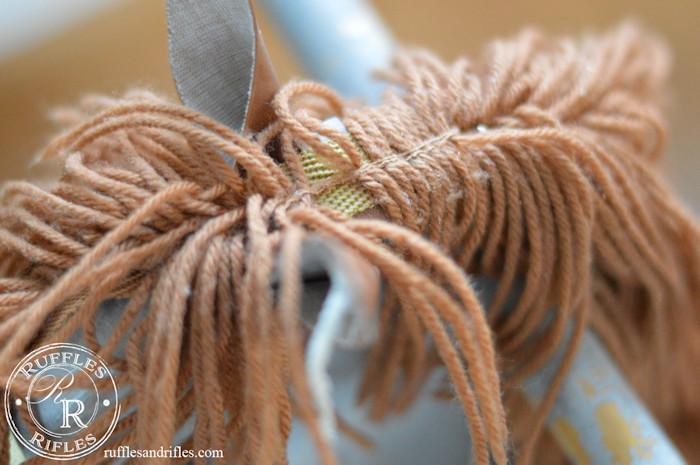 Yarn Rocking Horse Mane
4. Crafting a Realistic Horsehair Mane
4.1 Sourcing and Preparing Horsehair
- Source Horsehair: Obtain horsehair from a reputable supplier. Ensure the horsehair is clean, free of debris, and properly processed.
- Clean and Condition: Wash the horsehair with a mild shampoo and conditioner. Rinse thoroughly and allow it to dry completely. This will help to remove any dirt and restore its natural luster.
- Sort and Bundle: Sort the horsehair by length and thickness. Bundle the strands into small, manageable groups.
4.2 Attaching Horsehair for a Natural Look
- Prepare Attachment Points: Mark the attachment points along the rocking horse’s neck. Use a pencil to indicate where each bundle of horsehair will be placed.
- Sewing Method: Thread a needle with strong thread. Insert the needle through the rocking horse’s neck at one of the marked points.
- Attach Horsehair Bundle: Fold a small bundle of horsehair in half and place the folded end against the rocking horse’s neck. Stitch through the folded end, securing the horsehair to the rocking horse.
- Repeat: Continue attaching horsehair bundles along the entire length of the neck, spacing them closely together to create a full, natural-looking mane.
- Hot Glue Method (Optional): For added security, apply a small amount of hot glue to the attachment points before sewing. This will help to hold the horsehair in place while you stitch.
5. Adding Texture and Volume to Your Rocking Horse Mane
5.1 Techniques for Creating a Full Mane
To create a full and voluminous mane, consider the following techniques:
- Layering: Attach multiple rows of yarn or horsehair along the rocking horse’s neck. Overlapping the rows will create a thicker, more substantial mane.
- Varying Lengths: Use strands of varying lengths to add dimension and texture. This will mimic the natural appearance of a horse’s mane.
- Teasing: Gently tease the yarn or horsehair with a comb or brush to create added volume. Be careful not to over-tease, as this can cause tangling.
5.2 Incorporating Different Textures
Experiment with different textures to add visual interest to your rocking horse mane. Consider using a combination of smooth and textured yarns, or incorporating strands of ribbon or fabric. Braiding small sections of the mane can also add a unique touch.
6. Styling and Grooming the Rocking Horse Mane
6.1 Trimming and Shaping the Mane
Once the mane is attached, trim and shape it to achieve the desired look. Use sharp scissors to create a clean, even line. Consider tapering the mane towards the front of the rocking horse to create a more natural appearance.
6.2 Adding Braids and Decorative Touches
Braids and decorative touches can add a whimsical flair to your rocking horse mane. Experiment with different braiding techniques, such as French braids or fishtail braids. Add beads, ribbons, or other embellishments to create a unique and personalized design.
7. Ensuring Durability and Longevity of the Mane
7.1 Reinforcing Attachment Points
To ensure the durability of your rocking horse mane, reinforce the attachment points with additional stitching or hot glue. Check the mane regularly for loose strands and repair them promptly.
7.2 Protecting the Mane from Wear and Tear
Protect the mane from wear and tear by keeping it clean and free of tangles. Regularly comb or brush the mane to remove dust and debris. Avoid exposing the rocking horse to direct sunlight or moisture, as this can damage the yarn or horsehair.
8. Troubleshooting Common Mane-Making Issues
8.1 Dealing with Tangles and Knots
Tangles and knots are common issues when working with yarn or horsehair. To prevent tangles, work in small sections and keep the strands organized. If tangles do occur, gently tease them apart with a comb or brush.
8.2 Fixing Uneven or Sparse Areas
If you notice uneven or sparse areas in the mane, simply add more yarn or horsehair to fill in the gaps. Use the same attachment technique as before, and blend the new strands with the existing mane.
9. Exploring Creative Variations and Customizations
9.1 Adding Color Variations
Add color variations to your rocking horse mane by using yarns or horsehair in different shades. Consider creating a gradient effect by blending lighter and darker colors, or adding highlights with contrasting hues.
9.2 Incorporating Beads and Ribbons
Incorporate beads and ribbons into the mane for added flair. String beads onto strands of yarn or horsehair, or tie ribbons around sections of the mane. These decorative touches can add a touch of whimsy and personality to your rocking horse.
10. Maintenance and Care Tips for Your Rocking Horse Mane
10.1 Cleaning and Dusting
To keep your rocking horse mane looking its best, clean and dust it regularly. Use a soft brush or vacuum cleaner with a brush attachment to remove dust and debris. For stubborn stains, spot clean with a mild detergent and water.
10.2 Storing Your Rocking Horse Properly
Store your rocking horse in a cool, dry place away from direct sunlight. Cover the rocking horse with a cloth or plastic sheet to protect it from dust and moisture.
11. Rockscapes.net: Your Partner in Crafting the Perfect Rocking Horse
11.1 Inspiration and Ideas
At rockscapes.net, we’re passionate about helping you create beautiful and unique rocking horses. Visit our website for a wealth of inspiration and ideas, including photos of stunning rocking horse manes, step-by-step tutorials, and expert tips and tricks.
11.2 Expert Advice and Support
Need help with your rocking horse project? Our team of experts is here to provide personalized advice and support. Contact us with your questions, and we’ll be happy to guide you through every step of the process. You can reach us at Address: 1151 S Forest Ave, Tempe, AZ 85281, United States or Phone: +1 (480) 965-9011.
12. Frequently Asked Questions (FAQs)
What type of yarn is best for a rocking horse mane?
Acrylic and wool blends are the best types of yarn for a rocking horse mane because they are soft, durable, and easy to care for. These materials can withstand handling and maintain their appearance over time.
How can I make the mane look more realistic?
To make a rocking horse mane look more realistic, use horsehair instead of yarn. Additionally, vary the lengths of the strands, add texture by teasing the material, and incorporate color variations to mimic a natural mane.
What is the best way to attach the mane to the rocking horse?
The best way to attach the mane is by sewing it onto a twill tape and then securing the tape to the rocking horse’s neck. You can use a strong thread and add hot glue for extra reinforcement.
How do I prevent the mane from tangling?
To prevent the mane from tangling, work in small sections, keep the strands organized, and regularly comb or brush the mane to remove dust and debris.
Can I use real horsehair for the mane?
Yes, you can use real horsehair for the mane to achieve a more authentic look. Ensure the horsehair is clean, properly processed, and sourced from a reputable supplier.
How do I style the rocking horse mane?
Style the rocking horse mane by trimming and shaping it with sharp scissors to create a clean, even line. You can also add braids, beads, ribbons, or other embellishments for a unique touch.
How do I clean the rocking horse mane?
Clean the rocking horse mane by using a soft brush or vacuum cleaner with a brush attachment to remove dust and debris. For stubborn stains, spot clean with a mild detergent and water.
What tools do I need to make a rocking horse mane?
The essential tools you need include scissors, a needle and thread, a comb or brush, twill tape or fabric strips, a hot glue gun (optional), a measuring tape, and a pencil.
How can I add color variations to the mane?
Add color variations by using yarns or horsehair in different shades. Create a gradient effect by blending lighter and darker colors, or add highlights with contrasting hues.
Where can I find inspiration for rocking horse mane designs?
Find inspiration for rocking horse mane designs on rockscapes.net, which offers a wealth of ideas, step-by-step tutorials, and expert tips and tricks.
13. Conclusion
Creating a rocking horse mane is a rewarding project that adds character and charm to your handcrafted toy. By following these tips and techniques, you can craft a mane that is both beautiful and durable. Visit rockscapes.net for more inspiration and expert advice, and start creating the perfect rocking horse today.