Breaking a crystal rock, also known as a geode, can reveal the hidden treasures within, and at rockscapes.net, we’re here to guide you through the process with safety and precision. Discover the different methods for safely breaking geodes and unveiling their stunning crystal interiors, transforming an ordinary-looking rock into a dazzling display of nature’s artistry. Explore our website rockscapes.net for design ideas, a wealth of information about different types of stone, and useful construction tips.
1. What Is The Best Way To Break Open A Geode?
The best way to break open a geode is by using a geode cracker, which applies even pressure to split the rock without damaging the crystals inside. Other methods include using a hammer and chisel, slab saw, or wet tile saw, but these require more caution. Geodes, those fascinating geological formations, can be cracked open using several methods, each with its own advantages and disadvantages. The choice of method often depends on the size and type of geode, the tools available, and the desired outcome (e.g., a clean split versus breaking it into multiple pieces).
1.1. Using a Geode Cracker (Soil Pipe Cutter)
A geode cracker, also known as a soil pipe cutter, is designed to evenly distribute force around the geode, resulting in a clean break. Using a geode cracker minimizes the risk of shattering the crystals inside.
Advantages:
- Provides a clean and controlled break
- Reduces the risk of damaging internal crystals
- Suitable for harder geodes
Disadvantages:
- Can be relatively expensive
- Requires a specialized tool that may not be readily available
1.2. Using a Hammer and Stone Chisel
This classic method involves using a hammer and stone chisel to carefully create a fracture line along the geode’s surface. Applying gentle, controlled force along the intended breaking point increases the chances of a clean split.
Advantages:
- More budget-friendly as a hammer and stone chisel are common tools
- Offers precision in targeting specific breaking points
Disadvantages:
- Requires more skill and patience to avoid damaging the crystals
- May not be as effective on harder geodes
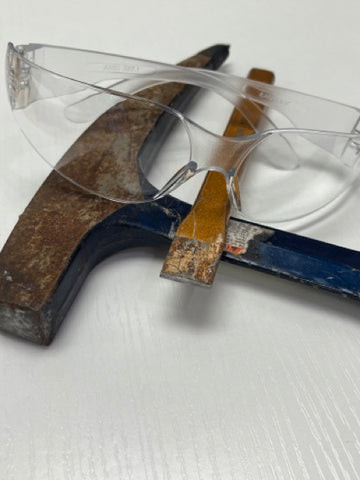 Hammer and Stone Chisel
1.3. Using a Hammer and Screwdriver
Similar to the hammer and chisel method, a hammer and screwdriver can be used to create a fracture line. Tapping the screwdriver along the geode’s surface with controlled force will eventually cause it to crack.
Advantages:
- An even more budget-friendly option using common tools
- Can be effective for smaller, more fragile geodes
Disadvantages:
- Offers less control compared to a chisel, increasing the risk of shattering
- May require more patience and precision
1.4. Using a Slab Saw
A slab saw is a specialized lapidary tool designed for cutting rocks and minerals. This method allows for precise and controlled cuts, preserving the integrity of the crystals within.
Advantages:
- Provides the most precise and controlled cut
- Preserves the integrity of the crystals
- Ideal for creating polished geode halves
Disadvantages:
- Requires specialized equipment that is not readily available to all enthusiasts
- Can be time-consuming
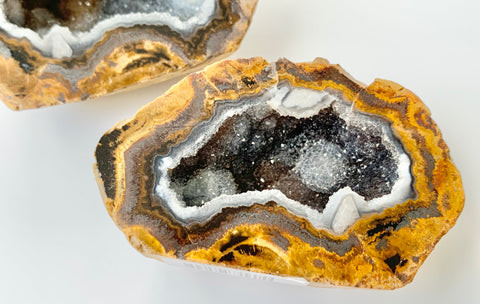 Geode cut open with a slab saw and polished
1.5. Using a Wet Tile Saw
A wet tile saw, commonly used in construction, can be repurposed for cutting geodes. The water-cooled blade minimizes dust and heat, providing a smoother cut.
Advantages:
- More accessible than a slab saw
- Provides a cleaner cut compared to hammering methods
Disadvantages:
- Cutting depth is limited, making it best for smaller geodes
- Requires careful handling and safety precautions
2. What Safety Precautions Should I Take When Breaking Crystal Rocks?
When breaking crystal rocks, prioritize safety by wearing safety goggles, gloves, and a dust mask to protect yourself from flying debris and sharp edges. Work in a well-ventilated area to avoid inhaling dust particles.
- Eye Protection: Always wear safety goggles to protect your eyes from flying rock fragments, which can cause serious injury.
- Hand Protection: Use gloves to shield your hands from sharp edges and rough surfaces, preventing cuts and abrasions.
- Respiratory Protection: Work in a well-ventilated area or wear a dust mask to avoid inhaling potentially harmful particles, especially when cutting or grinding geodes.
- Tool Safety: Maintain a firm grip on your tools to ensure control during the cracking process, reducing the risk of accidents.
- Awareness: Always be aware of your surroundings and the potential for flying debris. Keep bystanders at a safe distance.
3. What Tools Do I Need To Crack Open A Geode Safely?
To safely crack open a geode, you’ll need safety goggles, gloves, a hammer, a stone chisel or screwdriver, and optionally a geode cracker or slab saw. A dust mask and a well-ventilated workspace are also recommended.
3.1. Essential Tools
- Safety Goggles: To protect your eyes from flying rock fragments.
- Gloves: To protect your hands from sharp edges.
- Hammer: To apply force to the chisel or screwdriver.
- Stone Chisel or Screwdriver: To create a fracture line on the geode’s surface.
3.2. Optional Tools
- Geode Cracker (Soil Pipe Cutter): For a clean and controlled break.
- Slab Saw: For precise cutting, especially if you plan to polish the cut face.
- Wet Tile Saw: A more accessible alternative to a slab saw for smaller geodes.
- Dust Mask: To prevent inhalation of dust particles.
3.3. Workspace Preparation
- Well-Ventilated Area: Ensure the workspace is well-ventilated to minimize the risk of inhaling dust particles.
- Stable Surface: Place the geode on a stable, flat surface to prevent it from moving during the cracking process.
- Protective Covering: Consider covering the surrounding area with a tarp or cloth to contain any flying debris.
4. Can I Use A Regular Hammer To Break A Geode?
Yes, you can use a regular hammer to break a geode, but it’s best to use it in conjunction with a stone chisel or screwdriver for more controlled cracking. Using just a hammer can cause the geode to shatter into multiple pieces.
4.1. Benefits of Using a Hammer with a Chisel or Screwdriver
- Increased Precision: A chisel or screwdriver concentrates the force of the hammer, allowing for more controlled cracking along a specific line.
- Reduced Risk of Shattering: Directing the force through a chisel or screwdriver minimizes the risk of the geode breaking into multiple small pieces.
- Better Results: This method increases the likelihood of splitting the geode into two halves, revealing the crystal interior more effectively.
4.2. How to Use a Hammer with a Chisel or Screwdriver
- Positioning: Place the geode on a stable surface.
- Placement: Position the chisel or screwdriver on the geode where you want it to crack.
- Tapping: Gently tap the chisel or screwdriver with the hammer.
- Increasing Force: Gradually increase the force until the geode begins to crack along the desired line.
- Safety: Wear safety goggles and gloves to protect yourself from flying debris.
4.3. Risks of Using a Hammer Alone
- Uncontrolled Breakage: Using a hammer alone can result in the geode shattering into many pieces, potentially damaging the crystals inside.
- Increased Risk of Injury: The uncontrolled nature of this method increases the risk of flying debris and potential injury.
- Less Desirable Results: It is less likely to result in a clean split, making it harder to appreciate the geode’s interior.
5. How Do I Avoid Damaging The Crystals Inside When Breaking A Geode?
To avoid damaging the crystals inside when breaking a geode, use a geode cracker or a slab saw for controlled splitting. If using a hammer and chisel, apply gentle, gradual force along a pre-determined line.
5.1. Controlled Methods
- Geode Cracker: Distributes force evenly around the geode, minimizing stress on the crystals.
- Slab Saw: Provides a precise cut, avoiding any impact that could damage the crystals.
5.2. Gradual Force Technique
- Gentle Tapping: When using a hammer and chisel, start with gentle taps to create a fracture line.
- Gradual Increase: Gradually increase the force, allowing the geode to crack slowly along the intended path.
- Avoid Excessive Force: Applying too much force at once can cause the geode to shatter, damaging the crystals inside.
5.3. Pre-Determined Line
- Planning: Before you start, carefully plan where you want the geode to break.
- Creating Notches: Create small notches along the intended line using the chisel.
- Consistent Pressure: Apply consistent pressure along this line to encourage a clean break.
5.4. Additional Tips
- Stabilize the Geode: Ensure the geode is stable on a flat surface to prevent it from shifting during the process.
- Use Padding: Consider placing a cloth or padding under the geode to absorb some of the impact.
- Patience: Be patient and avoid the temptation to rush the process, as this can increase the risk of damage.
6. What Are Some Common Mistakes To Avoid When Cracking Open A Crystal Rock?
Common mistakes to avoid when cracking open a crystal rock include using excessive force, not wearing safety gear, and failing to properly stabilize the geode. Rushing the process can also lead to damage.
6.1. Using Excessive Force
- Risk: Shattering the geode into multiple pieces, damaging the crystals inside.
- Solution: Apply gradual, controlled force, allowing the geode to crack slowly along the intended path.
6.2. Neglecting Safety Gear
- Risk: Eye injuries from flying debris, cuts from sharp edges, and respiratory issues from dust inhalation.
- Solution: Always wear safety goggles, gloves, and a dust mask to protect yourself.
6.3. Failing to Stabilize the Geode
- Risk: The geode shifting during the cracking process, leading to uncontrolled breakage and potential injury.
- Solution: Place the geode on a stable, flat surface to prevent movement.
6.4. Rushing the Process
- Risk: Increasing the likelihood of mistakes, such as applying too much force or not properly aligning the chisel.
- Solution: Be patient and take your time, allowing the geode to crack naturally along the intended line.
6.5. Ignoring the Geode’s Structure
- Risk: Applying force in the wrong direction, which can cause the geode to break unevenly or damage the crystals.
- Solution: Examine the geode carefully to identify any natural weak points or lines, and apply force accordingly.
6.6. Not Preparing the Workspace
- Risk: Difficulty in managing debris and potential hazards in the surrounding area.
- Solution: Clear the workspace, provide adequate lighting, and consider using a protective covering to contain any flying fragments.
7. Are There Specific Types Of Geodes That Are Harder To Crack Open?
Yes, certain types of geodes, such as Druzy Mist, Las Choyas (Coconut), and Ojo de Sonora geodes, are known to be harder to crack open due to their dense outer layers. These often require a geode cracker or slab saw.
7.1. Druzy Mist Geodes
- Characteristics: These geodes are known for their fine, sparkling druzy crystals covering the interior.
- Difficulty: Their dense outer layers make them more resistant to cracking with traditional methods like a hammer and chisel.
- Recommended Method: A geode cracker is often the most effective way to open Druzy Mist geodes without damaging the delicate druzy crystals.
7.2. Las Choyas (Coconut) Geodes
- Characteristics: These geodes are named for their resemblance to coconuts, with a thick, hard outer shell.
- Difficulty: The tough outer layer can be challenging to penetrate, requiring significant force.
- Recommended Method: A geode cracker or slab saw is recommended to ensure a clean break without shattering the geode.
7.3. Ojo de Sonora Geodes
- Characteristics: These geodes are known for their distinctive “eye” patterns, which are formed by concentric bands of minerals.
- Difficulty: The intricate layering and hard outer shell make them difficult to crack open evenly.
- Recommended Method: A geode cracker can provide the necessary force to split the geode along its natural lines, while a slab saw can offer a more controlled cut.
7.4. General Tips for Harder Geodes
- Geode Cracker: This tool provides even pressure, reducing the risk of shattering the geode.
- Slab Saw: A slab saw allows for a precise and controlled cut, preserving the integrity of the crystals.
- Patience: Regardless of the method, patience is key when working with harder geodes. Avoid applying excessive force, which can damage the crystals inside.
- Safety: Always wear safety goggles and gloves to protect yourself from flying debris and sharp edges.
8. How Can I Polish The Face Of A Cracked Geode?
To polish the face of a cracked geode, start by sanding the surface with progressively finer grits of sandpaper, then use a polishing compound and a polishing wheel to achieve a smooth, shiny finish.
8.1. Preparation
- Cleaning: Thoroughly clean the geode face with water and a brush to remove any dirt or debris.
- Inspection: Examine the surface for any imperfections or rough areas that need to be addressed.
8.2. Sanding
- Coarse Grit Sandpaper: Start with a coarse grit sandpaper (e.g., 220 grit) to remove any major imperfections.
- Progressively Finer Grits: Gradually move to finer grits (e.g., 400, 600, 800 grit) to smooth the surface further.
- Wet Sanding: Use water during the sanding process to reduce dust and help achieve a smoother finish.
8.3. Polishing
- Polishing Compound: Apply a polishing compound (e.g., cerium oxide) to the geode face.
- Polishing Wheel: Use a polishing wheel or rotary tool with a polishing attachment to buff the surface.
- Gentle Pressure: Apply gentle, even pressure while polishing to avoid scratching or damaging the geode.
8.4. Final Steps
- Cleaning: Clean the geode face with water and a soft cloth to remove any remaining polishing compound.
- Inspection: Inspect the polished surface for any remaining imperfections and repeat the polishing process if necessary.
- Sealing (Optional): Consider applying a sealant to protect the polished surface and enhance its shine.
8.5. Safety Precautions
- Eye Protection: Always wear safety goggles to protect your eyes from flying debris.
- Respiratory Protection: Wear a dust mask to avoid inhaling potentially harmful particles, especially when using polishing compounds.
- Ventilation: Work in a well-ventilated area to minimize the risk of inhaling dust and fumes.
9. What Types Of Crystals Are Commonly Found Inside Crystal Rocks?
Common types of crystals found inside crystal rocks include quartz, amethyst, calcite, and celestite. The specific type of crystal depends on the geode’s origin and the minerals present during its formation.
9.1. Quartz
- Characteristics: Quartz is one of the most common minerals found in geodes, often appearing as clear or milky white crystals.
- Varieties: Different varieties of quartz, such as amethyst (purple) and citrine (yellow), can also be found depending on the presence of trace elements.
- Formation: Quartz crystals form when silica-rich fluids precipitate within the geode cavity.
9.2. Amethyst
- Characteristics: Amethyst is a purple variety of quartz, prized for its beautiful color and spiritual properties.
- Formation: Amethyst forms when trace amounts of iron are present in the silica-rich fluids and are exposed to natural irradiation.
- Occurrence: Amethyst is commonly found in geodes from Brazil, Uruguay, and other locations with volcanic activity.
9.3. Calcite
- Characteristics: Calcite is a calcium carbonate mineral that can form a variety of crystal shapes and colors inside geodes.
- Varieties: Calcite crystals can be transparent or opaque and may exhibit colors such as white, yellow, or orange.
- Formation: Calcite crystals form when calcium-rich fluids precipitate within the geode cavity.
9.4. Celestite
- Characteristics: Celestite is a strontium sulfate mineral that is known for its delicate, sky-blue crystals.
- Formation: Celestite crystals form in low-temperature hydrothermal environments, often in sedimentary rocks.
- Occurrence: Celestite is commonly found in geodes from Madagascar, Mexico, and the United States.
9.5. Other Minerals
- Agate: A microcrystalline variety of quartz that forms in bands or layers.
- Geothite: An iron oxide mineral that can form needle-like crystals or botryoidal masses.
- Pyrite: An iron sulfide mineral, also known as “fool’s gold,” that can form cubic crystals.
10. How Do I Store And Display My Crystal Rocks After Breaking Them Open?
After breaking open your crystal rocks, store them in a dry place away from direct sunlight to prevent fading. Display them on shelves, in display cases, or as part of a rock garden to showcase their natural beauty.
10.1. Cleaning
- Gentle Cleaning: Use a soft brush and mild soap to remove any dirt or debris from the crystals.
- Rinsing: Rinse the crystals thoroughly with water to remove any soap residue.
- Drying: Allow the crystals to air dry completely before storing or displaying them.
10.2. Storage
- Dry Environment: Store the crystals in a dry place to prevent moisture damage.
- Protection from Sunlight: Keep the crystals away from direct sunlight to prevent fading or discoloration.
- Individual Storage: Wrap each geode half in soft cloth or bubble wrap to prevent scratching or damage during storage.
10.3. Display
- Shelves: Display the crystals on shelves to showcase their beauty and create a visually appealing arrangement.
- Display Cases: Use display cases to protect the crystals from dust and damage while allowing them to be viewed.
- Rock Gardens: Incorporate the crystals into a rock garden to add a natural and decorative element to your outdoor space.
10.4. Additional Tips
- Labeling: Label each crystal with its name, origin, and any other relevant information.
- Lighting: Use appropriate lighting to highlight the crystals and enhance their natural beauty.
- Rotation: Rotate the crystals periodically to ensure even exposure to light and prevent fading.
At rockscapes.net, we understand the allure of crystal rocks and the joy of revealing their hidden beauty. Whether you’re a seasoned collector or a curious beginner, our website offers a wealth of information, inspiration, and resources to help you explore the fascinating world of geodes and crystal rocks.
Ready to embark on your own crystal rock adventure? Visit rockscapes.net today to discover stunning design ideas, detailed information about different types of stone, and useful construction tips. Let us help you transform your space with the timeless beauty of natural stone.
Contact us:
Address: 1151 S Forest Ave, Tempe, AZ 85281, United States
Phone: +1 (480) 965-9011
Website: rockscapes.net
FAQ: How To Break A Crystal Rock
1. Is it safe to break open a crystal rock at home?
Yes, it is safe to break open a crystal rock at home if you follow proper safety precautions such as wearing safety goggles and gloves.
2. What is the best tool for breaking open a geode?
A geode cracker is generally considered the best tool for breaking open a geode as it provides even pressure and reduces the risk of damaging the crystals.
3. Can I use a hammer and chisel to break open a geode?
Yes, you can use a hammer and chisel, but it requires more caution and control to avoid shattering the geode and damaging the crystals inside.
4. How do I avoid damaging the crystals inside a geode when breaking it open?
Use a geode cracker or a slab saw for controlled splitting. If using a hammer and chisel, apply gentle, gradual force along a pre-determined line.
5. Are some types of geodes harder to crack open than others?
Yes, certain types of geodes like Druzy Mist, Las Choyas, and Ojo de Sonora geodes are known to be harder to crack open.
6. What safety gear should I wear when breaking open a crystal rock?
Always wear safety goggles, gloves, and a dust mask to protect yourself from flying debris and sharp edges.
7. Can I use a regular hammer to break a crystal rock?
Yes, but it’s best to use it in conjunction with a stone chisel or screwdriver for more controlled cracking. Using just a hammer can cause the geode to shatter.
8. How do I polish the face of a cracked geode?
Start by sanding the surface with progressively finer grits of sandpaper, then use a polishing compound and a polishing wheel.
9. What types of crystals are commonly found inside geodes?
Common crystals found inside geodes include quartz, amethyst, calcite, and celestite.
10. How should I store and display my crystal rocks after breaking them open?
Store them in a dry place away from direct sunlight to prevent fading. Display them on shelves, in display cases, or as part of a rock garden.