Do you need rock salt for an ice cream maker? Yes, you absolutely need rock salt to make ice cream in a bag, but not in a traditional electric ice cream maker. Using rock salt lowers the freezing point of the ice, allowing the ice cream mixture to freeze faster and achieve that perfect creamy consistency. At rockscapes.net, we understand the importance of getting the right materials for your projects, whether it’s landscaping or creating delicious frozen treats! We offer information that enhances your experience, one stone or scoop at a time. Discover the magic of rock salt and how it transforms your homemade ice cream, along with unique landscaping ideas and decorative rocks to elevate your backyard projects, ensuring your creations are both beautiful and functional.
1. What is Rock Salt and Why is it Important for Homemade Ice Cream?
Rock salt, also known as halite, is a naturally occurring form of sodium chloride that comes in large, crystalline chunks. The primary role of rock salt in making homemade ice cream, particularly with the ice cream in a bag method, is its ability to lower the freezing point of water. According to a study by the University of Arizona’s Department of Atmospheric Sciences, adding salt to water reduces its freezing point because the salt ions interfere with the water molecules’ ability to form ice crystals.
This is crucial because ice alone can only get as cold as 32°F (0°C). To freeze the ice cream base effectively, you need a temperature significantly lower than that. When rock salt is mixed with ice, it creates a super-cooled environment that can drop well below 32°F. This lower temperature is what allows the liquid ice cream mixture to freeze into a semi-solid, creamy delight in a relatively short amount of time.
In the ice cream in a bag method, the ice cream base—typically a mixture of cream, milk, sugar, and flavorings—is sealed in a small bag. This bag is then placed inside a larger bag filled with ice and rock salt. As the ice melts, it absorbs heat from the surrounding environment, including the ice cream mixture. The rock salt accelerates this process by further lowering the temperature of the ice water, creating an efficient cooling system.
Here’s a simple breakdown of why rock salt is essential:
- Lowers Freezing Point: Rock salt reduces the freezing point of the ice, creating a colder environment.
- Accelerates Freezing: The colder environment speeds up the freezing process of the ice cream base.
- Achieves Creamy Texture: Rapid freezing helps create smaller ice crystals, resulting in a smoother, creamier texture.
Without rock salt, the ice wouldn’t get cold enough to freeze the ice cream base properly, leaving you with a slushy, less appealing result.
2. What Kind of Salt Works Best for Making Ice Cream?
While rock salt is the traditional and often recommended choice for making ice cream, other types of salt can also be used, each with its own characteristics. Here’s a look at the different types of salt and how they perform in the ice cream-making process:
- Rock Salt: This is the most commonly recommended salt for making ice cream because of its large crystal size and effectiveness in lowering the freezing point of ice. Its coarse texture ensures that it dissolves slowly, providing a sustained cooling effect.
- Ice Cream Salt: Essentially the same as rock salt, ice cream salt is specifically marketed for making ice cream. It works just as effectively as regular rock salt.
- Kosher Salt: Kosher salt can be used as a substitute for rock salt, especially if it’s the coarsest variety available. Its larger crystals help lower the freezing point, though it may dissolve slightly faster than rock salt.
- Sea Salt: Coarse sea salt can also be used, but like kosher salt, it may dissolve more quickly than rock salt. The mineral content in sea salt can sometimes add a subtle flavor to the ice cream-making process.
- Table Salt: While table salt can be used in a pinch, it is not the best option. Its fine texture causes it to dissolve very quickly, which can lead to a rapid but short-lived drop in temperature. This might not provide the sustained cooling needed for the ice cream to freeze properly.
Here’s a comparison table to help you decide which salt to use:
| Type of Salt | Crystal Size | Dissolving Speed | Cooling Effect | Availability |
|---|---|---|---|---|
| Rock Salt | Large | Slow | Sustained | Widely Available |
| Ice Cream Salt | Large | Slow | Sustained | Widely Available |
| Kosher Salt | Medium | Moderate | Moderate | Widely Available |
| Sea Salt | Medium | Moderate | Moderate | Widely Available |
| Table Salt | Fine | Fast | Rapid, Short-Lived | Widely Available |
For optimal results, rock salt or ice cream salt is the preferred choice. However, if you only have kosher salt or coarse sea salt on hand, they can work as viable alternatives. Just be mindful that they might dissolve faster, so you may need to add more ice and salt during the ice cream-making process to maintain the desired temperature. Avoid using table salt if possible, as it is the least effective option.
 homemade vanilla ice cream made in a bag with rock salt and ice
3. How Much Rock Salt Do I Need?
The amount of rock salt you need depends on the quantity of ice cream you are making and the size of your container. A general guideline is to use a ratio of 1 part rock salt to 3 parts ice.
For the popular ice cream in a bag method, a common recommendation is to use about 1/3 cup of rock salt for every 6-8 cups of ice. This ratio ensures that the ice temperature drops low enough to freeze the ice cream base effectively.
Here’s a more detailed breakdown based on different ice cream-making scenarios:
- Ice Cream in a Bag: For a standard batch of ice cream in a bag, which typically involves about 1 cup of ice cream base, use approximately 1/3 cup of rock salt with 6-8 cups of ice.
- Electric Ice Cream Maker: If you’re using an electric ice cream maker that requires ice and salt, follow the manufacturer’s instructions. Generally, these machines need a larger quantity of ice and salt compared to the bag method. A common ratio is 1 cup of rock salt for every 3 cups of ice, layered around the ice cream canister.
- Larger Batches: For larger batches of ice cream, adjust the amount of rock salt and ice proportionally. Maintaining the 1:3 ratio is crucial. For example, if you’re using 12 cups of ice, you would need about 4 cups of rock salt.
To ensure the best results, consider these tips:
- Use Enough Salt: Insufficient rock salt will not lower the temperature enough, resulting in longer freezing times and potentially a grainy texture.
- Layer Ice and Salt: When using an ice cream maker, layer the ice and rock salt evenly around the ice cream canister to ensure consistent cooling.
- Monitor Ice Levels: As the ice melts, the cooling effect diminishes. Replenish the ice and salt as needed to maintain a low temperature.
- Use a Thermometer: For precise temperature control, use a thermometer to monitor the ice water. Ideally, you want to maintain a temperature between 20°F and 25°F (-7°C to -4°C).
By following these guidelines, you can ensure that you use the right amount of rock salt to achieve perfectly frozen and creamy homemade ice cream every time.
4. Can I Reuse the Rock Salt?
Reusing rock salt is technically possible, but it’s not generally recommended for optimal results. After being used to make ice cream, rock salt becomes diluted with water as the ice melts, which reduces its effectiveness in lowering the freezing point.
Here are a few reasons why reusing rock salt isn’t ideal:
- Reduced Effectiveness: The salt concentration decreases as it mixes with melted ice, which means it won’t lower the temperature as effectively in subsequent uses. This can lead to longer freezing times and potentially affect the texture of your ice cream.
- Contamination: The used rock salt may contain impurities from the melting ice or the surrounding environment, which can affect the purity and performance of the salt.
- Inconsistent Results: Reusing rock salt can lead to inconsistent freezing temperatures, making it difficult to achieve the same creamy texture in each batch of ice cream.
However, if you’re in a pinch and want to reuse rock salt, here are some tips to mitigate the drawbacks:
- Strain the Salt: After use, strain the rock salt to remove any excess water and debris.
- Dry the Salt: Spread the salt on a baking sheet and dry it in a low-temperature oven (around 200°F or 93°C) for a few hours, or until it is completely dry. This helps to restore its effectiveness.
- Store Properly: Store the dried rock salt in an airtight container to prevent it from absorbing moisture from the air.
- Use More Salt: When reusing rock salt, use a slightly higher quantity to compensate for its reduced effectiveness.
- Monitor Temperature: Keep a close eye on the ice water temperature and add more salt if needed to maintain a temperature between 20°F and 25°F (-7°C to -4°C).
While reusing rock salt is an option, it’s generally best to use fresh rock salt for each batch of ice cream to ensure optimal freezing and the best possible texture. Fresh rock salt guarantees the most effective cooling and consistent results, leading to a superior homemade ice cream experience.
5. What Happens if I Don’t Use Enough Rock Salt?
Not using enough rock salt when making ice cream, especially with methods like the ice cream in a bag or traditional ice cream makers, can lead to several issues that affect the final product’s quality and texture. Rock salt is crucial for lowering the freezing point of the ice, and insufficient amounts can hinder this process.
Here are the primary consequences of not using enough rock salt:
- Slower Freezing: The most immediate effect is a slower freezing process. Without enough salt, the ice water surrounding the ice cream mixture won’t get cold enough to efficiently draw heat away from the base. This extended freezing time can be frustrating and time-consuming.
- Grainy Texture: Slow freezing leads to the formation of larger ice crystals in the ice cream. When the mixture freezes slowly, water molecules have more time to migrate and form larger structures. These larger ice crystals result in a grainy or icy texture, which is less pleasant than the smooth, creamy texture of well-made ice cream.
- Soft or Slushy Consistency: In severe cases of insufficient salt, the ice cream may not freeze at all, resulting in a soft, slushy consistency. The mixture might partially freeze around the edges but remain liquid in the center, making it unappetizing.
- Uneven Freezing: Even if the ice cream does eventually freeze, the process can be uneven. Parts of the mixture may freeze faster than others, leading to inconsistencies in texture and flavor distribution.
- Increased Melting Speed: Ice cream made with insufficient salt tends to melt more quickly once it’s served. The larger ice crystals and less stable structure mean it can’t hold its form as well at room temperature.
To avoid these issues, always ensure you use the correct ratio of rock salt to ice, typically around 1 part rock salt to 3 parts ice. Monitoring the temperature of the ice water and adding more salt as needed can also help maintain the necessary low temperature for optimal freezing. By using enough rock salt, you can achieve the smooth, creamy, and delicious ice cream you desire.
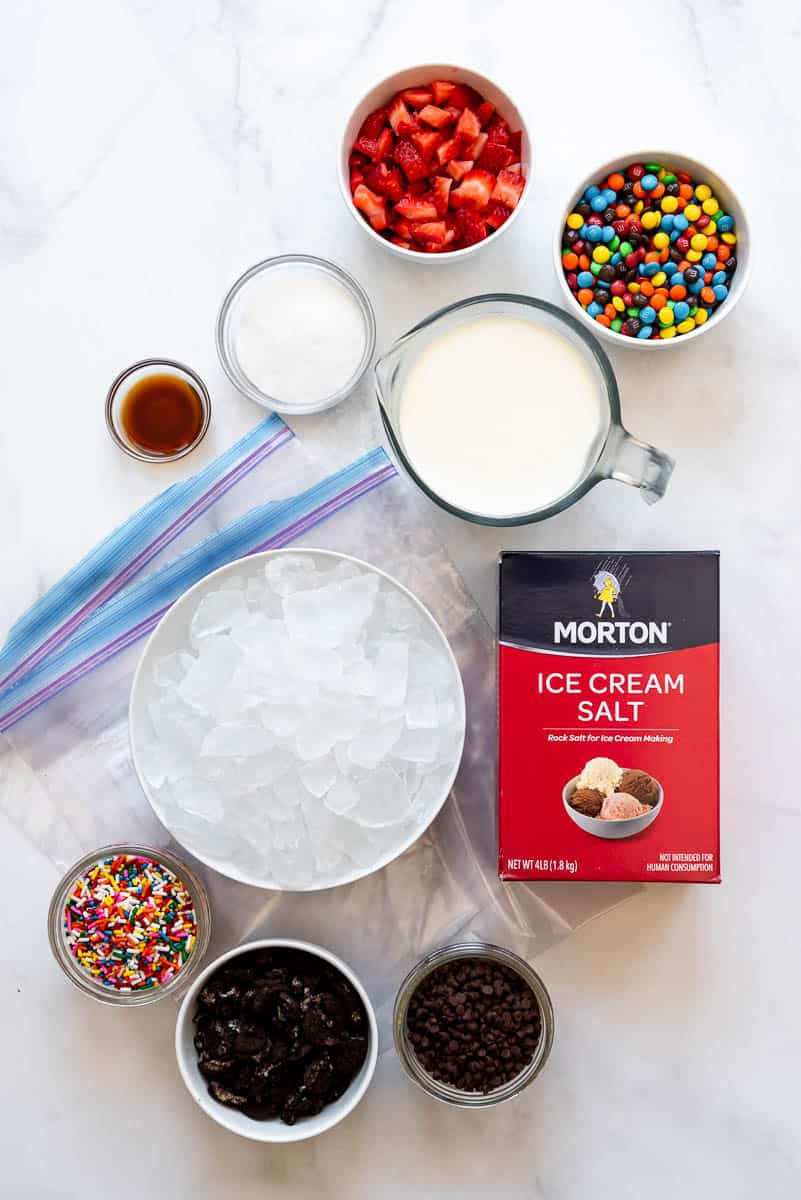 ingredients for ice cream in a bag
6. Alternative Options if You Don’t Have Rock Salt
If you find yourself without rock salt and are eager to make homemade ice cream, several alternatives can be used, although they may not be as effective. These substitutes can help lower the freezing point of ice, but they might require adjustments in quantity or technique to achieve the desired results.
Here are some alternative options:
- Kosher Salt: Coarse kosher salt is a good substitute for rock salt. Its larger crystals help lower the freezing point of ice, though it may dissolve slightly faster than rock salt. Use the same amount of kosher salt as you would rock salt, and monitor the ice water temperature to ensure it stays cold enough.
- Sea Salt: Coarse sea salt is another viable option. Like kosher salt, it may dissolve more quickly than rock salt, so you might need to add more as the ice melts. The mineral content in sea salt can also impart a subtle flavor to the ice cream-making process.
- Table Salt: While not the best choice, table salt can be used in a pinch. Its fine texture causes it to dissolve very quickly, leading to a rapid but short-lived drop in temperature. You’ll need to use a larger quantity of table salt compared to rock salt, and be prepared to add more frequently to maintain the low temperature.
- Epsom Salt: Epsom salt (magnesium sulfate) can also lower the freezing point of water, but it is not food-grade and should not come into contact with the ice cream mixture. Use Epsom salt only in the outer bag with the ice, ensuring the ice cream mixture is securely sealed in its own bag.
- Sugar: Adding sugar to the ice can also lower its freezing point, though not as effectively as salt. This method may require a significantly larger quantity of sugar, and it can make the ice water sticky.
Here’s a comparison of these alternatives:
| Alternative | Effectiveness | Dissolving Speed | Notes |
|---|---|---|---|
| Kosher Salt | Good | Moderate | Use coarse variety; monitor temperature. |
| Sea Salt | Good | Moderate | Use coarse variety; monitor temperature. |
| Table Salt | Fair | Fast | Use larger quantity; add frequently. |
| Epsom Salt | Good | Moderate | Non-food grade; ensure it doesn’t contact the ice cream mixture. |
| Sugar | Poor | Moderate | Requires a large quantity; can make the ice water sticky. |
When using any of these alternatives, it’s crucial to monitor the temperature of the ice water and adjust the quantity of salt or other substance accordingly. Keep the mixture as cold as possible to achieve the best results. If possible, try to find rock salt for the best possible outcome.
7. Tips for Making Ice Cream in a Bag Successfully
Making ice cream in a bag is a fun and easy activity, perfect for entertaining kids or enjoying a quick homemade treat. However, to ensure the best results, it’s important to follow some key tips and techniques.
Here are some essential tips for making ice cream in a bag successfully:
- Use High-Quality Ingredients: Start with the best ingredients possible. Use fresh, cold heavy cream, whole milk, and high-quality flavorings like vanilla extract. The better the ingredients, the better the ice cream will taste.
- Choose the Right Bags: Invest in heavy-duty, freezer-safe Ziploc bags. Name-brand bags are often more reliable and less likely to leak or break during the shaking process. Double-bag the ice cream mixture to provide extra protection against leaks.
- Chill Ingredients: Make sure your cream, milk, and any other liquid ingredients are thoroughly chilled before starting. This helps the ice cream freeze faster and more evenly.
- Use the Correct Ratio of Salt to Ice: The ideal ratio is about 1 part rock salt to 3 parts ice. This ensures the ice water gets cold enough to freeze the ice cream mixture effectively.
- Shake Vigorously: Shake the bag continuously and vigorously for at least 5-10 minutes, or until the ice cream reaches your desired consistency. The more you shake, the smoother and creamier the ice cream will be.
- Protect Your Hands: The bag of ice and salt gets very cold, so protect your hands by wearing gloves or wrapping the bag in a towel.
- Avoid Salt Contamination: Be careful when opening the inner bag to avoid getting any salt water into the ice cream. Wipe the outside of the inner bag before opening it.
- Add Mix-Ins at the End: If you want to add mix-ins like chocolate chips, crushed cookies, or fruit, do so after the ice cream has frozen. Add them to the bag and squish gently to combine.
- Eat Immediately or Freeze: Ice cream made in a bag has a soft-serve consistency and is best eaten immediately. If you prefer a firmer texture, transfer the ice cream to a freezer-safe container and freeze for a few hours.
Additional tips for troubleshooting:
- If the Ice Cream Isn’t Freezing: Add more rock salt to the ice and continue shaking. Make sure the bags are well-sealed and that the ice water is cold enough.
- If the Ice Cream is Too Icy: This could be due to slow freezing. Ensure you’re using enough salt and shaking the bag vigorously. Using more heavy cream and less milk can also help reduce iciness.
- If the Bag Leaks: Double-bag the ice cream mixture and check the bags for any holes or weak spots before starting.
By following these tips, you can make delicious, homemade ice cream in a bag that’s sure to impress.
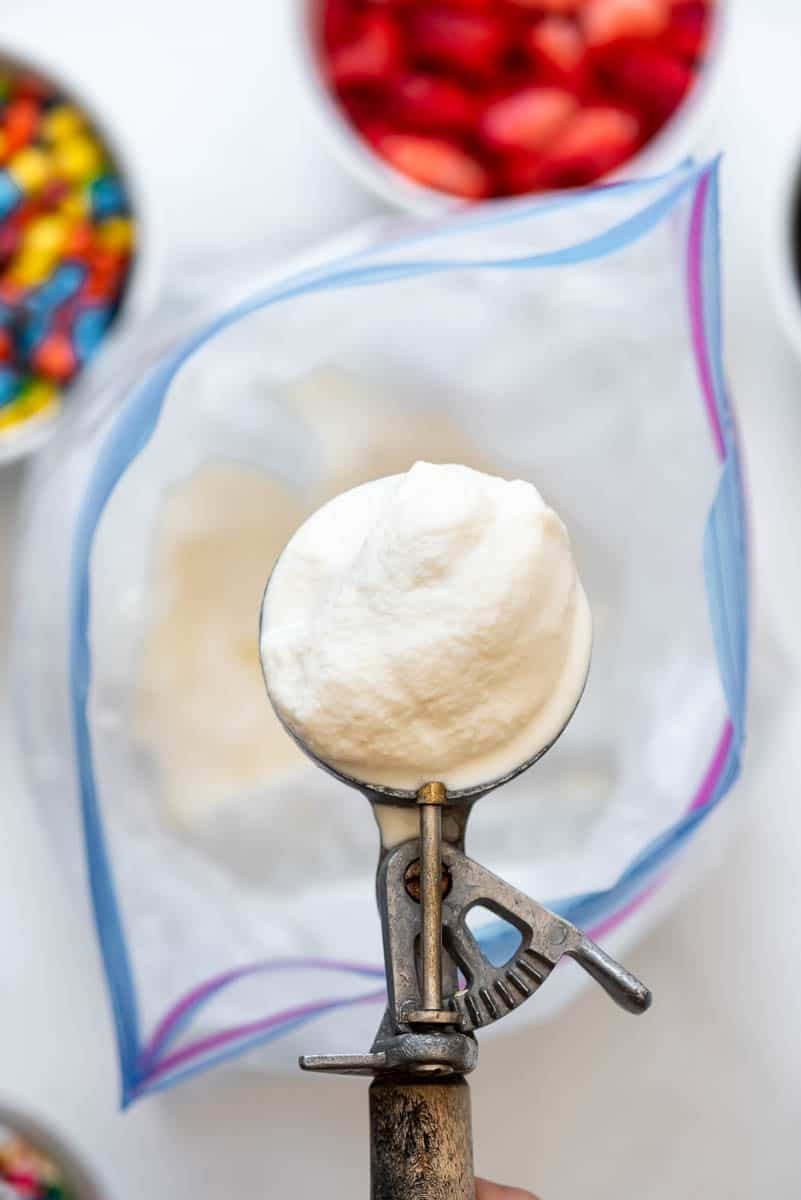
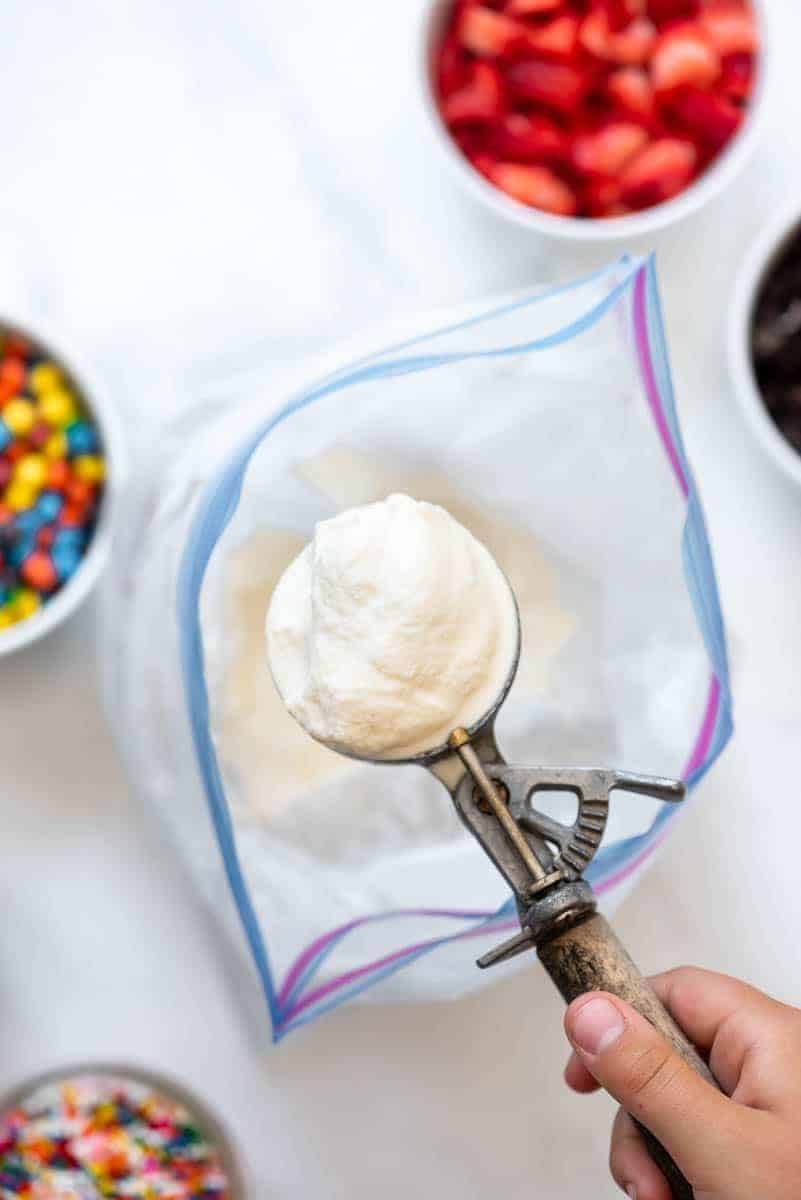 a hand holding a scoop of easy homemade vanilla ice cream made in a bag
8. Understanding the Science Behind the Freezing Process
The process of making ice cream in a bag is a great way to demonstrate some basic scientific principles, particularly those related to freezing point depression and heat transfer. Understanding the science behind the process can make the activity even more engaging and educational.
Here’s a breakdown of the key scientific concepts:
- Freezing Point Depression: The primary scientific principle at work is freezing point depression. The freezing point of a liquid is the temperature at which it transitions from a liquid to a solid state. Adding a solute, such as salt, to a solvent, such as water, lowers the freezing point of the solvent. This happens because the solute particles interfere with the formation of ice crystals, requiring a lower temperature for the water to freeze.
- Heat Transfer: Heat transfer is the movement of thermal energy from one place to another. In the ice cream-making process, heat is transferred from the ice cream mixture to the ice water surrounding it. The colder ice water absorbs heat from the warmer ice cream mixture, causing the mixture to cool down and eventually freeze.
- Endothermic Reaction: The melting of ice is an endothermic process, meaning it absorbs heat from its surroundings. When rock salt is added to the ice, it helps to melt the ice more quickly, further absorbing heat from the ice cream mixture and accelerating the freezing process.
- Agitation: Shaking the bag is crucial because it helps to keep the ice cream mixture evenly chilled and prevents the formation of large ice crystals. Agitation ensures that the mixture freezes uniformly, resulting in a smoother, creamier texture.
- Colligative Properties: Freezing point depression is a colligative property, meaning it depends on the number of solute particles in a solution, not on the identity of the solute. This is why different types of salt can be used to lower the freezing point of ice, although some may be more effective than others.
To further illustrate these concepts, consider the following:
- Without Salt: Ice alone can only get as cold as 32°F (0°C). This temperature is not cold enough to freeze the ice cream mixture quickly, resulting in larger ice crystals and a grainy texture.
- With Salt: Adding rock salt to the ice lowers the freezing point to below 32°F (0°C), allowing the ice cream mixture to freeze faster and form smaller ice crystals.
- Shaking: Agitation helps to distribute the cold temperature evenly throughout the ice cream mixture, preventing the formation of large ice crystals and ensuring a smooth, creamy texture.
By understanding these scientific principles, you can appreciate the magic of making ice cream in a bag and even use it as an educational tool to teach kids about freezing point depression, heat transfer, and the importance of agitation in creating a smooth, creamy texture.
9. Creative Variations and Flavor Ideas for Homemade Ice Cream
One of the best things about making homemade ice cream is the ability to customize the flavors and ingredients to your liking. Whether you’re using an ice cream maker or the ice cream in a bag method, there are endless possibilities for creative variations and flavor combinations.
Here are some inspiring ideas to get you started:
- Classic Flavors:
- Vanilla Bean: Use high-quality vanilla extract or vanilla bean paste for a rich, classic flavor.
- Chocolate: Add cocoa powder or melted chocolate to the base for a decadent treat.
- Strawberry: Blend fresh or frozen strawberries into the base for a fruity delight.
- Mint Chocolate Chip: Infuse the base with mint extract and add mini chocolate chips.
- Fruity Creations:
- Blueberry Cheesecake: Blend blueberries and cream cheese into the base for a creamy, tangy flavor.
- Mango Sorbet: Use mango puree for a refreshing, dairy-free option.
- Raspberry Ripple: Swirl raspberry jam or puree into the vanilla base for a beautiful and flavorful treat.
- Lemon Lavender: Add lemon zest and lavender extract for a unique and aromatic flavor.
- Decadent Delights:
- Cookies and Cream: Crush Oreo cookies and mix them into the vanilla base.
- Peanut Butter Cup: Add peanut butter and chopped peanut butter cups to the chocolate base.
- Salted Caramel: Swirl salted caramel sauce into the vanilla base for a sweet and salty delight.
- Coffee Toffee: Infuse the base with coffee extract and add chopped toffee pieces.
- Unique and Adventurous Flavors:
- Avocado Lime: Blend avocado and lime juice into the base for a creamy and refreshing flavor.
- Rose Pistachio: Add rose water and chopped pistachios for an exotic and aromatic treat.
- Spiced Pumpkin: Blend pumpkin puree and pumpkin pie spice into the base for a seasonal flavor.
- Maple Bacon: Add maple syrup and crumbled bacon for a sweet and savory combination.
Tips for adding flavors and mix-ins:
- Extracts: Use extracts sparingly, as they can be quite potent. Start with a small amount and add more to taste.
- Fruits: Fresh or frozen fruits can be blended into the base or added as mix-ins. If using frozen fruits, thaw them slightly before adding.
- Chocolates and Candies: Chop chocolates and candies into small pieces before adding them to the base.
- Sauces and Swirls: Swirl sauces and jams into the base after it has partially frozen for a beautiful ripple effect.
Get creative and experiment with different flavor combinations to create your own signature ice cream flavors. Don’t be afraid to try new things and have fun with the process.
10. Troubleshooting Common Issues When Making Ice Cream
Making homemade ice cream can sometimes present challenges, whether you’re using an ice cream maker or the ice cream in a bag method. Understanding common issues and how to troubleshoot them can help you achieve the perfect creamy texture and delicious flavor every time.
Here are some common problems and their solutions:
- Issue: Ice Cream is Grainy or Icy
- Cause: Slow freezing, too much water, or not enough fat.
- Solution: Ensure you’re using enough rock salt to lower the freezing point of the ice water. Use more heavy cream and less milk in the base. Shake the bag vigorously to prevent large ice crystals from forming.
- Issue: Ice Cream is Too Soft
- Cause: Not enough salt, too much sugar, or not freezing for long enough.
- Solution: Add more rock salt to the ice. Reduce the amount of sugar in the base. Freeze the ice cream for a longer period, or transfer it to a freezer-safe container and freeze for a few hours.
- Issue: Ice Cream is Too Hard
- Cause: Too little sugar or over-freezing.
- Solution: Increase the amount of sugar in the base. Allow the ice cream to soften slightly before serving.
- Issue: Ice Cream Lacks Flavor
- Cause: Not enough flavoring or using low-quality ingredients.
- Solution: Add more vanilla extract, cocoa powder, or other flavorings to the base. Use high-quality ingredients for a richer flavor.
- Issue: Ice Cream is Curdling
- Cause: Overheating the base or adding acidic ingredients too quickly.
- Solution: Avoid overheating the base. Add acidic ingredients like lemon juice or fruit puree gradually and in small amounts.
- Issue: Bag is Leaking
- Cause: Using low-quality bags or not sealing the bags properly.
- Solution: Use heavy-duty, freezer-safe Ziploc bags. Double-bag the ice cream mixture for extra protection against leaks. Ensure the bags are sealed tightly before shaking.
- Issue: Ice Cream is Freezing Unevenly
- Cause: Not shaking the bag vigorously enough or uneven distribution of ice and salt.
- Solution: Shake the bag continuously and vigorously to ensure even chilling. Distribute the ice and salt evenly around the ice cream mixture.
- Issue: Ice Cream Tastes Salty
- Cause: Salt water from the outer bag getting into the ice cream mixture.
- Solution: Be careful when opening the inner bag to avoid getting any salt water into the ice cream. Wipe the outside of the inner bag before opening it.
By addressing these common issues and implementing the appropriate solutions, you can consistently make delicious, homemade ice cream with the perfect texture and flavor.
Rock salt is essential for making ice cream in a bag because it lowers the freezing point of ice, creating a super-cooled environment that freezes the ice cream base quickly and evenly. Understanding the science behind this process and following the tips outlined above will help you create delicious, homemade ice cream every time.
Whether you’re making ice cream or designing a rock garden, rockscapes.net is here to provide you with the resources and inspiration you need. We invite you to explore our website for more creative ideas, detailed information about different types of rocks, and expert advice on how to bring your vision to life.
Ready to create the perfect backyard retreat or whip up a batch of homemade ice cream? Visit rockscapes.net today and let us help you turn your dreams into reality. Contact us at 1151 S Forest Ave, Tempe, AZ 85281, United States or call +1 (480) 965-9011 to speak with our experts. Let’s build something beautiful together!
FAQ: Rock Salt and Ice Cream Making
- 1. Can I use table salt instead of rock salt for making ice cream?
While table salt can be used in a pinch, it is not the best option. Its fine texture causes it to dissolve very quickly, which can lead to a rapid but short-lived drop in temperature. Rock salt is preferred for its slower dissolving rate and sustained cooling effect. - 2. How does rock salt help in making ice cream?
Rock salt lowers the freezing point of water, creating a colder environment than ice alone. This allows the ice cream mixture to freeze faster and achieve a smoother, creamier texture. - 3. How much rock salt should I use for making ice cream in a bag?
A general guideline is to use a ratio of 1 part rock salt to 3 parts ice. For ice cream in a bag, about 1/3 cup of rock salt for every 6-8 cups of ice is recommended. - 4. Is it safe if a little bit of the salty ice water gets into my ice cream?
While it’s best to avoid any salt water getting into your ice cream, a tiny amount is unlikely to cause harm. However, it can affect the taste and texture. Be extra careful when opening the bags to prevent contamination. - 5. Can I reuse the rock salt after making ice cream?
Reusing rock salt is not generally recommended. After use, it becomes diluted with water, reducing its effectiveness. Fresh rock salt ensures the best cooling and consistent results. - 6. What can I do if my ice cream is not freezing in the bag?
Ensure you are using enough rock salt and that the bags are well-sealed. Shake the bag vigorously and monitor the ice water temperature. Adding more rock salt may be necessary. - 7. What are some flavor variations I can try when making ice cream in a bag?
You can add extracts like vanilla, mint, or almond. Mix-ins like chocolate chips, crushed cookies, or fruit can also be added after the ice cream has frozen. - 8. Why is shaking the bag important when making ice cream in a bag?
Shaking the bag helps to keep the ice cream mixture evenly chilled and prevents the formation of large ice crystals. This ensures that the mixture freezes uniformly, resulting in a smoother, creamier texture. - 9. Can I use Epsom salt instead of rock salt?
Epsom salt (magnesium sulfate) can also lower the freezing point of water, but it is not food-grade and should not come into contact with the ice cream mixture. Use Epsom salt only in the outer bag with the ice, ensuring the ice cream mixture is securely sealed. - 10. How long does it take to make ice cream in a bag?
It typically takes about 5-15 minutes of shaking for the ice cream to thicken and freeze, depending on how vigorously you are shaking the bag and the temperature of the ingredients.