Getting rocks out of your flower bed can be a challenge, but it’s essential for creating a thriving garden, and rockscapes.net can help. This guide provides a variety of methods, from manual removal to embracing rocky soil, ensuring your flower beds become the envy of the neighborhood. Discover effective rock removal techniques, soil supplementation strategies, and raised-bed solutions for a flourishing landscape.
1. Understanding the Challenge of Rocky Soil
Gardening in rocky soil presents unique challenges, but it’s a common issue for many homeowners. Rocky soil can hinder root growth, affect drainage, and limit the availability of nutrients for plants. Overcoming these challenges requires a strategic approach to rock removal and soil improvement.
According to research from Arizona State University’s School of Earth and Space Exploration, soil composition significantly impacts plant health. Rocky soils, prevalent in regions like Arizona and New England, often lack the necessary nutrients and water retention capabilities for optimal plant growth.
1.1. Why is Rocky Soil a Problem for Flower Beds?
Rocky soil is a problem for flower beds because it restricts root growth, impairs water drainage, and reduces nutrient availability. Plant roots struggle to penetrate dense, rocky soil, leading to stunted growth and poor overall health. Additionally, the presence of rocks can disrupt the natural balance of moisture and nutrients in the soil, making it difficult for plants to thrive.
Here’s a breakdown of the issues:
- Restricted Root Growth: Rocks physically block and impede the expansion of plant roots.
- Poor Drainage: Rocky soil can drain too quickly, depriving plants of essential moisture, or create pockets where water stagnates, leading to root rot.
- Nutrient Deficiency: Rocks take up space that could be occupied by nutrient-rich soil, limiting the nutrients available to plants.
- Difficulty in Planting: Digging and planting in rocky soil is physically demanding and can damage gardening tools.
1.2. Identifying Rocky Soil in Your Flower Bed
Identifying rocky soil in your flower bed is the first step toward addressing the issue. The most obvious sign is the presence of visible rocks and stones on the soil surface. However, even if the surface appears clear, the soil beneath may be riddled with rocks.
Here are some ways to identify rocky soil:
- Visual Inspection: Examine the soil surface for visible rocks and stones.
- Soil Texture: Feel the soil for a gritty, coarse texture, which indicates the presence of rocks and sand.
- Digging Test: Dig a small hole and observe the soil profile for rocks and stones.
- Plant Growth: Observe plant growth for signs of stunted growth, nutrient deficiencies, or poor overall health.
- Water Drainage: Notice how quickly water drains from the soil after watering or rainfall. Rapid drainage may indicate rocky soil.
1.3. Common Types of Rocks Found in Flower Beds
Common types of rocks found in flower beds include granite, slate, sandstone, and various forms of gravel and pebbles. The type of rock can vary depending on the region and local geology. Understanding the type of rock present can help you choose the most effective removal methods and soil amendments.
Here’s a closer look at some common rock types:
| Rock Type | Description | Impact on Soil |
|---|---|---|
| Granite | Hard, coarse-grained igneous rock | Can make soil acidic and difficult to work with. |
| Slate | Fine-grained metamorphic rock | Can create layered soil structure, affecting drainage. |
| Sandstone | Sedimentary rock composed of sand grains | Can lead to sandy, well-draining but nutrient-poor soil. |
| Limestone | Sedimentary rock composed of calcium carbonate | Can make soil alkaline and affect nutrient availability. |
| Gravel/Pebbles | Small, rounded rock fragments | Can improve drainage but reduce water retention. |
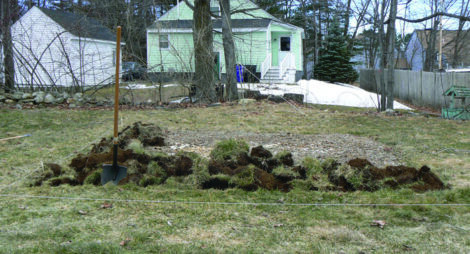 Granite rock in a flower bed
2. Methods for Removing Rocks from Your Flower Bed
Removing rocks from your flower bed can be a labor-intensive process, but the results are well worth the effort. There are several methods you can use, ranging from manual removal to mechanical techniques. The best approach depends on the size of your flower bed, the type of rocks present, and your physical capabilities.
2.1. Manual Rock Removal: Tools and Techniques
Manual rock removal involves physically digging up and removing rocks from your flower bed. This method is ideal for small to medium-sized flower beds and allows for precise removal of rocks. To make the process more efficient, you’ll need the right tools and techniques.
Here are the essential tools for manual rock removal:
- Shovel: Use a sturdy shovel to dig up soil and dislodge rocks.
- Garden Fork: A garden fork is useful for loosening soil and separating rocks from the surrounding dirt.
- Rake: A metal-tined garden rake helps to gather and remove smaller rocks and debris.
- Wheelbarrow: A wheelbarrow is essential for transporting rocks and soil.
- Gloves: Protect your hands with sturdy gardening gloves.
- Crowbar: For larger rocks, a crowbar can provide the leverage needed to dislodge them.
Here are some techniques for manual rock removal:
- Turn the Soil: Use a shovel or garden fork to turn the soil, exposing rocks.
- Remove Visible Rocks: Pick up and remove any visible rocks and stones.
- Sift the Soil: Use a garden rake to sift through the soil, separating smaller rocks and debris.
- Dig Deeper: Dig deeper into the soil to remove rocks lurking beneath the surface.
- Use a Crowbar: For larger rocks, use a crowbar to pry them out of the ground.
- Transport Rocks: Use a wheelbarrow to transport rocks to a designated disposal area.
2.2. Using a Tiller for Rocky Soil
Using a tiller for rocky soil can be an efficient way to break up compacted soil and expose rocks. However, it’s essential to use the right type of tiller and take precautions to avoid damaging the machine. Tillers with heavy-duty tines are better suited for rocky soil.
Before using a tiller, clear the area of any large rocks or debris. Start by making shallow passes, gradually increasing the depth as you remove rocks. Be prepared for the tiller to kick back when it hits a rock. Always wear safety glasses and gloves when operating a tiller.
Here are some tips for using a tiller in rocky soil:
- Choose the Right Tiller: Select a tiller with heavy-duty tines designed for rocky soil.
- Clear the Area: Remove any large rocks or debris before tilling.
- Start Shallow: Begin with shallow passes, gradually increasing the depth.
- Be Prepared for Kickback: Expect the tiller to kick back when it hits a rock.
- Wear Safety Gear: Always wear safety glasses and gloves when operating a tiller.
- Remove Rocks as You Go: Stop periodically to remove exposed rocks and debris.
2.3. Sifting and Screening Soil
Sifting and screening soil is a highly effective way to remove rocks and debris, resulting in a finer, more usable soil. This method involves passing soil through a screen or sieve, separating rocks and other unwanted materials. Sifting is particularly useful for preparing soil for raised beds or containers.
To sift soil, you’ll need a screen or sieve with a mesh size appropriate for the size of rocks you want to remove. Place the screen over a wheelbarrow or container and shovel soil onto the screen. Use a trowel or your hands to work the soil through the screen, allowing the finer particles to pass through while retaining the rocks and debris.
Here are some tips for sifting and screening soil:
- Choose the Right Screen: Select a screen with a mesh size appropriate for the size of rocks you want to remove.
- Work in Small Batches: Sift soil in small batches to avoid overloading the screen.
- Use a Trowel: Use a trowel or your hands to work the soil through the screen.
- Remove Debris: Remove any debris, such as roots and twigs, as you sift.
- Collect Sifted Soil: Collect the sifted soil in a wheelbarrow or container.
- Dispose of Rocks: Dispose of the rocks and debris in a designated area.
2.4. Rock Removal Machines and Equipment
For large-scale rock removal, consider using specialized machines and equipment. These machines can significantly reduce the time and effort required to clear rocky soil. Options include rock pickers, soil separators, and backhoes.
- Rock Pickers: Rock pickers are tractor-mounted machines that automatically pick up rocks from the soil surface.
- Soil Separators: Soil separators use a series of screens and conveyors to separate rocks and debris from soil.
- Backhoes: Backhoes are versatile machines that can be used to dig up and remove large rocks and boulders.
Before using any heavy equipment, be sure to assess the site for underground utilities and potential hazards. Always follow the manufacturer’s instructions and wear appropriate safety gear. Renting equipment may be a cost-effective option for a one-time project.
3. Improving Soil After Rock Removal
After removing rocks from your flower bed, it’s essential to improve the soil to create a healthy growing environment for your plants. This involves amending the soil with organic matter, balancing the pH level, and ensuring proper drainage.
3.1. Amending Soil with Organic Matter
Amending soil with organic matter is one of the most effective ways to improve its structure, fertility, and water retention. Organic matter includes compost, manure, leaf mold, and other decomposed plant and animal materials. Adding organic matter to your soil will create a more favorable environment for plant growth.
According to the United States Department of Agriculture (USDA), organic matter improves soil structure by creating aggregates, which are clusters of soil particles that enhance drainage and aeration. Organic matter also provides essential nutrients for plants and helps to retain moisture in the soil.
Here are some tips for amending soil with organic matter:
- Choose the Right Organic Matter: Select organic matter that is well-decomposed and free of weed seeds and pathogens.
- Apply Generously: Apply a generous layer of organic matter to the soil surface, typically 2-4 inches.
- Incorporate into Soil: Use a shovel or tiller to incorporate the organic matter into the top 6-12 inches of soil.
- Repeat Annually: Repeat the process annually to maintain soil health.
3.2. Balancing Soil pH
Balancing soil pH is crucial for ensuring that plants can access the nutrients they need to thrive. Soil pH measures the acidity or alkalinity of the soil, with a scale ranging from 0 to 14. Most plants prefer a slightly acidic to neutral pH, between 6.0 and 7.0.
- Test Your Soil: Use a soil testing kit or send a soil sample to a lab to determine your soil pH.
- Adjust pH as Needed: If your soil pH is too high (alkaline), add sulfur or acidifying fertilizers. If your soil pH is too low (acidic), add lime or wood ash.
- Retest Regularly: Retest your soil pH periodically to ensure it remains within the optimal range.
3.3. Improving Drainage
Improving drainage is essential for preventing waterlogged soil and root rot. Rocky soil often drains too quickly, but compacted soil can also suffer from poor drainage. To improve drainage, consider adding organic matter, creating drainage channels, or installing a drainage system.
- Add Organic Matter: Organic matter improves soil structure and drainage.
- Create Drainage Channels: Dig shallow channels to direct excess water away from the flower bed.
- Install a Drainage System: For severe drainage problems, consider installing a French drain or other drainage system.
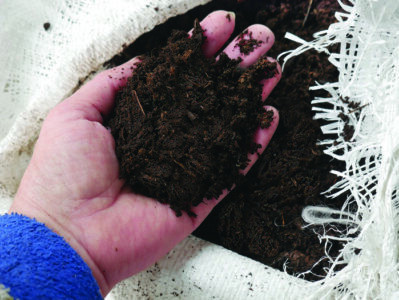
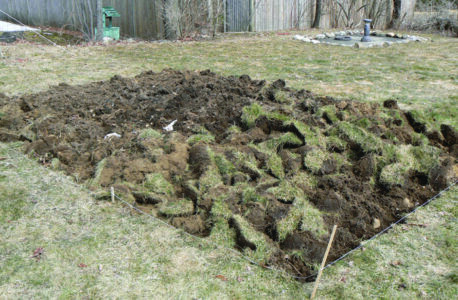 Amend soil with compost
4. Alternative Solutions: Raised Beds and Rock Gardens
If rock removal proves too challenging, consider alternative solutions such as raised beds or rock gardens. These options allow you to work with the existing conditions and create a beautiful and productive landscape.
4.1. Gardening in Raised Beds
Gardening in raised beds is an excellent way to overcome rocky soil and create a controlled growing environment. Raised beds are elevated structures filled with high-quality soil, allowing you to bypass the native soil altogether. This approach is particularly useful for growing vegetables, herbs, and flowers that require well-drained, fertile soil.
Here are some of the benefits of gardening in raised beds:
- Improved Soil Quality: Raised beds allow you to use a custom soil mix tailored to the needs of your plants.
- Better Drainage: Raised beds typically have excellent drainage, preventing waterlogged soil and root rot.
- Easier Access: Raised beds are easier to access and maintain, reducing strain on your back and knees.
- Pest Control: Raised beds can help to deter pests and diseases.
- Extended Growing Season: Raised beds warm up more quickly in the spring, extending the growing season.
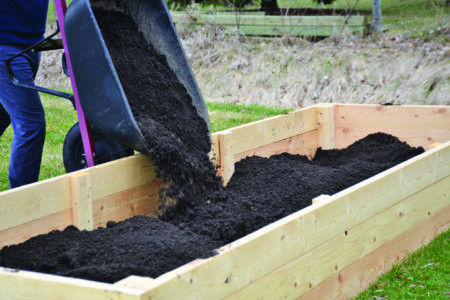 Raised garden box filled with soil
4.2. Creating a Rock Garden
Creating a rock garden is a creative way to embrace rocky soil and showcase plants that thrive in these conditions. Rock gardens feature a variety of rocks, stones, and drought-tolerant plants, creating a natural and visually appealing landscape. This option is ideal for slopes, dry areas, and other challenging locations.
Here are some tips for creating a rock garden:
- Choose the Right Rocks: Select rocks that are native to your area and complement the surrounding landscape.
- Arrange Rocks Naturally: Arrange rocks in a natural and aesthetically pleasing manner.
- Select Drought-Tolerant Plants: Choose plants that thrive in rocky, well-drained soil, such as succulents, alpines, and herbs.
- Provide Good Drainage: Ensure that the rock garden has excellent drainage to prevent waterlogged soil.
- Add Soil Amendments: Amend the soil with organic matter to improve its fertility and water retention.
4.3. Plants That Thrive in Rocky Soil
Many plants thrive in rocky soil, making them ideal for rock gardens or other challenging locations. These plants are typically drought-tolerant and adapted to well-drained soil. Consider these options:
- Succulents: Sedum, Sempervivum, and Echeveria are succulents that thrive in rocky soil.
- Alpines: Alpine plants such as Dianthus, Aubrieta, and Campanula are well-suited to rock gardens.
- Herbs: Thyme, Lavender, and Rosemary are herbs that tolerate rocky soil.
- Ornamental Grasses: Blue Fescue and Feather Reed Grass add texture and movement to rock gardens.
- Native Plants: Many native plants are adapted to rocky soil and require little maintenance.
5. Long-Term Maintenance and Prevention
After removing rocks and improving the soil, it’s essential to implement a long-term maintenance plan to prevent rocks from returning and maintain soil health. This involves regular weeding, mulching, and soil testing.
5.1. Regular Weeding and Rock Removal
Regular weeding and rock removal are essential for maintaining a healthy flower bed. Weeds compete with plants for nutrients and water, while rocks can hinder root growth and affect drainage. Make it a habit to remove weeds and rocks on a regular basis.
- Weed Regularly: Remove weeds as soon as they appear, before they have a chance to spread.
- Hand-Pull Weeds: Hand-pull weeds to remove the entire root system.
- Use Herbicides Sparingly: Use herbicides only as a last resort, following the manufacturer’s instructions carefully.
- Remove Rocks Regularly: Remove any rocks that appear on the soil surface.
5.2. Mulching to Suppress Weeds and Retain Moisture
Mulching is an effective way to suppress weeds, retain moisture, and improve soil health. Mulch is a layer of organic or inorganic material applied to the soil surface. Organic mulches include wood chips, bark, straw, and compost, while inorganic mulches include rocks and gravel.
According to research from the University of California, mulching can reduce weed growth by up to 90% and conserve soil moisture by up to 50%. Mulch also helps to regulate soil temperature and prevent soil erosion.
Here are some tips for mulching:
- Choose the Right Mulch: Select a mulch that is appropriate for your plants and soil type.
- Apply a Thick Layer: Apply a thick layer of mulch, typically 2-4 inches.
- Keep Mulch Away from Stems: Keep mulch away from plant stems to prevent rot.
- Replenish Mulch Annually: Replenish mulch annually to maintain its effectiveness.
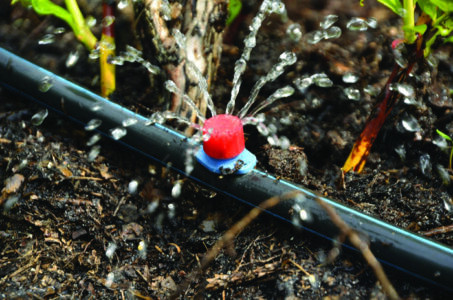 Soaker hose in a flower bed
5.3. Soil Testing and Amendment
Regular soil testing and amendment are essential for maintaining soil health and ensuring that plants have access to the nutrients they need. Soil testing can reveal nutrient deficiencies, pH imbalances, and other soil problems. Based on the test results, you can amend the soil with fertilizers, lime, or other amendments.
- Test Soil Regularly: Test your soil every 1-2 years to monitor its health.
- Follow Test Recommendations: Follow the recommendations of the soil test report to amend the soil as needed.
- Use Organic Fertilizers: Use organic fertilizers to provide essential nutrients for plants.
- Adjust pH as Needed: Adjust soil pH as needed to maintain the optimal range for your plants.
6. Real-Life Examples and Case Studies
To further illustrate the techniques discussed, let’s explore some real-life examples and case studies of gardeners who have successfully removed rocks from their flower beds and created thriving landscapes.
6.1. Case Study 1: Transforming a Rocky Backyard in Arizona
A homeowner in Arizona transformed a rocky backyard into a lush oasis by implementing a combination of rock removal, soil amendment, and raised beds. The homeowner began by manually removing rocks from the soil, using a shovel, garden fork, and wheelbarrow. After removing the majority of the rocks, the homeowner amended the soil with compost and other organic matter. Raised beds were then constructed to create a controlled growing environment for vegetables and herbs. The result was a beautiful and productive landscape that defied the challenging conditions.
6.2. Case Study 2: Creating a Rock Garden on a Slope in California
A gardener in California created a stunning rock garden on a steep slope by embracing the existing rocky conditions. The gardener selected drought-tolerant plants that thrived in rocky soil, such as succulents, alpines, and herbs. Rocks were arranged in a natural and aesthetically pleasing manner, creating a visually appealing landscape that required little maintenance. The rock garden not only solved the problem of the steep slope but also added beauty and interest to the property.
6.3. Expert Advice from Landscaping Professionals
Landscaping professionals recommend a multi-faceted approach to dealing with rocky soil. This includes:
- Thorough Site Assessment: Understanding the type of rocks and soil conditions is crucial.
- Strategic Rock Removal: Prioritizing removal in areas where it’s most impactful.
- Soil Improvement: Amending with high-quality organic matter.
- Plant Selection: Choosing plants adapted to rocky soil or using raised beds.
7. Addressing Specific Rock Types and Challenges
Different types of rocks present unique challenges and require specific removal techniques. Here are some tips for addressing specific rock types and challenges:
7.1. Removing Large Boulders
Removing large boulders requires specialized equipment and techniques. Consider renting a backhoe or hiring a professional contractor. Before attempting to remove a large boulder, assess the site for underground utilities and potential hazards. Use caution and follow safety guidelines.
7.2. Dealing with Shale and Slate
Shale and slate are layered rocks that can be difficult to remove. Use a crowbar or chisel to break up the rocks into smaller pieces. Amend the soil with organic matter to improve drainage and fertility.
7.3. Handling Gravel and Pebbles
Gravel and pebbles can be removed by sifting and screening the soil. Use a screen with a mesh size appropriate for the size of the gravel and pebbles. Amend the soil with organic matter to improve its structure and water retention.
8. Cost-Effective Solutions and DIY Projects
Removing rocks from your flower bed doesn’t have to break the bank. There are many cost-effective solutions and DIY projects you can undertake to improve your soil and create a thriving landscape.
8.1. Building Your Own Soil Sifter
Building your own soil sifter is a simple and cost-effective way to remove rocks and debris from your soil. You can construct a soil sifter using a wooden frame and wire mesh. The size of the mesh will determine the size of the rocks and debris that are removed.
8.2. Composting at Home
Composting at home is an excellent way to create nutrient-rich soil amendments for your flower bed. Compost is made from decomposed organic matter, such as grass clippings, leaves, and kitchen scraps. Composting not only improves soil health but also reduces waste and saves money on fertilizers.
8.3. Utilizing Free Resources
Take advantage of free resources, such as community compost programs, local nurseries, and online gardening forums. These resources can provide valuable information, materials, and support for your rock removal and soil improvement projects.
 Bagged compost for soil amendment
9. Safety Precautions and Best Practices
When removing rocks from your flower bed, it’s essential to follow safety precautions and best practices to avoid injuries and ensure a successful project.
9.1. Wearing Protective Gear
Always wear protective gear, such as gloves, safety glasses, and sturdy shoes, when removing rocks from your flower bed. Gloves will protect your hands from cuts and abrasions, while safety glasses will protect your eyes from flying debris. Sturdy shoes will provide support and prevent injuries.
9.2. Lifting Techniques
Use proper lifting techniques to avoid back injuries. Bend your knees and keep your back straight when lifting rocks. Avoid twisting your body while lifting. If a rock is too heavy to lift safely, use a crowbar or ask for assistance.
9.3. Tool Maintenance
Keep your tools in good working condition. Sharpen shovels and hoes regularly to make them more efficient. Clean tools after each use to prevent rust and corrosion. Store tools in a dry place to prolong their life.
10. Frequently Asked Questions (FAQs)
Here are some frequently asked questions about How To Get Rocks Out Of Flower Beds:
Q1: Why is it important to remove rocks from my flower bed?
Removing rocks from your flower bed is important because rocks can hinder root growth, affect drainage, and limit the availability of nutrients for plants.
Q2: What tools do I need for manual rock removal?
Essential tools for manual rock removal include a shovel, garden fork, rake, wheelbarrow, gloves, and crowbar.
Q3: Can I use a tiller to remove rocks from my flower bed?
Yes, you can use a tiller to remove rocks from your flower bed, but it’s essential to use the right type of tiller and take precautions to avoid damaging the machine.
Q4: How can I improve the soil after removing rocks?
After removing rocks, amend the soil with organic matter, balance the pH level, and improve drainage to create a healthy growing environment for your plants.
Q5: What are some alternative solutions to rock removal?
Alternative solutions to rock removal include gardening in raised beds and creating a rock garden.
Q6: What plants thrive in rocky soil?
Many plants thrive in rocky soil, including succulents, alpines, herbs, and native plants.
Q7: How can I prevent rocks from returning to my flower bed?
Implement a long-term maintenance plan that includes regular weeding, mulching, and soil testing to prevent rocks from returning and maintain soil health.
Q8: Is it safe to use herbicides for weed control in my flower bed?
Use herbicides only as a last resort, following the manufacturer’s instructions carefully. Consider hand-pulling weeds as a safer alternative.
Q9: How often should I test my soil?
Test your soil every 1-2 years to monitor its health and ensure that plants have access to the nutrients they need.
Q10: Where can I find more information about rock removal and soil improvement?
You can find more information about rock removal and soil improvement from local nurseries, online gardening forums, and university extension services. Also, visit rockscapes.net for expert advice and resources.
Removing rocks from your flower bed can be a challenging but rewarding task. By following the techniques and tips outlined in this guide, you can create a thriving landscape that enhances the beauty and value of your home. Remember to visit rockscapes.net for more inspiration and resources to help you achieve your gardening goals. For personalized advice and a wide selection of landscaping stones perfect for any project, contact Rockscapes Natural Stone at 1151 S Forest Ave, Tempe, AZ 85281, United States, or call +1 (480) 965-9011. Let us help you transform your garden dreams into reality.