How to build a rock retaining wall is a common question for homeowners looking to enhance their landscape with natural stone elements; at rockscapes.net, we offer a detailed guide to help you construct a durable and aesthetically pleasing retaining wall using various rock types and landscaping techniques. This comprehensive guide will walk you through each phase, from initial planning to the final touches, ensuring your retaining wall project is a success; embrace the beauty and functionality of stone with our expert advice, and transform your outdoor space into a stunning rockscape.
1. Understand Local Building Codes and Permits
Do I need to check local building codes and permits before building a retaining wall? Yes, it is crucial to verify local building codes and permit requirements before starting any retaining wall project to ensure compliance and avoid potential fines or structural issues. Many areas require permits for walls exceeding a certain height, typically around 30 to 36 inches, and some may require permits for any retaining wall height; failure to comply with these regulations can lead to costly fines and the forced removal of the structure.
To ensure your project aligns with local regulations, start by calling 811 before digging; this free service identifies underground utilities, preventing accidental damage and costly repairs. Next, visit your local government’s website, where you can often find detailed guidelines and standards for retaining wall construction, such as the Retaining Wall Standards provided by the City of Cincinnati. Additionally, if you live in a community with a homeowner’s association (HOA), review their rules for any additional restrictions on wall height, materials, or placement. In some cases, an engineer’s approval may be necessary, especially if the wall supports significant soil or is near property lines. Adhering to these steps ensures your retaining wall is safe, compliant, and built to last.
2. Gather the Necessary Equipment and Materials
What equipment and materials do I need to build a rock retaining wall? To successfully construct a rock retaining wall, you’ll need a variety of tools and materials including rocks, landscape fabric, gravel, sand, screenings, wood stakes, a shovel, a wheelbarrow, a line level and string, a four-foot level, a rake, mason’s line, a mallet, a maul or sledgehammer, and a tamper. Gathering these essential items beforehand will help streamline the building process.
Rocks are the primary material for building a rock retaining wall, and you’ll want to select stones that are appropriate for the size and style of your wall. Landscape fabric is essential for preventing soil from mixing with the drainage material, while gravel provides a stable base and promotes proper drainage behind the wall. Sand and screenings are used to level and stabilize the stones. Wood stakes and mason’s line help you mark and maintain a straight line for the wall. A shovel and wheelbarrow are necessary for moving materials, while a line level and four-foot level ensure your wall is level and structurally sound. A rake helps smooth out the gravel and sand, and a mallet, maul, or sledgehammer are used to adjust the stones into place. Finally, a tamper compacts the base and backfill, ensuring a solid and stable foundation for your retaining wall. Having all these materials and tools on hand will allow you to build a durable and aesthetically pleasing rock retaining wall.
3. Plan the Retaining Wall Design
How do I plan the design for my rock retaining wall? Planning the design of your rock retaining wall involves determining the size and scope of the project, selecting appropriate stones, and calculating the necessary materials. Consider the height and length of the wall, the type of stones required, and the amount of pressure the wall will need to withstand.
To start, measure the area where you plan to build the wall to determine the required height and length; remember that some communities have regulations for retaining walls over 30 or 36 inches. The height of your wall will dictate how wide it needs to be, with a general rule of thumb being one foot of thickness for every vertical foot; for example, a five-foot-tall wall should have a base that extends five feet back. Next, consider the type of stones you’ll need based on the pressure the wall will face and the steepness of the slope it will hold back; various retaining wall types offer different solutions for diverse landscaping needs. Calculate the amount of stone you need by estimating 0.4 cubic feet of crushed stone for the base and 0.35 cubic feet of gravel backfill for each square foot of the wall face area; always order 10-20% extra to account for cutting waste, compaction, and grading.
 Rock Retaining Wall Planning and Design
Planning the construction of a durable and aesthetically pleasing retaining wall.
3.1. Estimating Stone Quantity
How do I estimate the amount of stone needed for a retaining wall? To estimate the stone needed for your retaining wall, calculate the square footage of the wall face area; for each square foot, you’ll need approximately 0.4 cubic feet of crushed stone for the base and 0.35 cubic feet of gravel backfill. Accurate estimation ensures you have enough materials to complete the project without shortages.
Begin by measuring the height and length of the proposed retaining wall; multiply these measurements to find the total square footage of the wall face. For example, if your wall is 4 feet tall and 20 feet long, the face area is 80 square feet. Next, multiply the square footage by 0.4 to determine the volume of crushed stone needed for the base; in this case, 80 square feet x 0.4 cubic feet = 32 cubic feet of crushed stone. Then, multiply the square footage by 0.35 to find the volume of gravel backfill required; for our example, 80 square feet x 0.35 cubic feet = 28 cubic feet of gravel backfill.
It’s crucial to order 10-20% extra material to account for waste, compaction, and grading; this ensures you won’t run out of materials mid-project. Always consider the specific dimensions of your project when calculating the amount of stone needed, and consult with professionals at rockscapes.net for expert advice and material selection.
3.2. Selecting the Right Retaining Wall Blocks
What type of retaining wall blocks should I choose for my project? Selecting the right retaining wall blocks is essential for ensuring the stability and longevity of your wall; choose blocks with a rough, non-split face texture to increase friction and prevent sliding, and avoid flat stones that can shift and cause wall failure. Look for blocks with a minimum compressive strength of 3000 psi and interlocking features for added stability.
Consider the shape of the blocks as well; curved and angled blocks often perform better than basic rectangles, providing enhanced structural support; use a high-quality concrete mix with sufficient cement to ensure durability. For a natural stone retaining wall, opt for blocks that blend seamlessly with the surrounding landscape. Proper block selection is a critical step in building a retaining wall that stands the test of time. For more personalized advice, the experts at rockscapes.net can guide you in choosing the best materials for your specific needs and local conditions.
4. Organize Stones and Mark the Level
How do I organize the stones and mark the level for building a retaining wall? Organize the stones by size and weight, separating them into piles based on how square or attractive they are, and use the widest and heaviest stones at the base for stability. Mark the level using mason’s line and wooden stakes to ensure a straight and level line for the wall’s foundation.
Begin by sorting the stones into categories such as large, medium, and small, then further refine these categories based on shape and appearance; stones with flat surfaces are ideal for the base, while more decorative stones can be reserved for the top layers. Use gray outcropping stone for an appealing aesthetic. Next, hammer wooden stakes into the ground where you want the wall to go, ensuring they accommodate the required width-per-height ratio. Tie mason’s line around the stakes to mark the front edge of the base, and use a line level to ensure the line is straight and level. This will provide a clear guideline for the dimensions of the wall’s base. Precise organization and leveling are essential for a structurally sound and visually appealing retaining wall.
5. Excavate a Base Trench and Add Landscape Fabric
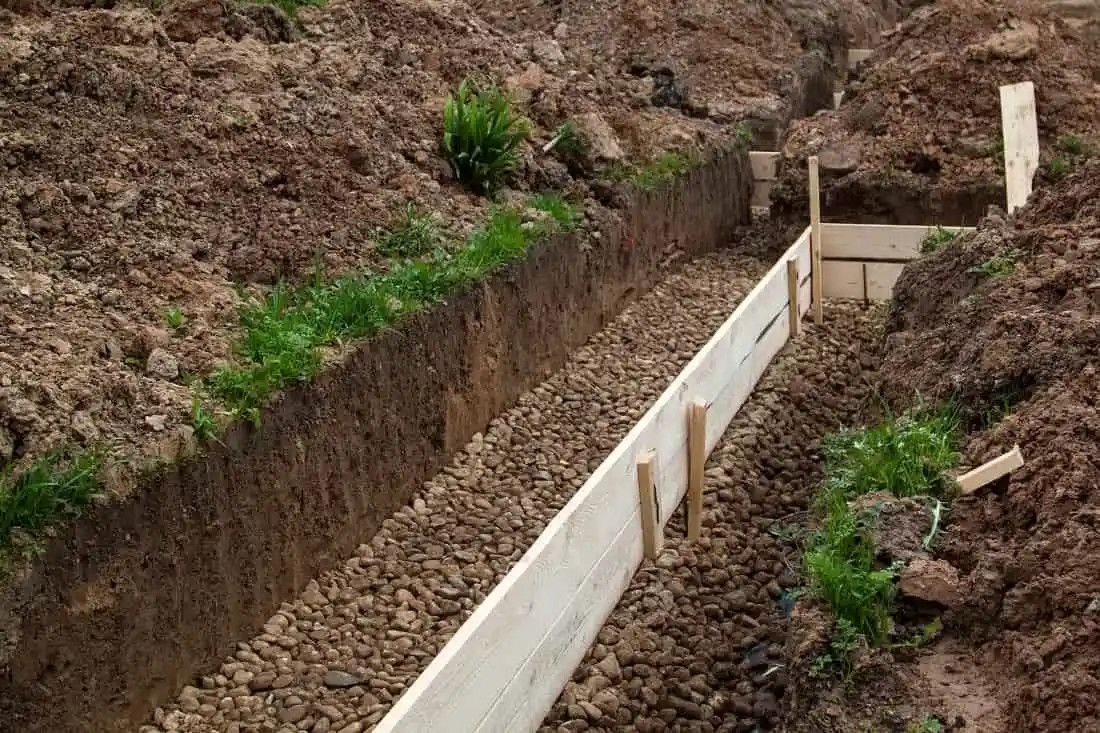
Why do I need to excavate a base trench and add landscape fabric? Excavating a base trench provides a stable foundation for your retaining wall by allowing you to set the first course of stones below grade, and adding landscape fabric prevents soil from mixing with the drainage material while allowing water to pass through. This combination ensures the longevity and stability of the wall.
Start by digging a trench approximately 12 inches deep and as wide as the base of your planned wall; this depth provides enough room for drainage rock and the first layer of large blocks, which anchor the base. Next, lay down landscape fabric across the entire trench, extending it beyond the edges; this fabric acts as a barrier, preventing soil particles from clogging the drainage system behind the wall. By folding the excess fabric over the backfill later, you add an extra layer of stability. Excavating the trench and adding landscape fabric are crucial steps in creating a durable and well-drained retaining wall.
 Excavating a Trench for Retaining Wall Construction
Proper excavation and landscape fabric placement for a stable retaining wall.
6. Lay a Crushed Stone Base
Why is it important to lay a crushed stone base for a retaining wall? Laying a 6-inch layer of drainage gravel as a base course provides proper drainage behind the wall, preventing water buildup and hydrostatic pressure that can compromise the wall’s integrity. This crushed stone base ensures a stable and level foundation for the retaining wall blocks.
To create the crushed stone base, start by pouring a layer of well-graded gravel, consisting of a mixture of 3/4 inch to 1/2 inch diameter stones, into the excavated trench; spread the gravel evenly to a thickness of approximately 6 inches. Use a mechanical compactor to compact the gravel in 2-inch layers, ensuring it is dense and stable. Level and smooth the gravel surface before setting the first course of blocks. The crushed stone base acts as a critical component in managing water runoff, which is essential for the long-term stability of the retaining wall.
7. Lay Down the First Level of Stones
How do I lay down the first level of stones for a retaining wall? Place the biggest and most durable stones in an even line, ensuring they just touch the front of the mason’s line to create a level surface on top; adjust the stones as needed by digging out or adding sand underneath to achieve a flat and stable foundation. This first level is crucial for the overall stability of the wall.
Choose the largest and sturdiest stones for this initial layer, as they will bear the majority of the wall’s weight. Carefully position each stone, ensuring it aligns with the mason’s line and sits as flat as possible; use a four-foot level to check the surface. If necessary, dig out areas or add sand to level the stones and eliminate any wobbling. The goal is to create a solid, level base that distributes weight evenly across the foundation. Proper placement of the first level is essential for the long-term durability and stability of your retaining wall.
8. Lay Down the Second Level of Stones
How do I lay down the second level of stones on a retaining wall? Position the stones on the second level slightly further back from the mason’s line than the first course, offsetting them to cover the spaces between the rocks below to enhance structural stability; use a four-foot level to maintain an even surface, and employ smaller rocks as shims to ensure everything is solid and well-interlaced.
Place each stone on the second level about a thumb width (approximately 1/2 inch) further back from the mason’s line compared to the first course; this setback helps create a slight batter, which enhances the wall’s ability to withstand the pressure from the backfill. Stagger the stones so that they cover the gaps between the stones in the first layer, creating a more stable and interlocked structure. Use your four-foot level to check that the surface is even, and insert smaller rocks as shims between the first and second levels to fill any gaps and ensure a tight fit. This technique of offsetting and interlocking the stones enhances the wall’s structural integrity and resistance to lateral pressure.
9. Maintain a Clean Stone Surface
Why is it important to keep the stone surface clean when building a retaining wall? Keeping the stone surface clean before setting each new course of retaining wall blocks ensures proper bonding and structural integrity; sweep away any dirt, debris, or excess mortar, and use a garden hose with a high-pressure setting for thorough cleaning. A clean surface promotes better adhesion and stability between the courses.
Before adding a new layer of stones, use a stiff broom to sweep the top of the lower course, removing any loose particles or debris. For a more thorough cleaning, spray the tops of the blocks with a garden hose set to high pressure. Allow the surface to dry completely before applying any mortar or setting the next course of stones. A clean surface ensures that the stones sit firmly and securely on the layer below, creating a stronger, more durable wall. This simple step can significantly enhance the longevity and stability of your retaining wall.
10. Install Retaining Wall Drainage System
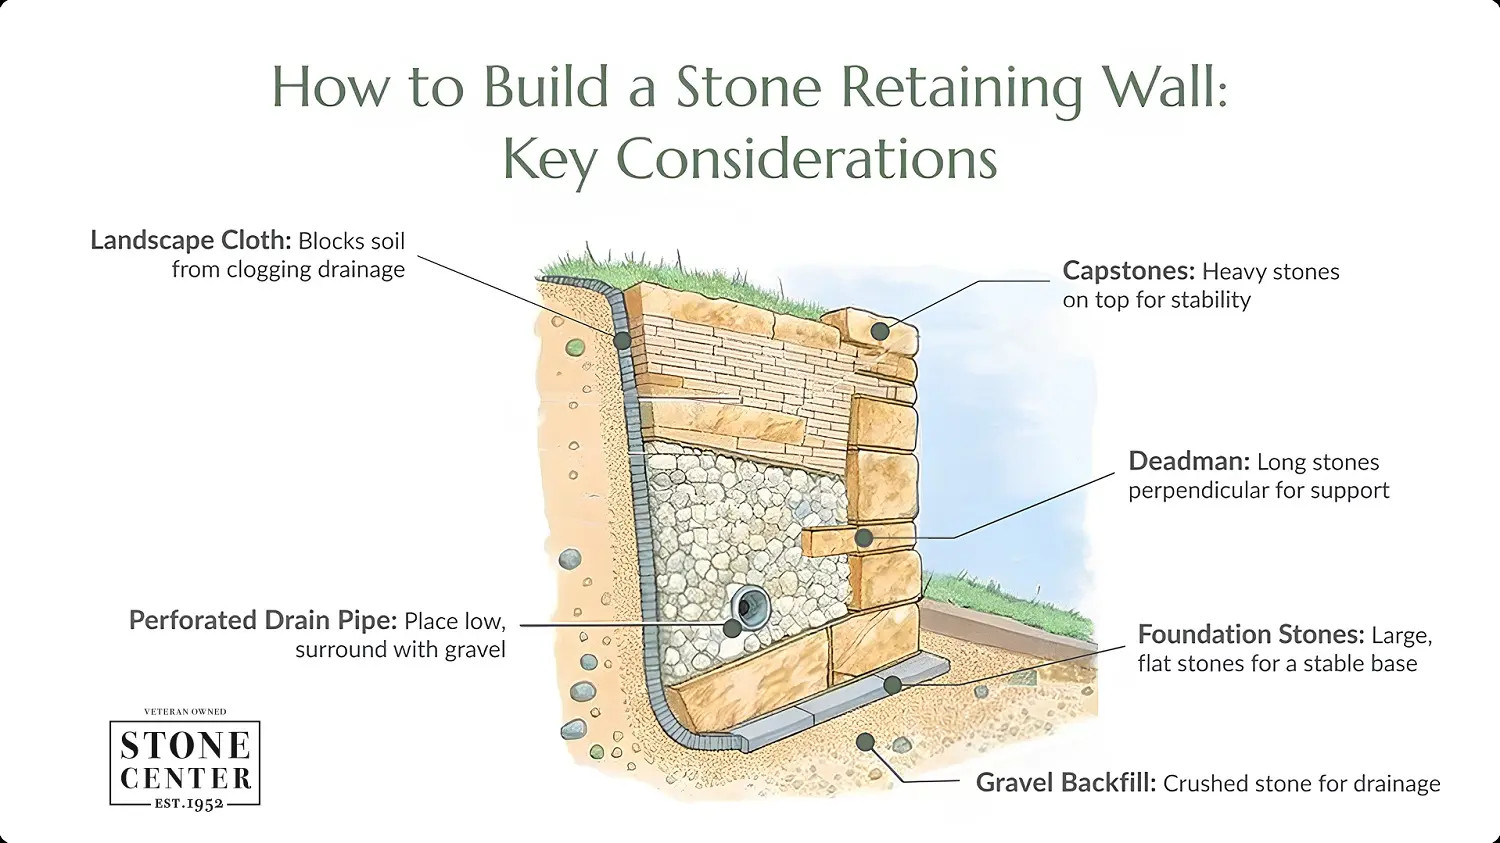
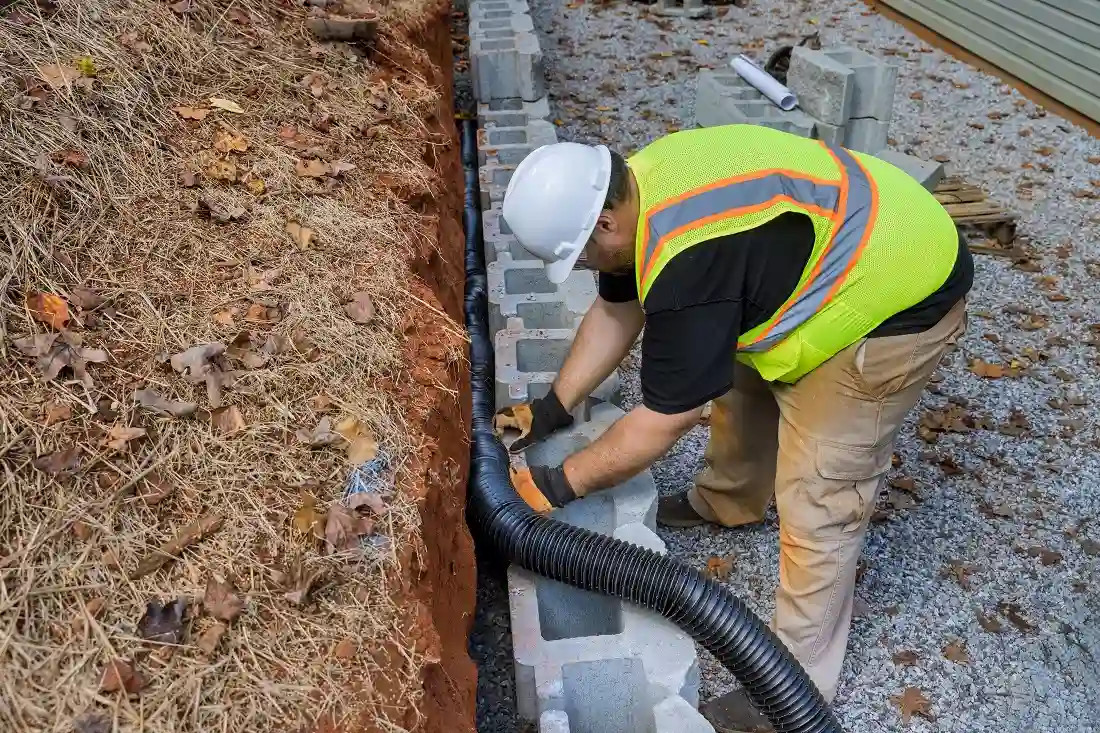
What is the best way to install a retaining wall drainage system? The drainage system is crucial for preventing water pooling and hydrostatic pressure behind the wall. Install perforated drainage pipes at the base, running along the entire wall length, and surround them with gravel backfill; at 20-30 foot intervals, install vertical pipes connected to the horizontal drainage pipe to provide exit points for water, extending them up through the backfill to ground level; daylight the drainage system by directing water away from the wall.
Begin by placing perforated drainage pipes at the base of the retaining wall, ensuring they run continuously along the entire length; these pipes will collect water that seeps through the soil. Surround the drainage pipes with gravel backfill to facilitate water flow into the pipes. At intervals of 20-30 feet, install vertical pipes connected to the horizontal drainage pipe; these vertical pipes should extend up through the backfill to the ground level, providing a pathway for water to escape. Ensure the drainage system is daylighted by grading the surrounding soil to direct water away from the wall; this prevents water from accumulating and exerting pressure. A well-installed drainage system is essential for the long-term stability and performance of your retaining wall.
 Effective Retaining Wall Drainage System
Proper drainage installation to prevent water damage and ensure wall longevity.
11. Backfill the Retaining Wall
How do I backfill a retaining wall properly? Backfill the wall with drainage gravel in layers, using the same technique as in the base trench: pour, rake, smooth, level, and tamp it down; at this point, only fill as high as the second level of rocks. Proper backfilling ensures stability and prevents excessive pressure on the wall.
Begin by pouring drainage gravel behind the wall, ensuring it fills the space evenly; use a rake to spread the gravel, smoothing out any uneven areas. Next, level the gravel to ensure it is consistent with the height of the second level of rocks. Use a tamper to compact the gravel, creating a solid and stable backfill; this helps to minimize settling and prevents water from accumulating behind the wall. Proper backfilling in layers is crucial for maintaining the wall’s structural integrity and preventing hydrostatic pressure.
12. Continue Laying More Stone Levels
How do I continue laying more levels of stone on my retaining wall? Each subsequent course should be laid in the same manner as the second, moving the stones back approximately a half-inch from the string and overlapping the seams beneath to maintain a tight and level fit; on the third layer, incorporate a deadman, which is a long rock that stretches back into the slope behind, to anchor the stones into the fill and add gravel as backfill.
As you add each new layer of stones, ensure they are set back about a half-inch from the mason’s line; this slight setback creates a batter, enhancing the wall’s stability. Overlap the seams between the stones to distribute the weight evenly and prevent weak points in the structure; try to keep the stones tight together and level on top, using shims if necessary. On the third layer, place a deadman, which is a long stone that extends horizontally into the slope behind the wall; this helps to anchor the stones and provide additional stability. As you build each layer, continue to add gravel as backfill to support the wall and facilitate drainage.
13. Create a Rustic Look with Split Blocks
How can I create a rustic look for my retaining wall using split blocks? Incorporate split blocks made of flat rocks or cut stones into the retaining wall for a natural, rustic appearance; stack the blocks in a random pattern, alternating split and manufactured blocks, and use larger split boulders sporadically to add visual interest while maintaining the wall’s structural integrity through proper installation techniques.
When adding split blocks, mix them randomly with manufactured blocks to create a varied and organic appearance; the irregular shapes and rough faces of the split blocks will add character to the wall. Use larger split boulders occasionally to create focal points and visual interest; be sure to integrate these larger stones securely into the wall structure. Ensure the wall’s structural integrity by using proper installation techniques, such as overlapping seams and backfilling with gravel. The combination of blocks and split stones will result in a unique and eye-catching retaining wall with a solid, natural base.
 Rustic Retaining Wall Design Using Split Blocks
Achieving a natural aesthetic with split and manufactured blocks.
14. Achieve a Smooth Finish for Your Rock Retaining Wall
How do I achieve a smooth finish for my rock retaining wall? For a smooth front face on the final course of retaining wall blocks, precise cuts are needed; mark each block and make straight cuts with a masonry saw or a circular saw with a concrete blade for curved walls, cutting blocks 1/8 inch smaller than measured to allow for mortar joints, and ensure the cut edge faces inward. Clean all saw-cut edges before installation for proper bonding to achieve a professional finish.
Begin by carefully measuring and marking each block to ensure precise cuts; use a masonry saw for straight cuts, and a circular saw with a concrete blade for curved walls. Cut the blocks approximately 1/8 inch smaller than the measured space to allow for mortar joints. When cutting blocks intended for the front face, position them so that the cut edge faces inward, creating a smooth, seamless appearance on the exterior. Clean the saw-cut edges thoroughly to remove any dust or debris, ensuring proper bonding when the blocks are installed. Achieving smooth, even cuts results in a professional and aesthetically pleasing finish for your retaining wall.
15. Complete the Top Level of the Rock Retaining Wall
What is the best way to finish the top level of a rock retaining wall? Place heavy and flat stones on the top layer for a polished look and secure fit, adjusting them tightly to minimize gaps, and tap them into place using a mallet; for extra stability, use masonry adhesive or shape stones with a chisel for a seamless finish, then fill the back with soil, compact gently, and add loam or grass seed for a natural blend. This final step completes the retaining wall and enhances its aesthetic appeal.
Choose heavy and flat stones for the top layer to provide a stable and polished appearance; adjust each stone carefully, minimizing gaps between them to create a seamless finish. Tap the stones into place using a mallet to ensure a secure fit. For added stability, apply masonry adhesive to the underside of the stones before placing them, or shape the stones with a chisel for a custom fit. Once the top layer is set, fill the back with soil, compacting it gently to avoid disturbing the stones. Finally, add a layer of loam and grass seed to blend the wall naturally into the surrounding landscape.
Enjoy Your Rock Retaining Wall
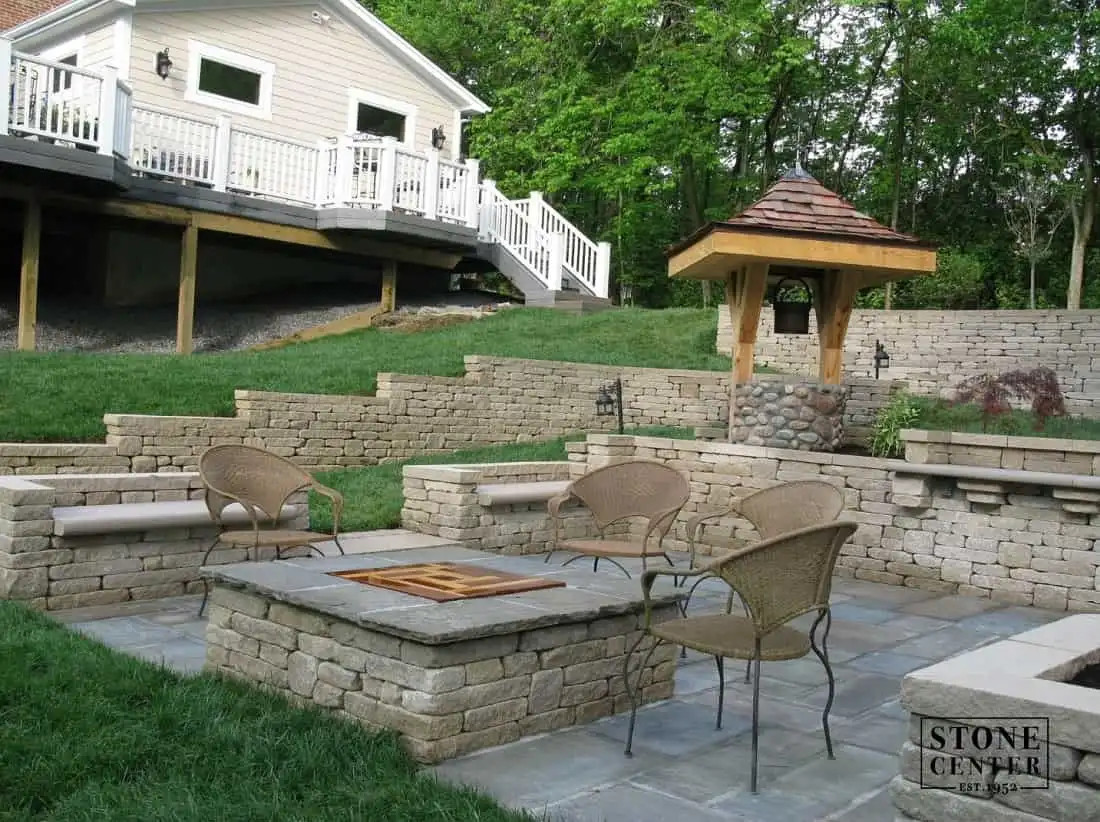
Why should I build a rock retaining wall? Rock retaining walls are a lot of work, but they can be a great complement to your yard because they become an attractive feature that allows you to expand your yard into previously unusable space; if you follow these steps, you’ll end up with a sturdy retaining wall that’ll stay in place for decades.
With a properly built retaining wall, you can transform sloping ground into usable, terraced spaces for gardening, seating, or other outdoor activities; the natural beauty of the stones enhances the aesthetic appeal of your yard, creating a stunning focal point. A well-constructed retaining wall also helps prevent soil erosion and manage water runoff, protecting your landscape from damage.
If you need advice on building a stone retaining wall, want to purchase natural stone, or are simply looking for other landscaping support, visit rockscapes.net; with decades of experience in the industry, rockscapes.net can guide you. Our team has the expertise to ensure your retaining wall project is a success.
Address: 1151 S Forest Ave, Tempe, AZ 85281, United States
Phone: +1 (480) 965-9011
Website: rockscapes.net
FAQ: How to Build a Rock Retaining Wall
1. What is a rock retaining wall and why should I build one?
A rock retaining wall is a structure built to hold back soil and create level areas in a landscape; building one can prevent erosion, create usable space, and add aesthetic appeal to your yard.
2. How do I determine the right size and type of rock for my retaining wall?
Consider the height and length of the wall, the slope of the ground, and the overall aesthetic you want to achieve; larger rocks are best for taller walls and areas with significant soil pressure, while different types of stone can create various looks, from rustic to modern. Rockscapes.net offers a wide selection of stones to fit any design.
3. What tools and materials are essential for building a rock retaining wall?
Essential tools and materials include rocks, landscape fabric, gravel, sand, a shovel, a wheelbarrow, a level, a tamper, and safety gear like gloves and eye protection.
4. How deep should I dig the base trench for a rock retaining wall?
The base trench should be dug approximately 12 inches deep and as wide as the base of your wall; this provides a stable foundation below the frost line and allows for proper drainage.
5. How do I ensure proper drainage behind a rock retaining wall?
Install a perforated drainage pipe at the base of the wall, surrounded by gravel; this allows water to escape and prevents hydrostatic pressure from building up behind the wall, which can cause it to fail.
6. What is the best way to stack rocks for maximum stability?
Overlap the seams between the rocks, and use a slight batter (inward slope) as you build; this distributes weight evenly and increases the wall’s resistance to pressure.
7. How do I backfill behind a rock retaining wall to prevent soil erosion?
Backfill in layers, compacting each layer as you go; use gravel near the wall for drainage and then topsoil further back; landscape fabric can also help prevent soil from mixing with the gravel.
8. What maintenance is required for a rock retaining wall?
Regularly inspect the wall for any signs of shifting or damage; clear any debris that accumulates and ensure the drainage system remains clear.
9. Can I build a rock retaining wall myself, or should I hire a professional?
Building a rock retaining wall is a manageable DIY project for smaller walls and experienced homeowners; however, for larger or more complex walls, hiring a professional ensures the job is done safely and correctly.
10. Where can I find inspiration and expert advice for designing and building my rock retaining wall?
Visit rockscapes.net for a wealth of inspiration, expert advice, and high-quality materials to help you design and build the perfect rock retaining wall for your property; our team can provide guidance and support every step of the way.