How To Do Rock Candy? Rock candy, also known as sugar crystals, is a delightful and straightforward treat to create at home, offering a fun science project and a tasty reward, and rockscapes.net is here to guide you through every step. This project combines the fun of creating beautiful, edible crystals with the satisfaction of enjoying a sweet treat. Whether you’re interested in the crystal formation, looking for a fun activity, or simply want to enjoy some homemade candy, this guide will help you master the art of making rock candy, transforming sugar and water into glistening gems. Get ready to explore the fascinating world of candy making with rock candy recipes, crystal growing tips, and homemade candy ideas.
1. What Is Rock Candy And Why Make It?
Rock candy is a type of confection made by allowing sugar crystals to grow from a supersaturated solution of sugar and water. Rock candy offers a unique experience, blending fun, education, and deliciousness into one sweet treat.
- Fun and Engaging Activity: Making rock candy is a captivating activity for both kids and adults. The process of watching crystals grow day by day is like a mini science experiment right in your kitchen.
- Educational Value: The project teaches basic principles of chemistry, such as saturation and crystallization, making it a sweet way to learn.
- Customizable: You can easily customize rock candy with different colors, flavors, and even edible glitter, making each batch unique.
- Great for Gifts and Parties: Homemade rock candy makes a thoughtful and personalized gift. It’s also a hit at parties as a decorative and tasty treat.
- Stress Relief: The simple, repetitive steps of making rock candy can be quite therapeutic, offering a relaxing break from the daily grind.
- Aesthetic Appeal: The sparkling crystals are visually appealing, making them a beautiful addition to any candy display or dessert table.
- Nostalgia: Rock candy often evokes fond childhood memories, bringing a sense of nostalgia with every taste.
According to research from Arizona State University’s School of Earth and Space Exploration, the process of crystallization mirrors geological formations, offering a hands-on understanding of how minerals form over time.
2. What Are The Essential Supplies For Making Rock Candy?
Having the right supplies ensures a smooth and successful rock candy-making experience. Here’s a comprehensive list of what you’ll need:
| Supplies | Description |
|---|---|
| Granulated Sugar | The main ingredient; use high-quality granulated sugar for the best results. |
| Water | Filtered water is recommended to avoid impurities that can affect crystal growth. |
| Skewers or Sticks | These provide a base for the crystals to grow on; wooden skewers, candy sticks, or even cotton twine can be used. |
| Clothespins | To hold the skewers in place and prevent them from touching the bottom or sides of the jar. |
| Mason Jars or Glass | Clear glass jars are ideal for watching the crystals grow; ensure they are clean and sterilized. |
| Saucepan | A heavy-bottomed saucepan is best for even heating and preventing the sugar from burning. |
| Food Coloring | Optional, but adds a fun and vibrant look to your rock candy. |
| Flavor Extracts | Optional, for adding different flavors such as vanilla, strawberry, or lemon. |
| Measuring Cups and Spoons | Accurate measurements are crucial for achieving the right sugar-to-water ratio. |
| Spatula or Spoon | For stirring the sugar solution until it dissolves completely. |
| Parchment Paper | For drying the rock candy after it’s removed from the solution. |
 Rock candy sticks in a vase, ready for the crystal-growing process.
3. How To Prepare The Skewers For Rock Candy?
Preparing the skewers properly is essential for providing a surface on which the sugar crystals can effectively grow. Here’s a step-by-step guide to ensure your skewers are ready for the rock candy solution:
- Trim the Skewers:
- Most skewers have a sharp end, which can be hazardous. Use a sturdy pair of scissors or a knife to carefully trim off the sharp tips. This prevents accidental pokes when handling the candy.
- If the cut end feels rough, use a bit of sandpaper to smooth it down. This ensures a safer and more comfortable experience when eating the rock candy.
- Soak the Skewers:
- Fill a mason jar with water and submerge the trimmed skewers in it for about an hour. Soaking helps the wood absorb moisture, which can improve sugar adhesion.
- Soaking also prevents the skewers from absorbing moisture from the sugar solution later, which could weaken the crystal formation.
- Coat with Sugar:
- After soaking, remove the skewers and let them dry slightly.
- Roll the damp skewers in granulated sugar, ensuring they are well-coated. The sugar granules act as seed crystals, providing a base for the rock candy to grow on.
- Allow the sugar-coated skewers to dry completely before placing them in the sugar solution. This step is crucial as it gives the initial crystals a place to start forming.
 Skewers trimmed and ready for sugar coating. Safety and preparation are key to successful rock candy making.
4. How To Make The Rock Candy Crystal Solution?
Creating the perfect crystal solution is a critical step in making rock candy. Follow these detailed instructions to ensure your solution is just right:
- Heat the Water:
- In a clean, heavy-bottomed saucepan, add 1½ cups of filtered water.
- Heat the water over medium-high heat until it begins to boil. A heavy-bottomed pan helps distribute heat evenly, preventing the sugar from scorching.
- Dissolve the Sugar:
- Once the water is boiling, remove the saucepan from the heat.
- Gradually add 4 cups of granulated sugar to the hot water, stirring continuously until the sugar is completely dissolved. Add the sugar in increments to make it easier to dissolve.
- Continue stirring until the solution becomes clear and no sugar granules are visible at the bottom of the pan. This may take some time, so be patient.
- Supersaturate the Solution:
- If all 4 cups of sugar dissolve completely, continue adding more sugar, one tablespoon at a time, stirring until it dissolves.
- Keep adding sugar until it no longer dissolves, and the solution becomes supersaturated. This means the water has dissolved as much sugar as it possibly can.
- The solution should be clear and slightly thick. The more sugar you dissolve, the better the crystal growth will be.
- Add Color and Flavor (Optional):
- If desired, add a few drops of food coloring to the solution. Remember, the final crystals will be much lighter in color than the solution, so use enough to make the solution deeply colored.
- Stir in a teaspoon of your favorite flavor extract, such as vanilla, strawberry, or lemon. Be sure to stir well to distribute the color and flavor evenly.
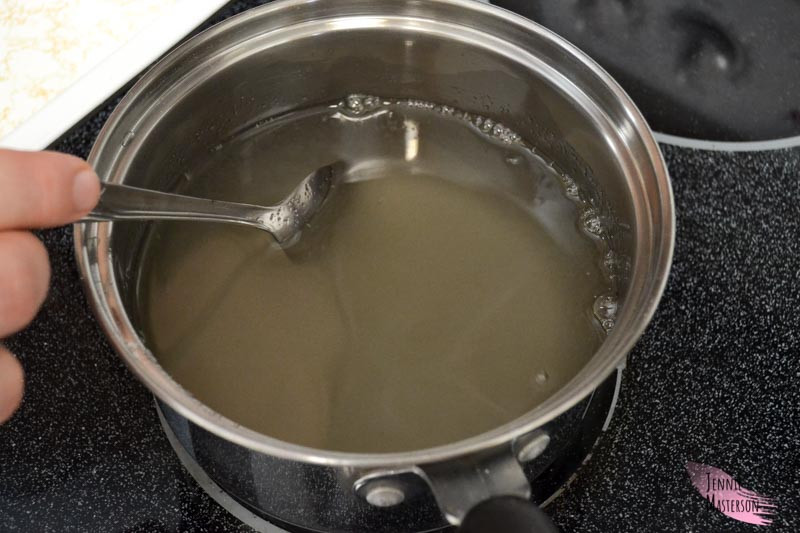 Stirring sugar into water in a pan to create the supersaturated solution for rock candy.
According to food science experts, the key to successful rock candy is achieving a true supersaturated solution, where the sugar is dissolved to its maximum capacity in the water.
5. How To Grow The Rock Candy Crystals Perfectly?
Growing the rock candy crystals requires patience and careful handling. Here’s how to ensure your crystals grow beautifully:
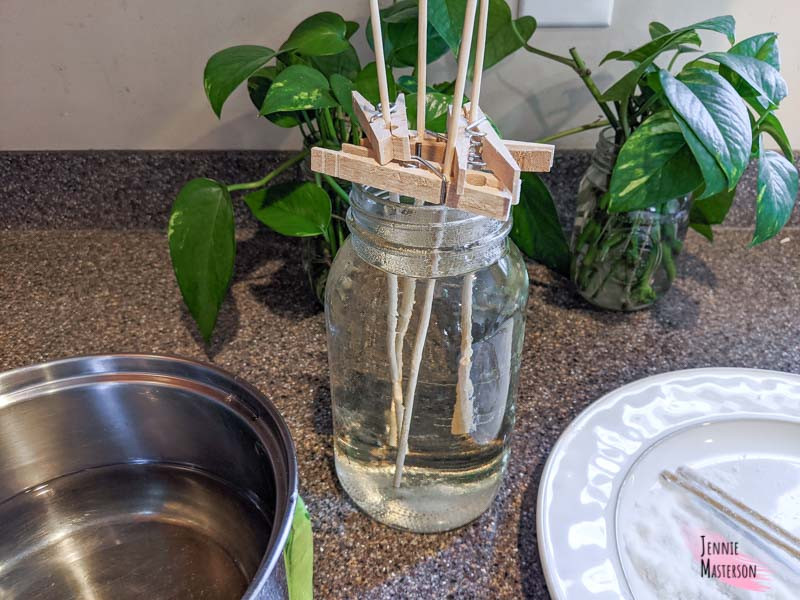
- Pour the Solution into Jars:
- Carefully pour the hot crystal solution into clean, empty mason jars. Leave some space at the top of each jar.
- Be extremely cautious when handling the hot solution to avoid burns. Use oven mitts or a towel to protect your hands.
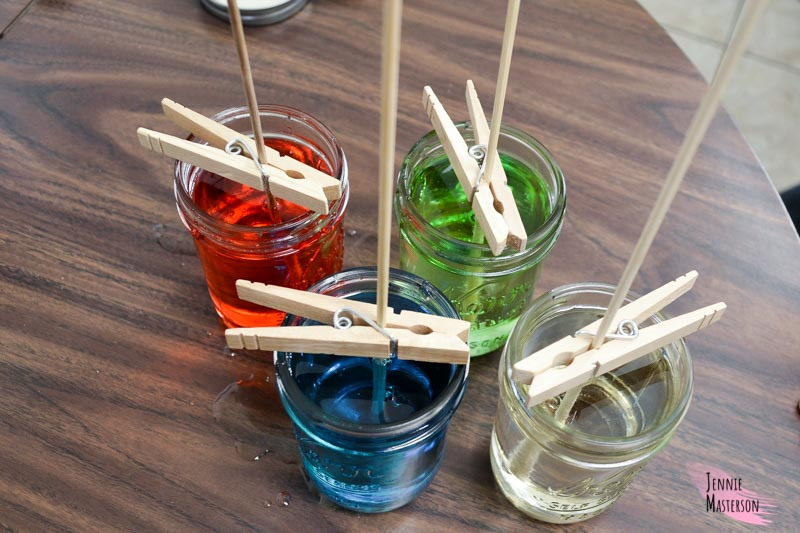
- Position the Skewers:
- Clip clothespins onto the sugar-coated skewers. The clothespins will suspend the skewers in the solution, preventing them from touching the bottom or sides of the jar.
- Place the skewers into the jars, ensuring they hang in the solution about 1 inch from the bottom. Arrange the skewers so they don’t touch each other.
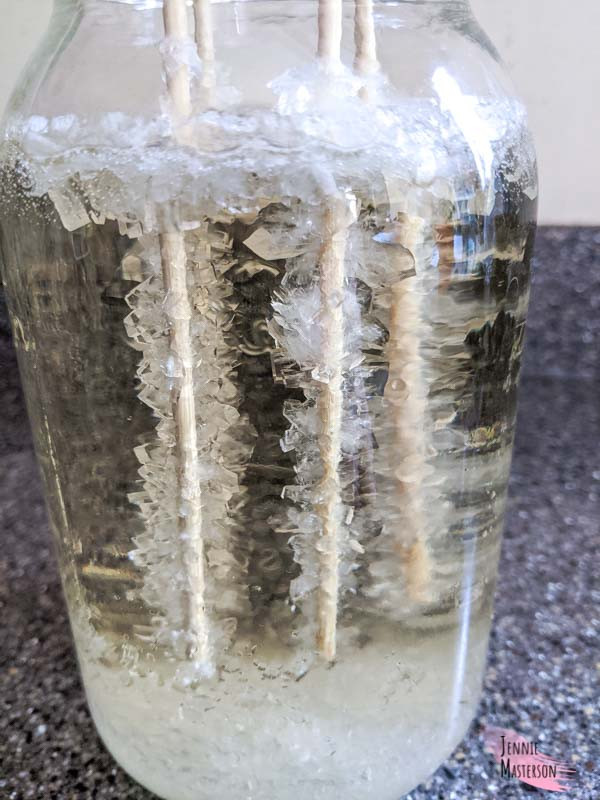
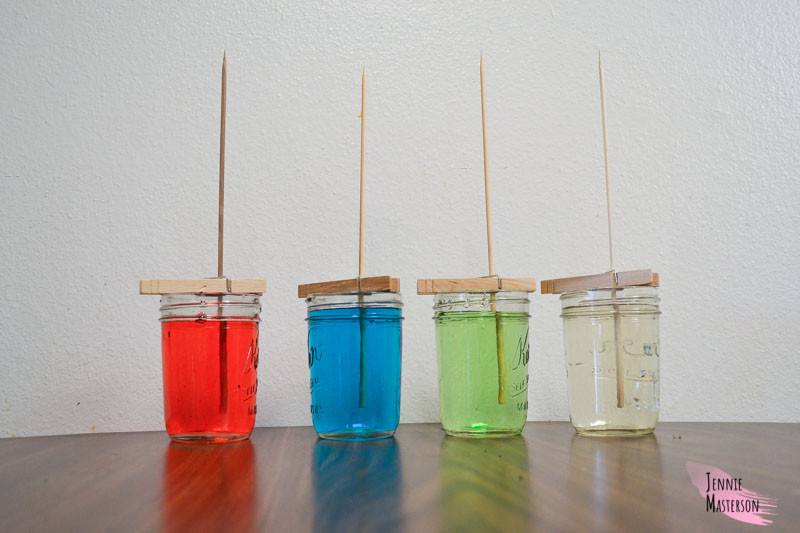
- Crystal Growth:
- Find a stable location where the jars can sit undisturbed for about a week. Avoid moving the jars during this time, as movement can disrupt crystal formation.
- Monitor the crystal growth daily. You should start to see crystals forming on the skewers within a day or two.
- The longer you leave the skewers in the solution, the larger the crystals will grow. Some people wait up to two weeks for maximum crystal size.
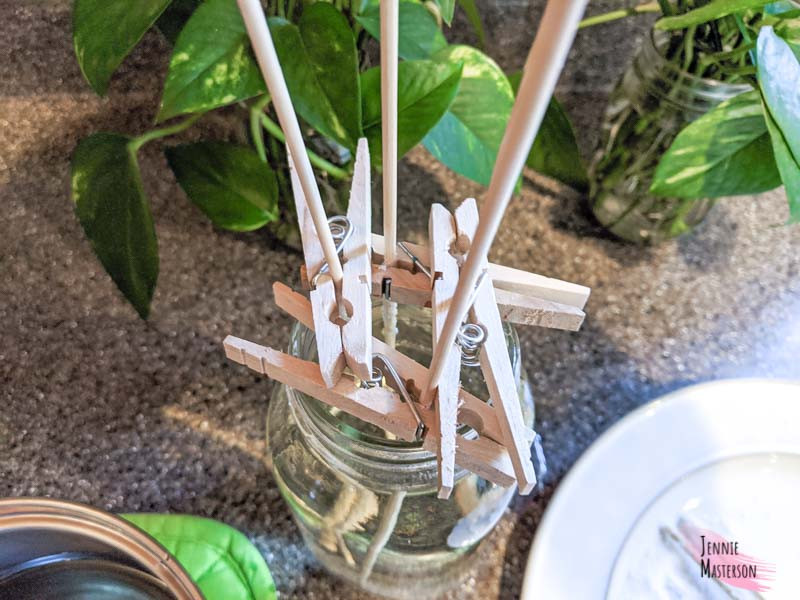 Arranging clothespins to suspend sugar-coated skewers in mason jars filled with crystal solution.
6. What Are Some Useful Tips For Growing Rock Candy Crystals?
Growing rock candy crystals can be a rewarding but sometimes tricky process. Here are some tips to help you achieve the best results:
| Tips | Description |
|---|---|
| Use Clean Jars | Ensure your mason jars are thoroughly cleaned and sterilized before pouring in the sugar solution. Any residue or impurities can interfere with crystal growth. |
| Avoid Disturbing the Jars | Once the skewers are in the solution, avoid moving or bumping the jars. Vibrations can disrupt the crystal formation process. |
| Control Temperature | Keep the jars in a location with a consistent temperature. Avoid placing them near drafts or in direct sunlight, as fluctuations can affect crystal growth. |
| Be Patient | Crystal growth takes time. It’s best to wait at least a week, or even longer, for the crystals to reach their full size. Resist the urge to pull them out too early. |
| Seed Crystals | Ensure the skewers are well-coated with sugar before placing them in the solution. These sugar granules act as seed crystals, providing a base for the rock candy to grow on. |
| Dust Prevention | Cover the jars loosely with a paper towel to prevent dust from falling into the solution. This helps keep the crystals clean and clear. |
| Proper Saturation | Make sure the sugar solution is fully saturated. This means dissolving as much sugar as possible in the water. A supersaturated solution is key to growing large, well-formed crystals. |
| Use Filtered Water | Use filtered water to avoid any impurities that could affect the crystal growth. Tap water may contain minerals that interfere with the process. |
| Avoid Overcrowding | Don’t overcrowd the jars with too many skewers. Each skewer needs enough space to allow the crystals to grow freely without touching each other. |
 Mason jar filled with rock candy solution and skewers, showing the beginning stages of crystal formation.
7. How Long Does It Take For Rock Candy Crystals To Grow?
The time it takes for rock candy crystals to grow depends on several factors, including the saturation of the sugar solution, the temperature, and the level of disturbance.
- Initial Crystal Formation: You’ll typically start to see small crystals forming on the sugar-coated skewers within 24 to 48 hours. These initial crystals are a good sign that the process is working.
- Continued Growth: Over the next few days, the crystals will gradually increase in size. The growth rate depends on how saturated the sugar solution is and how stable the environment is.
- Optimal Growth Period: For best results, allow the rock candy crystals to grow for at least one week. During this time, the crystals will become larger and more well-defined.
- Extended Growth (1-2 Weeks): For even larger crystals, you can leave the skewers in the solution for up to two weeks. The longer you wait, the bigger and more impressive the crystals will become.
- Monitoring Growth: Check the crystals daily to monitor their progress. Avoid disturbing the jars, but a quick visual check can help you determine when they’ve reached your desired size.
 Rock candy crystals growing inside a mason jar, showcasing the beauty of homemade candy.
8. How To Remove And Dry Rock Candy?
Removing and drying rock candy properly is essential to preserve its crystal structure and prevent it from becoming sticky. Here’s a step-by-step guide:
- Prepare a Drying Surface:
- Before removing the rock candy, prepare a clean, dry surface lined with parchment paper. This will prevent the candy from sticking to the surface as it dries.
- Carefully Remove the Skewers:
- Gently lift each skewer out of the mason jar. Be careful not to dislodge the crystals.
- If the skewers are stuck, gently wiggle them back and forth to loosen them from the hardened sugar at the top of the jar.
- Allow Excess Solution to Drip Off:
- Hold each skewer over the jar for a few moments to allow any excess sugar solution to drip off. This will prevent the candy from becoming too sticky.
- Place on Parchment Paper:
- Place the skewers on the prepared parchment paper, spacing them apart to prevent them from touching each other.
- Drying Time:
- Allow the rock candy to dry completely. This typically takes several hours or overnight.
- The drying time depends on the humidity and temperature of your environment. In humid conditions, it may take longer for the candy to dry.
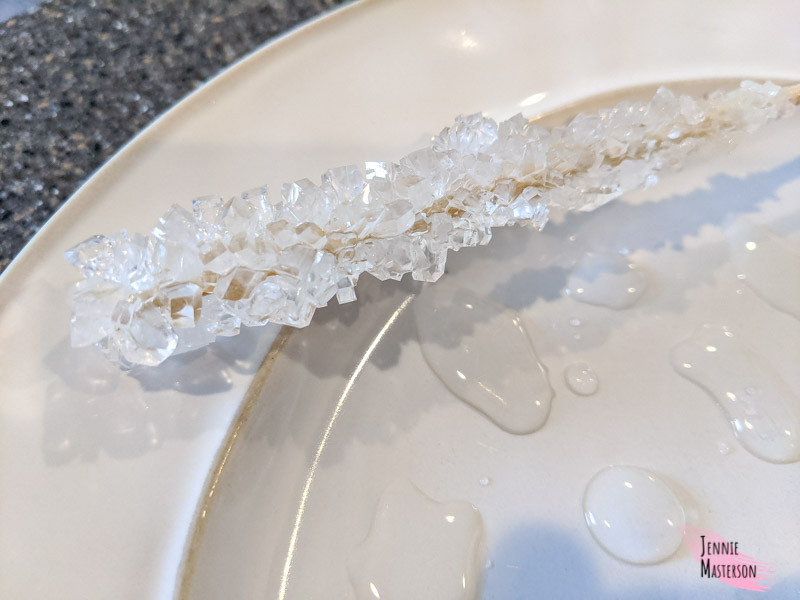 Rock candy sticks drying on parchment paper, illustrating the final step in making homemade crystal candy.
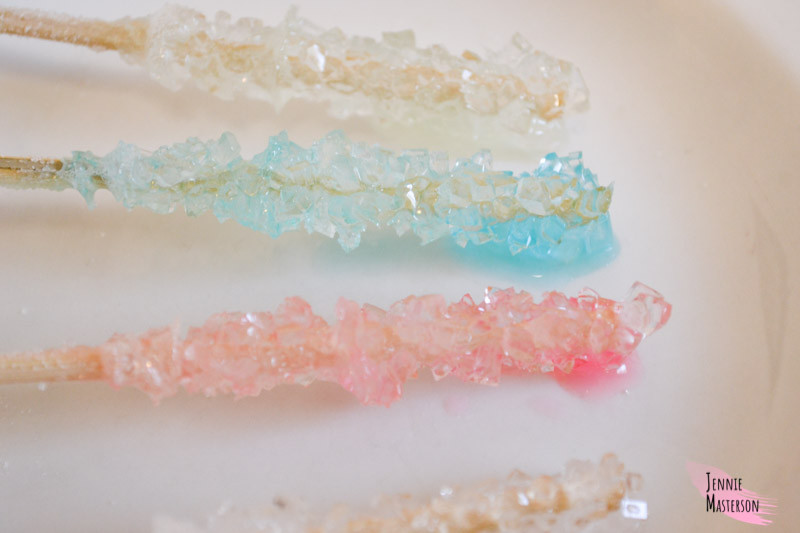
9. Can You Make Different Colors And Flavors Of Rock Candy?
Yes, absolutely! One of the best things about making rock candy is the ability to customize it with different colors and flavors. Here’s how you can create a variety of rock candy:
| Variations | Instructions |
|---|---|
| Different Colors | To add color, use food coloring. Add a few drops of your desired color to the sugar solution after it has been removed from the heat. Stir well to distribute the color evenly. Remember, the final crystals will be lighter than the solution, so use enough coloring to achieve the desired shade. You can also create layered colors by dipping the crystals. |
| Different Flavors | To add flavor, use flavor extracts such as vanilla, almond, lemon, or strawberry. Add about a teaspoon of extract to the sugar solution after it has been removed from the heat. Stir well to distribute the flavor evenly. You can also use flavored syrups or essential oils, but be sure they are food-grade and used sparingly. |
| Multiple Colors | If you want to make multiple colors, divide the sugar solution into separate containers after it has been prepared. Add different food coloring to each container and proceed with the crystal-growing process as usual. This allows you to create a variety of colorful rock candy at the same time. |
| Layered Flavors | You can experiment with dipping the crystals in different flavors after they have grown. For example, you can dip the crystals in melted chocolate or caramel for an extra layer of flavor. Just make sure the crystals are fully dried before dipping them. |
 Four mason jars filled with different colored rock candy solutions, each with skewers for growing crystals.
10. How To Store Rock Candy Properly?
Proper storage is crucial to keep your rock candy fresh, dry, and sparkling. Here’s how to store it correctly:
- Ensure Complete Drying: Before storing, make sure the rock candy is completely dry. Any residual moisture can cause the crystals to become sticky or dissolve.
- Individual Wrapping: Wrap each rock candy stick individually in plastic wrap or cellophane bags. This protects the crystals from humidity and prevents them from sticking together.
- Airtight Container: Place the wrapped rock candy in an airtight container. This provides an extra layer of protection against moisture and air.
- Cool, Dry Place: Store the airtight container in a cool, dry place away from direct sunlight. Avoid storing the candy in the refrigerator, as the humidity can cause it to become sticky.
- Short-Term Storage: For short-term storage (a few days), you can keep the wrapped rock candy in a candy dish or decorative container, as long as it’s in a cool, dry environment.
- Long-Term Storage: For long-term storage (several weeks), the airtight container in a cool, dry place is the best option.
- Avoid Humidity: Humidity is the biggest enemy of rock candy. Keep the candy away from areas with high humidity, such as the bathroom or kitchen sink.
 Four mason jars with sugar crystal solution.
11. What Are Some Creative Ideas For Using Rock Candy?
Rock candy isn’t just a treat to be eaten straight off the stick. Here are some creative ideas for using it in various ways:
| Uses | Description |
|---|---|
| Cocktail Stirrers | Use rock candy sticks as stirrers for cocktails or mocktails. As the candy dissolves, it adds a touch of sweetness and flavor to the drink. Choose colors and flavors that complement the beverage for an extra touch of elegance. |
| Coffee and Tea Sweeteners | Instead of using regular sugar, stir your coffee or tea with a rock candy stick. This adds a subtle sweetness and a beautiful presentation. Experiment with different flavors, such as vanilla or lemon, to enhance the taste of your hot beverage. |
| Party Favors | Individually wrapped rock candy sticks make delightful party favors. Customize the colors and flavors to match the theme of the party. Add a personalized tag or ribbon for an extra special touch. |
| Cake Decorations | Use rock candy crystals as decorations for cakes, cupcakes, or other desserts. The sparkling crystals add a touch of elegance and whimsy to any sweet treat. You can arrange them in patterns or scatter them randomly for a beautiful effect. |
| Edible Gifts | Create edible gift baskets featuring homemade rock candy along with other treats. This makes a thoughtful and personalized gift for friends and family. You can include different colors and flavors of rock candy for variety. |
| Wedding Favors | Rock candy can be an elegant and unique wedding favor. Match the colors to your wedding theme. |
| Science Experiments | Rock candy is a great science project for kids. They can learn about saturation, crystallization, and other scientific concepts while making a tasty treat. It’s a fun and educational activity that can be done at home or in the classroom. |
 Colored rock candy
12. Why Does My Rock Candy Solution Turn Brown?
A rock candy solution turning brown is typically due to caramelization, which occurs when the sugar is heated too much or for too long. Here’s a breakdown of why this happens and how to prevent it:
- Overheating: The primary reason for a rock candy solution turning brown is overheating the sugar. When sugar is heated to high temperatures, it begins to caramelize, resulting in a brown color and a slightly different flavor.
- Uneven Heating: If your saucepan doesn’t distribute heat evenly, some areas of the sugar solution may overheat and caramelize while others remain unaffected.
- Prolonged Heating: Heating the sugar solution for an extended period, even at a moderate temperature, can also cause caramelization. The longer the sugar is exposed to heat, the greater the chance of it browning.
- Impurities in Sugar: Although less common, impurities in the sugar can also contribute to the solution turning brown. Using high-quality, refined granulated sugar can help minimize this issue.
Preventing Brown Rock Candy Solution:
- Use Medium Heat: When heating the water and sugar mixture, use medium heat to prevent the sugar from overheating.
- Stir Constantly: Stir the solution continuously as it heats to ensure even distribution of heat and prevent any sugar from sticking to the bottom of the pan and caramelizing.
- Remove from Heat: Once the sugar is fully dissolved, remove the saucepan from the heat immediately. There’s no need to continue heating the solution after the sugar has dissolved.
- Use a Heavy-Bottomed Pan: A heavy-bottomed saucepan helps distribute heat evenly, reducing the risk of localized overheating and caramelization.
- Monitor Closely: Keep a close eye on the solution as it heats, and be ready to adjust the heat or remove the pan from the burner if you notice any signs of browning.
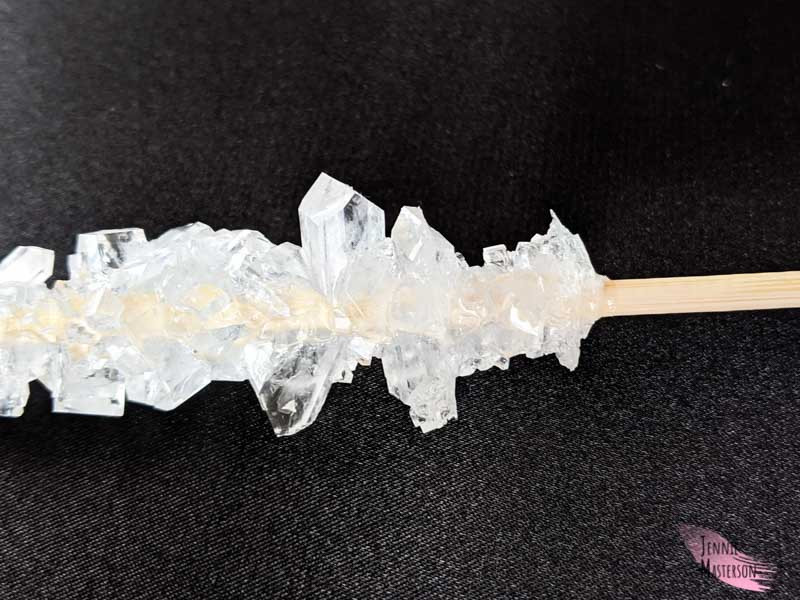 Close-up of rock candy structure.
13. Why Are My Crystals Small And Not Growing Well?
Small or poorly growing crystals can be frustrating, but several factors might be at play. Here’s a guide to troubleshoot and encourage better crystal growth:
- Insufficient Sugar Saturation:
- Problem: The most common reason for small crystals is a sugar solution that isn’t saturated enough. If the water can still dissolve more sugar, the crystals won’t have enough material to grow.
- Solution: Ensure your solution is supersaturated. This means adding sugar to the hot water until it no longer dissolves, even with constant stirring. The solution should be thick and almost syrupy.
- Temperature Fluctuations:
- Problem: Inconsistent temperatures can disrupt crystal formation. If the solution cools down too quickly or experiences significant temperature changes, it can hinder crystal growth.
- Solution: Keep the jars in a location with a stable temperature. Avoid placing them near drafts, windows, or heating vents. A consistent temperature promotes steady crystal growth.
- Disturbances:
- Problem: Movement or vibrations can interfere with crystal formation. If the jars are bumped or moved frequently, the delicate crystals may not grow properly.
- Solution: Place the jars in a location where they won’t be disturbed. Avoid touching or moving them until the crystals have reached your desired size.
- Impurities:
- Problem: Impurities in the water or sugar can affect crystal growth. Tap water, for example, may contain minerals that interfere with the process.
- Solution: Use filtered or distilled water to make your sugar solution. High-quality granulated sugar is also recommended to minimize impurities.
- Lack of Seed Crystals:
- Problem: If the skewers aren’t properly coated with sugar, there may not be enough seed crystals for the rock candy to grow on.
- Solution: Ensure the skewers are well-coated with sugar before placing them in the solution. Roll the damp skewers in granulated sugar, ensuring they are thoroughly covered.
14. Can You Reuse Rock Candy Solution?
Yes, you can reuse rock candy solution, but with a few considerations to ensure successful crystal growth.
| Factors | Descriptions |
|---|---|
| Filtering the Solution | Before reusing rock candy solution, it’s essential to filter it to remove any loose sugar crystals or impurities that may have accumulated during the first round of crystal growth. Use a fine-mesh sieve or cheesecloth to strain the solution, ensuring it is clean and clear. |
| Re-Saturating the Solution | Over time, the sugar solution may lose some of its saturation as water evaporates. To reuse the solution effectively, you may need to add more sugar to bring it back to a supersaturated state. Heat the filtered solution gently and gradually add more sugar, stirring until it dissolves completely. Continue adding sugar until no more will dissolve, indicating that the solution is fully saturated. |
| Checking for Clarity | Before reusing the solution, make sure it is still clear and free from any discoloration or cloudiness. If the solution has turned brown or has a strange odor, it’s best to discard it and make a fresh batch. A clear solution indicates that it is still pure and suitable for growing new crystals. |
| Adjusting Colors/Flavors | If you want to create different colors or flavors of rock candy, you can add food coloring and flavor extracts to the reused solution. Keep in mind that the existing color and flavor may affect the final result, so it’s best to start with a neutral base or use complementary colors and flavors. |
| Monitoring Crystal Growth | When reusing rock candy solution, monitor the crystal growth closely to ensure it is progressing as expected. If the crystals are growing slowly or not forming properly, the solution may need to be adjusted or discarded. Consistent monitoring will help you achieve the best results. |
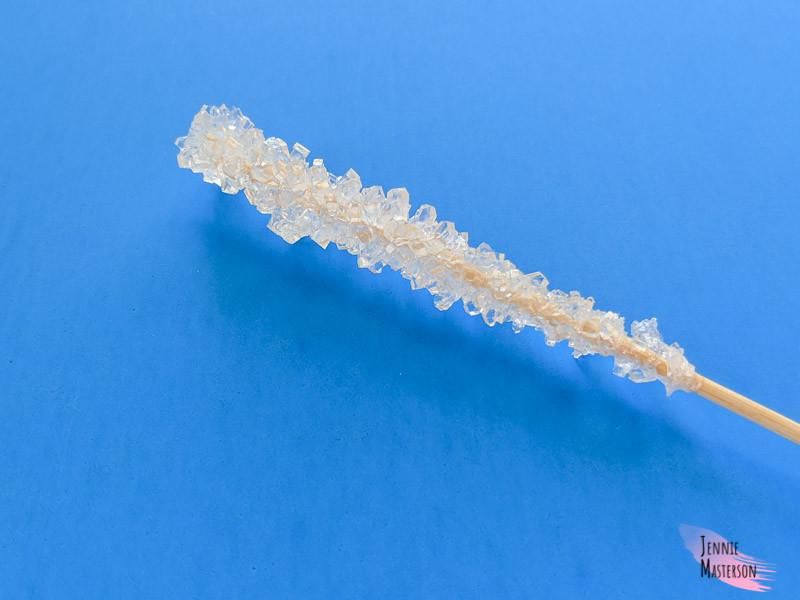 Rock candy stick, ready to be enjoyed.
15. Is Rock Candy Safe To Eat?
Yes, rock candy is generally safe to eat, as it is primarily made of sugar and water, both of which are considered safe for consumption. However, there are a few precautions to keep in mind:
| Considerations | Descriptions |
|---|---|
| Sugar Content | Rock candy is very high in sugar, so it should be consumed in moderation. Excessive sugar intake can lead to health problems such as weight gain, tooth decay, and increased risk of diabetes. People with diabetes or other sugar-related health conditions should be especially cautious about consuming rock candy. |
| Food Coloring | If you use food coloring to make rock candy, be sure to use food-grade coloring that is safe for consumption. Some artificial food colorings have been linked to health concerns, so it’s best to use natural food colorings whenever possible. |
| Flavor Extracts | Similarly, if you use flavor extracts, make sure they are food-grade and safe to eat. Some extracts may contain alcohol or other ingredients that could be harmful if consumed in large quantities. |
| Hygiene | When making rock candy, it’s important to maintain good hygiene practices to prevent contamination. Wash your hands thoroughly before starting, and use clean utensils and containers. Avoid touching the sugar solution with your bare hands, as this can introduce bacteria or other contaminants. |
| Allergies | If you have any food allergies, be sure to check the ingredients of the sugar, food coloring, and flavor extracts you use to make rock candy. Some ingredients may contain allergens such as nuts, dairy, or gluten. |
| Choking Hazard | Rock candy can be a choking hazard, especially for young children. Supervise children closely while they are eating rock candy, and make sure they are sitting down and taking small bites. |
FAQ About Making Rock Candy
| Question | Answer |
|---|---|
| Why isn’t my sugar dissolving? | Ensure your water is hot enough and stir continuously. Add sugar gradually for better dissolving. |
| Can I use honey instead of sugar? | While possible, honey’s different sugar composition may affect crystal formation. Sugar is best for consistent results. |
| How do I prevent the candy from sticking to the jar? | Use clean jars and ensure the skewers don’t touch the sides or bottom. |
| What if my candy is too sticky? | This usually means it wasn’t dried enough. Allow more drying time on parchment paper. |
| Can I make flavored rock candy? | Absolutely! Add a teaspoon of your favorite flavor extract to the solution after heating. |
| How do I get clear crystals? | Use filtered water and avoid any disturbances during the crystal growth process. |
| What’s the best temperature for crystal growth? | Room temperature is ideal. Avoid extreme temperatures or drafts. |
| How long can I store rock candy? | Properly wrapped and stored in a cool, dry place, rock candy can last for several weeks. |
| Why are my crystals cloudy? | This could be due to impurities or rapid cooling. Use filtered water and maintain a consistent temperature. |
| Can I add edible glitter to my rock candy? | Yes, add edible glitter to the sugar solution for a sparkling effect! |
Making rock candy is more than just a fun activity; it’s a sweet science experiment that brings joy to people of all ages. The process of transforming simple ingredients like sugar and water into beautiful, glistening crystals is truly magical.
Ready to embark on your rock candy adventure? For more inspiration, expert tips, and the finest selection of decorative rocks to complement your creations, visit rockscapes.net today. Let us help you turn ordinary moments into extraordinary memories.
Address: 1151 S Forest Ave, Tempe, AZ 85281, United States. Phone: +1 (480) 965-9011.