Configuring your Rock Space WiFi extender is a straightforward process that can significantly improve your home’s WiFi coverage. At rockscapes.net, we’re here to guide you through each step, ensuring you get the most out of your network and enjoy seamless connectivity throughout your property. From understanding the initial setup to optimizing placement, we’ll cover everything you need to know to boost your WiFi signal strength and coverage, ultimately enhancing your overall online experience.
1. What Is a Rock Space WiFi Extender and Why Do I Need One?
A Rock Space WiFi extender is a device designed to amplify and extend the range of your existing wireless network. If you’re experiencing dead zones or weak signals in certain areas of your home or property, a WiFi extender can help eliminate these issues by rebroadcasting your router’s signal.
- Eliminate Dead Zones: Extenders ensure consistent coverage in areas where the primary router signal is weak.
- Increase Coverage Area: They expand the reach of your WiFi, allowing you to connect devices in previously unreachable spots.
- Improve Signal Strength: By rebroadcasting the signal, extenders boost the strength and reliability of your WiFi connection.
Consider a scenario where your primary router is located in your living room, but you want to have strong WiFi in your backyard for outdoor entertaining. The Rock Space WiFi extender can be placed between the router and the backyard to bridge the gap and provide a reliable connection. Rock Space WiFi Extenders are particularly useful for homeowners who want to ensure seamless connectivity throughout their property, enabling you to enjoy streaming, gaming, and browsing without interruption.
2. What Are the Different Rock Space WiFi Extender Models?
Rock Space offers several WiFi extender models, each designed to cater to different needs and network environments. Knowing the capabilities of each model can help you select the one that best suits your requirements.
| Model | Description | Key Features | Ideal For |
|---|---|---|---|
| RSD0607 (AC750) | Dual-band WiFi range extender offering speeds up to 750Mbps. | Dual-band support (2.4GHz and 5GHz), WPS button for easy setup, compact design. | Small to medium-sized homes, basic internet usage. |
| RSD0608 (AC1200) | Dual-band WiFi range extender offering speeds up to 1200Mbps. | Dual-band support, higher speeds for smoother streaming, WPS button, Ethernet port for wired connections. | Medium-sized homes, streaming and gaming. |
| RSD0617 (AC2100) | Dual-band WiFi range extender offering speeds up to 2100Mbps. | Dual-band support, MU-MIMO technology for multiple device connections, smart signal indicator. | Larger homes, multiple devices, high-bandwidth activities. |
| RSD0618 (AX1800) | Dual-band WiFi range extender supporting WiFi 6 (802.11ax) with speeds up to 1800Mbps. | WiFi 6 support, OFDMA technology for improved efficiency, target wake time, WPS button, gigabit Ethernet port. | Homes with WiFi 6 routers, high-density networks, advanced features. |
| RSD0623 (AC2100) | Dual-band WiFi range extender offering speeds up to 2100Mbps, similar to RSD0617 but potentially with updated hardware or firmware enhancements. | Dual-band support, MU-MIMO technology, smart signal indicator, potentially improved performance or features compared to previous models. | Larger homes, multiple devices, high-bandwidth activities, users seeking the latest enhancements. |
3. What Do I Need Before Configuring My Rock Space WiFi Extender?
Before you begin the configuration process, make sure you have everything you need for a smooth setup.
- Rock Space WiFi Extender: Ensure you have the correct model and all included accessories.
- Router Information: You’ll need your router’s SSID (network name) and password.
- Device for Configuration: A computer, smartphone, or tablet with WiFi capabilities.
- Web Browser: Ensure you have an updated web browser like Chrome, Firefox, Safari, or Edge.
- Power Outlet: A readily available power outlet near your router for the initial setup.
Having these elements prepared in advance will streamline the setup process, allowing you to quickly extend your WiFi network and eliminate dead zones.
4. How Do I Configure My Rock Space WiFi Extender Using the WPS Button?
The WPS (Wi-Fi Protected Setup) button method is the simplest way to connect your Rock Space WiFi extender to your existing network.
-
Plug in the Extender: Place the extender into a power outlet near your router and wait for the Power LED to turn blue.
-
Press the WPS Button on Your Router: Locate the WPS button on your router (usually on the back or side) and press it.
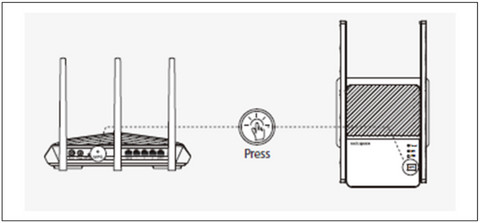 Press the WPS button on the router and on the extender
Alternative text: Activating WPS on the router initiates a secure connection with the Rock Space extender.
-
Press the WPS Button on the Extender: Within two minutes of pressing the router’s WPS button, press the WPS button on your Rock Space extender.
-
Wait for the Signal LED: The Signal LED on the extender should turn blue, indicating a successful connection. If it doesn’t, try again or use the web browser method.
-
Relocate the Extender: Unplug the extender and move it to a location between your router and the area with poor WiFi coverage. Plug it back in and wait for the Signal LED to turn blue again.
The WPS method offers a quick and easy way to extend your WiFi network, making it ideal for users who prefer a hassle-free setup.
5. How Do I Configure My Rock Space WiFi Extender Via a Web Browser?
If the WPS button method doesn’t work, or if you prefer a more detailed setup, you can configure your Rock Space WiFi extender using a web browser.
-
Connect to the Extender’s Network: On your computer or smartphone, connect to the extender’s default network, usually named “rockspace_EXT”.
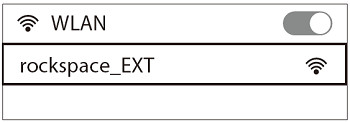 Rockspace_EXT in network list
Alternative text: Connecting to the Rock Space extender’s network via WiFi settings to begin web configuration.
-
Open a Web Browser: Launch a web browser and enter http://re.rockspace.local or http://192.168.0.254 in the address bar.
-
Create an Admin Password: You’ll be prompted to create an admin password for the extender. Make sure to record it for future use.
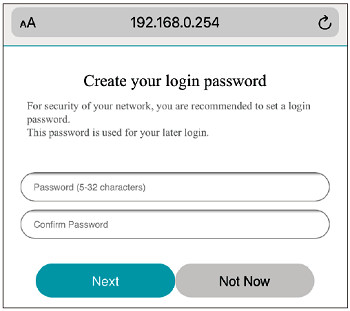 Create your login password
Alternative text: Creating a secure admin password for the Rock Space extender to protect settings and access.
-
Select Your WiFi Network: The extender will scan for available wireless networks. Select the WiFi network (SSID) you want to extend.
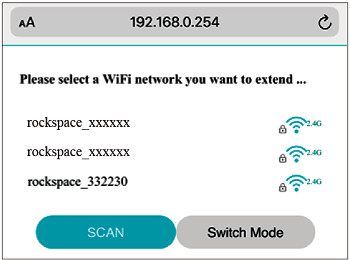 Please select a WiFi network you want to extend
Alternative text: Selecting the primary WiFi network from the available list to extend its coverage with the Rock Space extender.
-
Enter Your WiFi Password: Enter the password for the WiFi network you selected.
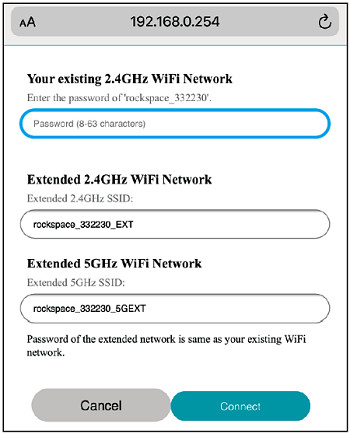 Enter the password of your existing network
Alternative text: Entering the existing WiFi password to securely connect the Rock Space extender to the network.
-
Wait for Confirmation: Wait until the page displays “Extended successfully!”
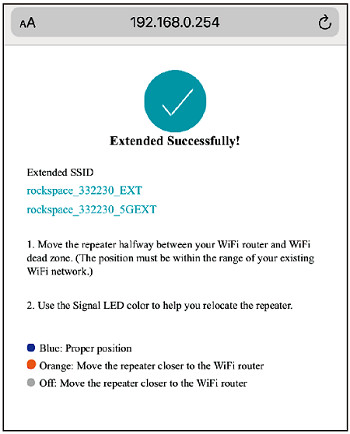 Extended successfully
Alternative text: Confirmation screen showing successful extension of the WiFi network with the Rock Space extender.
-
Relocate the Extender: Unplug the extender and move it to a location between your router and the area with poor WiFi coverage. Plug it back in and wait for the Signal LED to turn blue again.
The web browser method provides more control and customization options, ensuring a tailored setup for your specific network needs.
6. Where Is the Best Place to Position My Rock Space WiFi Extender?
Proper placement of your Rock Space WiFi extender is crucial for optimal performance. The ideal location is halfway between your router and the area where you need better WiFi coverage.
- Midpoint Placement: Position the extender where it can receive a strong signal from the router but still provide coverage to the dead zone.
- Signal Strength: Monitor the Signal LED on the extender. A blue light indicates a good connection. If the light is not blue, move the extender closer to the router.
- Avoid Obstructions: Keep the extender away from walls, metal objects, and electronic devices that can interfere with the signal.
Finding the right spot for your extender can significantly improve its effectiveness, ensuring seamless WiFi coverage throughout your property.
7. How Do I Connect My Devices to the Extended Network?
Once your Rock Space WiFi extender is set up, connecting your devices to the extended network is simple.
- Find the Extended Network: On your device, look for the network name that has “_EXT” or “_5GEXT” added to the end of your existing network name. If you customized the network name during setup, find the name you set.
- Enter the Password: By default, the password for the extended network is the same as your existing WiFi network. Enter the password and connect.
- Enjoy Improved Coverage: Your device should now be connected to the extended network, providing you with improved WiFi coverage and signal strength.
Connecting to the extended network is just like connecting to your regular WiFi, ensuring a seamless transition and enhanced connectivity.
8. What Common Issues Might I Encounter While Configuring My Rock Space WiFi Extender and How Do I Troubleshoot Them?
While setting up your Rock Space WiFi extender, you might encounter a few common issues. Here’s how to troubleshoot them:
| Issue | Troubleshooting Steps |
|---|---|
| Cannot connect to rockspace_EXT | Ensure your device’s WiFi is enabled and that you’re selecting the correct network. Try restarting your device and the extender. |
| Cannot access re.rockspace.local | Make sure you’re connected to the extender’s network. Clear your browser’s cache and try again. Alternatively, use the IP address (192.168.0.254) to access the setup page. |
| Extender fails to connect to WiFi | Double-check that you’ve entered the correct WiFi password. Ensure your router is broadcasting a signal and that the extender is within range. Try moving the extender closer to the router during setup. |
| Signal LED is not turning blue | Relocate the extender closer to the router. Ensure there are no obstructions between the router and extender. Try resetting the extender to factory settings and starting the setup process again. |
| Internet speed is slower than expected | Ensure the extender is placed in an optimal location. Check for interference from other devices. Update the extender’s firmware. If the issue persists, consider upgrading to a more powerful extender model. |
9. How Do I Reset My Rock Space WiFi Extender to Factory Settings?
Resetting your Rock Space WiFi extender to factory settings can resolve many issues and allow you to start the configuration process from scratch.
- Locate the Reset Button: Find the reset button on your extender. It’s usually a small pinhole located on the back or bottom of the device.
- Press and Hold: Use a paperclip or similar object to press and hold the reset button for about 10-15 seconds.
- Wait for Reset: Release the button and wait for the extender to reboot. The Power LED will likely blink or change color during the reset process.
- Reconfigure: Once the extender has rebooted, it will be back to its factory default settings. You can now reconfigure it using either the WPS button method or the web browser method.
Resetting your extender can be a helpful troubleshooting step, ensuring a clean slate for reconfiguration and improved performance.
10. What Are the Benefits of Using Rockscapes.Net for My Landscaping Needs?
While this article focuses on configuring your Rock Space WiFi extender, rockscapes.net offers a wealth of information and resources for all your landscaping needs, particularly when it comes to incorporating natural stone into your outdoor spaces.
- Design Inspiration: Explore a vast collection of design ideas and images to inspire your landscape projects.
- Product Information: Access detailed information about various types of natural stone, including granite, slate, and more.
- Expert Advice: Get guidance and tips from landscaping professionals on selecting and installing stone features.
- Supplier Network: Find reputable suppliers of natural stone and landscaping materials in your area.
At rockscapes.net, we’re committed to helping you create stunning and sustainable outdoor environments that enhance the beauty and value of your property.
FAQ: Configuring Your Rock Space WiFi Extender
-
How do I know if my Rock Space WiFi extender is working correctly?
Check the Signal LED on the extender. A blue light indicates a strong connection. Also, verify that your devices can connect to the extended network and access the internet with improved signal strength.
-
Can I use multiple Rock Space WiFi extenders to extend my network further?
Yes, you can use multiple extenders, but it’s generally recommended to use a mesh WiFi system for larger homes or properties to ensure seamless roaming and optimized performance.
-
Does a Rock Space WiFi extender slow down my internet speed?
While extenders can introduce some latency, a well-placed and properly configured extender should improve overall coverage without significantly impacting speed. Ensure your extender is placed in an optimal location and that you’re using a model that supports your network’s speed.
-
What is the difference between a WiFi extender and a mesh WiFi system?
A WiFi extender rebroadcasts the signal from your router, creating a separate network. A mesh WiFi system uses multiple nodes that work together to create a single, seamless network with intelligent routing for optimal performance.
-
How often should I update the firmware on my Rock Space WiFi extender?
Check for firmware updates regularly, ideally every few months. Firmware updates often include performance improvements, bug fixes, and security enhancements.
-
Can I use a Rock Space WiFi extender with any router?
Rock Space WiFi extenders are generally compatible with most standard routers. However, it’s always a good idea to check the compatibility list or consult the manufacturer’s website to ensure seamless integration.
-
What should I do if my Rock Space WiFi extender keeps disconnecting?
Check the extender’s placement, ensure it’s within range of the router, and verify that there are no obstructions causing interference. Also, check for firmware updates and consider resetting the extender to factory settings.
-
How do I change the password for my Rock Space WiFi extender?
Access the extender’s web-based management interface by entering http://re.rockspace.local or http://192.168.0.254 in your browser. Log in with your admin password and navigate to the settings section to change the password.
-
Can I use a wired connection with my Rock Space WiFi extender?
Some Rock Space WiFi extender models come with an Ethernet port, allowing you to connect devices via a wired connection for improved stability and speed.
-
How do I rename my Rock Space WiFi extender’s extended network?
Access the extender’s web-based management interface, log in with your admin password, and navigate to the wireless settings section. From there, you can customize the SSID (network name) of the extended network.
Ready to enhance your outdoor space with stunning stone features? Visit rockscapes.net today to explore design ideas, discover the perfect materials, and connect with landscaping experts. Whether you’re dreaming of a serene rock garden or a dramatic stone pathway, rockscapes.net has everything you need to bring your vision to life. Contact us at Address: 1151 S Forest Ave, Tempe, AZ 85281, United States or Phone: +1 (480) 965-9011.