Are you curious about making your own rock candy? Can You Make Rock Candy With Brown Sugar? Yes, you can make rock candy with brown sugar, adding a unique flavor to this classic treat, discover more ideas and rock projects at rockscapes.net. While white granulated sugar is the most common choice, brown sugar offers a delightful twist.
This guide will explore the nuances of using brown sugar in rock candy, offering tips and tricks for a successful outcome and helping you elevate your candy-making skills and explore exciting landscape ideas. Discover all the possibilities at rockscapes.net, where inspiration meets innovation.
Here are five user search intentions regarding the keyword “can you make rock candy with brown sugar”:
- Recipe Inquiry: Seeking a specific recipe for rock candy using brown sugar.
- Ingredient Substitution: Wondering if brown sugar can be used as a substitute for white sugar in a rock candy recipe.
- Flavor Profile: Curious about how brown sugar affects the taste and color of rock candy compared to white sugar.
- Troubleshooting: Looking for solutions to problems encountered while making rock candy with brown sugar.
- DIY Project: Interested in a fun and educational activity to do at home, experimenting with different sugar types.
1. Understanding the Basics of Rock Candy
Rock candy, also known as sugar candy or crystal candy, is essentially large sugar crystals formed by allowing a supersaturated solution of sugar and water to cool slowly. This process allows sugar molecules to gradually come out of the solution and attach to a seed crystal, creating the beautiful, translucent crystals we love.
1.1. What Makes Rock Candy Crystallize?
The secret to perfect rock candy lies in creating a supersaturated solution. This means dissolving more sugar in water than would typically dissolve at room temperature. Heat helps achieve this; as the solution cools, the sugar molecules are eager to latch onto something, and that’s where your seed crystals come in.
1.2. The Role of Sugar in Crystallization
Granulated white sugar is the traditional choice because it’s pure sucrose. This purity allows for the formation of clear, well-defined crystals. Other types of sugar, like brown sugar, contain molasses and other impurities, which can affect the crystallization process.
2. Can You Really Use Brown Sugar? The Definitive Answer
Yes, you absolutely can make rock candy with brown sugar! However, there are a few key differences and considerations compared to using white sugar. The molasses content in brown sugar affects the color, flavor, and crystallization process.
2.1. How Brown Sugar Affects Color and Flavor
Brown sugar imparts a warm, caramel-like flavor and a darker amber color to the rock candy. The intensity of the color and flavor will depend on whether you use light or dark brown sugar.
2.2. Light vs. Dark Brown Sugar: Which is Better?
- Light Brown Sugar: This will give a milder molasses flavor and a lighter color. It’s a good starting point if you’re new to making rock candy with brown sugar.
- Dark Brown Sugar: This will result in a richer, more intense flavor and a darker color. Use it if you want a more pronounced caramel taste.
2.3. The Science Behind Brown Sugar
Brown sugar is granulated white sugar with added molasses. The molasses content not only gives it a distinctive flavor but also affects its hygroscopic properties, meaning it attracts and retains moisture. This can influence the texture and crystallization process of your rock candy. According to research from the Sugar Association, the molasses in brown sugar also contributes trace minerals like calcium, potassium, and iron.
3. A Step-by-Step Guide to Making Brown Sugar Rock Candy
Here’s a detailed recipe to help you create delicious brown sugar rock candy. This recipe combines the basic principles of rock candy making with the unique characteristics of brown sugar.
3.1. Ingredients You’ll Need
- 3 cups brown sugar (light or dark, depending on your preference)
- 1 cup water
- Flavoring extracts (vanilla, maple, or caramel work well)
- Food coloring (optional, but darker colors like brown or amber enhance the look)
- Lollipop sticks, skewers, or cotton string
- Clothespins
- Wide-mouthed glasses or jars
3.2. Preparing Your Seed Crystals
This step is crucial for successful crystal formation. The seed crystals provide a base for the sugar molecules to latch onto.
- Dip your sticks or string in water.
- Roll them in brown sugar.
- Let them dry completely (about 1-2 hours).
3.3. Creating the Brown Sugar Solution
- In a medium saucepan, combine the brown sugar and water.
- Heat over medium heat, stirring constantly until the sugar is completely dissolved.
- Bring the mixture to a boil, then reduce the heat and simmer for about 5 minutes. This ensures all the sugar is fully dissolved.
- Remove from heat and let cool for about 15-20 minutes. This prevents the seed crystals from melting when you pour the solution.
- Add your flavoring extracts and food coloring, if desired.
3.4. Growing Your Rock Candy Crystals
- Pour the brown sugar solution into your prepared glasses or jars, leaving about an inch of space at the top.
- Carefully suspend your seed crystal sticks or strings into the solution, using clothespins to hold them in place. Ensure the sticks don’t touch the bottom or sides of the glass.
- Let the jars sit undisturbed for 5-7 days. The longer they sit, the larger the crystals will grow.
3.5. Harvesting Your Brown Sugar Rock Candy
- Gently remove the rock candy from the jars. If they’re stuck, try running warm water on the outside of the glass.
- Let the rock candy dry completely on a wire rack for a few hours before enjoying.
4. Troubleshooting Common Problems
Making rock candy can be tricky, and using brown sugar adds another layer of complexity. Here are some common issues and how to fix them.
4.1. Crystals Not Forming
- Issue: No crystals are forming after several days.
- Solution: The solution may not have been saturated enough. Try boiling the solution again with a bit more brown sugar, then let it cool and try again. Ensure the seed crystals are well-prepared and dry.
4.2. Small or Cloudy Crystals
- Issue: The crystals are small and not very clear.
- Solution: This could be due to impurities in the brown sugar or rapid cooling. Use a high-quality brown sugar and ensure the solution cools slowly and undisturbed. Heating the jars before pouring the solution can also help.
4.3. Mold Growth
- Issue: Mold is growing in the jars.
- Solution: This is rare but can happen if the jars aren’t clean or if the solution is contaminated. Sterilize the jars before use and ensure all utensils are clean. Unfortunately, if mold grows, you’ll need to discard the batch and start over.
4.4 Expert Tips for Crystallization
According to food scientists at Clemson University, the rate of cooling significantly impacts crystal size. Slow cooling promotes the growth of larger, more defined crystals, while rapid cooling results in smaller, less uniform crystals. Maintaining a stable temperature is key to achieving the desired crystal structure.
5. Elevating Your Rock Candy: Flavor and Color Variations
One of the joys of making rock candy is the ability to experiment with different flavors and colors. Brown sugar rock candy is no exception.
5.1. Complementary Flavors
Brown sugar pairs well with warm, comforting flavors like:
- Vanilla
- Maple
- Caramel
- Cinnamon
- Nutmeg
5.2. Enhancing the Color
While brown sugar naturally gives the rock candy a warm color, you can enhance it with:
- Brown food coloring
- Caramel food coloring
- A touch of black food coloring for a more dramatic look
5.3. Creative Combinations
Try these flavor and color combinations for unique brown sugar rock candy:
- Maple-Pecan: Add maple extract and a pinch of chopped pecans.
- Salted Caramel: Add caramel extract and a sprinkle of sea salt after drying.
- Cinnamon-Spice: Add cinnamon extract and a pinch of ground cloves.
6. Brown Sugar Rock Candy Recipe
Here’s a simple recipe for brown sugar rock candy:
Yields: Approximately 6-8 rock candy sticks
Prep Time: 20 minutes
Cook Time: 20 minutes
Crystal Growing Time: 5-7 days
Ingredients:
- 3 cups packed light or dark brown sugar
- 1 cup water
- 1 teaspoon vanilla extract
- Optional: food coloring
- Wooden skewers or candy sticks
- Granulated sugar for coating
- Tall glasses or jars
Equipment:
- Saucepan
- Wooden spoon
- Clothespins or clips
- Wax paper
Instructions
Get started:
- Prepare the sticks: Dip the wooden skewers or candy sticks in water, then roll them in granulated sugar. This gives the crystals something to grab onto. Allow the sticks to dry completely before proceeding.
Make the sugar syrup:
- In a medium saucepan, combine the brown sugar and water. Heat over medium heat, stirring constantly, until the sugar dissolves completely.
- Once the sugar is dissolved, bring the mixture to a boil. Let it boil for 1-2 minutes, then remove from heat.
- Stir in the vanilla extract and a few drops of food coloring if desired.
Grow the crystals:
- Pour the hot syrup into tall glasses or jars.
- Clip the sugared sticks to the sides of the glasses with clothespins or clips, ensuring that the sticks are submerged in the syrup but not touching the bottom of the glass.
- Allow the glasses to sit undisturbed for 5-7 days. The longer they sit, the larger the crystals will grow.
Harvest the candy:
- After 5-7 days, carefully remove the sticks from the glasses.
- Lay the sticks on wax paper and allow them to dry completely. This may take a few hours.
Tips and tricks:
- Use clean glasses and utensils to prevent contamination.
- Don’t disturb the glasses while the crystals are growing.
- If crystals start to form on the surface of the syrup, carefully break them up with a spoon.
- Store the finished rock candy in an airtight container.
7. The Appeal of Rock Candy: More Than Just a Treat
Rock candy isn’t just a sweet treat; it’s a nostalgic confection with a rich history and a fun science experiment rolled into one.
7.1. A Sweet Trip Down Memory Lane
For many, rock candy evokes memories of childhood, carnivals, and simpler times. Its unique texture and appearance make it a delightful and memorable treat.
7.2. A Fun and Educational Activity
Making rock candy is a great way to engage kids (and adults) in a fun science experiment. It teaches about saturation, crystallization, and the properties of sugar.
7.3. Rock Candy in Landscaping
While we’ve focused on the edible kind, don’t forget the role of actual rocks in landscaping! At rockscapes.net, you can find inspiration for using rocks to create stunning outdoor spaces. From decorative stones to functional pathways, rocks add natural beauty and durability to any landscape. Consider these ideas:
- Rock Gardens: Create a serene space with various rock types and drought-resistant plants.
- Stone Pathways: Design a charming walkway using flagstone or pebbles.
- Water Features: Incorporate rocks into ponds or waterfalls for a natural look.
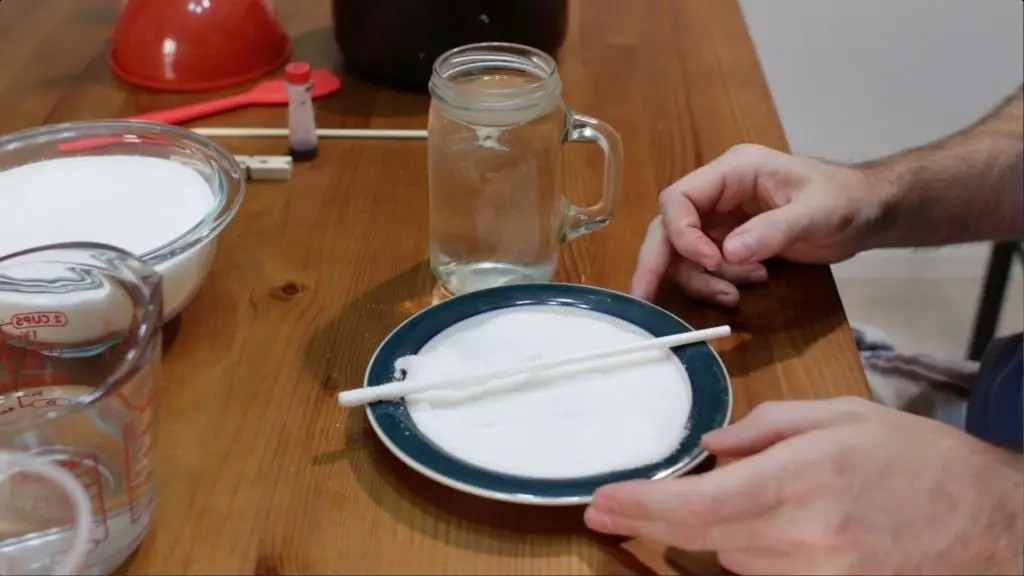 white stick covered in sugar on a plate
8. Rock Candy in Landscaping
While we’ve focused on the edible kind, don’t forget the role of actual rocks in landscaping! At rockscapes.net, you can find inspiration for using rocks to create stunning outdoor spaces. From decorative stones to functional pathways, rocks add natural beauty and durability to any landscape. Consider these ideas:
- Rock Gardens: Create a serene space with various rock types and drought-resistant plants.
- Stone Pathways: Design a charming walkway using flagstone or pebbles.
- Water Features: Incorporate rocks into ponds or waterfalls for a natural look.
8.1. Choosing the Right Rocks for Your Landscape
Selecting the right rocks is essential for achieving the desired aesthetic and functionality. Consider the following factors:
- Type of Rock: Different rock types offer unique colors, textures, and durability. Granite, limestone, sandstone, and slate are popular choices.
- Size and Shape: The size and shape of the rocks should complement the overall design and purpose. Boulders can create dramatic focal points, while smaller pebbles are ideal for pathways and ground cover.
- Color: The color of the rocks should harmonize with the surrounding landscape and architecture. Earthy tones like browns, grays, and tans blend seamlessly with natural environments.
- Source: Sourcing rocks locally can reduce transportation costs and environmental impact. Check with local quarries and suppliers for sustainable options.
8.2. Designing with Rocks: Tips and Techniques
Effective rock placement can transform an ordinary landscape into a captivating outdoor space. Here are some design tips to keep in mind:
- Balance and Proportion: Create a sense of balance by distributing rocks evenly throughout the landscape. Use larger rocks as focal points and smaller rocks as accents.
- Layering: Layering rocks of different sizes and textures adds depth and visual interest. Start with a base layer of larger rocks and then add smaller rocks on top.
- Grouping: Group rocks in clusters to create natural-looking arrangements. Avoid placing rocks in straight lines or symmetrical patterns.
- Contrast: Use contrasting rock types and colors to create visual interest. For example, pair dark-colored rocks with light-colored gravel.
- Functionality: Consider the functional aspects of rock placement. Use rocks to create retaining walls, pathways, and water features.
8.3. Maintaining Your Rock Landscape
Proper maintenance is essential for preserving the beauty and longevity of your rock landscape. Here are some maintenance tips:
- Weed Control: Regularly remove weeds from your rock landscape to prevent them from spreading. Use a combination of hand-pulling, herbicides, and landscape fabric.
- Cleaning: Periodically clean your rocks to remove dirt, debris, and stains. Use a pressure washer or scrub brush with soapy water.
- Stabilization: Stabilize loose rocks to prevent them from shifting or falling. Use rock glue or mortar to secure rocks in place.
- Drainage: Ensure proper drainage to prevent water from accumulating around rocks. Install drainage systems as needed.
- Mulching: Apply mulch around rocks to suppress weeds, retain moisture, and regulate soil temperature.
8.4. Landscaping Near You
If you’re near Tempe, Arizona, or in the surrounding area, you can get rocks for landscaping at:
- Address: 1151 S Forest Ave, Tempe, AZ 85281, United States
- Phone: +1 (480) 965-9011
- Website: rockscapes.net
9. Frequently Asked Questions
Here are some common questions about making rock candy with brown sugar.
9.1. Can I use other types of sugar besides brown and white?
While white and brown sugar are most common, you can experiment with other sugars like turbinado or demerara for different flavors and textures.
9.2. How long does it take for rock candy crystals to form?
Crystals typically start forming within 24-48 hours, but it takes 5-7 days for them to grow to a substantial size.
9.3. What’s the best temperature for growing rock candy crystals?
Room temperature (around 68-72°F or 20-22°C) is ideal for slow, even crystal growth.
9.4. Can I reuse the leftover sugar solution?
Yes, you can reheat the solution and add more sugar to make another batch.
9.5. Why is my rock candy sticky?
This is usually due to high humidity. Store the rock candy in an airtight container with a desiccant packet to keep it dry.
9.6. What are the best flavorings for brown sugar rock candy?
Vanilla, maple, caramel, and butterscotch extracts work exceptionally well with brown sugar’s natural flavor. Spices like cinnamon and nutmeg also complement it nicely.
9.7. Can I add fruit juice to the sugar solution for extra flavor?
Yes, but be cautious about the water content. Reduce the amount of water in the recipe to compensate for the liquid from the fruit juice. Citrus juices like lemon or orange can add a zesty twist.
9.8. How do I prevent the sticks from sticking to the bottom of the glass?
Ensure that the sticks are suspended in the middle of the glass and not touching the bottom or sides. Using a clothespin to secure the stick can help keep it in place.
9.9. What is the best way to store brown sugar rock candy?
Store the rock candy in an airtight container at room temperature, away from direct sunlight and humidity. Adding a desiccant packet can help absorb excess moisture.
9.10. Is it possible to make layered or multicolored rock candy?
Yes, you can create layered rock candy by allowing one color to crystallize partially and then adding another color to the same solution. For multicolored candy, divide the solution into separate containers and add different food colorings to each.
10. Conclusion: Embrace the Sweetness and the Stone
So, can you make rock candy with brown sugar? Absolutely! It’s a fun and rewarding culinary experiment that yields a delicious and unique treat. And while you’re indulging in your homemade candy, don’t forget the beauty and versatility of natural rocks.
Head over to rockscapes.net for endless inspiration and expert advice on incorporating rocks into your landscape. Whether you’re dreaming of a tranquil rock garden or a stunning stone pathway, rockscapes.net has everything you need to bring your vision to life. Contact us today and let our experts help you design the perfect outdoor space!