Fixing a broken rocking chair runner involves understanding the wood’s properties and using the right techniques for a durable repair; Rockscapes.net provides solutions for all your repair needs. This comprehensive guide will walk you through the process of repairing a broken rocking chair runner, ensuring you can restore your beloved rocker to its former glory. Discover expert tips and tricks for long-lasting repairs, learn about wood grain direction, and find the best materials for the job, enhancing your woodworking skills and furniture repair expertise.
1. Why Did My Rocking Chair Runner Break?
Rocking chair runners break due to a combination of factors, but understanding these can help prevent future issues. Several elements contribute to this common problem:
- Wood Grain Direction: The direction of the wood grain significantly impacts the runner’s strength. If the grain runs parallel to the runner’s length, it’s more susceptible to splitting.
- Age and Wear: Over time, the wood can weaken due to constant use and environmental factors like humidity and temperature changes.
- Stress and Pressure: The repetitive motion of rocking puts continuous stress on the runners, leading to cracks and eventual breakage.
- Poor Construction: In some cases, the runners may not have been properly constructed or attached to the chair frame.
- Wood Type: The type of wood used also plays a role; softer woods are more prone to damage than hardwoods.
2. What Tools And Materials Do I Need To Fix A Rocking Chair Runner?
To successfully repair a broken rocking chair runner, gather the following tools and materials. Having everything on hand will streamline the repair process and ensure a professional finish:
| Tool/Material | Description | Why You Need It |
|---|---|---|
| Wood Glue | High-quality wood adhesive | To create a strong bond between the broken pieces. |
| Clamps | Various sizes and types | To hold the pieces together securely while the glue dries. |
| Sandpaper | Assorted grits (e.g., 120, 220) | To smooth out rough edges and prepare the surface for gluing and finishing. |
| Wood Filler | For filling gaps and cracks | To create a seamless repair by filling any imperfections. |
| Finish Screws | Appropriate size for the wood thickness | To add extra reinforcement to the glued joint. |
| Drill | With various drill bits | To create pilot holes for the screws, preventing the wood from splitting. |
| Wood Stain/Finish | Matching the original color of the chair | To blend the repair with the rest of the chair, maintaining its appearance. |
| Safety Glasses | To protect your eyes | To ensure safety while sanding, drilling, and working with adhesives. |
| Work Gloves | To protect your hands | To prevent splinters and protect against chemicals. |
| Wood Replacement (Optional) | If the runner is severely damaged | Replacing it ensures it matches and is the same quality, giving your chair a new lease on life. Ensure that the wood is flexible and durable to keep the chair rocking. |
| Chisel | For carving wood | To help you shape any wood for the rocking chair runner. |
| Mallet | For using with a chisel | To ensure that you can chisel wood without damaging your chisel. |
| Hand Plane | For creating a smooth surface | To help create a smooth surface to help you blend your rocking chair runner with the rest of your rocking chair. |
| Tape Measure | Ensuring correct measurements | Essential for accurately measuring and cutting materials to the right size, guaranteeing a precise fit during the repair. |
| Carpenter’s Square | Helping keep everything squared | Ensures that angles are accurate and square, which is crucial for maintaining the stability and structural integrity of the repaired runner. |
| Utility Knife | Great for cutting | Ideal for precise cuts and trimming, aiding in shaping materials and removing excess adhesive or filler for a seamless finish. |
| Putty Knife | Flexible knife | An essential tool for applying wood filler evenly and smoothly, ensuring that surface imperfections are filled seamlessly and the finish is professionally done. |
| Rags | For cleaning | Necessary for wiping away excess glue, applying finishes, and keeping the work area clean, which leads to a tidy and efficient repair process. |
| Mineral Spirits | Cleaning agent | Used for cleaning brushes and dissolving finishes, ensuring that tools are properly maintained and surfaces are prepared for optimal adhesion and a flawless final coat. |
3. How Do I Assess The Damage To The Rocking Chair Runner?
Before starting the repair, carefully assess the extent of the damage. This will help you determine the best course of action.
- Identify the Type of Break: Is it a clean break, a split along the grain, or a completely shattered piece?
- Check for Missing Pieces: Ensure you have all the broken pieces. If any are missing, you may need to fabricate a replacement.
- Evaluate the Wood Condition: Look for signs of rot, insect damage, or excessive dryness, which could affect the repair’s success.
- Examine the Joints: Check the joints where the runner connects to the chair frame. These may also need reinforcement.
- Consider the Chair’s Age and Value: For antique or valuable chairs, consider consulting a professional furniture restorer.
4. Step-by-Step Guide: How To Fix A Broken Rocking Chair Runner?
Here’s a detailed guide to repairing a broken rocking chair runner. Follow these steps for a successful and durable repair:
4.1. Preparation
- Clean the Surfaces: Remove any dirt, old glue, or finish from the broken edges. Use a solvent like mineral spirits if necessary.
- Dry Fit: Before applying glue, dry-fit the pieces to ensure they align properly. Use clamps to hold them in place.
- Prepare the Clamps: Have the clamps ready and within reach. You’ll need to work quickly once the glue is applied.
4.2. Gluing
- Apply Wood Glue: Apply a generous amount of wood glue to both broken surfaces. Ensure the glue covers the entire area.
- Join the Pieces: Press the broken pieces together, aligning them carefully.
- Clamp Securely: Use clamps to hold the pieces tightly together. Apply even pressure to ensure a strong bond.
- Wipe Away Excess Glue: Use a damp cloth to wipe away any excess glue that squeezes out.
4.3. Reinforcement
- Drill Pilot Holes: Once the glue is dry (refer to the glue manufacturer’s instructions), drill pilot holes for the finish screws. The pilot holes should be slightly smaller than the screw’s shank to prevent splitting.
- Insert Finish Screws: Drive the finish screws into the pilot holes. Be careful not to overtighten, which could strip the wood.
- Countersink the Screws: Use a countersink bit to create a recess for the screw heads, allowing them to sit flush with the surface.
4.4. Filling and Sanding
- Apply Wood Filler: If there are any gaps or cracks, apply wood filler to create a smooth surface.
- Let it Dry: Allow the wood filler to dry completely, according to the manufacturer’s instructions.
- Sand the Surface: Sand the repaired area with progressively finer grits of sandpaper (e.g., 120, 220) until it’s smooth and even with the surrounding wood.
4.5. Finishing
- Stain the Wood: Apply wood stain to the repaired area, matching the original color of the chair. Allow it to dry completely.
- Apply Finish: Apply a clear finish (e.g., varnish, lacquer, polyurethane) to protect the repaired area and blend it with the rest of the chair.
- Cure Time: Allow the finish to cure completely before using the chair.
5. What If The Rocking Chair Runner Is Severely Damaged?
If the rocking chair runner is severely damaged, you might need to replace it entirely. Here’s how:
5.1. Remove the Old Runner
- Detach the Runner: Carefully detach the old runner from the chair frame. This may involve removing screws, bolts, or dowels.
- Document the Attachment: Take photos or make notes of how the runner was attached to the chair. This will help you replicate the attachment with the new runner.
5.2. Create a New Runner
- Measure the Old Runner: Measure the length, width, and thickness of the old runner. Use these measurements to create a new runner.
- Select the Wood: Choose a wood that matches the original runner in terms of species, grain, and color.
- Cut the Wood: Cut the wood to the correct dimensions using a saw.
- Shape the Runner: Use a router, plane, or spokeshave to shape the runner to match the original.
- Sand the Runner: Sand the new runner smooth with progressively finer grits of sandpaper.
5.3. Attach the New Runner
- Align the Runner: Align the new runner with the chair frame, using your photos or notes as a guide.
- Drill Pilot Holes: Drill pilot holes for the screws, bolts, or dowels.
- Attach the Runner: Attach the new runner to the chair frame using the appropriate fasteners.
- Test the Chair: Test the chair to ensure the new runner is securely attached and the chair rocks smoothly.
6. What Are Some Tips For Preventing Future Damage To Rocking Chair Runners?
Preventing future damage to your rocking chair runners involves simple maintenance and care.
- Regular Inspection: Check the runners regularly for signs of wear, cracks, or loose joints.
- Proper Storage: Store the chair in a dry, stable environment. Avoid exposure to extreme temperatures or humidity.
- Smooth Surfaces: Use the chair on smooth, even surfaces to reduce stress on the runners.
- Weight Limits: Be mindful of the chair’s weight limit. Overloading the chair can cause undue stress on the runners.
- Lubrication: Apply a lubricant to the joints to reduce friction and prevent wear.
- Protective Pads: Add felt pads to the bottom of the runners to protect them from abrasion.
7. What Are The Different Types Of Wood Suitable For Rocking Chair Runners?
Choosing the right type of wood is crucial for the longevity and performance of rocking chair runners. Here are some popular options:
| Wood Type | Characteristics | Pros | Cons |
|---|---|---|---|
| Oak | Hard, strong, and durable with a distinctive grain pattern | Excellent strength, good resistance to wear, readily available | Can be prone to splintering if not properly sealed, may require pre-drilling to avoid splitting when using screws or nails |
| Maple | Hard, dense, and fine-grained with a smooth surface | High impact resistance, smooth finish, takes stain well | Can be more expensive than other hardwoods, may require sharp tools for shaping |
| Cherry | Strong, stable, and reddish-brown with a beautiful grain that darkens with age | Attractive appearance, good workability, resists warping | Softer than oak or maple, may require extra care to avoid dents and scratches |
| Hickory | Exceptionally strong, tough, and resilient with a coarse grain | Very high strength, excellent shock resistance, good for heavy-duty use | Can be difficult to work with due to its hardness, may require specialized tools |
| Walnut | Moderately hard, strong, and chocolate-brown with a rich, straight grain | Elegant appearance, good stability, machines well | Relatively expensive, may fade over time if exposed to direct sunlight |
| Poplar | Soft, lightweight, and straight-grained with a pale yellow to greenish-brown color | Affordable, easy to work with, takes paint well | Not as durable as hardwoods, prone to dents and scratches |
| Ash | Hard, strong, and elastic with a prominent grain pattern | Good bending properties, high shock resistance, commonly used in sports equipment | Can be susceptible to insect damage if not properly treated, may require careful grain matching for consistent appearance |
| Birch | Hard, heavy, and close-grained with a light color | Strong, uniform texture, good for staining | Can be prone to blotching when stained, may require a sealer before finishing |
| Mahogany | Medium-hard, durable, and reddish-brown with a fine, even grain | Resists swelling, shrinking, and warping | Considered rare, and can be relatively expensive. |
| Pine | Soft, lightweight, and straight-grained with a pale yellow color | Versatile, readily available, environmentally friendly, good for a variety of projects | Tends to dent easily, and may be difficult to stain. |
8. What Are Some Common Mistakes To Avoid When Repairing Rocking Chair Runners?
Avoiding common mistakes can save you time and frustration.
- Using the Wrong Glue: Use a high-quality wood glue specifically designed for furniture repair.
- Not Clamping Properly: Ensure the clamps are applying even pressure and holding the pieces securely.
- Skipping Pilot Holes: Always drill pilot holes before inserting screws to prevent the wood from splitting.
- Over-Sanding: Be careful not to sand too aggressively, which can remove too much material and alter the shape of the runner.
- Incorrect Finishing: Use a finish that matches the original color and sheen of the chair.
- Rushing the Process: Allow ample time for the glue and finish to dry completely.
9. How Can I Restore The Finish On The Repaired Area To Match The Original Chair?
Restoring the finish on the repaired area involves careful matching and blending.
- Identify the Original Finish: Determine the type of finish used on the chair (e.g., varnish, lacquer, polyurethane).
- Match the Color: Use wood stain to match the color of the original finish. Test the stain on a scrap piece of wood before applying it to the chair.
- Apply the Finish: Apply the finish in thin, even coats, allowing each coat to dry completely before applying the next.
- Blend the Finish: Use fine-grit sandpaper or steel wool to blend the edges of the repaired area with the surrounding finish.
- Polish the Finish: Polish the finish with a soft cloth to create a smooth, even sheen.
10. Where Can I Find Replacement Parts And Professional Repair Services?
Finding the right replacement parts and professional services can ensure a high-quality repair.
- Online Retailers: Websites like Rockscapes.net, Amazon, eBay, and specialized woodworking suppliers offer a wide range of furniture repair parts and tools.
- Local Hardware Stores: Check your local hardware stores for wood glue, sandpaper, screws, and other basic repair materials.
- Woodworking Suppliers: Visit a local woodworking supplier for high-quality wood, finishes, and specialized tools.
- Antique Shops: Antique shops may carry vintage or reproduction furniture parts.
- Professional Furniture Restorers: Search online for professional furniture restorers in your area. Check their reviews and ask for references before hiring them.
For more inspiration and resources, visit Rockscapes.net, your premier destination for landscape design and natural stone solutions in the USA.
FAQ: Fixing Broken Rocking Chair Runners
1. Can I fix a broken rocking chair runner with just glue?
Yes, you can fix a broken rocking chair runner with just glue, but it depends on the severity of the break. For small cracks or clean breaks, high-quality wood glue can be sufficient. However, for larger breaks or splits, it’s best to reinforce the repair with screws or dowels. Proper clamping is also essential to ensure a strong bond.
2. What type of glue is best for repairing a rocking chair runner?
The best type of glue for repairing a rocking chair runner is a high-quality wood glue, such as polyvinyl acetate (PVA) glue. These glues are designed to create strong, durable bonds between wood surfaces. Look for glues that are specifically labeled for furniture repair or woodworking.
3. How long should I clamp the rocking chair runner after gluing?
You should clamp the rocking chair runner for at least 24 hours after gluing. This allows the glue to fully cure and form a strong bond. Refer to the glue manufacturer’s instructions for specific drying times, as some glues may require longer clamping periods.
4. Can I use wood filler to repair a large gap in the rocking chair runner?
Yes, you can use wood filler to repair a large gap in the rocking chair runner. However, it’s important to use a high-quality wood filler that is designed for filling large gaps. Apply the filler in thin layers, allowing each layer to dry completely before applying the next. Once the filler is dry, sand it smooth to blend it with the surrounding wood.
5. How do I prevent the wood from splitting when inserting screws into the rocking chair runner?
To prevent the wood from splitting when inserting screws into the rocking chair runner, always drill pilot holes first. The pilot holes should be slightly smaller than the screw’s shank. This allows the screws to grip the wood without forcing it apart. You can also use a countersink bit to create a recess for the screw heads, allowing them to sit flush with the surface.
6. What should I do if the rocking chair runner is completely broken in half?
If the rocking chair runner is completely broken in half, you may need to replace it entirely. Follow the steps outlined in Section 5 of this guide to remove the old runner, create a new runner, and attach it to the chair frame.
7. How do I match the stain color when repairing a rocking chair runner?
To match the stain color when repairing a rocking chair runner, start by identifying the type of stain used on the original chair. Then, visit a local hardware store or woodworking supplier and select a stain that closely matches the original color. Test the stain on a scrap piece of wood before applying it to the chair to ensure a good match.
8. Can I use a power sander to sand the repaired area of the rocking chair runner?
Yes, you can use a power sander to sand the repaired area of the rocking chair runner, but be careful not to sand too aggressively. Use a fine-grit sandpaper (e.g., 220 grit) and apply light pressure to avoid removing too much material. It’s best to start with a lower speed setting and gradually increase it as needed.
9. How do I protect the repaired area of the rocking chair runner from future damage?
To protect the repaired area of the rocking chair runner from future damage, apply a clear finish, such as varnish, lacquer, or polyurethane. This will create a protective barrier that resists scratches, moisture, and wear. Apply the finish in thin, even coats, allowing each coat to dry completely before applying the next.
10. Is it worth it to repair a broken rocking chair runner, or should I just buy a new chair?
Whether it’s worth it to repair a broken rocking chair runner depends on several factors, including the value of the chair, the extent of the damage, and your DIY skills. If the chair is an antique or has sentimental value, it’s likely worth repairing. If the damage is minor and you’re comfortable with basic woodworking techniques, you can save money by repairing it yourself. However, if the damage is extensive or you’re not confident in your abilities, it may be best to hire a professional furniture restorer or consider buying a new chair.
Rocking chairs often hold sentimental value, and repairing them can be a rewarding experience. By following this guide and using the right tools and materials, you can restore your beloved rocker to its former glory. Remember to visit Rockscapes.net for all your landscaping and stone supply needs, and let us help you create the perfect outdoor oasis.
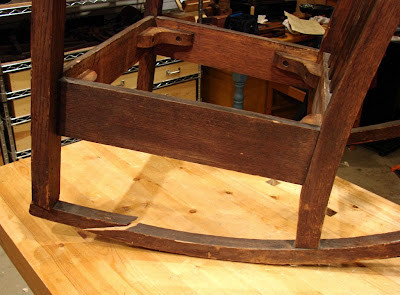 Rocking chair with broken runner before repair
Understanding the importance of grain direction is crucial in preventing future breaks, ensuring the longevity of your rocking chair.
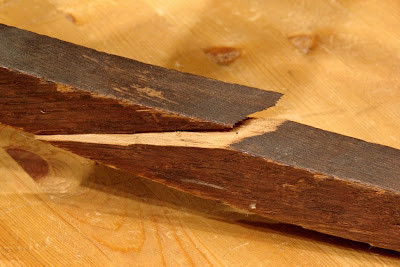 Close-up of split rocking chair runner showing wood grain
Loosening the screws and rotating the broken parts allows for easy access to the surfaces needing glue. Remember to protect your floors during the repair process.
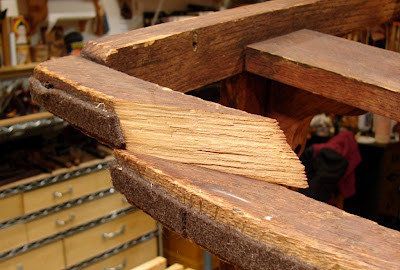 Rocking chair runner being prepared for gluing with screws loosened
The glue combined with a clamp swarm creates a strong, secure hold, ensuring the repaired runner is as sturdy as the original.
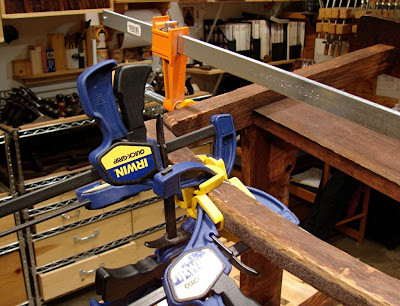 Clamps holding glued rocking chair runner
Driving finish screws across the joint after gluing provides extra reinforcement, ensuring a long-lasting repair for your rocking chair runner.
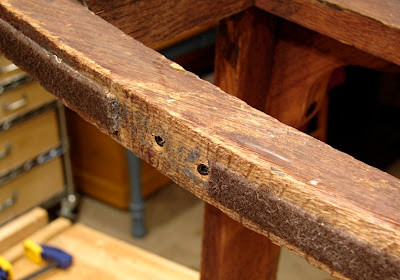 Rocking chair runner reinforced with finish screws
For personalized assistance and expert advice, contact us at rockscapes.net, located at 1151 S Forest Ave, Tempe, AZ 85281, United States, or call +1 (480) 965-9011.