Melted crayon rocks offer a fantastic and colorful way to recycle old crayons and create unique decorative pieces for your home or garden, and here at rockscapes.net, we’re all about bringing natural elements and creative flair together. This guide will walk you through how to transform ordinary stones into vibrant works of art, perfect for adding a personal touch to your rock garden, paperweights, or unique gifts. Dive into the world of rock painting, melted crayon art, and discover the joy of creating beautiful stone crafts.
1. What Are Melted Crayon Rocks and Why Make Them?
Melted crayon rocks are ordinary stones transformed into colorful art pieces by melting crayons onto their surface. You should make them because they’re a fun, easy, and eco-friendly project. They repurpose old crayons, add a unique decorative touch to your space, and make personalized gifts.
These eye-catching creations are more than just colorful decorations; they are a testament to the beauty of upcycling and creative expression. They combine the natural appeal of stones with the vibrant hues of crayons, offering a unique way to personalize your rock garden, add a playful touch to your desk as paperweights, or create memorable gifts for friends and family. The process is simple, engaging, and yields stunning results.
2. Who Would Enjoy Making Melted Crayon Rocks?
Anyone who enjoys crafts, DIY projects, or upcycling will enjoy making melted crayon rocks. It’s a great activity for families, art enthusiasts, and those looking for unique home décor ideas.
- Families: This project is perfect for involving kids in creative activities. It teaches them about recycling and allows them to express their artistic side.
- Art Enthusiasts: If you love experimenting with colors and textures, melted crayon rocks offer a new canvas to explore your creativity.
- DIY Home Decorators: Those looking to add a personal touch to their home will find this project rewarding. The finished rocks can be used as paperweights, garden decorations, or unique display pieces.
- Gift Givers: Melted crayon rocks make thoughtful, personalized gifts for any occasion. They show that you put time and effort into creating something special.
- Upcyclers: If you’re passionate about reducing waste and repurposing materials, this project is a fantastic way to give old crayons a new life.
3. What Materials Do You Need to Make Melted Crayon Rocks?
To make melted crayon rocks, you’ll need:
- Smooth, clean rocks
- Old crayons (peeled)
- An oven or heat gun
- A baking sheet or heat-resistant surface
- Oven mitts or tongs
- Newspaper or protective covering for your workspace
3.1. Smooth, Clean Rocks
The foundation of your art piece. Smooth rocks provide the best surface for the crayon wax to adhere to, ensuring a vibrant and even distribution of color. Cleanliness is key, as any dirt or debris can interfere with the melting process and affect the final look.
- Sourcing: Look for rocks in your backyard, local parks (where permitted), or craft stores.
- Preparation: Wash the rocks with soap and water, then let them dry completely before starting the project.
3.2. Old Crayons (Peeled)
The heart of your color palette. Using old crayons is an excellent way to recycle and give them a new purpose. Peeling the paper off beforehand ensures a smooth, even melt and prevents any unwanted paper residue on your rocks.
- Collection: Gather old crayons from your home, school, or community centers.
- Preparation: Remove the paper wrapping from each crayon. This can be a fun, albeit slightly tedious, task that kids can help with.
3.3. An Oven or Heat Gun
Your melting tool. An oven provides a consistent and even heat source, allowing the crayons to melt slowly and evenly. A heat gun offers more control over the melting process, allowing for more intricate designs and patterns.
- Oven: Preheat your oven to a low temperature (around 200°F or 93°C).
- Heat Gun: Use a low setting and keep the gun moving to avoid overheating any one area.
3.4. A Baking Sheet or Heat-Resistant Surface
A safe platform for your rocks. A baking sheet protects your oven from any dripping wax and makes it easy to transfer the rocks in and out. A heat-resistant surface is essential when using a heat gun to protect your workspace.
- Baking Sheet: Line it with parchment paper for easy cleanup.
- Heat-Resistant Surface: A silicone mat or old ceramic tile works well.
3.5. Oven Mitts or Tongs
Essential safety equipment. Handling hot rocks and baking sheets requires protection to prevent burns.
- Oven Mitts: Provide a secure grip and insulation from the heat.
- Tongs: Useful for picking up and moving the hot rocks with precision.
3.6. Newspaper or Protective Covering for Your Workspace
A barrier against messes. Melting crayons can be a messy process, so covering your workspace is essential to protect it from drips and spills.
- Newspaper: An affordable and readily available option.
- Plastic Tablecloth: Reusable and easy to clean.
4. How Do You Make Melted Crayon Rocks Using an Oven?
Making melted crayon rocks with an oven is straightforward. Here are the steps:
- Preheat your oven to 200°F (93°C).
- Place the rocks on a baking sheet lined with parchment paper.
- Bake the rocks for 10-15 minutes to warm them up.
- Remove the baking sheet from the oven using oven mitts.
- Quickly place crayon pieces on the warm rocks, allowing them to melt.
- Experiment with different colors and patterns.
- Let the rocks cool completely on the baking sheet before handling.
4.1. Safety First
Before embarking on this colorful journey, let’s emphasize the importance of safety. Working with heat can be risky, especially when children are involved. Ensure that all steps involving the oven are handled by an adult. Keep a close eye on the melting process to prevent any accidents or overheating. By prioritizing safety, you can enjoy this creative activity without any worries.
4.2. Step-by-Step Guide
Now, let’s dive into the step-by-step guide on creating your melted crayon rocks using an oven.
4.2.1. Preheat Your Oven
Begin by preheating your oven to a low temperature of 200°F (93°C). This gentle heat will warm the rocks without causing them to crack or explode. Ensure that the oven is properly preheated before moving on to the next step.
4.2.2. Prepare the Rocks
While the oven is preheating, prepare the rocks by placing them on a baking sheet lined with parchment paper. This will prevent the rocks from sticking to the baking sheet and make cleanup easier. Arrange the rocks in a single layer, leaving enough space between them for the crayons to melt evenly.
4.2.3. Warm the Rocks
Once the oven is preheated, place the baking sheet with the rocks inside and let them warm up for 10-15 minutes. This will help the crayons melt more easily and adhere better to the surface of the rocks. Keep a close eye on the rocks to ensure they don’t get too hot.
4.2.4. Apply the Crayons
After warming the rocks, carefully remove the baking sheet from the oven using oven mitts. Working quickly, place crayon pieces on the warm rocks, allowing them to melt and spread. Experiment with different colors and patterns to create unique designs.
4.2.5. Get Creative
This is where the fun begins. Let your imagination run wild and experiment with different color combinations, patterns, and techniques. Try layering colors, creating swirls, or even using stencils to create intricate designs. The possibilities are endless.
4.2.6. Cool and Harden
Once you’re satisfied with your designs, let the rocks cool completely on the baking sheet before handling them. This will allow the crayon wax to harden and adhere firmly to the surface of the rocks. Avoid touching the rocks while they’re still warm to prevent smudging or distorting the designs.
5. How Do You Make Melted Crayon Rocks Using a Heat Gun?
Using a heat gun offers more control. Here’s how:
- Place the rock on a heat-resistant surface.
- Hold the heat gun a few inches away from the rock.
- Apply crayon pieces to the rock.
- Use the heat gun to melt the crayons, moving it around to distribute the colors evenly.
- Continue adding colors and melting them until you achieve the desired effect.
- Let the rock cool completely.
5.1. Safety First
Before starting, it’s important to prioritize safety. Heat guns can get very hot, so always use caution. Work in a well-ventilated area to avoid inhaling fumes from the melting crayons. Keep the heat gun moving to prevent overheating any one spot. And never leave the heat gun unattended while it’s turned on.
5.2. Step-by-Step Guide
Now that you’re aware of the safety precautions, let’s dive into the step-by-step guide on How To Make Melted Crayon Rocks using a heat gun.
5.2.1. Prepare Your Workspace
Before you begin, set up your workspace. Place the rock on a heat-resistant surface, such as a silicone mat or ceramic tile. This will protect your table or countertop from the heat.
5.2.2. Position the Heat Gun
Hold the heat gun a few inches away from the rock. It’s important to maintain a safe distance to avoid scorching the crayons or overheating the rock.
5.2.3. Apply Crayon Pieces
Now comes the fun part: applying the crayon pieces to the rock. You can break the crayons into small pieces or use whole crayons, depending on the effect you want to achieve. Place the crayon pieces directly on the surface of the rock, arranging them in any pattern or design you like.
5.2.4. Melt the Crayons
Once the crayon pieces are in place, turn on the heat gun and direct the heat towards the crayons. As the crayons melt, they will begin to spread and blend together, creating a colorful, marbled effect. Move the heat gun around to distribute the colors evenly and prevent any one spot from overheating.
5.2.5. Add More Colors
Continue adding colors and melting them until you achieve the desired effect. You can layer different colors on top of each other to create depth and dimension. Experiment with different techniques, such as swirling the melted crayons with a toothpick or creating patterns with a stencil.
5.2.6. Let the Rock Cool
Once you’re satisfied with your design, turn off the heat gun and let the rock cool completely. This will allow the melted crayons to harden and set, creating a durable and long-lasting finish.
6. What Are Some Creative Ideas for Melted Crayon Rocks?
The possibilities are endless. Here are a few ideas to get you started:
- Rainbow Rocks: Use all the colors of the rainbow for a vibrant, cheerful look.
- Ocean Theme: Blues, greens, and whites can create a calming ocean-inspired design.
- Galaxy Rocks: Dark blues, purples, and glitter can mimic the look of a galaxy.
- Monochrome: Stick to one color family for a sleek, modern look.
- Holiday Themes: Red and green for Christmas, orange and black for Halloween, etc.
6.1 Rainbow Rocks
Unleash the full spectrum of colors with rainbow rocks. These vibrant creations capture the essence of joy and positivity. Perfect for adding a splash of color to any space, rainbow rocks make delightful decorations or thoughtful gifts.
To create rainbow rocks, gather crayons in all the colors of the rainbow: red, orange, yellow, green, blue, indigo, and violet. Arrange the crayons in the order of the rainbow, either in stripes or a swirling pattern. As the crayons melt, they will blend together, creating a beautiful gradient of colors.
6.2 Ocean Theme
Bring the tranquility of the ocean into your home with ocean-themed rocks. These calming creations evoke the serenity of the sea, making them ideal for creating a relaxing atmosphere. Whether used as paperweights or decorative accents, ocean-themed rocks add a touch of coastal charm to any space.
To create ocean-themed rocks, use crayons in shades of blue, green, and white. Experiment with different techniques to mimic the movement of the waves, such as swirling the colors together or creating layered effects.
6.3 Galaxy Rocks
Embark on an intergalactic adventure with galaxy rocks. These mesmerizing creations capture the beauty and mystery of the cosmos. Adorned with dark blues, purples, and shimmering glitter, galaxy rocks make captivating decorations or unique gifts for space enthusiasts.
To create galaxy rocks, use crayons in dark shades of blue and purple. Sprinkle glitter over the melted crayons to add a touch of sparkle and create the illusion of stars. Experiment with different techniques to create depth and dimension, such as layering colors or using a toothpick to create swirling patterns.
6.4 Monochrome
Embrace simplicity and sophistication with monochrome rocks. These sleek creations exude modern elegance, making them ideal for minimalist decor styles. Whether used as paperweights or decorative accents, monochrome rocks add a touch of understated charm to any space.
To create monochrome rocks, stick to one color family, such as shades of gray, white, or black. Experiment with different techniques to create subtle variations in tone and texture.
6.5 Holiday Themes
Celebrate the seasons with holiday-themed rocks. These festive creations capture the spirit of each holiday, making them perfect for adding a touch of seasonal cheer to your home. Whether it’s red and green for Christmas, orange and black for Halloween, or pastel colors for Easter, holiday-themed rocks make delightful decorations or thoughtful gifts.
To create holiday-themed rocks, use crayons in colors that are associated with each holiday. Experiment with different techniques to create festive designs, such as stripes, polka dots, or holiday-themed motifs.
7. What Safety Precautions Should You Take?
- Always supervise children when using an oven or heat gun.
- Use oven mitts or tongs to handle hot rocks.
- Work in a well-ventilated area.
- Protect your workspace with newspaper or a heat-resistant mat.
- Avoid touching the rocks until they have cooled completely.
7.1. Supervision
Constant supervision is essential when children are involved in making melted crayon rocks. The use of ovens or heat guns requires adult supervision to ensure safety.
7.2. Protective Gear
Always use oven mitts or tongs to handle hot rocks. These protective measures prevent burns and ensure a safe crafting experience.
7.3. Ventilation
Working in a well-ventilated area is crucial to avoid inhaling fumes from the melting crayons. Proper ventilation helps maintain a safe and comfortable environment.
7.4. Workspace Protection
Protect your workspace with newspaper or a heat-resistant mat to prevent messes and damage. This simple precaution can save you time and effort in cleanup.
7.5. Cooling Period
Avoid touching the rocks until they have cooled completely to prevent burns and smudging. Patience is key to achieving the desired result.
8. How Do You Clean Up After Making Melted Crayon Rocks?
Cleaning up is easy:
- Let any melted crayon wax cool and harden.
- Peel off the wax from the baking sheet or heat-resistant surface.
- Wipe down your workspace with a damp cloth.
- Dispose of any remaining crayon pieces properly.
8.1. Cooling
Allow any melted crayon wax to cool and harden. This makes the cleanup process much easier and more efficient.
8.2. Peeling
Peel off the wax from the baking sheet or heat-resistant surface. Once the wax has hardened, it can be easily peeled off without leaving any residue.
8.3. Wiping
Wipe down your workspace with a damp cloth to remove any remaining crayon residue. This ensures a clean and tidy crafting area.
8.4. Disposal
Dispose of any remaining crayon pieces properly. Check local recycling guidelines for crayon disposal to minimize environmental impact.
9. What Are Some Other Uses for Melted Crayon Rocks?
Beyond decoration, melted crayon rocks can be used as:
- Paperweights
- Garden markers
- Desk accessories
- Unique gifts
- Educational tools for teaching colors
9.1. Paperweights
Melted crayon rocks make excellent paperweights. Their weight and colorful designs add functionality and aesthetic appeal to any desk or workspace.
9.2. Garden Markers
Use melted crayon rocks as garden markers to label plants and herbs. Their durability and weather resistance make them ideal for outdoor use.
9.3. Desk Accessories
Add a touch of personality to your desk with melted crayon rocks. They can be used as decorative accents or organizational tools to keep your workspace tidy and stylish.
9.4. Unique Gifts
Melted crayon rocks make thoughtful and personalized gifts for any occasion. Their handmade charm and unique designs show that you care.
9.5. Educational Tools
Use melted crayon rocks as educational tools for teaching colors. Their vibrant hues and tactile texture make learning fun and engaging for children.
10. How Can You Make Your Melted Crayon Rocks Last Longer?
To ensure your creations stand the test of time:
- Apply a clear sealant or varnish to protect the crayon wax.
- Avoid placing the rocks in direct sunlight or extreme temperatures.
- Handle them with care to prevent chipping or damage.
- Clean them gently with a soft cloth if needed.
10.1. Sealant Application
Apply a clear sealant or varnish to protect the crayon wax from the elements. This protective layer enhances the durability and longevity of your melted crayon rocks.
10.2. Environmental Protection
Avoid placing the rocks in direct sunlight or extreme temperatures to prevent fading or melting. Keeping them in a stable environment preserves their vibrant colors and structural integrity.
10.3. Gentle Handling
Handle the rocks with care to prevent chipping or damage. Rough handling can compromise the delicate crayon designs, so gentle handling is essential.
10.4. Soft Cleaning
Clean the rocks gently with a soft cloth if needed to remove dust or debris. Avoid harsh chemicals or abrasive cleaners that could damage the crayon wax.
11. Where Can You Find Inspiration for Your Melted Crayon Rocks?
Look online for inspiration:
- Craft blogs
- DIY websites
- Rockscapes.net for unique stone and landscape ideas
11.1. Pinterest
Pinterest is a treasure trove of creative ideas for melted crayon rocks. Explore various designs, color combinations, and techniques to inspire your own creations.
11.2. Instagram
Follow artists and crafters on Instagram for a daily dose of inspiration. See how others are using melted crayons to create stunning rock art.
11.3. Craft Blogs
Read craft blogs for tutorials, tips, and tricks on making melted crayon rocks. Learn from experienced crafters and discover new techniques to elevate your skills.
11.4. DIY Websites
Explore DIY websites for step-by-step guides and project ideas. These websites offer a wealth of information on various crafting projects, including melted crayon rocks.
11.5. Rockscapes.net
Visit Rockscapes.net for unique stone and landscape ideas. Discover how to incorporate melted crayon rocks into your outdoor decor and create stunning garden displays.
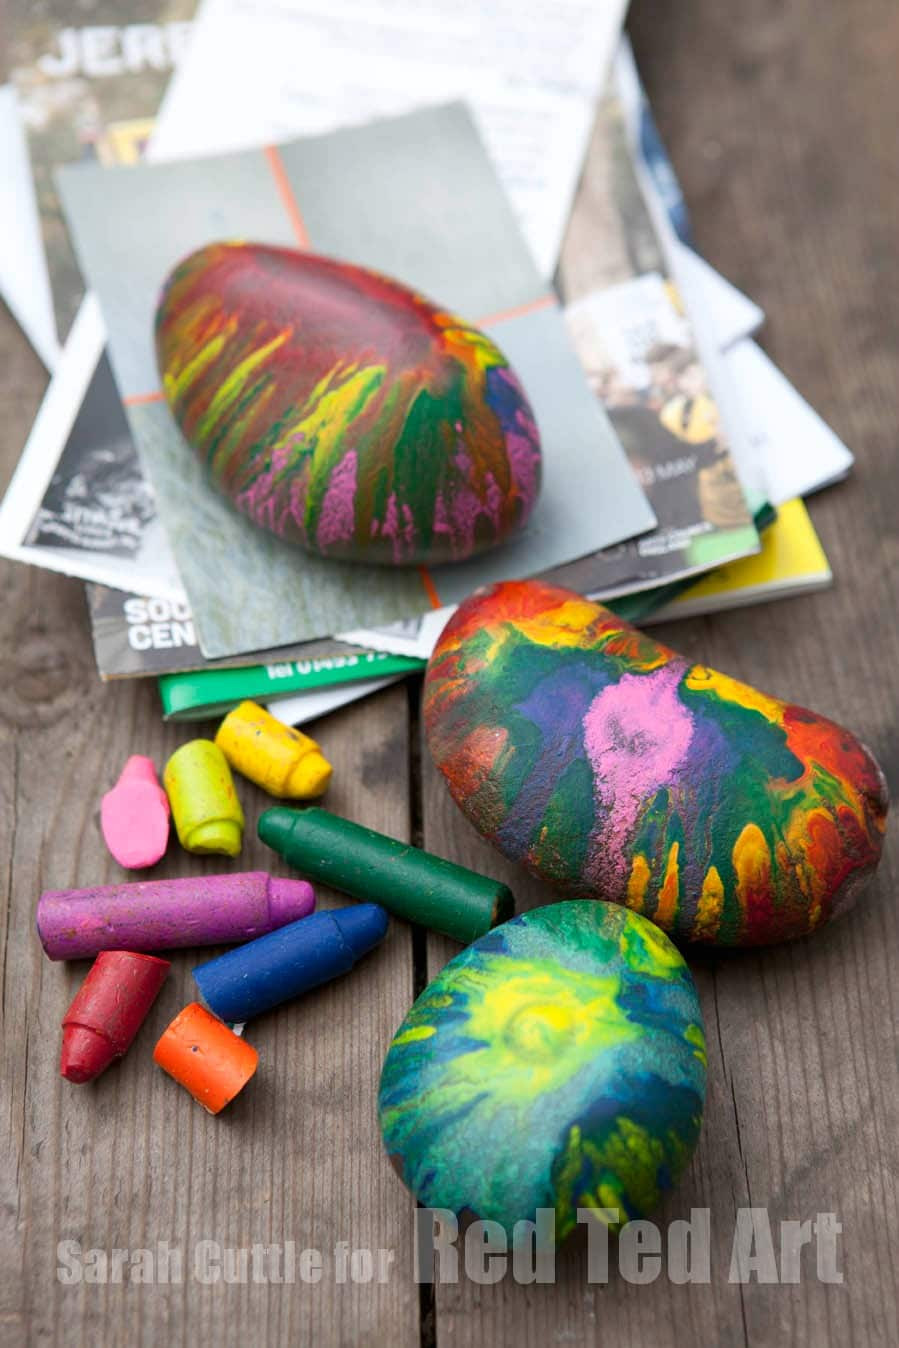 Collection of easy crayon rock paper weights featuring colorful melted crayon designs.
12. What Are the Benefits of Making Melted Crayon Rocks?
Making melted crayon rocks offers numerous benefits:
- It’s a fun and creative activity.
- It’s a great way to recycle old crayons.
- It’s an affordable and accessible craft.
- It allows for personal expression and customization.
- It creates unique and beautiful decorations.
12.1. Creative Activity
Making melted crayon rocks is a fun and creative activity that stimulates imagination and artistic expression. It provides an outlet for creativity and relaxation.
12.2. Recycling
It’s a great way to recycle old crayons and reduce waste. Instead of throwing away broken or unwanted crayons, you can repurpose them into beautiful works of art.
12.3. Affordability
It’s an affordable and accessible craft that requires minimal supplies. With just a few basic materials, you can create stunning melted crayon rocks without breaking the bank.
12.4. Personalization
It allows for personal expression and customization. You can experiment with different colors, patterns, and techniques to create unique designs that reflect your personal style.
12.5. Unique Decorations
It creates unique and beautiful decorations that add charm and personality to your home. Melted crayon rocks make thoughtful gifts or eye-catching accents for any space.
13. Can You Sell Melted Crayon Rocks?
Yes, melted crayon rocks can be a unique and popular item to sell at craft fairs, online marketplaces, or local shops.
13.1. Craft Fairs
Melted crayon rocks are a hit at craft fairs, attracting customers with their vibrant colors and handmade charm. Display them creatively to catch the eye of potential buyers.
13.2. Online Marketplaces
List your melted crayon rocks on online marketplaces like Etsy to reach a wider audience. Showcase their unique designs and personalization options to stand out from the competition.
13.3. Local Shops
Partner with local shops to sell your melted crayon rocks on consignment. Collaborate with retailers to create eye-catching displays that highlight the beauty and craftsmanship of your creations.
14. What Kind of Rocks Work Best?
Smooth, flat rocks work best for this project. River rocks, beach stones, or even craft store rocks are all good options.
14.1. River Rocks
River rocks are smooth and rounded, making them ideal for creating melted crayon rock art. Their natural shapes and textures add visual interest to your designs.
14.2. Beach Stones
Beach stones offer a variety of shapes and sizes, perfect for experimenting with different melted crayon techniques. Their smooth surfaces provide an ideal canvas for creating stunning works of art.
14.3. Craft Store Rocks
Craft store rocks are readily available and come in various shapes and sizes. Their affordability and convenience make them a popular choice for beginners and experienced crafters alike.
15. How Do You Prevent the Crayons from Smearing?
To prevent smearing, let the crayon wax cool and harden completely before handling the rocks. You can also apply a clear sealant to protect the design.
15.1. Cooling Period
Allow the crayon wax to cool and harden completely before handling the rocks. This ensures that the colors set properly and prevents smearing.
15.2. Sealant Application
Apply a clear sealant to protect the design from smudging or fading. This protective layer enhances the durability and longevity of your melted crayon rock art.
16. Can You Use This Technique on Other Surfaces?
While rocks are ideal, you can experiment with melting crayons on other heat-resistant surfaces like wood or ceramic tiles.
16.1. Wood
Experiment with melting crayons on wooden surfaces to create unique and rustic designs. Use heat-resistant wood and follow safety precautions to avoid accidents.
16.2. Ceramic Tiles
Ceramic tiles provide a smooth and durable surface for melting crayons. Create colorful patterns and designs that can be used as decorative accents or coasters.
17. What Are Some Tips for Blending Colors?
To blend colors effectively:
- Apply the crayons in layers, starting with the lighter colors.
- Use a heat gun or oven to melt the colors together gradually.
- Experiment with different blending techniques, such as swirling or feathering.
17.1. Layering
Apply the crayons in layers, starting with the lighter colors. This allows the colors to blend together seamlessly and creates depth and dimension.
17.2. Gradual Melting
Use a heat gun or oven to melt the colors together gradually. This prevents the crayons from overheating and allows you to control the blending process.
17.3. Blending Techniques
Experiment with different blending techniques, such as swirling or feathering. These techniques create unique and artistic effects that enhance the beauty of your melted crayon rock art.
18. How Do You Remove Crayon Wax from Surfaces?
To remove crayon wax from surfaces:
- Heat the wax with a hairdryer.
- Wipe away the melted wax with a clean cloth.
- Use a mild detergent to remove any remaining residue.
18.1. Heat Application
Heat the wax with a hairdryer to soften it and make it easier to remove. This gentle heat helps loosen the crayon wax without damaging the underlying surface.
18.2. Wiping
Wipe away the melted wax with a clean cloth. Use gentle pressure to lift the wax from the surface, working in small sections until it’s completely removed.
18.3. Residue Removal
Use a mild detergent to remove any remaining residue. This ensures that the surface is clean and free from crayon wax, leaving it looking as good as new.
19. What Kind of Crayons Work Best?
Most standard wax crayons will work, but higher quality crayons tend to produce more vibrant and consistent colors.
19.1. Standard Wax Crayons
Standard wax crayons are a budget-friendly option for creating melted crayon rock art. They come in a wide range of colors and are readily available at most art supply stores.
19.2. High-Quality Crayons
High-quality crayons tend to produce more vibrant and consistent colors, resulting in more stunning and long-lasting designs. Invest in high-quality crayons for professional-looking results.
20. How Can You Make the Colors More Vibrant?
To make the colors more vibrant:
- Use high-quality crayons.
- Apply multiple layers of crayon wax.
- Use a white base coat to make the colors pop.
20.1. Quality Crayons
Use high-quality crayons that are known for their rich pigmentation and smooth application. High-quality crayons produce more vibrant and consistent colors.
20.2. Layering Application
Apply multiple layers of crayon wax to intensify the colors. Layering creates depth and dimension, resulting in more visually appealing designs.
20.3. White Base Coat
Use a white base coat to make the colors pop. The white base provides a neutral canvas that allows the crayon colors to stand out and appear more vibrant.
21. FAQ About Making Melted Crayon Rocks
21.1. Is it safe to melt crayons?
Yes, melting crayons is generally safe as long as you follow safety precautions like working in a well-ventilated area and supervising children.
21.2. Can I use any type of rock?
Smooth, flat rocks work best, but you can experiment with different textures.
21.3. How hot should the oven be?
Preheat your oven to a low temperature, around 200°F (93°C).
21.4. How long do the rocks need to bake?
Bake the rocks for 10-15 minutes to warm them up before applying the crayons.
21.5. Can I use a microwave instead of an oven?
No, do not use a microwave, as it can cause the rocks to explode.
21.6. What if I don’t have a heat gun?
An oven is a great alternative for melting crayons.
21.7. How do I clean crayon wax off my baking sheet?
Let the wax cool and harden, then peel it off.
21.8. Can I sell these at a craft fair?
Yes, melted crayon rocks are a popular item at craft fairs.
21.9. How do I make the colors last longer?
Apply a clear sealant to protect the crayon wax.
21.10. What other crafts can I do with melted crayons?
Melted crayons can be used for canvas art, candle making, and more.
22. Ready to Get Started?
Melted crayon rocks are a fun, easy, and rewarding project for all ages. Whether you’re looking to recycle old crayons, create unique decorations, or simply unleash your creativity, this guide provides everything you need to get started. So gather your supplies, follow the steps, and let your imagination run wild.
23. Discover More at Rockscapes.net
Looking for more inspiration and unique stone ideas? Visit rockscapes.net for a wide range of landscape designs, stone types, and DIY projects. Our experts can help you find the perfect stones for your next project and provide tips for creating stunning rockscapes.
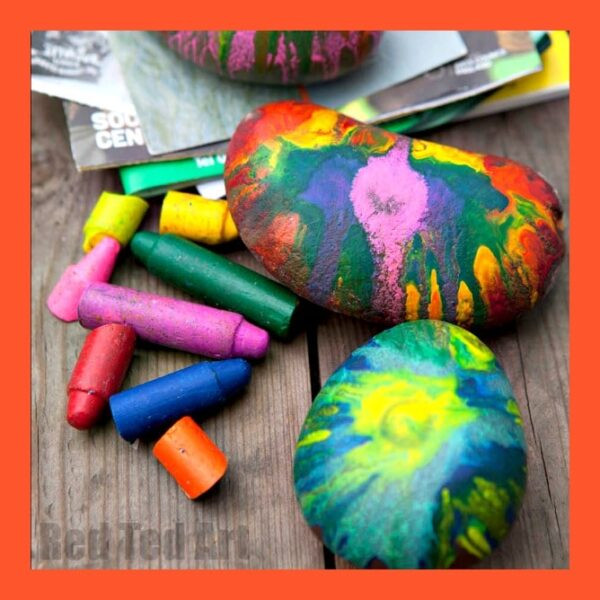 Easy Crayon Rock Paper Weights featuring colorful melted crayon designs displayed on a work surface.
Transform your garden, create unique gifts, and express your creativity with melted crayon rocks. Start your colorful journey today!
Address: 1151 S Forest Ave, Tempe, AZ 85281, United States
Phone: +1 (480) 965-9011
Website: rockscapes.net
24. Transform Your Landscape with Rockscapes.net
Ready to take your landscape to the next level? At rockscapes.net, we offer a wide range of stone options and expert advice to help you create the perfect outdoor space. From unique rock formations to stunning garden designs, we have everything you need to bring your vision to life.
- Explore Our Stone Collection: Discover a variety of natural stones, including granite, slate, and river rock.
- Get Expert Advice: Our team of landscape professionals can help you choose the right stones for your project.
- Find Inspiration: Browse our gallery of stunning rockscapes and garden designs.
Don’t wait any longer to create the landscape of your dreams. Visit rockscapes.net today and start your journey towards a more beautiful and sustainable outdoor space.
Call to Action: Visit rockscapes.net now to explore our stone collection and get expert advice on creating your dream landscape.
Remember, the possibilities are endless when it comes to creating with stone. Let your imagination run wild and see what you can create with the help of rockscapes.net!
 Father's Day crafts for kids featuring handmade gifts and creative projects suitable for children to make.
25. Broken Crayons? Don’t Throw Them Away!
Discover surprising uses for broken crayons and turn them into creative masterpieces. Visit rockscapes.net for innovative ideas and inspiration. Unleash your creativity and make the most of your art supplies!