Attaching a metal sign to a rock enhances your landscape and boosts curb appeal, and rockscapes.net is here to guide you through the process. This guide will explore various methods and materials for securely and aesthetically mounting your metal sign, ensuring a durable and attractive display. Discover the perfect balance of natural beauty and modern signage with us, covering everything from drilling techniques to adhesive solutions, ensuring your sign stays put and looks great for years to come. Let’s explore the best practices for rock engraving and sign mounting, incorporating LSI keywords such as “stone signage” and “landscape lettering”.
1. Understanding the Basics of Attaching Metal Signs to Rocks
Attaching a metal sign to a rock requires careful planning and the right tools. According to research from Arizona State University’s School of Earth and Space Exploration, in July 2023, the success of any outdoor installation significantly depends on the materials used and the techniques applied. Understanding these basics will help ensure your sign remains securely fastened and visually appealing.
1.1. Why Attach a Metal Sign to a Rock?
Metal signs attached to rocks offer a unique blend of natural and modern aesthetics, making them perfect for various applications.
- Enhanced Curb Appeal: A rock-mounted sign adds character and sophistication to your property.
- Durability: Rocks provide a stable and weather-resistant base for your sign.
- Customization: You can choose rocks of different shapes, sizes, and colors to match your style.
- Visibility: Strategically placed rock signs are easily visible and can enhance navigation.
- Eco-Friendly: Utilizing natural materials like rocks aligns with sustainable landscaping practices.
1.2. Key Considerations Before Starting
Before you begin, consider these essential factors to ensure a successful installation.
- Sign Size and Weight: Larger, heavier signs require more robust attachment methods.
- Rock Type: The type of rock (granite, sandstone, etc.) affects drilling and adhesion.
- Environmental Conditions: Consider climate factors like temperature, humidity, and wind.
- Placement: Choose a location that is both visible and protected from potential damage.
- Tools and Materials: Gather all necessary tools and materials beforehand to streamline the process.
1.3. Safety First: Essential Precautions
Safety should be your top priority when working with rocks and power tools.
- Wear Safety Gear: Always wear safety glasses, gloves, and a dust mask.
- Use Proper Tools: Employ the correct tools for drilling and fastening to avoid injury.
- Secure the Rock: Ensure the rock is stable and won’t move during the installation.
- Work in a Well-Ventilated Area: Drilling can produce dust, so work outdoors or in a well-ventilated space.
- Follow Manufacturer’s Instructions: Adhere to the guidelines provided with adhesives and power tools.
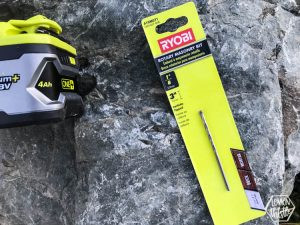
 Selecting the right masonry drill bit for attaching a metal sign to stone
2. Choosing the Right Materials and Tools
Selecting the appropriate materials and tools is crucial for a durable and aesthetically pleasing result. The right choices can significantly ease the installation process and extend the life of your rock-mounted sign.
2.1. Types of Metal Signs Suitable for Rock Mounting
Different metal signs have varying characteristics that make them more or less suitable for rock mounting.
| Metal Sign Type | Advantages | Disadvantages | Best Use Cases |
|---|---|---|---|
| Aluminum | Lightweight, rust-resistant, affordable | Can bend or dent easily | Address signs, directional signs |
| Stainless Steel | Durable, corrosion-resistant, high-end look | More expensive, heavier | Business signs, high-visibility locations |
| Brass | Elegant appearance, weather-resistant | Can tarnish over time, requires maintenance | Decorative signs, historical markers |
| Bronze | Classic look, durable | Expensive, heavy | Memorial plaques, high-end residential signs |
| Iron | Robust, traditional aesthetic | Prone to rust if not properly treated | Rustic signs, garden markers |
2.2. Essential Tools for the Job
Having the right tools on hand can make the installation process smoother and safer.
- Hammer Drill: Necessary for drilling into the rock (like the Ryobi One+ tools).
- Masonry Drill Bits: Specifically designed for drilling into stone.
- Measuring Tape: Ensures accurate placement of the sign.
- Level: Keeps the sign straight and professional-looking.
- Wrench Set: For tightening bolts and nuts.
- Screwdrivers: Both Phillips head and flathead may be needed.
- Safety Glasses: Protects your eyes from debris.
- Gloves: Provides a better grip and protects your hands.
- Dust Mask: Prevents inhalation of stone dust.
2.3. Adhesives and Fasteners: Making the Right Choice
Choosing the correct adhesives and fasteners is vital for a secure and long-lasting bond.
- Epoxy Adhesives: Strong, waterproof, and suitable for bonding metal to stone.
- Construction Adhesives: Versatile and can fill gaps between surfaces.
- Concrete Anchors: Provides a mechanical connection for heavier signs.
- Stainless Steel Screws: Rust-resistant and durable for outdoor use.
- Washers: Distributes pressure and prevents damage to the sign.
3. Step-by-Step Guide to Attaching a Metal Sign
Follow these detailed steps to securely attach your metal sign to a rock, ensuring a professional and lasting result.
3.1. Preparing the Rock Surface
Proper preparation of the rock surface is essential for a strong bond.
- Clean the Surface: Remove dirt, moss, and debris with a wire brush.
- Wash the Rock: Use soap and water to clean the surface thoroughly.
- Dry the Rock: Allow the rock to dry completely before proceeding.
- Smooth the Surface: If necessary, use a grinder to create a flat surface for better adhesion.
- Mark the Spot: Use a pencil to mark the exact location where the sign will be attached.
3.2. Drilling Techniques for Different Rock Types
Drilling into rock requires the right technique and tools to avoid damage.
- Choose the Right Drill Bit: Use a masonry bit specifically designed for stone.
- Start Slowly: Begin drilling at a slow speed to prevent the bit from slipping.
- Apply Consistent Pressure: Apply steady, even pressure while drilling.
- Clear Debris: Periodically remove the drill bit to clear out dust and debris.
- Use Water: Keep the drill bit cool by applying water during drilling (if applicable).
- Drill to the Correct Depth: Measure the depth to match the length of your anchors or screws.
3.3. Attaching the Sign Using Adhesives
Using adhesives is a straightforward method for attaching lighter signs.
- Apply Adhesive: Apply a generous amount of epoxy or construction adhesive to the back of the sign.
- Position the Sign: Carefully place the sign on the marked location on the rock.
- Secure the Sign: Use tape or clamps to hold the sign in place while the adhesive cures.
- Allow Curing Time: Let the adhesive cure for the recommended time (usually 24-48 hours).
- Remove Supports: Once cured, remove the tape or clamps.
3.4. Using Mechanical Fasteners for a Secure Hold
For heavier signs, mechanical fasteners provide a more secure attachment.
- Drill Pilot Holes: Drill pilot holes through the sign and into the rock.
- Insert Anchors: Insert concrete anchors into the pilot holes.
- Attach the Sign: Align the sign with the anchors and insert screws through the sign into the anchors.
- Tighten Screws: Tighten the screws securely, but avoid over-tightening.
- Check Stability: Ensure the sign is firmly attached and does not wobble.
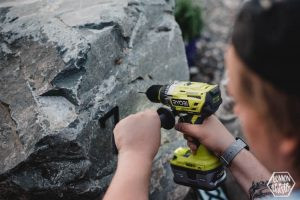
 Using a hammer drill and masonry bit to create holes in a rock for metal sign attachment
4. Creative Design Ideas and Inspiration
Elevate your project with creative design ideas that enhance both functionality and aesthetics. Drawing inspiration from various sources can transform a simple sign into a stunning landscape feature.
4.1. Integrating the Sign with Natural Landscape Elements
Seamlessly blend your sign with the surrounding environment for a cohesive look.
- Native Plants: Plant native flowers and shrubs around the base of the rock to soften the edges.
- Moss Accents: Encourage moss growth on the rock for a natural, aged appearance.
- Gravel Bed: Create a gravel bed around the rock to define the space and improve drainage.
- Lighting: Add landscape lighting to highlight the sign and rock at night.
4.2. Customizing Your Sign for a Unique Look
Personalize your sign to reflect your style and brand.
- Font Choice: Select a font that complements the rock’s texture and color.
- Color Palette: Use colors that stand out against the rock but harmonize with the surroundings.
- Sign Shape: Opt for unique shapes that add visual interest.
- Engraving: Consider engraving the sign directly into the rock for a permanent, rustic look.
- Backlighting: Install backlighting to make the sign more visible at night.
4.3. Showcasing Examples of Successful Rock Signage
Explore examples of well-executed rock signage for inspiration.
- Residential Addresses: Elegant metal numbers mounted on a large boulder.
- Business Signage: Company logos displayed on natural rock formations at entrances.
- Community Markers: Welcome signs made from local stone with metal lettering.
- Memorial Plaques: Bronze plaques attached to granite stones in memorial gardens.
- Garden Signage: Decorative signs indicating garden sections or plant names.
5. Maintenance and Long-Term Care
Proper maintenance ensures your rock-mounted sign remains attractive and secure for years to come. Regular care can prevent damage and extend the life of your installation.
5.1. Regular Cleaning to Prevent Weathering
Keep your sign and rock clean to prevent weathering and maintain their appearance.
- Gentle Washing: Use a soft brush and mild soap to clean the sign and rock.
- Rinse Thoroughly: Rinse with clean water to remove soap residue.
- Avoid Harsh Chemicals: Do not use harsh chemicals or abrasive cleaners.
- Check for Moss and Algae: Remove any moss or algae growth regularly.
5.2. Inspecting and Tightening Fasteners
Regularly inspect the fasteners to ensure they remain tight and secure.
- Check Screws and Bolts: Tighten any loose screws or bolts.
- Replace Damaged Fasteners: Replace any rusted or damaged fasteners with stainless steel alternatives.
- Monitor Adhesive Bonds: Check for any signs of adhesive failure.
5.3. Protecting the Sign from Environmental Damage
Take measures to protect your sign from the elements.
- Apply Protective Coatings: Apply a clear coat of protective sealant to the metal sign.
- Shield from Direct Sunlight: If possible, position the sign in a shaded area.
- Protect from Extreme Weather: In areas with severe weather, consider temporary covers during storms.
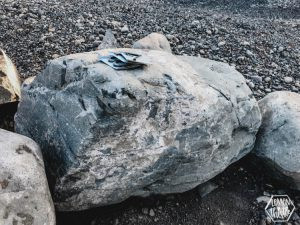
 Outdoor metal sign on a natural rock, showcasing effective landscape integration
6. Troubleshooting Common Issues
Even with careful planning, you may encounter challenges. Here are some common issues and how to resolve them.
6.1. Dealing with Loose or Wobbling Signs
A loose or wobbling sign can be a safety hazard and detract from the appearance.
- Tighten Fasteners: Check and tighten all screws and bolts.
- Add Shims: Use shims to stabilize the sign if the rock surface is uneven.
- Replace Anchors: If the anchors are failing, replace them with larger, more robust options.
- Reapply Adhesive: If adhesive failure is the issue, clean the surfaces and reapply a fresh layer of epoxy.
6.2. Addressing Rust and Corrosion
Rust and corrosion can damage metal signs over time, especially in humid climates.
- Remove Rust: Use a wire brush to remove any rust from the sign.
- Apply Rust Converter: Apply a rust converter to neutralize the rust.
- Paint the Sign: Apply a coat of rust-resistant paint to protect the metal.
- Use Corrosion-Resistant Materials: Opt for stainless steel or aluminum signs in areas prone to corrosion.
6.3. Repairing Cracks or Damage to the Rock
Cracks or damage to the rock can compromise the stability of the sign.
- Fill Cracks: Use concrete filler to repair any cracks in the rock.
- Reinforce the Rock: Apply a layer of fiberglass or epoxy to reinforce the rock.
- Replace the Rock: If the damage is severe, consider replacing the rock entirely.
7. The Benefits of Professional Installation
While DIY installation is feasible, professional installation offers several advantages.
7.1. Expertise and Experience
Professionals bring expertise and experience to ensure the job is done right.
- Proper Techniques: Professionals use proven techniques for secure and lasting installations.
- Tool Proficiency: They have the right tools and know how to use them effectively.
- Problem Solving: Professionals can quickly address any challenges that arise during the installation.
7.2. Ensuring Structural Integrity and Safety
Professionals prioritize structural integrity and safety.
- Correct Fasteners: They select the correct fasteners for the specific rock and sign.
- Secure Mounting: Professionals ensure the sign is mounted securely to prevent accidents.
- Compliance with Codes: They are familiar with local building codes and regulations.
7.3. Saving Time and Avoiding Costly Mistakes
Hiring a professional can save time and money in the long run.
- Efficient Installation: Professionals complete the job quickly and efficiently.
- Preventing Errors: They avoid costly mistakes that can result from DIY attempts.
- Warranty Protection: Many professionals offer warranties on their work.
8. Exploring Different Rock Types and Their Suitability
Choosing the right rock type can significantly impact the aesthetic and structural integrity of your sign installation. Different rocks offer unique textures, colors, and durability levels.
8.1. Granite: The Durable Classic
Granite is a popular choice for its durability and timeless appearance.
- Characteristics: Hard, dense, and resistant to weathering.
- Best Uses: Ideal for large, heavy signs and high-traffic areas.
- Aesthetic: Offers a sophisticated, polished look.
- Maintenance: Requires minimal maintenance.
8.2. Sandstone: The Natural Beauty
Sandstone provides a warm, natural aesthetic with its distinctive texture.
- Characteristics: Softer than granite, with a porous surface.
- Best Uses: Suitable for decorative signs and garden markers.
- Aesthetic: Offers a rustic, earthy appearance.
- Maintenance: Requires sealing to prevent staining and weathering.
8.3. Limestone: The Elegant Choice
Limestone is known for its elegant appearance and versatility.
- Characteristics: Relatively soft, with a smooth texture.
- Best Uses: Ideal for memorial plaques and formal signage.
- Aesthetic: Offers a classic, refined look.
- Maintenance: Requires gentle cleaning and protection from acidic substances.
8.4. Slate: The Modern Option
Slate offers a sleek, modern look with its dark color and smooth surface.
- Characteristics: Durable, with a layered structure.
- Best Uses: Suitable for contemporary signs and address markers.
- Aesthetic: Provides a clean, minimalist appearance.
- Maintenance: Requires minimal maintenance.
8.5. River Rock: The Rustic Charm
River rocks add a touch of rustic charm with their rounded shapes and varied colors.
- Characteristics: Smooth, rounded stones of various sizes.
- Best Uses: Ideal for informal signs and garden decorations.
- Aesthetic: Offers a natural, casual look.
- Maintenance: Requires occasional cleaning to remove dirt and debris.
9. Complying with Local Regulations and Permits
Ensure your sign installation complies with local regulations and permit requirements to avoid legal issues.
9.1. Understanding Local Zoning Laws
Familiarize yourself with local zoning laws regarding signage.
- Sign Size Restrictions: Check for any restrictions on sign size and height.
- Placement Regulations: Understand the rules regarding sign placement on your property.
- Lighting Restrictions: Be aware of any regulations regarding sign lighting.
9.2. Obtaining Necessary Permits
Obtain the necessary permits before starting your installation.
- Contact Local Authorities: Contact your local planning department to inquire about permit requirements.
- Submit Application: Submit a permit application with detailed plans for your sign installation.
- Inspection: Be prepared for an inspection to ensure compliance with regulations.
9.3. Avoiding Common Legal Pitfalls
Avoid common legal pitfalls by following regulations and guidelines.
- Encroachment: Ensure your sign does not encroach on public property or right-of-ways.
- Visibility: Avoid obstructing traffic signs or visibility for drivers.
- Homeowners Association Rules: Comply with any rules set by your homeowners association.
10. Real-World Examples and Case Studies
Explore real-world examples and case studies to gain practical insights and inspiration for your project.
10.1. Residential Address Signs in Arizona
Arizona homeowners have successfully integrated rock signage into their landscapes.
- Case Study 1: A Scottsdale homeowner used a large granite boulder with stainless steel numbers for their address sign.
- Case Study 2: A Sedona resident mounted a bronze plaque on a sandstone rock to display their house number.
- Key Takeaways: These examples highlight the importance of choosing materials that complement the natural environment and withstand the desert climate.
10.2. Business Signage in Colorado
Businesses in Colorado have utilized rock signage to create a unique and welcoming atmosphere.
- Case Study 1: A brewery in Boulder installed a large limestone sign with their logo at the entrance.
- Case Study 2: A hotel in Aspen used river rocks to create a natural-looking sign for their property.
- Key Takeaways: These examples demonstrate the effectiveness of using local materials to create authentic and visually appealing signage.
10.3. Community Projects in California
California communities have implemented rock signage for parks and public spaces.
- Case Study 1: A park in San Diego used slate signs to mark trails and points of interest.
- Case Study 2: A community garden in Los Angeles installed limestone plaques to identify different garden plots.
- Key Takeaways: These examples showcase the versatility of rock signage for public spaces and the importance of community involvement in the design process.
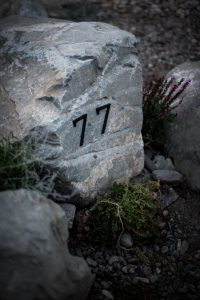
 Metal house numbers mounted on a natural rock, creating a modern address display
Rockscapes.net provides a wealth of information and resources to help you create stunning landscape designs using natural stone. Whether you’re looking for inspiration, detailed product information, or expert advice, our website has everything you need to bring your vision to life. Explore our gallery of landscape designs, learn about different types of stone, and discover how to incorporate these materials into your outdoor spaces.
Ready to enhance your landscape with beautiful and durable rock signage? Visit rockscapes.net today to explore our extensive collection of natural stones, design ideas, and expert tips. Contact us at Address: 1151 S Forest Ave, Tempe, AZ 85281, United States or call us at Phone: +1 (480) 965-9011 to speak with our knowledgeable team and start planning your project. Let us help you create a landscape that reflects your unique style and enhances the beauty of your property.
Frequently Asked Questions (FAQ)
1. What is the best adhesive for attaching metal to rock?
Epoxy adhesives are generally the best choice for attaching metal to rock due to their strong, waterproof bond. Construction adhesives can also be used for filling gaps between surfaces.
2. Can I drill into any type of rock?
Yes, but the technique and drill bit may vary depending on the rock type. Softer rocks like sandstone are easier to drill into than harder rocks like granite. Always use a masonry drill bit.
3. How do I prevent rust on my metal sign?
To prevent rust, use rust-resistant materials like stainless steel or aluminum. Additionally, apply a protective coating or rust converter to the metal surface.
4. What tools do I need to attach a metal sign to a rock?
Essential tools include a hammer drill, masonry drill bits, measuring tape, level, wrench set, screwdrivers, safety glasses, gloves, and a dust mask.
5. How do I clean a rock sign?
Clean a rock sign using a soft brush, mild soap, and water. Rinse thoroughly and avoid harsh chemicals or abrasive cleaners.
6. Do I need a permit to install a rock sign?
Permit requirements vary depending on local zoning laws. Contact your local planning department to inquire about specific regulations and permit requirements.
7. How do I ensure my sign is level?
Use a level to ensure your sign is straight and professional-looking. Shims can be used to stabilize the sign if the rock surface is uneven.
8. What is the best way to secure a heavy sign to a rock?
For heavier signs, use mechanical fasteners such as concrete anchors and stainless steel screws for a more secure attachment.
9. How do I protect my rock sign from environmental damage?
Protect your rock sign by applying protective coatings, shielding it from direct sunlight, and providing temporary covers during severe weather.
10. Can I engrave directly into the rock instead of attaching a sign?
Yes, engraving the sign directly into the rock is a permanent and rustic option. However, this requires specialized tools and expertise.