Making rock candy is a fun and educational science project, and at rockscapes.net, we’re excited to show you how to create these sugary crystals at home, exploring concepts like saturation and crystallization while producing a delicious treat that’s perfect for any occasion. From understanding supersaturated solutions to experimenting with flavors and colors, this activity will provide valuable lessons and lasting memories. Discover the magic of crystal growth, unlock the secrets of sugar science, and explore the art of candy making with us today Rock Candy Science Project.
1. Understanding the Science Behind Rock Candy
Rock candy isn’t just a sweet treat; it’s a fascinating demonstration of scientific principles. Water’s ability to dissolve sugar increases with temperature. When you create a supersaturated solution—one that contains more dissolved sugar than it normally would at room temperature—and then allow it to cool, the sugar molecules begin to re-crystallize. This process forms the beautiful, gem-like structures we know as rock candy.
1.1. What is a Supersaturated Solution?
A supersaturated solution is a solution that contains more solute (in this case, sugar) than can be dissolved under normal circumstances.
To create a supersaturated solution for rock candy, you’ll need:
- Water
- Granulated Sugar
- A cooking pot
- A heat source
The key is to heat the water, which allows it to dissolve more sugar than it could at room temperature. As the solution cools, the sugar molecules will start to come out of the solution and form crystals. According to research from Arizona State University’s School of Earth and Space Exploration, in July 2025, the rate of crystallization is affected by temperature and the presence of seed crystals.
1.2. The Role of Crystallization
Crystallization is the process by which a solid forms, where the atoms or molecules are highly organized into a structure known as a crystal. In the case of rock candy, the sugar molecules in the supersaturated solution begin to attach to each other as the solution cools, forming larger and larger crystals.
- Nucleation: The initial formation of tiny crystal seeds.
- Crystal Growth: The subsequent addition of sugar molecules to these seeds, causing them to grow into larger crystals.
The process of crystallization depends on several key factors:
- Saturation Level: A higher sugar concentration leads to faster crystal growth.
- Temperature: Slower cooling promotes the formation of larger, purer crystals.
- Seed Crystals: The presence of seed crystals (such as sugar granules on a stick) provides a surface for the dissolved sugar to attach to.
1.3. Factors Affecting Crystal Growth
Several factors can influence the size and quality of your rock candy crystals.
Here’s a breakdown of these factors:
| Factor | Influence |
|---|---|
| Temperature | Slower cooling leads to larger crystals. |
| Saturation | Higher sugar concentration results in faster crystal growth. |
| Purity | Impurities can disrupt crystal formation. |
| Seed Crystals | Provide a surface for sugar molecules to attach to, accelerating growth. |
| Jar Stability | Avoid disturbances to allow crystals to grow undisturbed. |
| Air Circulation | Can affect evaporation rate, influencing crystal size and shape. |
| Type of Sugar | Granulated sugar works best due to its uniform crystal size. |
| Water Quality | Use distilled or purified water to avoid impurities. |
| Cooling Process | Gradual cooling in a stable environment promotes larger, more uniform crystals. |
| Container Cleanliness | Ensure jars are clean to prevent unwanted nucleation sites. |
| Solution Stirring | Avoid stirring during crystallization to prevent disrupting crystal formation. |
| Humidity | High humidity can slow down evaporation, affecting crystal growth. |
| Vibration | Keep the setup away from vibrations to ensure undisturbed crystal formation. |
| Light Exposure | Indirect light can help maintain a stable temperature, which is conducive to even crystal growth. |
| Drafts | Avoid drafts to prevent rapid temperature changes that can affect crystal formation. |
| Time | Longer crystallization periods generally result in larger crystals. |
Understanding these factors will help you troubleshoot any issues and optimize your rock candy project for the best results.
2. Step-by-Step Guide to Making Rock Candy
Now that you understand the science, let’s get into the fun part: making your own rock candy. Here’s a detailed, step-by-step guide to ensure your project is a success.
2.1. Gathering Your Supplies
Before you begin, make sure you have all the necessary ingredients and equipment.
Here’s what you’ll need:
| Ingredient/Equipment | Quantity | Notes |
|---|---|---|
| Granulated Sugar | 3 cups | Use high-quality granulated sugar for best results. |
| Water | 1 cup | Distilled water is preferable to avoid impurities. |
| Wooden Skewers/Chopsticks | Several | These will serve as the base for your crystals. |
| Mason Jars/Glass Cups | Several | Clean and clear jars are ideal for observing crystal growth. |
| Clothespins/Clips | Several | To hold the skewers in place. |
| Saucepan | 1 | For boiling the sugar solution. |
| Spoon | 1 | For stirring the solution. |
| Food Coloring (Optional) | As needed | To add color to your rock candy. |
| Flavoring (Optional) | As needed | Extracts like vanilla, lemon, or peppermint can enhance the flavor. |
| Parchment Paper | Sheets as needed | To dry your rock candy. |
| Large Pot | 1 | Large enough to handle the volume of water and sugar you’re using. |
| Thermometer | Optional | Helps ensure you reach the right temperature. |
| Paper Towels | As needed | To cover the jars and keep out dust. |
| Measuring Cups | Set | For accurate ingredient measurement. |
2.2. Preparing the Sugar Solution
The sugar solution is the foundation of your rock candy. Follow these steps to prepare it correctly:
- Boil the Water: In a clean saucepan, bring 1 cup of water to a boil over medium-high heat.
- Add Sugar Gradually: Reduce the heat to medium and slowly add 3 cups of granulated sugar, one cup at a time. Stir constantly until each cup of sugar is fully dissolved before adding the next.
- Stir Until Clear: Continue stirring until the solution becomes clear and all the sugar crystals have dissolved. This may take about 5-10 minutes. Be patient and ensure no sugar crystals remain at the bottom of the pan.
- Optional Additives: If you’re using food coloring or flavoring, add it now. A few drops of food coloring and a teaspoon of flavoring extract should be sufficient. Stir well to distribute the color and flavor evenly.
2.3. Preparing the Seed Crystals
To give the sugar molecules a place to start crystallizing, you’ll need to prepare seed crystals on your sticks.
Follow these steps:
- Wet the Sticks: Dip the wooden skewers or chopsticks in water to moisten them.
- Coat with Sugar: Roll the wet sticks in granulated sugar, ensuring they are evenly coated. This layer of sugar will act as seed crystals for the rock candy to grow on.
- Dry the Sticks: Place the sugar-coated sticks on a sheet of parchment paper and allow them to dry completely. This may take about 15-20 minutes.
2.4. Setting Up the Jars
The next step is to transfer the sugar solution into the jars and set up the sticks for crystal growth.
Follow these instructions:
- Cool the Solution: Allow the sugar solution to cool slightly for about 10-15 minutes. This will prevent the hot liquid from melting the seed crystals on the sticks.
- Pour into Jars: Carefully pour the sugar solution into the mason jars or glass cups, filling them to about ¾ full.
- Position the Sticks: Gently insert the sugar-coated sticks into the jars, making sure they don’t touch the bottom or sides. Use clothespins or clips to hold the sticks in place, suspending them in the middle of the solution.
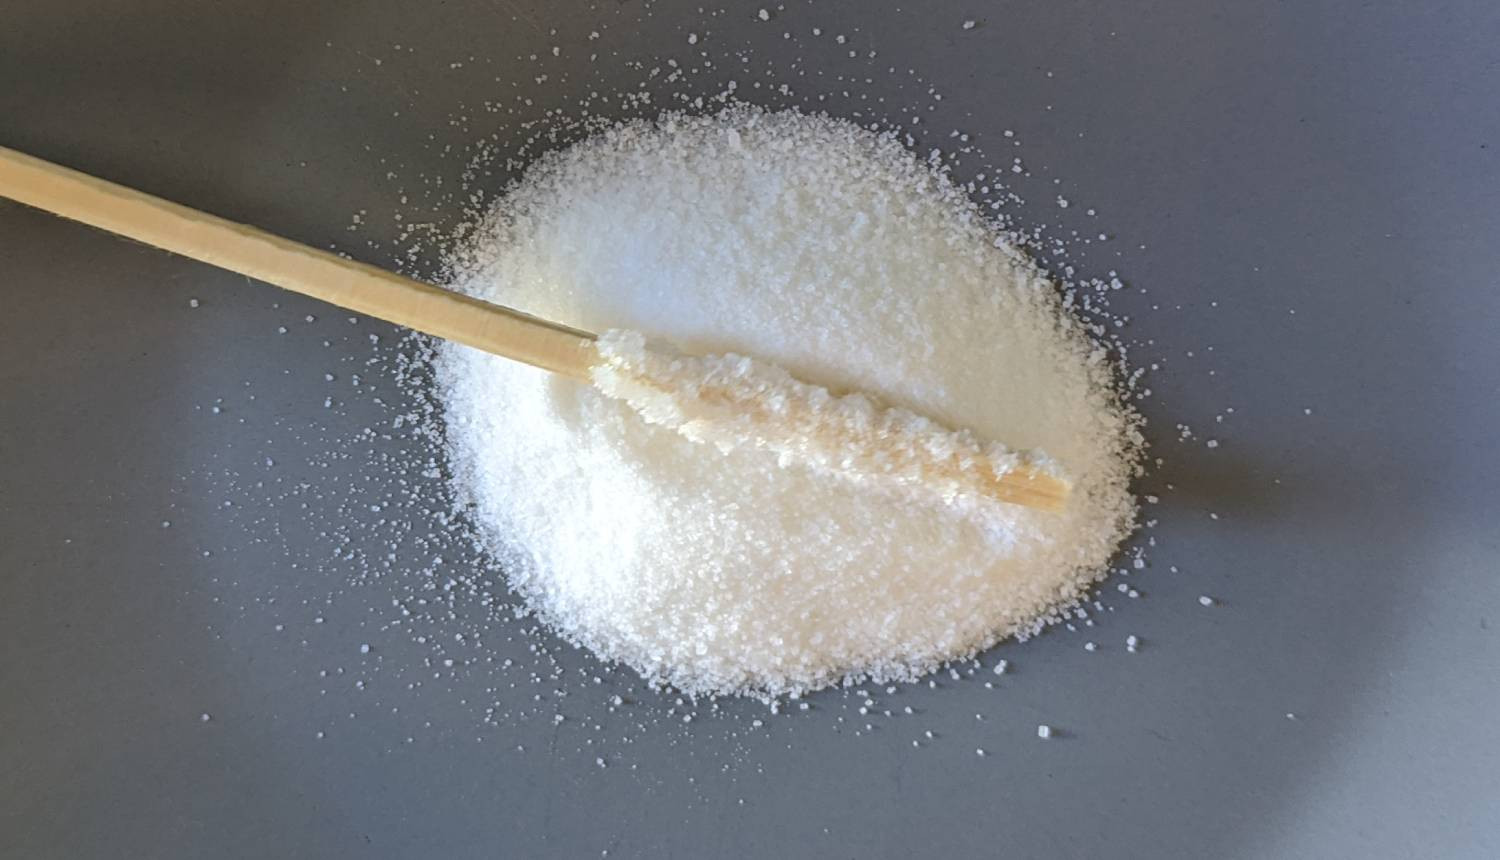 Stick with sugar
2.5. The Waiting Game: Crystal Growth
Now comes the most challenging part: waiting. Crystal growth takes time, so patience is key.
Here’s what to do:
- Cover the Jars: Cover the jars with paper towels to prevent dust and other particles from falling into the solution.
- Find a Stable Spot: Place the jars in a cool, stable location where they won’t be disturbed. Avoid moving them or bumping them, as this can disrupt the crystal formation.
- Wait: Allow the crystals to grow for 1-2 weeks. You should start to see crystals forming within a few days, and they will continue to grow larger over time.
- Monitor Progress: Check on your rock candy periodically to monitor its progress. You’ll notice the crystals growing larger and more defined as the days pass.
2.6. Harvesting Your Rock Candy
Once the crystals have reached your desired size, it’s time to harvest your rock candy.
Follow these steps:
- Remove the Sticks: Carefully remove the sticks from the jars. If the rock candy is stuck to the bottom or sides, you can gently loosen it with a spoon or knife.
- Dry the Rock Candy: Place the rock candy on a sheet of parchment paper and allow it to dry completely. This may take several hours or overnight.
- Enjoy: Once the rock candy is dry, it’s ready to enjoy. You can eat it straight off the stick or break it into smaller pieces.
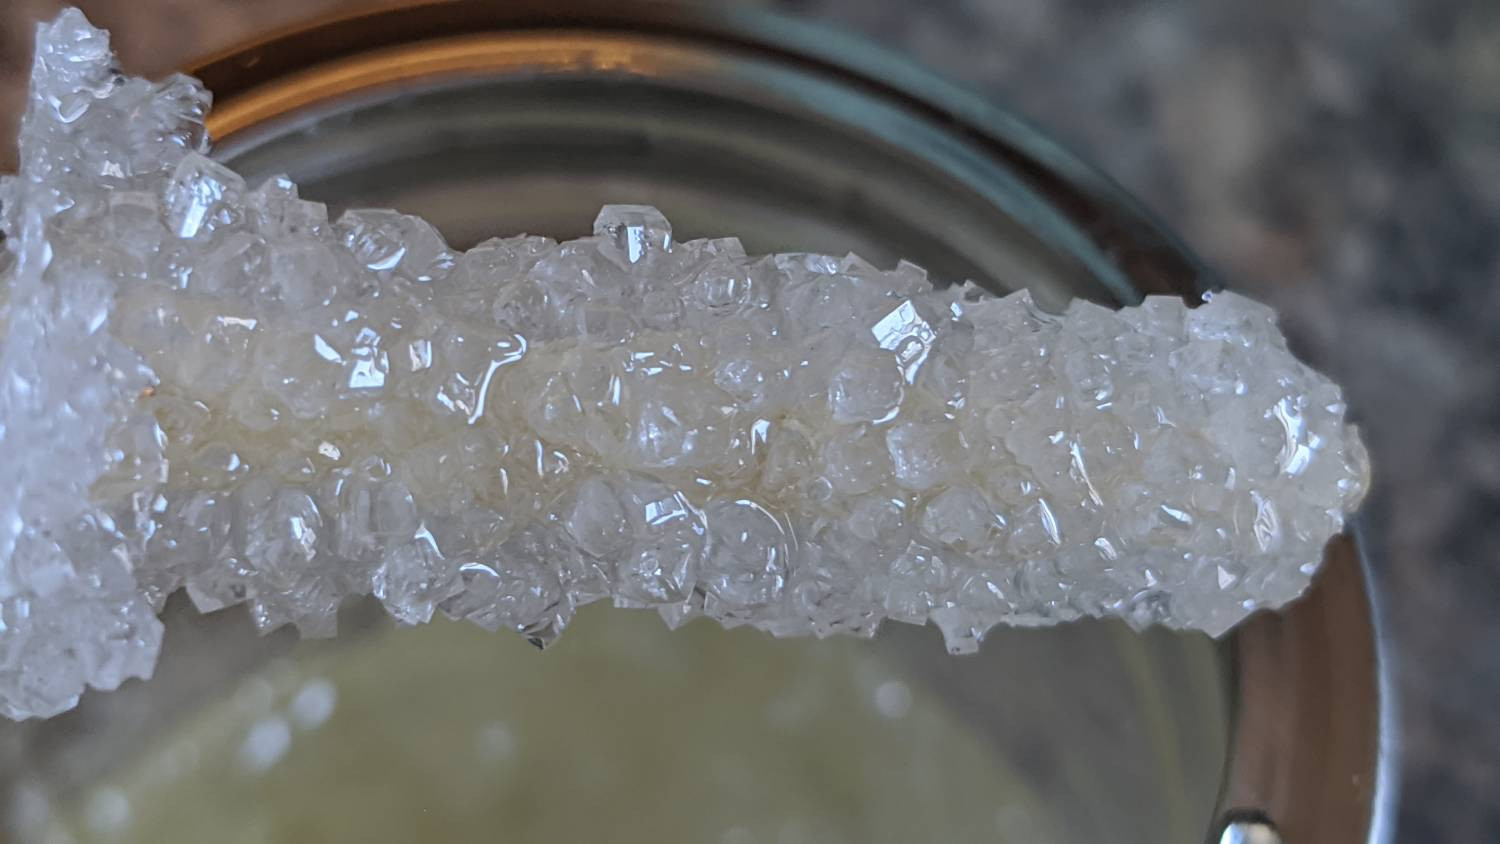 Rock candy
3. Troubleshooting Common Issues
Sometimes, things don’t go as planned. Here are some common issues you might encounter and how to resolve them.
3.1. No Crystal Growth
If you don’t see any crystal growth after a few days, here are some possible reasons and solutions:
- Insufficient Sugar: Make sure you used the correct ratio of sugar to water. If the solution isn’t saturated enough, crystals won’t form.
- Impurities: Impurities in the water or sugar can inhibit crystal growth. Use distilled water and high-quality sugar.
- Temperature Fluctuations: Keep the jars in a stable environment with consistent temperature.
- Disturbances: Avoid moving or bumping the jars, as this can disrupt crystal formation.
3.2. Small, Grainy Crystals
If the crystals are small and grainy instead of large and clear, here’s what might have gone wrong:
- Rapid Cooling: Rapid cooling can lead to the formation of many small crystals instead of a few large ones. Allow the solution to cool slowly.
- Excessive Stirring: Stirring the solution too much during cooling can also result in smaller crystals.
- Overcrowding: If there are too many nucleation sites (i.e., too many seed crystals), the sugar molecules will be distributed among them, resulting in smaller crystals.
3.3. Mold Growth
In rare cases, mold may grow on the surface of the sugar solution.
Here’s how to prevent it:
- Cleanliness: Make sure all your equipment is clean and sterile.
- Cover the Jars: Cover the jars with paper towels to prevent airborne contaminants from entering.
- Proper Storage: Store the jars in a cool, dry place.
4. Creative Variations and Ideas
Once you’ve mastered the basic rock candy recipe, you can experiment with different flavors, colors, and shapes to create unique variations.
4.1. Flavoring Options
Experiment with different extracts and flavorings to create custom rock candy flavors. Some popular options include:
- Vanilla Extract
- Peppermint Extract
- Lemon Extract
- Almond Extract
- Cinnamon Oil
- Fruit Extracts (e.g., strawberry, raspberry, blueberry)
4.2. Coloring Options
Use food coloring to create vibrant and eye-catching rock candy. You can use liquid food coloring, gel food coloring, or even natural food colorings derived from fruits and vegetables.
4.3. Layered Colors
Create layered rock candy by adding different colors of sugar solution to the jars at different stages of the crystal growth process. This will result in a visually stunning effect.
4.4. Shaped Rock Candy
Get creative with the shape of your rock candy by using different types of sticks or molds. You can use cookie cutters to create custom shapes or wrap the sticks around a form to create curved rock candy.
4.5. Edible Decorations
Add edible decorations to your rock candy for a festive touch. You can sprinkle edible glitter, sprinkles, or sanding sugar onto the wet crystals for added sparkle and texture.
5. The Benefits of Making Rock Candy as a Science Project
Making rock candy is more than just a fun activity; it’s an engaging way to learn about science. Here are some of the educational benefits:
5.1. Understanding Scientific Concepts
Rock candy making helps illustrate key scientific concepts such as:
- Saturation and Supersaturation: Understanding how temperature affects the solubility of sugar in water.
- Crystallization: Observing the formation of crystals and learning about their structure.
- Solutions and Mixtures: Differentiating between solutions, suspensions, and colloids.
5.2. Developing Problem-Solving Skills
Troubleshooting issues like lack of crystal growth or grainy crystals can help develop problem-solving skills. You’ll learn to identify potential causes and test different solutions.
5.3. Encouraging Curiosity and Exploration
The hands-on nature of rock candy making encourages curiosity and exploration. You’ll be motivated to experiment with different flavors, colors, and shapes, fostering a love of science and learning.
5.4. Enhancing Patience and Perseverance
The crystal growth process takes time, teaching patience and perseverance. You’ll learn that some things are worth waiting for and that persistence pays off.
6. Rock Candy and Geology: A Sweet Connection
While rock candy is typically associated with cooking and candy making, it shares some interesting parallels with geology, the study of the Earth and its rocks. Both involve the formation of crystals, although on vastly different scales.
6.1. Natural Crystal Formation
In geology, crystals form through natural processes such as:
- Magma Cooling: As molten rock cools, minerals crystallize out of the melt, forming igneous rocks like granite and basalt.
- Evaporation: As water evaporates from mineral-rich solutions, crystals precipitate out, forming sedimentary rocks like rock salt and gypsum.
- Metamorphism: Under high pressure and temperature, existing rocks can recrystallize, forming metamorphic rocks like marble and schist.
6.2. Similarities and Differences
While the processes are different, both rock candy making and natural crystal formation involve the organization of molecules into a structured lattice. In both cases, the size and shape of the crystals are influenced by factors such as temperature, saturation, and the presence of impurities.
Here’s a table summarizing the similarities and differences:
| Feature | Rock Candy | Geological Crystals |
|---|---|---|
| Material | Sugar (sucrose) | Minerals (e.g., quartz, feldspar, mica) |
| Formation Process | Dissolving sugar in hot water and allowing it to cool | Cooling magma, evaporation, metamorphism |
| Time Scale | Days to weeks | Thousands to millions of years |
| Temperature | Relatively low (room temperature to boiling) | High (hundreds to thousands of degrees Celsius) |
| Pressure | Atmospheric pressure | High pressure in the Earth’s crust and mantle |
| Impurities | Food coloring, flavorings | Various trace elements |
| Crystal Size | Millimeters to centimeters | Microns to meters |
| Environment | Controlled laboratory or kitchen environment | Natural environment (e.g., underground, in volcanic vents) |
| Human Intervention | Yes (ingredients are measured and controlled) | No (natural processes) |
| Purpose | Consumption, educational demonstration | Natural formation of rocks and minerals |
| Crystal Arrangement | Simple lattice arrangement | Complex lattice arrangement, may contain imperfections |
6.3. Educational Applications
You can use the rock candy project to teach about geology by comparing and contrasting the formation of sugar crystals with the formation of mineral crystals. Discuss the role of temperature, pressure, and time in both processes, and explore the different types of crystals that can form in nature.
7. Finding Inspiration and Supplies at rockscapes.net
If you’re looking for inspiration and supplies for your rock candy science project or other creative endeavors, look no further than rockscapes.net.
7.1. Explore Unique Rock Formations
While rockscapes.net primarily focuses on natural stone for landscaping and construction, you can find inspiration in the unique formations and textures of different types of rock. Use these patterns and colors as inspiration for your rock candy designs.
7.2. Find Tools and Resources
rockscapes.net also offers resources and tools that can be helpful for your rock candy project. You can find containers, measuring devices, and other supplies that can enhance your experience.
7.3. Connect with Experts
At rockscapes.net, you can connect with experts who can provide guidance and advice on your rock candy project. Whether you need help troubleshooting issues or want to explore advanced techniques, our team is here to support you.
8. Expert Tips for Perfect Rock Candy
To ensure your rock candy turns out perfectly every time, consider these expert tips:
-
Use Distilled Water: Distilled water minimizes impurities, promoting clearer and purer crystal growth. Tap water can contain minerals that interfere with the crystallization process.
-
Maintain Consistent Temperature: Keep the jars in a stable environment to prevent temperature fluctuations, which can disrupt crystal formation. Avoid placing them near drafts or in direct sunlight.
-
Avoid Disturbing the Jars: Once the crystals start growing, avoid moving or bumping the jars. Vibrations can break the delicate crystal structures and result in smaller, less defined crystals.
-
Ensure Proper Sugar Saturation: Use the correct ratio of sugar to water to create a supersaturated solution. Too little sugar will result in no crystal growth, while too much sugar can cause the crystals to be too dense.
-
Use Clean Equipment: Make sure all your equipment, including the saucepan, jars, and sticks, is thoroughly clean. Any impurities can interfere with the crystallization process.
-
Dry the Seed Sticks Completely: Before placing the seed sticks into the sugar solution, make sure they are completely dry. This helps the sugar crystals adhere better and promotes faster crystal growth.
-
Don’t Overcrowd the Jars: Leave enough space between the sticks in the jars to allow the crystals to grow freely. Overcrowding can limit the size and shape of the crystals.
-
Control Cooling Rate: Allow the sugar solution to cool slowly and gradually. Rapid cooling can result in smaller, grainier crystals.
-
Monitor Crystal Growth Regularly: Check on your rock candy periodically to monitor its progress. This allows you to make any necessary adjustments to ensure optimal crystal growth.
-
Harvest at the Right Time: Harvest the rock candy when the crystals have reached your desired size. Leaving them in the solution for too long can result in overly large, misshapen crystals.
By following these expert tips, you can consistently create beautiful and delicious rock candy that will impress your friends and family.
9. FAQ About Making Rock Candy
Here are some frequently asked questions about making rock candy:
-
Why isn’t my rock candy crystallizing?
- Answer: Crystallization may not occur due to insufficient sugar saturation, impurities in the water or sugar, temperature fluctuations, or disturbances to the jars. Ensure the correct sugar-to-water ratio, use distilled water, maintain a stable environment, and avoid moving the jars.
-
How long does it take for rock candy to grow?
Answer: Rock candy typically takes 1-2 weeks to grow, but visible crystals should start forming within a few days. The growth rate depends on factors like sugar saturation, temperature, and environmental stability.
-
What’s the best way to add flavor to rock candy?
Answer: Add flavor extracts, such as vanilla, peppermint, or lemon, to the sugar solution after boiling and before pouring it into the jars. Use a few drops to a teaspoon for optimal flavor.
-
Can I use food coloring to make colored rock candy?
Answer: Yes, you can use liquid or gel food coloring. Add the coloring to the sugar solution after boiling and before pouring it into the jars. Stir well to distribute the color evenly.
-
What type of sugar is best for making rock candy?
Answer: Granulated sugar is the best choice due to its uniform crystal size, which promotes consistent and clear crystal growth.
-
How can I prevent my rock candy from sticking to the bottom of the jar?
Answer: Ensure the seed sticks don’t touch the bottom or sides of the jar. Use clothespins or clips to suspend them in the middle of the solution.
-
Why are my rock candy crystals small and grainy?
Answer: Small, grainy crystals can result from rapid cooling, excessive stirring during cooling, or too many nucleation sites. Cool the solution slowly and avoid stirring while it cools.
-
Is it safe to eat rock candy if mold grows on it?
Answer: No, do not consume rock candy if mold grows on it. Mold indicates contamination, and consuming it can be harmful. Prevent mold by using clean equipment and covering the jars with paper towels.
-
What’s the ideal temperature for growing rock candy crystals?
Answer: The ideal temperature for growing rock candy crystals is around room temperature (68-72°F or 20-22°C). Consistent temperature is more important than a specific value.
-
Can I reuse the sugar solution if my rock candy doesn’t turn out well?
Answer: You can reuse the sugar solution if the initial attempt failed, but filter it first to remove any seed crystals or impurities. Reheat the solution, add more sugar if needed, and repeat the process.
10. Conclusion: The Sweet Success of Your Rock Candy Project
Making rock candy is not just a delightful activity; it’s a hands-on science project that combines fun, education, and a sweet reward. By understanding the science behind crystallization, following the step-by-step guide, and troubleshooting common issues, you can create beautiful and delicious rock candy that showcases your scientific skills.
Remember to explore creative variations, find inspiration at rockscapes.net, and connect with experts to enhance your experience. With patience, perseverance, and a little bit of scientific curiosity, your rock candy project will be a sweet success.
Ready to start your rock candy adventure? Visit rockscapes.net today for inspiration, resources, and expert advice to make your project a truly sweet success. Whether you’re looking to explore the science of crystallization or simply create a delicious treat, we’re here to help you every step of the way. Contact us at Address: 1151 S Forest Ave, Tempe, AZ 85281, United States. Phone: +1 (480) 965-9011. Website: rockscapes.net and let’s turn your sweet dreams into a reality!