What Type Of Paint To Paint Rocks for eye-catching rock art and durable outdoor displays? Rock painting is a fun and creative activity that brings joy and positivity to communities, and rockscapes.net is here to guide you through it all. Selecting the right paint ensures your artistic creations withstand the elements and spread kindness for years to come, and here, we’ll explore the best paints, preparation techniques, and sealing methods for vibrant, long-lasting rock designs, including acrylic paints, paint pens, and outdoor sealants for stunning stone art.
1. Understanding the Basics of Rock Painting
Rock painting, also known as stone painting or rock art, has surged in popularity as a creative outlet and a means of spreading positivity within communities. More than just a simple craft, it’s a way to connect with others through art and thoughtful messages. But before diving into this colorful activity, it’s crucial to understand the fundamentals, especially when it comes to choosing the right kind of paint.
1.1. Why Choose Rock Painting?
Rock painting offers numerous benefits for individuals of all ages.
- Creative Expression: It provides a unique canvas for artistic expression, allowing you to explore different styles and techniques.
- Stress Relief: The act of painting can be therapeutic, helping to reduce stress and promote relaxation.
- Community Engagement: Painted rocks can be hidden in public places for others to find, fostering a sense of community and connection.
- Spreading Kindness: Inspirational messages and colorful designs on rocks can brighten someone’s day and spread positivity.
1.2. The Importance of Selecting the Right Paint
Choosing the correct paint is paramount for successful rock painting. The ideal paint should adhere well to the rock’s surface, be durable enough to withstand outdoor conditions, and offer vibrant colors that won’t fade easily.
- Adhesion: The paint must bond effectively with the rock to prevent peeling or chipping.
- Durability: Outdoor rocks are exposed to sunlight, rain, and temperature fluctuations, so the paint needs to be weather-resistant.
- Color Retention: High-quality paints maintain their vibrancy over time, ensuring your artwork remains eye-catching.
1.3. Safety Considerations
When selecting paints, it’s also important to consider safety aspects. Non-toxic paints are preferable, especially if children are involved in the rock-painting process. Ensure proper ventilation when using spray sealants to avoid inhaling harmful fumes.
2. Top Paint Types for Rock Painting
Choosing the right paint is crucial for creating stunning and durable rock art. Here’s a detailed look at the best types of paint for your rock painting projects.
2.1. Acrylic Paints
Acrylic paints are a popular choice for rock painting due to their versatility, vibrant colors, and durability. They adhere well to most surfaces, dry quickly, and are water-resistant once sealed.
2.1.1. Advantages of Acrylic Paints
- Versatility: Suitable for various techniques, from base coats to detailed designs.
- Vibrant Colors: Available in a wide range of colors that can be easily mixed.
- Quick Drying: Allows for layering and faster project completion.
- Water Resistance: Once sealed, acrylics can withstand outdoor conditions.
- Affordability: Generally more cost-effective compared to other paint types.
2.1.2. Best Acrylic Paint Brands for Rock Painting
Several brands offer high-quality acrylic paints ideal for rock painting:
| Brand | Product Highlights | Price Range |
|---|---|---|
| Arteza | Wide range of colors, smooth consistency, good coverage. | $15-30 |
| Apple Barrel | Budget-friendly, good for base coats, available in various colors. | $1-3 |
| Liquitex BASICS | High pigment concentration, excellent for detailed work, durable finish. | $5-15 |
| FolkArt | Good for decorative painting, matte finish, suitable for vintage-style designs. | $2-5 |
| Golden Artist Colors | Professional-grade, exceptional color intensity, archival quality. | $10-25 |
Note: Prices are approximate and may vary based on location and retailer.
2.1.3. Tips for Using Acrylic Paints
- Preparation: Clean the rock thoroughly with soap and water before painting.
- Base Coat: Apply a base coat of acrylic paint to create a smooth surface for your design.
- Layering: Allow each layer of paint to dry completely before adding the next to prevent smudging.
- Blending: Use a soft brush to blend colors seamlessly.
- Sealing: Seal the painted rock with a waterproof sealant to protect the design from the elements.
2.2. Acrylic Paint Pens
Acrylic paint pens, also known as paint markers, are perfect for adding intricate details, lettering, and fine lines to your rock art. They offer precision and control, making them ideal for both beginners and experienced artists.
2.2.1. Advantages of Acrylic Paint Pens
- Precision: Fine tips allow for detailed work and intricate designs.
- Control: Easy to handle and maneuver, providing better control over paint flow.
- Convenience: No need for brushes or palettes; paint is directly applied from the pen.
- Versatility: Suitable for various surfaces, including rocks, wood, and fabric.
- Quick Drying: Dries quickly, minimizing the risk of smudging.
2.2.2. Top Acrylic Paint Pen Brands
Here are some of the best acrylic paint pen brands for rock painting:
| Brand | Product Highlights | Tip Sizes | Price Range |
|---|---|---|---|
| Posca | Opaque, water-based paint, excellent coverage, available in various colors and tip sizes. | Extra-fine to broad | $3-7 |
| Molotow | Highly pigmented, UV-resistant, refillable, suitable for professional use. | Extra-fine to broad | $5-10 |
| Artistro | Vibrant colors, smooth flow, quick-drying, ideal for detailed work. | Extra-fine to medium | $15-25 |
| Sakura | Archival quality, fade-resistant, suitable for fine art applications. | Extra-fine to medium | $4-8 |
| Ohuhu | Dual-tip markers with both fine and brush tips, versatile for various techniques. | Fine and brush | $20-35 |
Note: Prices are approximate and may vary based on location and retailer.
2.2.3. Tips for Using Acrylic Paint Pens
- Priming: Shake the pen well and prime the tip by pressing it down on a scrap surface until the paint flows smoothly.
- Pressure: Use light pressure to avoid flooding the tip with paint.
- Layering: Allow each layer to dry before adding the next to prevent smudging.
- Storage: Store pens horizontally to prevent the ink from drying out.
- Cleaning: Clean the tips with a damp cloth after each use to maintain optimal performance.
2.3. Oil-Based Paints
Oil-based paints are known for their rich colors, durability, and glossy finish. While they require a longer drying time and mineral spirits for cleanup, they can provide excellent results for rock painting.
2.3.1. Advantages of Oil-Based Paints
- Rich Colors: Offer deep, vibrant colors with a glossy sheen.
- Durability: Highly resistant to fading, chipping, and weathering.
- Blending: Allow for smooth blending and seamless transitions between colors.
- Longevity: Provide a long-lasting finish that can withstand outdoor conditions.
- Professional Look: Give rock art a polished, professional appearance.
2.3.2. Popular Oil-Based Paint Brands
Here are some well-regarded oil-based paint brands:
| Brand | Product Highlights | Drying Time | Price Range |
|---|---|---|---|
| Winsor & Newton | High-quality pigments, smooth consistency, excellent lightfastness. | 24-48 hours | $8-15 |
| Gamblin | Professional-grade, archival quality, vibrant colors. | 24-72 hours | $10-20 |
| Grumbacher | Budget-friendly, good for beginners, decent color selection. | 24-48 hours | $5-10 |
| Van Gogh | Student-grade, reliable performance, wide range of colors. | 24-72 hours | $6-12 |
| Liquitex | Oil-based enamel paints, self-leveling, glossy finish, durable and weather-resistant. | 6-8 hours | $7-14 |
Note: Prices are approximate and may vary based on location and retailer.
2.3.3. Tips for Using Oil-Based Paints
- Ventilation: Work in a well-ventilated area due to the strong odor of oil-based paints and solvents.
- Priming: Apply a primer to the rock to improve adhesion and prevent the paint from soaking into the surface.
- Thinning: Use mineral spirits or turpentine to thin the paint and clean brushes.
- Drying Time: Allow ample drying time (24-72 hours) between layers.
- Sealing: While not always necessary, sealing can enhance the longevity and appearance of the artwork.
2.4. Exterior Latex Paints
Exterior latex paints are specifically formulated for outdoor use, making them a durable and weather-resistant option for rock painting. They are water-based, easy to clean up, and available in a wide range of colors.
2.4.1. Benefits of Exterior Latex Paints
- Weather Resistance: Designed to withstand outdoor elements such as sunlight, rain, and temperature changes.
- Durability: Provides a long-lasting finish that resists fading, chipping, and cracking.
- Easy Cleanup: Water-based formula allows for easy cleanup with soap and water.
- Wide Color Selection: Available in a variety of colors and finishes.
- Adhesion: Excellent adhesion to various surfaces, including rocks.
2.4.2. Top Exterior Latex Paint Brands
Here are some trusted exterior latex paint brands:
| Brand | Product Highlights | Drying Time | Price Range |
|---|---|---|---|
| BEHR | Excellent weather protection, fade-resistant, mildew-resistant finish. | 1-2 hours | $25-40 |
| Sherwin-Williams | High-quality pigments, long-lasting color, superior durability. | 2-4 hours | $30-50 |
| Valspar | Good coverage, easy application, weather-resistant formula. | 1-2 hours | $20-35 |
| Kilz | Primer and paint in one, excellent adhesion, mold and mildew resistance. | 1-2 hours | $20-30 |
| Rust-Oleum | Durable, rust-resistant finish, suitable for various outdoor surfaces. | 2-4 hours | $15-25 |
Note: Prices are approximate and may vary based on location and retailer.
2.4.3. Tips for Using Exterior Latex Paints
- Surface Preparation: Clean the rock thoroughly and ensure it is dry before painting.
- Priming: Apply a latex-based primer for better adhesion and a smoother finish.
- Application: Use a brush, roller, or spray gun for even coverage.
- Layering: Apply multiple thin coats rather than one thick coat to prevent drips and ensure proper drying.
- Drying Time: Allow each coat to dry completely before applying the next.
- Sealing: While not always necessary, sealing can provide extra protection against the elements.
2.5. Chalk Paints
Chalk paints are known for their matte finish, vintage look, and excellent adhesion to various surfaces. They are a popular choice for creating rustic or distressed rock art.
2.5.1. Advantages of Chalk Paints
- Matte Finish: Provides a smooth, velvety matte finish that is ideal for vintage-style designs.
- Excellent Adhesion: Sticks well to most surfaces without the need for extensive preparation.
- Distressing: Easy to distress for a weathered, vintage look.
- Versatility: Can be used on various materials, including rocks, wood, and metal.
- Water-Based: Easy to clean up with soap and water.
2.5.2. Popular Chalk Paint Brands
Here are some well-known chalk paint brands:
| Brand | Product Highlights | Coverage | Price Range |
|---|---|---|---|
| Annie Sloan | High-quality, richly pigmented, excellent for creating distressed finishes. | 1 liter covers 13 sq meters | $30-40 |
| Rust-Oleum | Budget-friendly, good coverage, easy to distress. | 1 liter covers 14 sq meters | $15-25 |
| FolkArt | Smooth application, wide range of colors, suitable for decorative painting. | 2 oz covers 0.7 sq meters | $3-5 |
| Krylon | Spray chalk paint, convenient for quick coverage, matte finish. | Varies | $8-12 |
| Amy Howard at Home | Self-leveling, minimal prep, durable finish. | 32 oz covers 14 sq meters | $35-45 |
Note: Prices are approximate and may vary based on location and retailer.
2.5.3. Tips for Using Chalk Paints
- Surface Preparation: Clean the rock to remove any dirt or debris.
- Application: Apply chalk paint in thin, even coats using a brush or sponge.
- Distressing: Once dry, use sandpaper or a sanding block to distress the edges and surfaces for a vintage look.
- Sealing: Seal with wax or a clear coat to protect the finish and enhance durability.
- Layering: Chalk paints can be layered to create unique color combinations and effects.
2.6. Glow-in-the-Dark Paints
Glow-in-the-dark paints add a fun and magical element to your rock art, making them visible in low-light conditions. They are perfect for creating whimsical designs or adding a unique touch to outdoor decorations.
2.6.1. Advantages of Glow-in-the-Dark Paints
- Visibility: Rocks glow in the dark, making them visible at night.
- Fun and Whimsical: Adds a unique and playful element to rock art.
- Versatility: Can be used for various designs, from stars and moons to spooky themes.
- Easy to Use: Available in acrylic and spray formulas.
- Safe: Most glow-in-the-dark paints are non-toxic and safe for use.
2.6.2. Recommended Glow-in-the-Dark Paint Brands
Here are some popular glow-in-the-dark paint brands:
| Brand | Product Highlights | Glow Duration | Price Range |
|---|---|---|---|
| Art ‘N Glow | Highly concentrated, long-lasting glow, available in various colors. | Up to 12 hours | $15-25 |
| Krylon | Spray paint, easy to apply, good for large surfaces. | 1-2 hours | $8-12 |
| FolkArt | Acrylic paint, water-based, non-toxic, suitable for detailed work. | 1-2 hours | $3-5 |
| DecoArt | Glows brightly, smooth application, durable finish. | 2-4 hours | $4-7 |
| SpaceBeams | Ultra-bright, long-lasting, strontium aluminate-based glow. | Up to 10 hours | $20-30 |
Note: Prices are approximate and may vary based on location and retailer.
2.6.3. Tips for Using Glow-in-the-Dark Paints
- Charge Time: Expose the painted rock to bright light for several hours to charge the glow.
- Base Coat: Apply a white or light-colored base coat for better glow visibility.
- Layering: Apply multiple thin coats for a brighter, longer-lasting glow.
- Sealing: Seal with a clear coat to protect the paint and enhance durability.
- Placement: Place the rocks in an area that receives plenty of sunlight during the day.
3. Preparing Your Rocks for Painting
Proper preparation is key to ensuring your paint adheres well and your designs look their best. Follow these steps to prepare your rocks for painting.
3.1. Gathering Your Rocks
First, gather your rocks. Smooth, flat rocks are ideal for painting as they provide an even surface for your designs. You can find rocks in your backyard, at local parks, or purchase them from craft stores or landscaping suppliers. According to research from Arizona State University’s School of Earth and Space Exploration, in July 2025, certain types of rocks, such as sedimentary rocks, are easier to paint due to their porous nature.
3.2. Cleaning Your Rocks
Once you have your rocks, clean them thoroughly with soap and water to remove any dirt, debris, or loose particles. Use a scrub brush to ensure all surfaces are clean. Rinse the rocks well and allow them to dry completely before painting.
3.3. Priming Your Rocks
Priming your rocks can improve paint adhesion and create a smoother surface for your designs. Use a multi-surface primer and apply a thin, even coat to the entire rock. Allow the primer to dry completely before proceeding with your paint.
 Clean rocks ready to be painted
3.4. Sanding Your Rocks
If your rocks have rough edges or uneven surfaces, you can sand them down to create a smoother painting surface. Use sandpaper with a fine grit and gently sand the rocks until they are smooth to the touch. Be sure to remove any sanding dust before painting.
4. Step-by-Step Guide to Painting Rocks
Now that you’ve gathered your materials and prepared your rocks, follow these steps to create beautiful painted rocks.
4.1. Applying a Base Coat
Start by applying a base coat of acrylic paint to your rock. Choose a color that complements your design or use white for a neutral base. Apply the paint evenly using a sponge brush or paintbrush. Allow the base coat to dry completely before proceeding.
4.2. Creating Your Design
Once the base coat is dry, it’s time to create your design. You can use acrylic paint pens, fine-tipped brushes, or stencils to add intricate details, lettering, and patterns. Get creative and let your imagination run wild.
4.3. Adding Details and Embellishments
Enhance your design with additional details and embellishments. Use glitter, beads, sequins, or other decorative elements to add texture and visual interest. Adhere these embellishments with craft glue or a strong adhesive.
4.4. Sealing Your Painted Rocks
After your design is complete and the paint is dry, seal your painted rock with a waterproof sealant. This will protect your artwork from the elements and ensure it lasts for years to come. Apply several thin coats of sealant, allowing each coat to dry completely before applying the next.
5. Choosing the Right Sealant
Sealing your painted rocks is crucial for protecting your artwork and ensuring its longevity, especially when displaying them outdoors. Here’s a guide to choosing the right sealant for your rock painting projects.
5.1. Types of Sealants
Several types of sealants are suitable for painted rocks, each with its own advantages and disadvantages.
- Acrylic Sealants: Water-based sealants that provide a clear, protective finish. They are easy to apply and clean up but may not be as durable as other options.
- Polyurethane Sealants: Oil-based sealants that offer excellent durability and water resistance. They provide a glossy finish and are ideal for outdoor use but require mineral spirits for cleanup.
- Epoxy Resins: Two-part sealants that create a hard, durable, and waterproof finish. They are ideal for high-traffic areas or items exposed to harsh conditions but can be more challenging to apply.
- Mod Podge: A versatile sealant that can be used as a glue, sealer, and finish. It provides a durable, protective layer but may not be as water-resistant as other options.
5.2. Factors to Consider
When choosing a sealant, consider the following factors:
- Weather Resistance: If you plan to display your painted rocks outdoors, choose a sealant that is waterproof and UV-resistant.
- Durability: Select a sealant that can withstand wear and tear, especially if the rocks will be handled frequently.
- Finish: Consider the desired finish, whether glossy, matte, or satin, and choose a sealant that provides the appropriate look.
- Ease of Use: Opt for a sealant that is easy to apply and clean up, especially if you are a beginner.
- Safety: Ensure the sealant is non-toxic and safe for use, especially if children will be handling the painted rocks.
5.3. Top Sealant Brands for Painted Rocks
Here are some of the best sealant brands for painted rocks:
| Brand | Product Highlights | Finish | Application | Price Range |
|---|---|---|---|---|
| Krylon Crystal Clear | Quick-drying, non-yellowing, provides a durable, protective finish. | Glossy | Spray | $8-12 |
| Mod Podge Outdoor | Water-resistant, UV-resistant, easy to use, versatile for various projects. | Glossy/Matte | Brush/Sponge | $5-10 |
| Minwax Polycrylic | Water-based, durable, clear finish, low odor, easy to clean up. | Glossy/Satin | Brush | $10-15 |
| Rust-Oleum Clear Coat | Oil-based, excellent durability, protects against rust and corrosion, provides a glossy finish. | Glossy | Spray | $7-12 |
| DecoArt Media Fluid Acrylics Clear Matte Medium | Provides a matte finish, ideal for protecting painted surfaces without adding shine, water-based and non-toxic. | Matte | Brush/Sponge | $6-10 |
Note: Prices are approximate and may vary based on location and retailer.
5.4. Tips for Sealing Painted Rocks
Follow these tips for sealing painted rocks effectively:
- Clean the Surface: Ensure the painted rock is clean and dry before applying the sealant.
- Apply Thin Coats: Apply several thin coats of sealant rather than one thick coat to prevent drips and ensure even coverage.
- Allow Drying Time: Allow each coat of sealant to dry completely before applying the next.
- Ventilation: Work in a well-ventilated area when using spray sealants to avoid inhaling fumes.
- Test First: Test the sealant on a small, inconspicuous area of the painted rock to ensure it doesn’t react negatively with the paint.
6. Creative Ideas for Rock Painting
Rock painting offers endless possibilities for creativity and self-expression. Here are some ideas to inspire your rock painting projects.
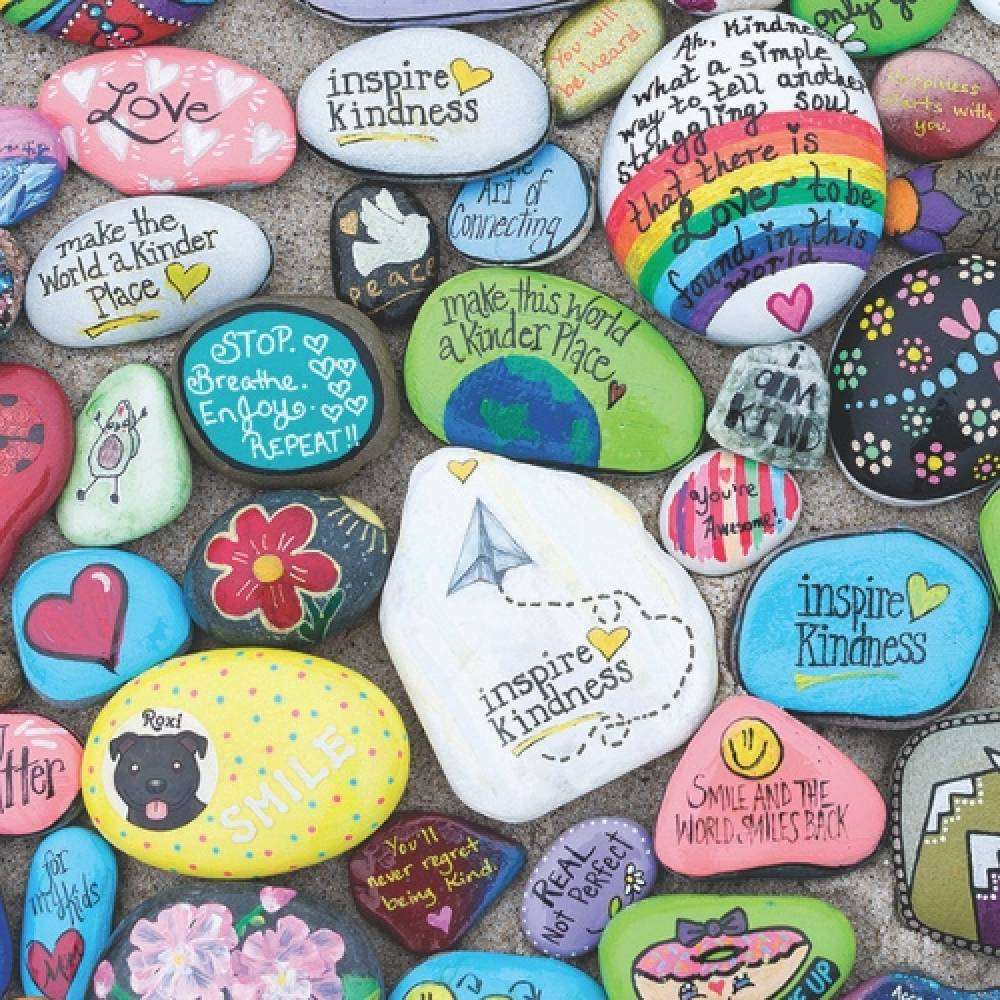
6.1. Inspirational Messages
Paint rocks with inspirational messages, quotes, or affirmations to spread positivity and uplift others.
- “Be Kind”
- “You Are Loved”
- “Believe in Yourself”
- “Never Give Up”
- “Stay Positive”
6.2. Nature-Inspired Designs
Create nature-inspired designs with flowers, leaves, animals, and landscapes.
- Paint colorful flowers, such as daisies, sunflowers, and roses.
- Create realistic or stylized leaves and trees.
- Paint animals, such as ladybugs, butterflies, and birds.
- Design scenic landscapes with mountains, rivers, and forests.
6.3. Abstract Patterns
Experiment with abstract patterns, shapes, and colors to create unique and eye-catching designs.
- Use geometric shapes, such as circles, squares, and triangles.
- Create colorful patterns with dots, stripes, and swirls.
- Mix and match colors to create interesting and dynamic compositions.
- Experiment with different painting techniques, such as splattering, dripping, and marbling.
6.4. Themed Rocks
Create themed rocks for holidays, seasons, or special occasions.
- Paint rocks with festive designs for Christmas, Halloween, Easter, or Thanksgiving.
- Create rocks with summery designs for the beach, pool, or garden.
- Paint rocks with autumn leaves, pumpkins, and harvest themes.
- Design rocks with winter snowflakes, snowmen, and cozy scenes.
6.5. Character Rocks
Paint rocks with beloved characters from movies, TV shows, or books.
- Create rocks with cartoon characters, such as Mickey Mouse, Snoopy, and SpongeBob.
- Paint rocks with superhero characters, such as Superman, Batman, and Wonder Woman.
- Design rocks with characters from popular movies, such as Harry Potter, Star Wars, and Frozen.
- Paint rocks with characters from classic fairy tales, such as Cinderella, Little Red Riding Hood, and Peter Pan.
7. Where to Hide Your Painted Rocks
Once you’ve created your painted rocks, it’s time to hide them for others to discover and enjoy. Here are some ideas for where to hide your painted rocks.
7.1. Local Parks
Local parks are a great place to hide painted rocks, as they are often visited by families, children, and nature enthusiasts.
- Hide rocks near playground equipment, benches, or picnic tables.
- Place rocks along walking trails or near scenic viewpoints.
- Leave rocks near flower beds or gardens.
7.2. Community Centers
Community centers are hubs for local activities and events, making them a great place to spread kindness.
- Hide rocks near the entrance, lobby, or bulletin board.
- Place rocks in community gardens or outdoor seating areas.
- Leave rocks near sports fields or recreational facilities.
7.3. Libraries
Libraries are centers for learning and community engagement, making them a perfect place to hide painted rocks with inspirational messages.
- Hide rocks near the entrance, book displays, or reading areas.
- Place rocks in children’s sections or near community bulletin boards.
- Leave rocks in outdoor gardens or seating areas.
7.4. Schools
Schools are ideal for spreading positivity among students and teachers.
- Hide rocks near the entrance, playground, or school garden.
- Place rocks in classrooms or teachers’ lounges (with permission).
- Leave rocks near the school library or cafeteria.
7.5. Public Gardens
Public gardens are beautiful places to showcase your artistic creations and bring joy to visitors.
- Hide rocks among flower beds, trees, or water features.
- Place rocks along pathways or near benches.
- Leave rocks near sculptures or other garden art.
8. Ethical Considerations for Rock Hiding
While hiding painted rocks can be a fun and rewarding activity, it’s important to do so responsibly and ethically. Here are some considerations to keep in mind.
8.1. Respect Private Property
Avoid hiding rocks on private property without permission. Stick to public spaces where everyone can enjoy them.
8.2. Follow “Leave No Trace” Principles
Be mindful of the environment and avoid leaving rocks in sensitive areas or natural habitats.
8.3. Avoid Hiding Rocks in National Parks
Most national parks have a “leave no trace” policy, so it’s best to avoid hiding rocks in these protected areas.
8.4. Be Mindful of Local Regulations
Check local regulations or ordinances regarding rock hiding before placing your painted rocks in public spaces.
8.5. Encourage Responsible Rock Finding
When you hide your rocks, encourage finders to share their discoveries on social media and re-hide the rocks in new locations to keep the fun going.
9. Frequently Asked Questions (FAQs) About Painting Rocks
Here are some frequently asked questions about painting rocks.
9.1. What kind of paint should I use on rocks?
The best types of paint for rocks are acrylic paints, acrylic paint pens, oil-based paints, exterior latex paints, chalk paints, and glow-in-the-dark paints. Acrylics are versatile and durable, while paint pens offer precision for detailed work.
9.2. How do I prepare rocks for painting?
Clean the rocks with soap and water, prime them with a multi-surface primer, and sand them if necessary to create a smooth painting surface.
9.3. How do I seal painted rocks?
Seal painted rocks with a waterproof sealant, such as acrylic sealant, polyurethane sealant, epoxy resin, or Mod Podge, to protect the artwork from the elements.
9.4. What is the best sealant for outdoor rocks?
For outdoor rocks, use a polyurethane sealant or epoxy resin, as they offer excellent durability and water resistance.
9.5. Can I use sharpies on rocks?
Yes, you can use Sharpies on rocks, but they may fade over time. Seal the rock with a waterproof sealant to protect the Sharpie ink.
9.6. Are acrylic paints waterproof?
Acrylic paints are water-resistant once dry, but they are not completely waterproof. Sealing with a waterproof sealant is necessary for outdoor use.
9.7. How do I clean painted rocks?
Clean painted rocks with a damp cloth and mild soap. Avoid using harsh chemicals or abrasive cleaners, as they may damage the paint.
9.8. How long does it take for painted rocks to dry?
Drying time varies depending on the type of paint and sealant used. Acrylic paints typically dry in 20-30 minutes, while oil-based paints may take 24-72 hours.
9.9. Can I paint rocks with kids?
Yes, painting rocks is a fun and creative activity for kids. Use non-toxic paints and sealants, and supervise children during the painting process.
9.10. Where can I find inspiration for rock painting ideas?
You can find inspiration for rock painting ideas on websites like Pinterest, Instagram, and rock painting blogs, as well as on rockscapes.net.
10. Discover More at rockscapes.net
Ready to elevate your rock painting and landscaping endeavors? Visit rockscapes.net for a wealth of inspiration, detailed guides, and expert advice. Whether you’re seeking stunning design ideas, comprehensive information on various rock types, or helpful tips for successful project execution, rockscapes.net is your go-to resource.
Unlock your creative potential and transform your surroundings with the timeless beauty of rocks. Contact us today and let our team of experts assist you in bringing your vision to life.
Address: 1151 S Forest Ave, Tempe, AZ 85281, United States
Phone: +1 (480) 965-9011
Website: rockscapes.net
Call to Action
Ready to get started with rock painting or enhance your landscape with beautiful rocks? Explore rockscapes.net for inspiration, detailed guides, and expert advice. Discover stunning design ideas, learn about different rock types, and get helpful tips for successful project execution. Contact us today and let our team of experts assist you in bringing your vision to life!