Are you looking for a creative and fun way to add a personal touch to your garden or outdoor space? Painting ladybugs on rocks is a delightful DIY project that’s perfect for all ages and skill levels. At rockscapes.net, we provide inspiration and guidance to help you transform ordinary stones into beautiful works of art, enhancing your landscape with unique and charming decorations. Discover how to choose the right rocks, select vibrant paints, and apply easy-to-follow techniques to create adorable ladybug rock art. Let’s explore the world of rock painting, craft ideas, and artistic expression to make your outdoor space truly special.
1. Why Should I Paint Ladybugs on Rocks?
Painting ladybugs on rocks is a wonderful way to add charm and personality to your garden. These cute little critters bring a splash of color and whimsy to any outdoor space.
Answer:
Ladybug painted rocks introduce a playful and personalized touch to your garden. Not only are they visually appealing, but this craft also provides a fantastic opportunity to express your creativity and involve family members in a fun DIY project. Ladybugs symbolize good luck and protection in many cultures, making them a meaningful addition to your landscape. Using rock art, garden décor, and outdoor crafts, you can transform ordinary stones into eye-catching accents that enhance the overall aesthetic of your garden. Rockscapes.net offers a variety of ladybug rock painting ideas to inspire your artistic endeavors and bring a touch of nature-inspired charm to your surroundings.
Expanding on the Answer:
Ladybug painted rocks serve as delightful additions to your garden, offering several benefits that go beyond mere decoration. These hand-painted creations inject a playful and personalized touch into your outdoor space, reflecting your unique artistic flair.
Creative Expression and Family Involvement
The process of painting ladybugs on rocks is inherently creative, allowing you to experiment with different colors, patterns, and styles. This DIY project is suitable for all ages and skill levels, making it an ideal activity to involve family members. According to a study published in the Journal of Creative Behavior, engaging in creative activities like rock painting can enhance cognitive functions and promote emotional well-being.
Symbolism and Cultural Significance
Ladybugs are often regarded as symbols of good luck, protection, and positive transformation in various cultures. Incorporating ladybug-themed art into your garden can be a symbolic gesture, adding a layer of meaning to your outdoor décor.
Enhancing Garden Aesthetics
Strategically placed ladybug rocks can create focal points and add visual interest to your garden. Whether nestled among plants, lining pathways, or adorning rock gardens, these painted stones can transform ordinary spaces into charming and inviting environments.
Eco-Friendly and Sustainable
Rock painting is an eco-friendly craft that repurposes natural materials. By using rocks and non-toxic paints, you can create sustainable decorations that minimize environmental impact. This aligns with the growing trend of eco-conscious landscaping, where sustainable practices and materials are prioritized.
Stress Relief and Relaxation
The act of painting can be therapeutic and meditative, providing a much-needed escape from the stresses of daily life. As noted in Art Therapy: Journal of the American Art Therapy Association, engaging in art-making activities can reduce anxiety and promote relaxation.
Educational Opportunity
For children, rock painting can be an educational activity that fosters an appreciation for nature and art. It provides an opportunity to learn about ladybugs, their role in the ecosystem, and basic painting techniques.
Gifting and Sharing
Ladybug painted rocks make thoughtful and personalized gifts for friends and family. They can be used as unique party favors, tokens of appreciation, or decorative accents for special occasions.
Rockscapes.net Inspiration
Rockscapes.net serves as a valuable resource for ladybug rock painting ideas, offering a wide range of tutorials, tips, and inspiration to suit your artistic preferences. Whether you’re looking for simple designs or more intricate patterns, Rockscapes.net provides the guidance and resources you need to bring your creative vision to life.
2. What Materials Do I Need to Paint Ladybugs on Rocks?
Gathering the right supplies is essential for a successful rock painting project. Here’s what you’ll need to create your ladybug masterpieces.
Answer:
To paint ladybugs on rocks, you’ll need smooth rocks, acrylic paints (red, black, white), paintbrushes of varying sizes, a sealant or varnish, a palette or container for your paints, a pencil for sketching (optional), and a damp cloth for cleaning up. These supplies ensure your rock art is both vibrant and durable. You can find a detailed list of materials and recommended products on rockscapes.net to help you get started.
Expanding on the Answer:
Having the right materials at your fingertips is key to ensuring a smooth and enjoyable rock painting experience. Each item plays a specific role in creating durable, vibrant, and visually appealing ladybug rock art.
Rocks
The foundation of your artwork, rocks should be chosen carefully.
- Smooth Surface: Opt for rocks with a smooth, non-porous surface to ensure the paint adheres well. Rough surfaces can make it difficult to achieve clean lines and even coverage.
- Size and Shape: Choose rocks of varying sizes and shapes to add visual interest to your collection. Round or oval rocks are ideal for ladybug designs, but don’t be afraid to experiment with different forms.
- Cleanliness: Ensure the rocks are clean and dry before painting. Wash them with soap and water if necessary, and allow them to dry completely to remove any dirt or debris.
Acrylic Paints
Acrylic paints are a popular choice for rock painting due to their versatility and durability.
- Essential Colors: Red, black, and white are the primary colors needed for ladybug designs. Consider purchasing additional colors such as yellow, blue, or green to add variety and creativity to your artwork.
- Quality: Invest in high-quality acrylic paints to ensure vibrant, long-lasting color. Student-grade paints are suitable for beginners, while professional-grade paints offer richer pigmentation and better coverage.
- Non-Toxic: Choose non-toxic acrylic paints, especially if children are involved in the project. These paints are safer for use and pose no health hazards.
Paintbrushes
A variety of paintbrushes will allow you to create different effects and details in your ladybug designs.
- Round Brushes: Use round brushes for painting fine lines, small details, and intricate patterns. Different sizes of round brushes will allow you to vary the thickness of your lines.
- Flat Brushes: Flat brushes are ideal for painting larger areas, such as the ladybug’s body or background. They can also be used for creating straight lines and sharp edges.
- Detail Brushes: Fine-tipped detail brushes are essential for adding the finishing touches to your ladybug designs, such as the eyes, antennae, and spots.
Sealant or Varnish
A sealant or varnish is crucial for protecting your painted rocks from the elements and ensuring they last for years to come.
- Type: Choose a clear, non-yellowing sealant or varnish that is specifically designed for outdoor use. Water-based sealants are eco-friendly and easy to clean up, while solvent-based sealants offer greater durability and weather resistance.
- Application: Apply the sealant or varnish in thin, even coats, allowing each coat to dry completely before applying the next. This will prevent drips, streaks, and bubbles.
- UV Protection: Look for sealants or varnishes that offer UV protection to prevent the colors from fading over time.
Palette or Container for Paints
A palette or container will help you organize your paints and prevent them from drying out while you work.
- Palette: A palette with individual wells is ideal for holding different colors of paint. This allows you to easily mix and blend colors as needed.
- Container: Alternatively, you can use a plastic container or disposable plate as a palette. Just be sure to clean it thoroughly after each use to prevent the paint from drying and hardening.
Pencil for Sketching (Optional)
A pencil can be useful for sketching your ladybug design onto the rock before painting.
- Soft Lead: Use a soft-lead pencil to create light, erasable lines. This will allow you to make changes and adjustments to your design as needed.
- Eraser: Keep a soft eraser on hand to remove any unwanted pencil marks. Be careful not to rub too hard, as this can damage the paint.
Damp Cloth for Cleaning Up
A damp cloth is essential for cleaning up spills, wiping paintbrushes, and correcting mistakes.
- Soft Cloth: Use a soft, lint-free cloth to prevent scratching the paint.
- Water: Keep a container of clean water nearby for rinsing paintbrushes.
- Paper Towels: Paper towels can also be useful for cleaning up spills and drying paintbrushes.
By gathering these essential materials, you’ll be well-prepared to embark on your ladybug rock painting adventure and create beautiful, long-lasting works of art. Check out rockscapes.net for a comprehensive list of recommended products and suppliers to help you get started.
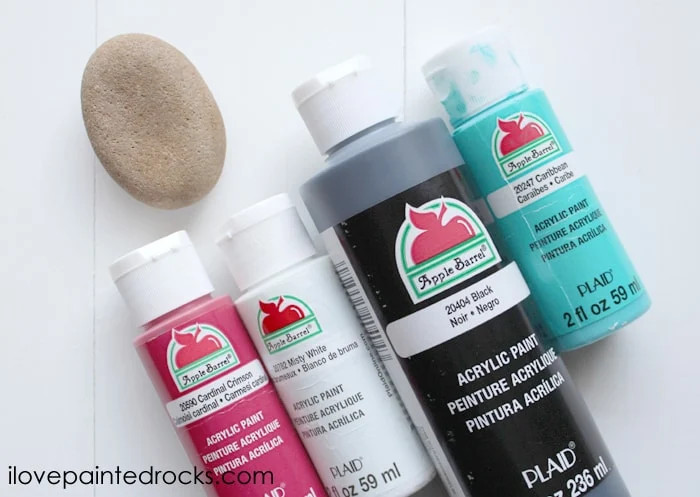 Ladybug rock painting supplies including rocks, acrylic paints, and paintbrushes
3. How Do I Prepare the Rocks for Painting?
Proper preparation ensures the paint adheres well and your design looks its best. Cleaning and priming the rocks are key steps.
Answer:
Begin by washing the rocks with soap and water to remove any dirt or debris. Let them dry completely. If desired, apply a base coat of white or light-colored acrylic paint to create a smooth surface for your design. This step is especially helpful for darker rocks. Refer to rockscapes.net for detailed instructions and tips on preparing rocks for painting.
Expanding on the Answer:
Preparing the rocks properly before painting is a crucial step that significantly impacts the final result. Clean and primed rocks provide an ideal surface for the paint to adhere, ensuring vibrant colors and long-lasting designs.
Cleaning the Rocks
Removing dirt, debris, and loose particles from the rocks is essential for achieving a smooth and even paint application.
- Washing: Wash the rocks thoroughly with soap and water to remove any surface contaminants. Use a scrub brush to dislodge stubborn dirt or grime.
- Rinsing: Rinse the rocks thoroughly with clean water to remove all traces of soap.
- Drying: Allow the rocks to dry completely before proceeding to the next step. This can be done by air-drying them in a sunny location or using a clean cloth to pat them dry.
Priming the Rocks
Applying a base coat of primer or light-colored acrylic paint can enhance the vibrancy of the colors and create a smooth surface for your design.
- Base Coat: Apply a thin, even coat of white or light-colored acrylic paint to the surface of the rocks. This will help the colors stand out and prevent them from being absorbed by the rock.
- Drying Time: Allow the base coat to dry completely before proceeding to the next step. This may take several hours, depending on the type of paint used and the ambient humidity.
- Sanding (Optional): If the base coat is uneven or rough, lightly sand it with fine-grit sandpaper to create a smooth surface. Be careful not to remove too much paint, as this can compromise the coverage.
Additional Tips for Rock Preparation:
- Porous Rocks: If the rocks are particularly porous, consider applying a sealant or primer specifically designed for porous surfaces. This will help to prevent the paint from being absorbed by the rock and ensure a more vibrant and long-lasting finish.
- Dark Rocks: Dark-colored rocks may require multiple coats of base paint to achieve adequate coverage. Consider using a specialized primer for dark surfaces to block out the underlying color.
- Smooth Rocks: Smooth rocks are generally easier to paint than rough rocks, but they may also be more prone to chipping or scratching. Applying a clear coat of sealant or varnish after painting can help to protect the surface and prevent damage.
- Safety Precautions: When cleaning or sanding rocks, wear appropriate safety gear, such as gloves and a dust mask, to protect your skin and lungs from irritation.
- Rockscapes.net Guidance: Rockscapes.net offers detailed instructions and tips on preparing rocks for painting, including advice on selecting the right cleaning products, primers, and sealants. Consult Rockscapes.net for expert guidance and recommendations to ensure your rock painting project is a success.
4. What Are the Basic Steps for Painting Ladybugs on Rocks?
Follow these simple steps to create your own adorable ladybug rocks, perfect for beginners and experienced painters alike.
Answer:
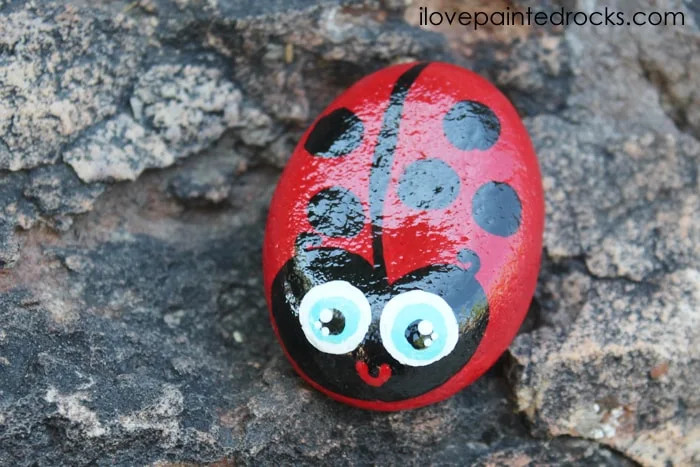
First, paint the entire rock red and let it dry. Then, add a black head and spots using a fine-tipped brush. Draw a line down the middle to represent the wing separation. Add white dots for the eyes and small antennae. Finally, apply a clear sealant to protect your artwork. Visit rockscapes.net for step-by-step tutorials and design ideas.
Expanding on the Answer:
Painting ladybugs on rocks is a delightful and straightforward process that can be enjoyed by people of all ages and skill levels. By following these basic steps, you can create charming ladybug rocks that add a touch of whimsy and personality to your garden or outdoor space.
Step 1: Base Coat
The first step in painting ladybugs on rocks is to apply a base coat of red acrylic paint to the entire surface of the rock.
- Coverage: Ensure that the entire rock is evenly coated with paint, including the underside. This will provide a vibrant and uniform background for your ladybug design.
- Drying Time: Allow the base coat to dry completely before proceeding to the next step. This may take several hours, depending on the type of paint used and the ambient humidity.
- Multiple Coats: If the base coat is uneven or translucent, apply a second coat of red paint to achieve full coverage.
Step 2: Adding the Head and Spots
Once the base coat is dry, use a fine-tipped brush to add the ladybug’s head and spots in black acrylic paint.
- Head Shape: The ladybug’s head is typically a semi-circular shape that covers approximately one-third of the rock’s surface. Use a small, round brush to create a clean and defined edge.
- Spot Placement: The ladybug’s spots can be arranged in a symmetrical or asymmetrical pattern, depending on your preference. Use a fine-tipped brush to create small, evenly spaced dots.
- Spot Size: Vary the size of the spots to add visual interest and create a more realistic effect.
Step 3: Defining the Wing Separation
To create the illusion of wing separation, draw a thin, curved line down the middle of the ladybug’s back using black acrylic paint.
- Line Thickness: The line should be thin and delicate to avoid overpowering the overall design. Use a fine-tipped brush to create a clean and precise line.
- Curvature: The line should follow the natural curve of the rock to create a more realistic effect.
- Placement: Position the line slightly off-center to create a more dynamic and visually appealing composition.
Step 4: Adding Eyes and Antennae
Use a fine-tipped brush and white acrylic paint to add the ladybug’s eyes. Then, use black acrylic paint to add small antennae.
- Eye Placement: The eyes should be positioned on either side of the ladybug’s head, close to the top edge.
- Eye Size: The eyes should be small and round to create a cute and endearing expression.
- Antennae Length: The antennae should be short and slightly curved, extending from the top of the ladybug’s head.
Step 5: Sealing the Artwork
To protect your painted rocks from the elements and ensure they last for years to come, apply a clear sealant or varnish.
- Type: Choose a clear, non-yellowing sealant or varnish that is specifically designed for outdoor use.
- Application: Apply the sealant or varnish in thin, even coats, allowing each coat to dry completely before applying the next.
- Coverage: Ensure that the entire surface of the rock is coated with sealant, including the underside.
By following these basic steps, you can create charming ladybug rocks that add a touch of whimsy and personality to your garden or outdoor space. Rockscapes.net offers a variety of step-by-step tutorials and design ideas to inspire your rock painting projects.
 Easy ladybug rock painting idea with red base, black spots, and white eyes
5. What Are Some Creative Variations for Ladybug Rock Designs?
Get inspired with different color schemes, patterns, and embellishments to make your ladybug rocks truly unique.
Answer:
Try painting ladybugs in various colors like yellow, orange, or blue. Experiment with different spot patterns or add glitter for a sparkling effect. You can also paint ladybugs with different expressions or add tiny accessories like hats or bows. Rockscapes.net showcases a wide array of creative rock painting ideas to spark your imagination.
Expanding on the Answer:
While the classic red and black ladybug is undoubtedly charming, there are countless creative variations you can explore to make your rock designs truly unique. By experimenting with different color schemes, patterns, and embellishments, you can create a collection of ladybug rocks that reflect your personal style and artistic vision.
Color Schemes
Break away from the traditional red and black color scheme and explore a rainbow of possibilities.
- Yellow Ladybugs: Paint the base coat yellow and add black spots for a cheerful and sunny ladybug design.
- Orange Ladybugs: Opt for a warm and inviting look with an orange base coat and black spots.
- Blue Ladybugs: Create a whimsical and magical effect with a blue base coat and white or silver spots.
- Pastel Ladybugs: Soften the look with pastel shades of pink, lavender, or mint green.
- Metallic Ladybugs: Add a touch of glamour with metallic paints in gold, silver, or bronze.
Spot Patterns
Experiment with different spot patterns to create unique and eye-catching ladybug designs.
- Symmetrical Spots: Arrange the spots in a symmetrical pattern for a classic and balanced look.
- Asymmetrical Spots: Create a more dynamic and organic feel by placing the spots in an asymmetrical pattern.
- Varying Spot Sizes: Use spots of different sizes to add visual interest and depth to the design.
- Heart-Shaped Spots: Add a touch of romance with heart-shaped spots.
- Star-Shaped Spots: Create a celestial-inspired ladybug with star-shaped spots.
Embellishments
Add embellishments to your ladybug rocks to give them extra personality and flair.
- Glitter: Sprinkle glitter over the wet paint for a sparkling and eye-catching effect.
- Rhinestones: Glue small rhinestones onto the ladybug’s body for a touch of elegance and glamour.
- Googly Eyes: Add googly eyes to the ladybug’s face for a playful and whimsical look.
- Ribbon Bows: Tie small ribbon bows around the ladybug’s neck or head for a touch of sweetness and charm.
- Tiny Hats: Craft tiny hats out of felt or paper and glue them onto the ladybug’s head for a touch of whimsy and fun.
Expressions
Give your ladybug rocks different expressions to convey a range of emotions and personalities.
- Smiling Ladybugs: Paint a small, upturned mouth to create a smiling ladybug.
- Winking Ladybugs: Paint one eye closed to create a winking ladybug.
- Surprised Ladybugs: Paint wide, round eyes to create a surprised ladybug.
- Sleepy Ladybugs: Paint closed eyes with long eyelashes to create a sleepy ladybug.
- Angry Ladybugs: Paint furrowed eyebrows and a downturned mouth to create an angry ladybug.
Rockscapes.net Inspiration
Rockscapes.net is a treasure trove of creative rock painting ideas, showcasing a wide array of ladybug designs and variations. Whether you’re looking for simple and classic designs or more elaborate and whimsical creations, Rockscapes.net provides the inspiration and guidance you need to unleash your creativity and bring your rock painting visions to life.
 Ladybug painted rock ideas with various colors and spot patterns
6. How Do I Make the Ladybug Eyes Look “Kawaii”?
Achieve an adorable, cartoonish look for your ladybug eyes with these simple techniques for creating a “kawaii” style.
Answer:
To create kawaii eyes, paint large, round white eyes with smaller blue irises and tiny black pupils. Add a small white dot as a highlight in the upper corner of each pupil to give them a sparkling, cute appearance. Rockscapes.net offers tutorials specifically on achieving this popular art style on rocks.
Expanding on the Answer:
The “kawaii” style, originating from Japan, is characterized by its emphasis on cuteness, simplicity, and charm. When applied to ladybug rock painting, the kawaii aesthetic can transform ordinary insects into irresistibly adorable characters. Achieving kawaii eyes is a key element in capturing this style, and there are several techniques you can use to create the desired effect.
Large, Round Eyes
The foundation of kawaii eyes is their size and shape. The eyes should be large and round, taking up a significant portion of the ladybug’s face.
- Proportion: Aim for eyes that are disproportionately large compared to the rest of the ladybug’s features. This exaggeration is a hallmark of the kawaii style.
- Shape: Use a round brush or a dotting tool to create perfectly round eyes. Avoid any sharp edges or irregular shapes.
White Base
The white base serves as the canvas for the rest of the eye details, making the colors pop and creating a bright, innocent look.
- Coverage: Ensure that the white base is opaque and evenly applied. This will provide a clean and vibrant background for the irises and pupils.
- Size: The white base should be slightly larger than the intended size of the irises, leaving a small border of white around the colored portion of the eye.
Colored Irises
The irises add depth and personality to the kawaii eyes. Choose bright, cheerful colors such as blue, green, or pink.
- Placement: Position the irises in the center of the white base, leaving an equal amount of white showing around the edges.
- Size: The irises should be smaller than the white base but still large enough to be clearly visible.
- Color Choice: Opt for colors that complement the overall color scheme of the ladybug.
Tiny Black Pupils
The pupils are the focal point of the eyes, adding a touch of intensity and focus to the kawaii expression.
- Placement: Position the pupils in the center of the irises, leaving a small amount of colored iris showing around the edges.
- Size: The pupils should be small and round, creating a sense of innocence and vulnerability.
- Color: Use black acrylic paint to create dark, defined pupils.
White Highlights
The white highlights are the key to creating the sparkling, cute appearance that is characteristic of kawaii eyes.
- Placement: Add a small white dot in the upper corner of each pupil, slightly off-center.
- Size: The white dots should be tiny and subtle, but still visible enough to catch the light and create a glimmering effect.
- Shape: Use a fine-tipped brush or a dotting tool to create perfectly round white dots.
Additional Tips for Kawaii Eyes
- Experiment with different eye shapes: While round eyes are the most common in the kawaii style, you can also experiment with oval or almond-shaped eyes.
- Add eyelashes: Use a fine-tipped brush to add short, delicate eyelashes to the upper eyelid.
- Use a glossy sealant: Apply a glossy sealant to the finished ladybug rock to enhance the shine and vibrancy of the eyes.
By following these techniques, you can create adorable kawaii eyes that will make your ladybug rocks truly irresistible. Rockscapes.net offers tutorials specifically on achieving this popular art style on rocks, providing step-by-step instructions and helpful tips to guide you through the process.
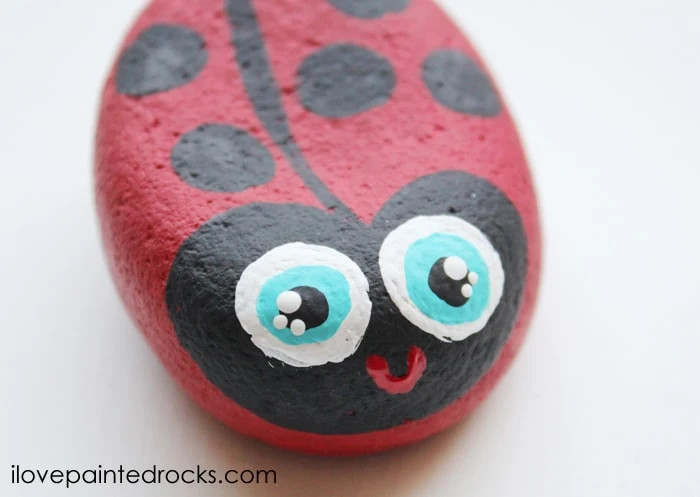 How to give eyes kawaii details with large white eyes, blue irises, and white highlights
7. What Kind of Sealant Should I Use to Protect the Painted Rocks?
Choosing the right sealant is crucial for protecting your artwork from the elements and ensuring its longevity.
Answer:
Opt for a clear, non-yellowing, water-resistant sealant specifically designed for outdoor use. Acrylic-based sealants are a good choice. Apply several thin coats, allowing each to dry completely before applying the next. Find recommended sealants and application tips on rockscapes.net.
Expanding on the Answer:
Selecting the appropriate sealant is paramount in preserving the vibrancy and longevity of your painted rocks, especially if they are intended for outdoor display. The sealant acts as a protective barrier against the elements, preventing fading, chipping, and other forms of damage.
Key Considerations When Choosing a Sealant
- Clarity: Opt for a clear sealant that will not cloud or distort the colors of your painted rocks. A non-yellowing formula is essential to prevent the sealant from discoloring over time.
- Water Resistance: Choose a sealant that is water-resistant to protect your painted rocks from rain, snow, and other forms of moisture. This will prevent the paint from peeling or running.
- UV Protection: Select a sealant that offers UV protection to prevent the colors from fading due to prolonged exposure to sunlight.
- Durability: Choose a sealant that is durable and resistant to scratching, chipping, and other forms of wear and tear.
- Type of Sealant: Acrylic-based sealants are a popular choice for painted rocks due to their clarity, water resistance, and durability. Polyurethane sealants offer even greater protection but may yellow over time.
- Application Method: Sealants are available in spray and brush-on formulas. Spray sealants are generally easier to apply and provide a more even coating, while brush-on sealants may offer greater control and precision.
Application Tips for Sealants
- Clean the Rocks: Ensure that the painted rocks are clean and dry before applying the sealant. Remove any dust, dirt, or debris with a soft cloth.
- Apply Thin Coats: Apply several thin coats of sealant, allowing each coat to dry completely before applying the next. This will prevent drips, runs, and other imperfections.
- Follow Manufacturer’s Instructions: Always follow the manufacturer’s instructions for application and drying times.
- Ventilation: Apply the sealant in a well-ventilated area to avoid inhaling harmful fumes.
- Test the Sealant: Before sealing all of your painted rocks, test the sealant on a small, inconspicuous area to ensure that it does not damage or discolor the paint.
Recommended Sealants for Painted Rocks
- Krylon UV-Resistant Clear Coating: This spray sealant provides excellent UV protection and is ideal for outdoor use.
- Mod Podge Outdoor: This water-based sealant is easy to apply and provides a durable, water-resistant finish.
- Rust-Oleum Clear Coat: This spray sealant is designed for use on a variety of surfaces and provides a durable, long-lasting finish.
Rockscapes.net offers a wealth of information on selecting and applying sealants for painted rocks. Consult Rockscapes.net for recommended products, application tips, and expert advice to ensure that your painted rocks are well-protected and will last for years to come.
 Glossy ladybug painted rock with a protective sealant
8. Where Can I Display My Ladybug Painted Rocks?
Discover creative ways to showcase your ladybug rocks in your garden, home, or community.
Answer:
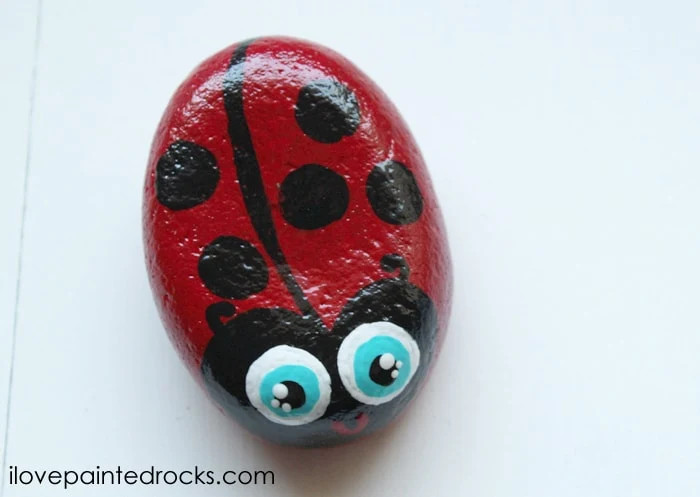
Place your ladybug rocks in flower beds, along garden paths, or in rock gardens. You can also hide them in parks or public spaces for others to find as part of a “kindness rocks” project. Use rockscapes.net for inspiration on unique display ideas.
Expanding on the Answer:
Once you’ve created your adorable ladybug painted rocks, the next step is to find the perfect places to display them. Whether you’re looking to add a touch of whimsy to your garden, brighten up your home, or spread joy in your community, there are countless creative ways to showcase your artwork.
In the Garden
The garden is a natural habitat for ladybug rocks, and there are many ways to incorporate them into your outdoor landscape.
- Flower Beds: Place ladybug rocks among your flowers to add a pop of color and create a whimsical scene.
- Garden Paths: Line your garden paths with ladybug rocks to create a charming and inviting walkway.
- Rock Gardens: Add ladybug rocks to your rock garden to enhance the natural beauty of the stones and plants.
- Potted Plants: Place ladybug rocks in your potted plants to add a touch of personality and charm.
- Vegetable Gardens: Ladybugs are beneficial insects that help to control pests, so placing ladybug rocks in your vegetable garden can be both decorative and practical.
In the Home
Ladybug rocks can also be used to add a touch of whimsy and charm to your indoor décor.
- Windowsills: Place ladybug rocks on your windowsills to brighten up your home and add a touch of nature to your indoor space.
- Shelves: Display ladybug rocks on your shelves to add a pop of color and create a playful vignette.
- Desks: Place ladybug rocks on your desk to add a touch of cheer to your workspace.
- Mantels: Display ladybug rocks on your mantel to create a festive and whimsical holiday display.
- Centerpieces: Use ladybug rocks as part of a centerpiece for your dining table or coffee table.
In the Community
Spreading kindness and joy is a wonderful way to share your ladybug rocks with others.
- Kindness Rocks Projects: Hide ladybug rocks in parks, playgrounds, and other public places for others to find as part of a “kindness rocks” project.
- Gifts: Give ladybug rocks as gifts to friends, family, and neighbors.
- Community Gardens: Donate ladybug rocks to community gardens to add a touch of whimsy and beauty to these shared spaces.
- Schools: Donate ladybug rocks to schools to brighten up classrooms and playgrounds.
- Nursing Homes: Donate ladybug rocks to nursing homes to bring joy and cheer to residents.
Rockscapes.net offers a wealth of inspiration and ideas for displaying your ladybug painted rocks. Consult Rockscapes.net for unique display ideas, tips for creating eye-catching arrangements, and inspiration for spreading kindness and joy in your community.
 How to paint a ladybug rock for a kindness rocks project
9. How Do I Get Kids Involved in Painting Ladybugs on Rocks?
Make rock painting a fun and educational activity for children with these tips and ideas.
Answer:
Simplify the design, use larger brushes, and provide stencils for younger children. Make it a group activity and let them choose their own colors and patterns. Supervise them closely and ensure they use non-toxic paints. rockscapes.net offers kid-friendly tutorials and safety guidelines.
Expanding on the Answer:
Engaging children in the art of painting ladybugs on rocks is a fantastic way to foster their creativity, develop their fine motor skills, and create lasting memories. By adapting the project to suit their abilities and interests, you can transform it into a fun, educational, and rewarding experience.
Simplify the Design
For younger children, it’s best to start with a simplified version of the ladybug design.
- Basic Shapes: Focus on basic shapes such as circles and dots.
- Fewer Details: Omit intricate details such as antennae and wing separations.
- Larger Areas: Encourage children to paint larger areas with single colors rather than attempting complex patterns.
Use Larger Brushes
Larger brushes are easier for small hands to grip and control.
- Chunky Brushes: Provide children with chunky brushes that are specifically designed for their age group.
- Foam Brushes: Foam brushes are also a good option, as they are easy to clean and provide even coverage.
- Short Handles: Choose brushes with short handles to give children better control over their strokes.
Provide Stencils
Stencils can help children create more precise and consistent designs.
- Pre-Cut Stencils: Purchase pre-cut stencils in the shape of ladybugs and spots.
- DIY Stencils: Create your own stencils by cutting shapes out of cardboard or plastic.
- **