How To Attach Mane And Tail To Wooden Rocking Horse can seem daunting, but with the right approach, it’s a rewarding project; rockscapes.net provides diverse resources to assist you. This guide will walk you through the process, ensuring a beautiful and durable result, enhancing the charm of your wooden rocking horse, turning it into a cherished heirloom with our landscape design ideas, stone selection, and installation tips.
1. Understanding The Basics Of Rocking Horse Restoration
Before diving into the specifics of attaching a mane and tail, it’s important to understand the basic principles of rocking horse restoration. What are the key elements of a successful restoration project?
1.1. Assessing The Rocking Horse
First, assess the rocking horse’s condition. Look for any structural damage, loose joints, or areas that need repair before you start adding the mane and tail. Are there any signs of wood rot or insect infestation?
- Structural Integrity: Check for cracks, splits, or weak points in the wood.
- Joint Stability: Ensure that all joints are tight and secure.
- Surface Condition: Examine the surface for old paint, varnish, or damage.
1.2. Gathering Your Materials
Gathering the right materials is essential for a successful rocking horse restoration. What supplies do you need for the mane and tail attachment?
- Yarn or Horsehair: Choose high-quality yarn or horsehair for a realistic look.
- Twill Tape or Fabric: Use twill tape or sturdy fabric as a base for the mane.
- Strong Adhesive: Select a reliable adhesive suitable for wood and fabric.
- Staples and Staple Gun: Use staples for added security, especially for the mane.
- Drill and Drill Bits: You may need to drill holes for attaching the tail.
- Scissors and Measuring Tape: Essential for cutting and measuring materials.
1.3. Preparing The Wood
Preparing the wood surface is crucial for proper adhesion. How should you prepare the surface before attaching the mane and tail?
- Cleaning: Remove any dirt, dust, or debris from the areas where the mane and tail will be attached.
- Sanding: Lightly sand the surface to create a better bond for the adhesive.
- Priming: Apply a primer if the wood is bare or if you’re painting the rocking horse.
2. How To Choose The Right Materials For The Mane And Tail
Selecting the right materials for the mane and tail is key to achieving a realistic and durable look. What are the best options for each component?
2.1. Selecting The Right Yarn Or Horsehair
The choice between yarn and horsehair depends on the desired look and budget. What are the pros and cons of each option?
-
Yarn:
- Pros: Affordable, available in various colors and textures, easy to work with.
- Cons: May not look as realistic as horsehair, can fray or wear out over time.
-
Horsehair:
- Pros: More realistic appearance, durable, adds a touch of authenticity.
- Cons: More expensive, may require special handling, can be harder to find.
2.2. Choosing The Best Fabric For The Mane Base
The fabric used as a base for the mane should be strong and durable. What types of fabric are suitable for this purpose?
- Twill Tape: A strong, woven fabric that provides a solid base for attaching the yarn or horsehair.
- Canvas: A heavy-duty fabric that can withstand wear and tear.
- Felt: A soft, easy-to-work-with fabric that adds a comfortable feel.
2.3. Selecting The Appropriate Adhesive
The adhesive should be strong enough to hold the mane and tail securely in place. What types of adhesives are recommended?
- Wood Glue: Ideal for bonding wood to wood, providing a strong and lasting hold.
- Epoxy: A two-part adhesive that creates a waterproof and heat-resistant bond.
- Construction Adhesive: A versatile adhesive suitable for various materials, including wood and fabric.
3. Step-By-Step Guide: Attaching The Mane
Attaching the mane requires careful planning and execution. What are the steps involved in creating a beautiful and secure mane?
3.1. Preparing The Mane Base
The first step is to prepare the base onto which the yarn or horsehair will be attached. How do you create a suitable mane base?
- Measure and Cut: Measure the length of the horse’s neck where the mane will be attached. Cut the twill tape or fabric to this length, adding a few extra inches for overlap.
- Fold and Secure: Fold the edges of the fabric inward to create a clean edge and prevent fraying. Use fabric glue or stitching to secure the folded edges.
- Mark Attachment Points: Mark the points on the fabric where you will attach the yarn or horsehair. Space the marks evenly for a uniform look.
3.2. Attaching The Yarn Or Horsehair To The Base
Next, attach the yarn or horsehair to the prepared base. What techniques can you use to create a full and realistic mane?
- Cutting The Yarn Or Horsehair: Cut the yarn or horsehair into equal lengths, typically around 6-8 inches, depending on the desired mane length.
- Looping Technique: Fold each strand of yarn or horsehair in half to create a loop. Place the loop over the marked point on the fabric.
- Securing The Loops: Thread the ends of the yarn or horsehair through the loop and pull tight to create a knot. Repeat this process for each marked point, ensuring the strands are close together for a full mane.
- Alternative Stitching Method: Use a sewing machine, stitch the strands onto the tape. After sewing, trim the tape edges neatly and apply fabric glue to prevent fraying.
3.3. Affixing The Mane To The Rocking Horse
With the mane assembled, the next step is to attach it to the rocking horse. How do you ensure a secure and seamless attachment?
- Applying Adhesive: Apply a generous amount of wood glue or construction adhesive to the back of the fabric base.
- Positioning The Mane: Carefully position the mane along the horse’s neck, aligning it with the desired placement.
- Securing With Staples: Use a staple gun to secure the mane to the wood, spacing the staples evenly along the fabric base.
- Clamping (If Necessary): If the mane doesn’t sit flush against the wood, use clamps to hold it in place while the adhesive dries.
- Drying Time: Allow the adhesive to dry completely, typically for 24-48 hours, before moving on to the next step.
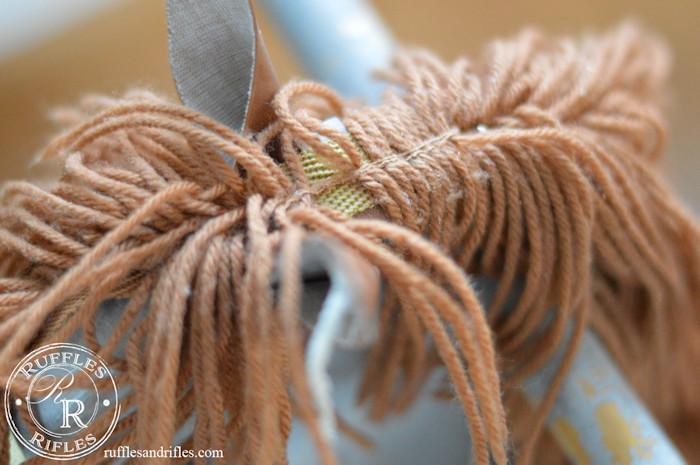 Rocking Horse Mane
The image shows yarn sewn onto twill tape, then stapled to the rocking horse’s head, showcasing a method for creating and attaching a realistic mane.
4. Step-By-Step Guide: Attaching The Tail
Attaching the tail requires a slightly different approach than the mane. What are the key steps to creating a beautiful and secure tail?
4.1. Preparing The Tail Hole
The first step is to prepare the hole where the tail will be inserted. How do you ensure a proper fit and secure attachment?
- Drilling A Hole: If there isn’t an existing hole, use a drill to create one in the horse’s rear. The hole should be deep enough to accommodate the tail but not go all the way through the wood.
- Sanding The Edges: Smooth the edges of the hole with sandpaper to prevent splinters and ensure a clean insertion.
- Cleaning The Hole: Remove any dust or debris from the hole to ensure a good bond with the adhesive.
4.2. Assembling The Tail
Next, assemble the tail using yarn or horsehair. What techniques can you use to create a full and realistic tail?
- Cutting The Yarn Or Horsehair: Cut the yarn or horsehair into equal lengths, typically around 12-18 inches, depending on the desired tail length.
- Bundling The Strands: Gather the strands together and tie them tightly at one end with a piece of string or yarn.
- Creating A Tapered Look: Trim the ends of the yarn or horsehair at an angle to create a tapered look, mimicking a real horse’s tail.
4.3. Affixing The Tail To The Rocking Horse
With the tail assembled, the next step is to attach it to the rocking horse. How do you ensure a secure and seamless attachment?
- Applying Adhesive: Apply a generous amount of wood glue or epoxy to the tied end of the tail.
- Inserting The Tail: Carefully insert the glued end of the tail into the prepared hole.
- Securing The Tail: Use small pieces of wood or shims to hold the tail in place while the adhesive dries.
- Drying Time: Allow the adhesive to dry completely, typically for 24-48 hours, before removing the shims.
 Rocking Horse Tale
The image displays a tail emerging from a hole in the rocking horse, illustrating a method where the tail is glued inside, between two pieces of wood.
5. Advanced Techniques For A Professional Finish
For those seeking a more professional finish, there are several advanced techniques to consider. What are some ways to elevate the look of your restored rocking horse?
5.1. Blending The Mane And Tail
Blending the mane and tail seamlessly into the rocking horse’s design can enhance its overall appearance. How do you achieve a cohesive look?
- Color Matching: Choose yarn or horsehair colors that complement the rocking horse’s paint or finish.
- Subtle Transitions: Use blending techniques to soften the transition between the mane and the horse’s neck.
- Styling The Mane And Tail: Trim and style the mane and tail to create a natural and flowing look.
5.2. Adding Texture And Dimension
Adding texture and dimension to the mane and tail can make them appear more realistic and visually appealing. What are some ways to achieve this?
- Layering Colors: Use multiple shades of yarn or horsehair to create depth and dimension.
- Varying Lengths: Cut the strands of yarn or horsehair at slightly different lengths to add texture.
- Adding Highlights: Use a lighter shade of yarn or horsehair to create highlights and add visual interest.
5.3. Weatherproofing The Mane And Tail
If the rocking horse will be used outdoors, it’s important to weatherproof the mane and tail. What steps can you take to protect them from the elements?
- Sealing The Yarn Or Horsehair: Apply a sealant or protectant to the yarn or horsehair to repel water and prevent fading.
- Using Weather-Resistant Adhesives: Choose adhesives that are specifically designed for outdoor use and can withstand moisture and temperature changes.
- Regular Maintenance: Inspect the mane and tail regularly for signs of wear and tear, and reapply sealant as needed.
6. Maintaining Your Restored Rocking Horse
Proper maintenance is essential to preserving the beauty and integrity of your restored rocking horse. What steps can you take to keep it in top condition?
6.1. Regular Cleaning
Regular cleaning can prevent the buildup of dirt and dust, keeping your rocking horse looking its best. How should you clean it?
- Dusting: Use a soft cloth or brush to dust the rocking horse regularly.
- Gentle Cleaning: Use a mild soap and water solution to clean any stains or dirt.
- Drying: Dry the rocking horse thoroughly after cleaning to prevent moisture damage.
6.2. Inspecting For Damage
Regular inspections can help you identify and address any potential problems before they become serious. What should you look for?
- Loose Joints: Check for any loose joints or connections and tighten them as needed.
- Cracks Or Splits: Inspect the wood for any cracks or splits and repair them promptly.
- Worn Mane And Tail: Check the mane and tail for signs of wear and tear, and repair or replace them as needed.
6.3. Storing Your Rocking Horse Properly
Proper storage can protect your rocking horse from damage and prolong its lifespan. What are some tips for storing it correctly?
- Indoor Storage: Store the rocking horse indoors in a cool, dry place away from direct sunlight.
- Covering: Cover the rocking horse with a cloth or sheet to protect it from dust and scratches.
- Avoiding Moisture: Avoid storing the rocking horse in damp or humid environments to prevent wood rot.
7. Common Mistakes To Avoid When Attaching Mane And Tail
Avoiding common mistakes is crucial for a successful rocking horse restoration. What pitfalls should you be aware of?
7.1. Using The Wrong Type Of Glue
Using the wrong type of glue can lead to weak bonds and premature failure. What types of glue should you avoid?
- Craft Glues: These glues are often not strong enough for the stresses involved in rocking horse use.
- Water-Based Glues: These glues can weaken over time, especially in humid environments.
7.2. Not Preparing The Surface Properly
Failing to prepare the surface properly can result in poor adhesion. What steps should you take to ensure a good bond?
- Always Sand: Sanding creates a rough surface that glue can grip more effectively.
- Clean Thoroughly: Remove any dust, oil, or old finish that could interfere with adhesion.
7.3. Rushing The Drying Process
Rushing the drying process can compromise the strength of the bond. How long should you wait before applying pressure?
- Follow Manufacturer’s Instructions: Always adhere to the drying times recommended by the glue manufacturer.
- Use Clamps: Clamps can help maintain pressure while the glue dries, ensuring a strong bond.
8. Adding Unique Details To Your Rocking Horse
Adding unique details can make your rocking horse truly special. What creative touches can you incorporate?
8.1. Custom Painting And Finishes
Custom painting and finishes can transform the look of your rocking horse. What options are available?
- Vintage Finishes: Techniques like distressing, antiquing, and milk paint can give your rocking horse a charming vintage look.
- Themed Designs: Consider painting your rocking horse with a theme, such as a favorite animal or character.
8.2. Personalized Engravings
Personalized engravings can add a sentimental touch to your rocking horse. What messages can you engrave?
- Names and Dates: Engrave the name of the child who will ride the rocking horse, along with their birthdate or a special occasion.
- Quotes and Sayings: Engrave a meaningful quote or saying that reflects your family’s values.
8.3. Adding Accessories
Adding accessories can enhance the play value and aesthetic appeal of your rocking horse. What accessories can you add?
- Saddles and Bridles: Miniature saddles and bridles can add a realistic touch.
- Blankets and Pillows: Soft blankets and pillows can make the ride more comfortable.
9. The Benefits Of Restoring A Wooden Rocking Horse
Restoring a wooden rocking horse offers numerous benefits. What are the advantages of undertaking this project?
9.1. Preserving History And Nostalgia
Restoring a rocking horse helps preserve a piece of history and nostalgia. How does it connect you to the past?
- Family Heirlooms: Rocking horses are often passed down through generations, carrying sentimental value.
- Vintage Charm: Restoring a vintage rocking horse can bring a touch of old-world charm to your home.
9.2. Creating A Unique And Personalized Gift
A restored rocking horse makes a unique and personalized gift. Why is it such a special present?
- Handmade Touch: A restored rocking horse shows that you put time and effort into creating something special.
- Customizable: You can customize the rocking horse to match the recipient’s preferences and style.
9.3. Promoting Sustainability And Recycling
Restoring a rocking horse is an act of sustainability and recycling. How does it benefit the environment?
- Reduces Waste: Instead of buying a new rocking horse, you’re giving new life to an existing one.
- Conserves Resources: Restoring a rocking horse requires fewer resources than manufacturing a new one.
10. Where To Find Inspiration And Supplies For Your Project
Finding inspiration and supplies is essential for a successful rocking horse restoration. Where can you find what you need?
10.1. Online Resources And Communities
Online resources and communities offer a wealth of information and support. What websites and forums can you consult?
- Rocking Horse Forums: Online forums dedicated to rocking horse restoration offer tips, advice, and inspiration.
- DIY Blogs: Many DIY blogs feature tutorials and project ideas for rocking horse restoration.
10.2. Local Craft And Hobby Stores
Local craft and hobby stores are great sources for supplies and materials. What can you find there?
- Yarn and Fabric: A wide selection of yarn and fabric for the mane and tail.
- Adhesives and Finishes: Glues, paints, and finishes for restoring the wood.
10.3. Antique Shops And Flea Markets
Antique shops and flea markets can be treasure troves for vintage rocking horses and parts. What can you discover?
- Original Parts: You may find original parts to replace damaged or missing components.
- Vintage Rocking Horses: You can find rocking horses in need of restoration at affordable prices.
Attaching a mane and tail to a wooden rocking horse is a rewarding project that combines craftsmanship, creativity, and a touch of nostalgia. By following these steps and tips, you can transform an old rocking horse into a cherished heirloom that will bring joy for years to come. For more landscape design ideas, stone selection, and installation tips, visit rockscapes.net, or visit our location at 1151 S Forest Ave, Tempe, AZ 85281, United States or call us on +1 (480) 965-9011. Let rockscapes.net be your partner in creating beautiful and sustainable landscapes.
Frequently Asked Questions (FAQ)
1. What Is The Best Material For A Rocking Horse Mane?
The best material depends on your budget and desired look. Yarn is affordable and easy to work with, while horsehair offers a more realistic appearance.
2. How Do I Prevent The Mane And Tail From Falling Off?
Use a strong adhesive like wood glue or epoxy, and secure with staples. Ensure the surface is properly prepared before attachment.
3. Can I Use Hot Glue To Attach The Mane And Tail?
Hot glue is not recommended as it may not provide a long-lasting bond, especially with the rocking motion.
4. How Do I Clean A Rocking Horse Mane And Tail?
Use a soft brush or cloth to gently remove dust and dirt. For stains, use a mild soap and water solution.
5. What Is The Best Way To Style A Rocking Horse Mane And Tail?
Trim the strands to the desired length and use a comb or brush to style. You can also add braids or ribbons for a decorative touch.
6. How Do I Repair A Damaged Rocking Horse Mane Or Tail?
For minor damage, try re-gluing loose strands. For more significant damage, you may need to replace the entire mane or tail.
7. How Can I Make My Rocking Horse Mane Look More Realistic?
Use multiple shades of yarn or horsehair to create depth and dimension. Vary the lengths of the strands for added texture.
8. What Tools Do I Need To Attach A Rocking Horse Mane And Tail?
You’ll need scissors, measuring tape, adhesive, a staple gun, and possibly a drill and drill bits.
9. How Long Does It Take For The Glue To Dry Completely?
Allow the adhesive to dry completely for 24-48 hours before applying pressure or using the rocking horse.
10. Can I Paint The Mane And Tail?
It’s not recommended to paint the mane and tail as it can make them stiff and unnatural. Instead, choose yarn or horsehair in the desired color.
