Can You Tumble Rocks By Hand? Yes, you absolutely can! At rockscapes.net, we believe in the beauty of handcrafted results, and hand-tumbling rocks is a fantastic way to transform dull stones into gleaming gems. This guide will walk you through the process of manual rock polishing, providing an engaging experience and helping you achieve stunning results with various types of rocks, minerals, and gemstones.
1. Why Choose Hand Polishing Rocks?
Hand polishing rocks offers a unique blend of simplicity, affordability, and control, making it a great choice for both beginners and experienced rock enthusiasts. While rock tumblers provide a convenient automated approach, hand polishing provides a more intimate connection with your stones, allowing for a personalized touch.
- Accessibility: Hand polishing requires minimal equipment, making it accessible to everyone.
- Cost-Effective: The materials needed are inexpensive, reducing the overall cost compared to investing in a rock tumbler.
- Precision: You have complete control over the shaping and polishing process, especially crucial for delicate or valuable stones.
- Therapeutic: Many find the rhythmic motion of hand polishing relaxing and meditative.
- Ideal for Soft Stones: As suggested by the Mohs Scale of Hardness, softer stones like turquoise and amber are better suited for hand polishing as they might not withstand the tumbling process.
 Hand polishing rocks
2. Essential Tools and Materials for Hand Polishing
To embark on your hand polishing adventure, gather these essential tools and materials:
- Rocks: Select a variety of rocks suitable for polishing.
- Buckets: Two small buckets for cleaning and rinsing.
- Soap: Mild dish soap for cleaning the rocks.
- Toothbrush: An old toothbrush for scrubbing crevices.
- Sandpaper: Various grits (220, 500, 1200) for shaping and smoothing.
- Cutting Board: A hard, flat surface for sanding.
- Thick Cloth: Denim or similar material for final polishing.
- Toothpaste: Abrasive toothpaste for creating luster.
- Mineral Oil/Rock Polish: To enhance the shine after polishing.
- Dremel (Optional): A rotary tool for faster shaping and polishing of hard stones.
- Protective Gear (If using Dremel): Safety glasses, gloves, and a mask.
3. Step-by-Step Guide to Hand Polishing Rocks
Follow these detailed steps to achieve beautifully polished rocks by hand:
3.1. Step 1: Cleaning Your Rocks
Begin by thoroughly cleaning your rocks to remove any dirt, debris, or residue. This ensures that the sandpaper works effectively and prevents scratches during the polishing process.
- Fill a small bucket with hot, soapy water.
- Submerge the rocks in the soapy water and scrub them with a toothbrush to remove any stubborn dirt.
- Rinse the rocks thoroughly with clean water to remove all traces of soap.
- Refill the bucket with clean water to use throughout the polishing process.
3.2. Step 2: Rough Shaping with 220-Grit Sandpaper
The next step involves shaping the rocks and removing any sharp edges or imperfections. This is achieved using 220-grit sandpaper.
- Moisten the 220-grit sandpaper and place it grit-side up on a cutting board or other hard, flat surface.
- Wet the rock and hold it in your dominant hand.
- Rub the rock along the sandpaper in a circular motion to remove hard edges and shape the stone.
- Continuously wet the rock to remove fine particles and facilitate the sanding process.
- Continue sanding until the edges are smooth and rounded, or you achieve the desired shape.
For harder stones, you might consider starting with a coarser grit such as 80-grit, but be cautious when using coarse sandpaper on softer stones, as it can cause more scratches than it removes.
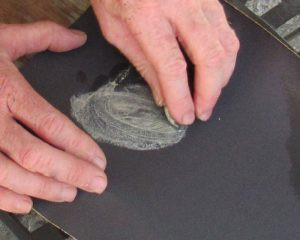 Shaping amber with sandpaper
3.3. Step 3: Refining the Shape with 500-Grit Sandpaper
Once the initial shaping is complete, move on to 500-grit sandpaper to refine the shape and remove any heavy scratches left by the coarser sandpaper.
- Replace the 220-grit sandpaper with 500-grit sandpaper.
- Wet the sandpaper and the rock.
- Rub the rock along the sandpaper in a circular motion, focusing on removing scratches and refining the shape.
- Keep the rock wet throughout the sanding process for optimal results.
3.4. Step 4: Polishing with 1200-Grit Sandpaper
The final sanding step involves using 1200-grit sandpaper to remove lighter scratches and begin the polishing process. This is where the shine starts to emerge.
- Replace the 500-grit sandpaper with 1200-grit sandpaper.
- Wet the sandpaper and the rock.
- Rub the rock along the sandpaper in a circular motion, focusing on buffing out tiny scratches on the surface.
- Keep the rock wet, rinsing it often to expose any areas that need more attention.
- Continue polishing until the surface starts to shine.
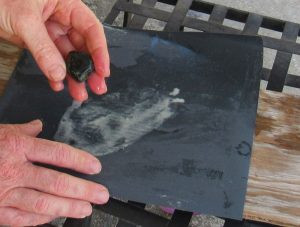 Checking progress with sandpaper
3.5. Step 5: Final Polishing with Toothpaste
For the final polishing touch, use toothpaste to create a beautiful luster on the rock’s surface.
- Dampen a square of thick cloth, preferably denim or a similar material.
- Apply a generous dab of toothpaste to the cloth.
- Work the stone through the toothpaste and over the fabric in a circular motion.
- Add more toothpaste as needed, depending on the stone, until the desired shine is achieved.
- Rinse off the toothpaste with clean water.
According to Allen McGhee, a seasoned rockhound and hand polisher, toothpaste works just as well as commercial polishing compounds and is a more cost-effective alternative. Any toothpaste will do, so there’s no need to invest in expensive brands.
3.6. Step 6: Enhancing the Shine
To bring out the full luster of your newly polished rock, coat it with mineral oil or a commercial rock polish.
- Apply a small amount of mineral oil or rock polish to a clean cloth.
- Rub the cloth over the surface of the rock to create a thin, even coating.
- Allow the rock to dry completely.
- Admire your beautifully polished rock!
4. Augmenting Hand Polishing with a Dremel
A Dremel is a versatile rotary tool that can be used to enhance the hand polishing process, particularly for shaping and polishing hard stones or those with intricate crevices.
4.1. How to Use a Dremel for Rock Polishing
- Attach a grinding or polishing head to the Dremel.
- Start with a coarse grit for shaping and gradually move to finer grits for polishing.
- Wet the rock and the polishing head.
- Gently move the Dremel over the surface of the rock, applying light pressure.
- Work in small sections, taking care not to overheat the rock or the polishing head.
- Rinse the rock and the polishing head frequently to remove debris.
- Once the desired shape and polish are achieved, finish with toothpaste and mineral oil as described above.
4.2. Safety Precautions When Using a Dremel
When using a Dremel for rock polishing, it’s crucial to prioritize safety. Always wear protective eyewear to prevent eye damage from flying chips. Gloves should be used to protect your hands from sharp edges and the rotating tip of the Dremel. Additionally, wearing a mask will prevent you from inhaling the tiny particles that come off the rock as it is ground.
4.3. Benefits of Using a Dremel
- Speed: A Dremel can significantly speed up the shaping and polishing process, especially for hard stones.
- Precision: It allows for precise shaping and polishing of intricate details and hard-to-reach areas.
- Versatility: A Dremel can be used for a variety of tasks, from grinding and smoothing sharp edges to creating perfectly smooth or rounded stones.
5. Rock Tumbling vs. Hand Polishing: Which is Right for You?
While both rock tumbling and hand polishing can produce beautiful results, they each have their own advantages and disadvantages.
| Feature | Rock Tumbling | Hand Polishing |
|---|---|---|
| Speed | Slow (days to weeks) | Fast (hours) |
| Labor Intensity | Low (machine does the work) | High (requires manual effort) |
| Control | Limited | High |
| Cost | Higher initial investment (tumbler required) | Lower (minimal equipment needed) |
| Best Suited For | Harder rocks, large quantities | Softer rocks, delicate stones, small quantities |
| Noise | Can be noisy | Quiet |
| Stone Variety | Suitable for a variety of stones | Best for softer stones like amber and turquoise |
5.1. When to Choose Rock Tumbling
- You want to polish a large quantity of rocks at once.
- You prefer a hands-off approach.
- You are working with harder rocks that require more aggressive abrasion.
- You don’t mind the noise and longer processing time.
5.2. When to Choose Hand Polishing
- You want more control over the final result.
- You are working with delicate or valuable stones that require a gentle touch.
- You enjoy the therapeutic aspect of handcrafting.
- You want a faster turnaround time.
- You are working with softer stones that might not withstand the tumbling process.
6. The Merits of Polishing Rocks by Hand
Hand polishing rocks offers a unique set of benefits that make it a worthwhile endeavor for rock enthusiasts of all levels.
- Enhanced Control: Hand polishing provides unparalleled control over the shaping and polishing process, allowing you to achieve the exact desired result.
- Preservation of Value: For rare or expensive rocks and gems, hand polishing can preserve and even enhance their value by minimizing the risk of damage.
- Sense of Accomplishment: The satisfaction of transforming a dull, rough stone into a gleaming gem through your own effort is a reward in itself.
- Mindfulness and Relaxation: The rhythmic motion of hand polishing can be a meditative and relaxing experience, providing a welcome escape from the stresses of daily life.
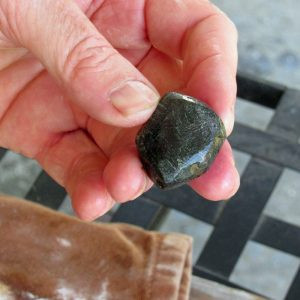 Shiny polished stone
7. Understanding the Mohs Hardness Scale in Rock Polishing
The Mohs Hardness Scale is a crucial reference for anyone involved in rock polishing, whether by hand or with a tumbler. Developed by German mineralogist Friedrich Mohs in 1812, this scale characterizes the scratch resistance of various minerals through their ability to scratch softer materials.
7.1. The Mohs Scale Explained
The scale ranges from 1 to 10, with each number representing a different mineral’s hardness:
- Talc: The softest mineral, easily scratched by a fingernail.
- Gypsum: Can be scratched by a fingernail.
- Calcite: Can be scratched by a copper coin.
- Fluorite: Can be scratched by a steel knife.
- Apatite: Can be scratched by a steel knife with difficulty.
- Orthoclase Feldspar: Can be scratched by a steel file.
- Quartz: Scratches glass easily.
- Topaz: Can scratch quartz.
- Corundum: Scratches topaz.
- Diamond: The hardest mineral, scratching all others.
7.2. How the Mohs Scale Affects Polishing
When hand polishing rocks, the Mohs Hardness Scale helps you determine the appropriate polishing methods and materials. Softer stones, like those rated 1-4, polish more easily and are less likely to withstand the aggressive tumbling process. Harder stones may require more coarse abrasives and longer polishing times. Knowing the hardness of your rocks ensures efficient and effective polishing while preventing damage.
8. Identifying Your Rocks: A Quick Guide
Being able to identify the rocks you are working with enhances your polishing experience and helps you understand their unique properties. Here’s a quick guide to some common rock types:
| Rock Type | Characteristics | Common Uses |
|---|---|---|
| Quartz | Hard, glassy, various colors (clear, white, pink, purple) | Jewelry, decorative stones, countertops |
| Agate | Banded chalcedony, various colors and patterns | Jewelry, decorative stones, ornamental objects |
| Jasper | Opaque chalcedony, typically red, yellow, or brown | Jewelry, decorative stones, carvings |
| Amethyst | Purple variety of quartz | Jewelry, decorative stones, spiritual practices |
| Obsidian | Volcanic glass, typically black | Jewelry, cutting tools (historically), decorative objects |
| Turquoise | Blue-green mineral, often with matrix veins | Jewelry, decorative stones, cultural artifacts |
| Aventurine | Quartz with inclusions of mica or hematite, giving a glittery appearance | Jewelry, decorative stones, lucky charms |
| Petrified Wood | Fossilized wood, where organic material has been replaced by minerals | Decorative stones, landscaping, unique art pieces |
| Geodes | Hollow rocks containing crystals inside | Decorative objects, mineral collections, educational purposes |
| Tiger’s Eye | Chatoyant quartz, golden-brown color | Jewelry, decorative stones, protective amulets |
For more in-depth rock identification, resources like the Geology Department at Arizona State University offer extensive guides and educational materials.
9. Advanced Techniques and Tips for Hand Polishing Rocks
Elevate your hand polishing skills with these advanced techniques and helpful tips:
- Pre- shaping: Use a rock hammer or saw to remove large imperfections and create a more uniform shape before sanding.
- Diamond Lapping: Consider using diamond lapping discs for faster and more precise shaping and polishing of harder stones.
- Ultrasonic Cleaning: After polishing, use an ultrasonic cleaner to remove any remaining polishing compound and reveal the true shine of your rocks.
- Waxing: Apply a thin layer of wax to your polished rocks to protect the surface and enhance the shine.
- Experimentation: Don’t be afraid to experiment with different polishing compounds, cloths, and techniques to find what works best for you and your rocks.
10. Common Mistakes to Avoid When Hand Polishing Rocks
Avoid these common pitfalls to ensure a successful and enjoyable hand polishing experience:
- Skipping Steps: Rushing through the sanding process can result in uneven surfaces and scratches.
- Using Dirty Materials: Contaminated sandpaper or cloths can introduce scratches and imperfections.
- Applying Too Much Pressure: Excessive pressure can damage the rock or cause the sandpaper to wear out quickly.
- Overheating: Overheating the rock during polishing can cause it to crack or discolor.
- Neglecting Safety: Failing to wear protective gear can lead to eye injuries, skin abrasions, and respiratory problems.
11. Incorporating Polished Rocks into Your Landscape with Rockscapes.net
Once you’ve mastered the art of hand polishing rocks, it’s time to showcase your creations in your landscape! Rockscapes.net offers a wealth of inspiration and resources for incorporating polished rocks into your outdoor spaces.
11.1. Landscape Design Ideas
- Rock Gardens: Create a stunning rock garden featuring a variety of polished rocks, succulents, and other drought-tolerant plants.
- Water Features: Add polished rocks to your ponds, fountains, or waterfalls for a touch of elegance and tranquility.
- Pathways: Line your garden pathways with polished rocks to create a visually appealing and textured surface.
- Borders: Use polished rocks to define garden beds and create clean, crisp borders.
- Accent Pieces: Place polished rocks strategically throughout your landscape as eye-catching accent pieces.
11.2. Practical Tips for Landscaping with Rocks
- Choose the Right Rocks: Select rocks that complement the style and colors of your home and landscape.
- Consider Size and Shape: Use a variety of sizes and shapes to create visual interest and dimension.
- Arrange Rocks Naturally: Mimic natural rock formations to create a more organic and appealing look.
- Provide Proper Drainage: Ensure that your rock installations have proper drainage to prevent water damage and erosion.
- Maintain Your Landscape: Regularly clean and maintain your rock installations to keep them looking their best.
At Rockscapes.net, located at 1151 S Forest Ave, Tempe, AZ 85281, United States, you can find a wide variety of rocks and expert advice for all your landscaping needs. Contact us at +1 (480) 965-9011 or visit our website, rockscapes.net, for more information.
12. FAQ About Hand Polishing Rocks
12.1. What types of rocks are best for hand polishing?
Softer stones like turquoise, amber, and obsidian are generally easier to hand polish.
12.2. Can I use regular sandpaper for rock polishing?
Yes, you can use regular sandpaper, but it’s important to use a variety of grits, starting with a coarser grit for shaping and gradually moving to finer grits for polishing.
12.3. How long does it take to hand polish a rock?
The time it takes to hand polish a rock depends on the size, hardness, and desired level of polish. It can take anywhere from a few hours to several days.
12.4. What is the best polishing compound for hand polishing rocks?
Toothpaste is a cost-effective and readily available polishing compound that works well for hand polishing rocks.
12.5. Do I need to wear protective gear when hand polishing rocks?
Yes, it’s recommended to wear safety glasses, gloves, and a mask to protect yourself from flying debris and dust.
12.6. Can I use a Dremel for all types of rocks?
A Dremel can be used for most types of rocks, but it’s particularly useful for harder stones and those with intricate crevices.
12.7. How do I clean polished rocks?
Polished rocks can be cleaned with mild soap and water. Avoid using harsh chemicals or abrasive cleaners.
12.8. How can I enhance the shine of my polished rocks?
You can enhance the shine of your polished rocks by coating them with mineral oil or a commercial rock polish.
12.9. Where can I find rocks for hand polishing?
Rocks for hand polishing can be found in nature, at rock and mineral shows, and online.
12.10. How do I store my polished rocks?
Polished rocks can be stored in a display case, a jewelry box, or any other safe and dry location.
13. Conclusion: Unleash Your Creativity with Hand Polished Rocks
Hand polishing rocks is a rewarding and creative endeavor that allows you to transform ordinary stones into extraordinary gems. By following the steps outlined in this guide, you can unlock the beauty hidden within rocks and create stunning pieces for your landscape, jewelry, or collection.
Visit rockscapes.net today to discover a world of inspiration, resources, and expert advice for incorporating polished rocks into your landscape. Whether you’re seeking design ideas, practical tips, or the perfect rocks for your project, rockscapes.net is your ultimate destination for all things rock-related. Start your hand polishing journey today and unleash your creativity with the timeless beauty of polished rocks! Let us help you transform your outdoor space into a stunning rockscape!