How Do You Polish A Rock By Hand to reveal its hidden beauty? Hand polishing is a rewarding way to transform rough stones into gleaming treasures, and rockscapes.net is here to guide you. By using simple techniques and readily available materials, you can achieve stunning results, enhancing your rockhounding finds and creating unique decorative pieces. Discover the art of hand polishing and unlock the natural luster of your rocks with rockscapes.net, and create personalized lapidary art, showcase geological specimens, and enhance decorative rock collections.
1. Why Choose to Polish Rocks by Hand?
Hand polishing rocks is a fantastic option for several reasons. It’s an accessible method that anyone, even novice rock enthusiasts, can undertake with ease.
- Simplicity and Affordability: The process requires minimal materials and investment, making it a budget-friendly way to enhance your rock collection.
- Therapeutic Benefits: Many find the rhythmic motion of hand polishing relaxing, offering a meditative and calming experience.
- Ideal for Delicate Stones: Hand polishing is particularly well-suited for softer stones like turquoise and amber, which may not withstand the rigors of a rock tumbler. According to research from Arizona State University’s School of Earth and Space Exploration, softer stones exhibit better results when polished manually due to reduced risk of damage.
- Preservation of Fragile Materials: Hand polishing is an excellent choice for preserving delicate materials like amber, where minimal material removal is desired.
 Hand-polishing-rocks-suited-for-fragile-stones
2. What Materials Do You Need to Polish Rocks by Hand?
Before you start your hand-polishing project, gather the necessary materials to ensure a smooth and efficient process.
| Material | Purpose |
|---|---|
| Soft-bristled Brush | To remove any dirt, grime or loose particles from the rock’s surface. This will ensure that the polishing compounds can effectively work on the rock. |
| Bucket or Container | This will hold the water and the rock(s). |
| Cutting Board | This is to provide a flat, stable surface for sanding the rocks, ensuring even and controlled material removal. It is used to protect the work area and prevent damage to other surfaces during the sanding process. |
| 220-Grit Sandpaper | This is used for initial shaping and rounding of the rock. |
| 500-Grit Sandpaper | To remove heavy scratches. |
| 1200-Grit Sandpaper | To remove lighter scratches. |
| Thick Cloth | To create a beautiful luster. |
| Toothpaste | To create a beautiful luster. |
| Mineral Oil | To bring out the luster. |
| Commercial Rock Polish | It can enhance the rock’s shine, provide added protection, and create a more professional-looking finish. Additionally, commercial rock polishes often contain ingredients that help to fill in microscopic imperfections on the rock’s surface, further improving its overall appearance. |
| Dremel | A Dremel is a popular motorized rotary tool that’s handy for grinding and smoothing sharp edges and completing extensive shaping of hard stones, especially those with lots of crevices. It’s possible to shape and polish rocks and gems faster with a Dremel. When using a Dremel, protective eyewear is a must. Even small chips can damage an eye. Gloves should be used to protect hands. Sharp edges on the rock and the rotating tip of the Dremel can break the skin. Wearing a mask prevents inhaling the tiny particles coming off the rock as it is ground. |
3. What Are the Steps on How to Polish Rocks by Hand?
Follow these detailed steps to achieve a stunning, hand-polished finish on your rocks:
3.1. Step 1: Cleaning the Rock(s)
Begin by thoroughly cleaning the rock(s) to remove any dirt, grime, or debris. Use a soft-bristled brush and hot, soapy water to scrub the surface, paying close attention to crevices and textured areas. According to the Gemological Institute of America (GIA), proper cleaning is crucial as it prepares the rock for subsequent polishing stages, ensuring optimal results. Rinse the rock(s) thoroughly with clean water to remove any soap residue, then discard the soapy water and refill the bucket with fresh water.
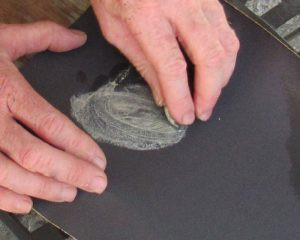
3.2. Step 2: Rounding the Corners and Rough Shaping
Moisten a sheet of 220-grit sandpaper and place it grit-side up on a cutting board or other hard, flat surface. Wet the rock(s) and hold it in your dominant hand. Begin rubbing the rock(s) along the sandpaper to remove any hard edges or sharp corners. This process is essential for creating a smooth, uniform surface that is comfortable to handle and aesthetically pleasing. Continually wet the rock(s) and sandpaper to remove fine particles and facilitate the sanding process. Continue until the edges are smooth and rounded, or you achieve the desired shape.
3.3. Step 3: Refining the Shape and Removing Heavy Scratches
Progress to 500-grit sandpaper to further refine the shape and remove any heavy scratches left by the coarser 220-grit sandpaper. Wet the sandpaper and rock(s), and repeat the rubbing process, paying attention to any imperfections or rough spots. This step is crucial for achieving a smooth, even surface that is ready for the final polishing stages. Keep the rock(s) wet throughout the sanding process for optimal results.
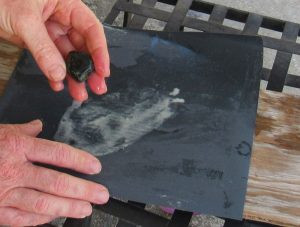
3.4. Step 4: Removing Lighter Scratches and Initial Polishing
Switch to 1200-grit sandpaper to remove any remaining light scratches and begin the initial polishing process. This extra-fine sandpaper buffs out tiny imperfections on the rock(s)’ surface, gradually bringing out its natural shine. The shine will start forming during this step. Make sure to keep the rock(s) wet, rinsing it often to expose anything that’s been missed.
 Removing-lighter-scratches-and-initial-polishing
3.5. Step 5: Polishing with Toothpaste
Dampen a square of thick cloth, preferably denim or a similar material, and apply a generous dab of toothpaste. Work the rock(s) through the toothpaste and over the fabric, using firm, even pressure. The gentle abrasives in the toothpaste will further polish the surface, creating a beautiful luster. Depending on the stone, add more toothpaste several times until the desired shine is achieved. Allen McGhee, a seasoned rockhound, suggests that any toothpaste works effectively, so there’s no need to invest in expensive brands.
3.6. Step 6: Final Rinse and Coating
Rinse off any remaining toothpaste with clean water and thoroughly dry the rock(s). Apply a thin, even coat of mineral oil or commercial rock polish to enhance the luster and protect the surface. Allow the rock(s) to dry completely before handling or displaying them. This final step brings out the full potential of the polished stone, revealing its natural beauty and radiance.
 Checking-the-progress-after-polishing-with-500-grit-and-1200-grit-sandpaper
4. How to Polish Rocks by Hand: Utilizing a Dremel for Enhanced Results
For those seeking a more efficient and precise polishing method, a Dremel rotary tool can be a valuable asset. A Dremel is particularly useful for grinding and smoothing sharp edges, as well as performing extensive shaping on harder stones or those with intricate crevices.
4.1. Safety First
When using a Dremel, prioritize safety by wearing protective eyewear to shield your eyes from potential debris. Gloves are also essential to protect your hands from sharp edges and the rotating tip of the tool. Additionally, a mask is recommended to prevent inhaling any fine particles that may be released during the grinding process.
4.2. Shaping and Polishing
Attach a suitable grinding or polishing bit to the Dremel and adjust the speed according to the type of stone you are working with. Begin by gently shaping the rock, removing any rough edges or imperfections. Then, switch to a polishing bit and apply a polishing compound to achieve a smooth, lustrous finish.
4.3. Personal Preference
The extent to which you use a Dremel for shaping and polishing depends on your personal preference. Some prefer a more natural, organic shape, while others opt for a perfectly smooth and rounded stone. A Dremel can be particularly helpful for working with harder rocks that would take a considerable amount of time to smooth by hand.
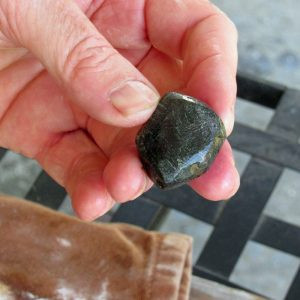 The-dull-stone-is-now-shiny
5. Rock Tumbling vs. Hand Polishing: Which Method Should You Choose?
Both rock tumbling and hand polishing offer unique advantages, and the best method depends on your specific needs and preferences.
| Feature | Rock Tumbling | Hand Polishing |
|---|---|---|
| Time Investment | Lengthy process, ranging from several days to several weeks | Quicker turnaround, especially for softer rocks |
| Labor Intensity | Less labor-intensive, as the machine does most of the work | More labor-intensive, requiring manual effort |
| Control | Less control over the final shape and finish | More control over the final shape and finish |
| Best Suited For | Harder rocks, large batches, and those seeking a uniform, rounded shape | Softer rocks, delicate specimens, and those seeking a more customized finish |
| Initial Investment | Requires the purchase of a rock tumbler | Requires minimal investment in sandpaper, cloths, and polishing compounds |
| Level of Effort | Low, as the tumbler does most of the work | High, as it involves manual sanding and polishing |
| Rocks That Can Tumble | Can handle a variety of rocks, especially harder ones like agate, jasper, and quartz. | Suitable for softer stones like turquoise, amber, and other delicate materials that may be damaged in a tumbler. |
| Outcome | Produces uniformly shaped and polished stones, often with rounded edges. | Allows for greater control over the final shape and finish, ideal for preserving unique features of the stone. |
| Noise Level | Can be noisy, especially during the grinding stages, which may require placing the tumbler in a remote area. | Quiet process, allowing for indoor polishing without disturbing others. |
| Skill Level | Beginner-friendly, as the process is automated and requires minimal skill. | Requires some skill and patience to achieve desired results, especially for intricate shapes and finishes. |
6. What are the Benefits of Polishing Rocks by Hand?
While hand polishing may require more time and effort, it offers several distinct advantages:
- Greater Control: Hand polishing allows for greater control over the final shape, finish, and overall appearance of the rock.
- Sense of Accomplishment: Many find the process of hand polishing to be a rewarding and satisfying experience, providing a sense of accomplishment and connection with the natural world.
- Preservation of Value: Hand polishing is particularly valuable for rare or expensive rocks and gems, as it minimizes the risk of damage and preserves their intrinsic value.
7. Polish Up on Your Rock Knowledge With Rockscapes.Net
Ready to dive into the world of hand-polished rocks? Rockscapes.net offers a wealth of inspiration, information, and expert advice to help you create stunning landscape features with natural stone. Explore our extensive collection of resources and discover the endless possibilities for transforming your outdoor spaces into breathtaking works of art.
Are you looking for:
- Design Ideas: Discover diverse landscape designs using polished stones.
- Material Information: Access detailed guides on selecting the best stones for your projects.
- Local Suppliers: Find reliable suppliers near you.
At rockscapes.net, located at 1151 S Forest Ave, Tempe, AZ 85281, United States, and reachable by phone at +1 (480) 965-9011, we are dedicated to helping you realize your dream landscape. Whether you’re a homeowner, landscape designer, or contractor, our resources and expertise will guide you through every step of the process.
8. FAQs About Polishing Rocks by Hand
8.1. What types of rocks are best for hand polishing?
Softer stones like turquoise, amber, and other delicate materials are ideal for hand polishing, as they may be damaged in a rock tumbler.
8.2. What grit sandpaper should I start with?
Start with 220-grit sandpaper to round the corners and do some rough shaping, especially for rough or uneven stones.
8.3. Can I use a Dremel for hand polishing?
Yes, a Dremel rotary tool can be used to enhance the polishing process, especially for grinding and smoothing sharp edges on harder stones.
8.4. Is hand polishing better than rock tumbling?
Hand polishing offers more control over the final shape and finish, while rock tumbling is less labor-intensive and suitable for large batches of harder rocks.
8.5. What kind of toothpaste should I use for polishing?
Any toothpaste will work, so there’s no need to invest in expensive brands.
8.6. Do I need to wear safety gear when hand polishing?
Protective eyewear, gloves, and a mask are recommended when using a Dremel to prevent injury from debris and fine particles.
8.7. Can I polish rocks indoors?
Yes, hand polishing is a relatively quiet process that can be done indoors without disturbing others.
8.8. How long does it take to hand polish a rock?
The time required depends on the hardness of the rock and the desired level of polish, but it generally takes less time than rock tumbling.
8.9. What is the Mohs Scale of Hardness and how does it relate to polishing?
The Mohs Scale of Hardness measures the resistance of a mineral to scratching. Softer stones with a lower rating on the scale are easier to polish by hand than harder stones.
8.10. Can children polish rocks by hand?
Yes, with proper supervision and guidance, children can participate in hand polishing projects, learning about geology and developing fine motor skills.