Anubias plants, when glued to rocks, create stunning aquascapes. Rockscapes.net provides a detailed guide on how to securely attach Anubias to rocks, enhancing the beauty and natural appeal of your aquarium. By following this guide, you can master gluing aquatic plants to rocks, create stunning displays, and add a touch of natural beauty to your aquarium or water garden.
1. What Is The Best Way To Attach Anubias To Rock?
The best way to attach Anubias to rock is by using super glue gel containing cyanoacrylate. This method ensures a strong, non-toxic bond, allowing the plant to securely attach to the rock over time.
-
Why Super Glue Gel? Super glue gel, specifically those containing cyanoacrylate, is ideal due to its non-toxic nature once cured and its ability to create a strong and lasting bond in aquatic environments. Cyanoacrylate is a liquid acrylic that forms an acrylic bond between the plant and the rock, ensuring the Anubias stays in place.
-
Preparing the Anubias: Before gluing, gently remove the Anubias from its pot and clean off as much rock wool (the cotton-like material around the roots) as possible. This helps the glue adhere directly to the roots. According to research from Arizona State University’s School of Life Sciences, healthy roots are crucial for the plant’s ability to attach and thrive on the rock.
-
Selecting the Right Rock: Choose a rock with a rough surface or natural crevices. Texas holey rock, lava rock, or other porous rocks work well. These provide better adhesion for the glue and a natural look for the aquascape.
-
Step-by-Step Gluing Process:
- Dry the plant roots and the area on the rock where the Anubias will be attached.
- Apply a small amount of super glue gel to the chosen spot on the rock.
- Press the roots of the Anubias firmly onto the glue, holding it in place for about a minute until the glue sets.
- Ensure the rhizome (the thick stem from which the leaves and roots grow) is not covered in glue, as this can harm the plant.
-
Alternative Attachment Methods: While super glue is the most effective, other methods include using thread, fishing line, or rubber bands to tie the Anubias to the rock. However, these methods are less reliable and may require more maintenance.
-
Post-Attachment Care: Once the Anubias is attached, place the rock in the aquarium. The plant will gradually attach its roots to the rock, creating a natural and aesthetically pleasing look. Ensure the aquarium has proper lighting and water conditions suitable for Anubias growth.
By following these steps, you can successfully attach Anubias to rocks, enhancing your aquarium with beautiful and thriving aquatic plants. Rockscapes.net offers a variety of resources and products to help you create stunning aquascapes.
2. What Materials Are Needed To Glue Anubias To Rock?
To successfully glue Anubias to rock, you will need a few essential materials: Anubias plants, suitable rocks, super glue gel (cyanoacrylate-based), and a few optional tools for preparation.
-
Anubias Plant: Choose a healthy Anubias plant, preferably one that is about 3-4 inches tall. Smaller plants are easier to attach and allow for better integration with the rock.
-
Aquarium Rock: Select a rock that is safe for aquarium use and has a textured surface. Texas holey rock, lava rock, or other porous rocks are excellent choices. Avoid rocks that may leach harmful chemicals into the water.
-
Super Glue Gel: Ensure the super glue gel contains cyanoacrylate, as this is the active ingredient that creates a strong and safe bond in aquatic environments. Standard super glue (liquid) may not be as effective due to its runny consistency.
-
Optional Gloves: While not required, wearing gloves can prevent the glue from sticking to your hands.
-
Paper Towels: Use paper towels to dry the plant roots and the rock surface before applying the glue.
-
Small Container of Water: A small container of water can be helpful for rinsing the plant roots to remove debris.
-
Scissors or Tweezers: These tools can be useful for trimming any dead or decaying roots before gluing.
-
Example: You can use Seachem Flourish Glue
 Anubias Plant Setup
Anubias plants and glue setup for your home aquarium.
-
Detailed Breakdown:
- Anubias Varieties: There are several varieties of Anubias, including Anubias Nana, Anubias Barteri, and Anubias Congensis. Each has slightly different leaf shapes and sizes, allowing you to choose the best option for your aquascape.
- Rock Types:
- Texas Holey Rock: Excellent for Cichlid and Goldfish aquariums, as it helps balance pH and hardness.
- Lava Rock: Lightweight and porous, providing ample surface area for the Anubias to attach.
- Okho Stone: Offers a unique aesthetic with its dark color and interesting textures.
- Smooth River Rocks: Can be used, but ensure they have enough texture for the glue to adhere properly.
- Super Glue Gel Considerations: Look for super glue gels that are specifically labeled as safe for aquarium use to ensure they do not contain harmful chemicals.
-
Preparation Steps:
- Gather all the necessary materials in a well-lit workspace.
- Inspect the Anubias plant and trim any dead or decaying roots.
- Rinse the rock to remove any dirt or debris.
- Dry the rock and plant roots thoroughly before proceeding with the gluing process.
By having these materials prepared, you can efficiently and effectively attach Anubias to rocks, creating a beautiful and natural-looking aquarium display. Rockscapes.net offers a range of high-quality rocks and plants to help you achieve your aquascaping goals.
3. How Do You Prepare Anubias For Gluing To Rock?
Preparing Anubias for gluing to rock involves several key steps to ensure the plant adheres properly and remains healthy. This includes removing the plant from its pot, cleaning the roots, and identifying the rhizome.
-
Remove the Plant from Its Pot: Gently take the Anubias plant out of its pot. Be careful not to damage the roots or leaves during this process.
-
Clean the Roots: Remove as much of the rock wool (the cotton-like material surrounding the roots) as possible. This material can prevent the glue from adhering properly to the roots. Gently rinse the roots under running water to help remove any remaining debris. Use your fingers to carefully tease apart the roots and remove the rock wool.
-
Identify the Rhizome: Locate the rhizome of the Anubias, which is the thick, horizontal stem from which the leaves and roots grow. It is crucial not to cover the rhizome with glue, as this can cause the plant to rot and die. The rhizome should remain exposed to the water.
-
Trim Dead or Damaged Roots: Use scissors or tweezers to trim any dead or damaged roots. This helps promote healthy growth and ensures that only healthy roots are attached to the rock.
-
Dry the Roots: Before applying the glue, dry the roots with a paper towel. This helps the glue adhere better to the roots and the rock surface.
-
Detailed Explanation:
- Importance of Removing Rock Wool: Rock wool is often treated with fertilizers or chemicals that can be harmful to aquarium inhabitants. Removing it ensures a cleaner and healthier environment for your tank.
- Why the Rhizome Should Not Be Covered: The rhizome is responsible for the plant’s growth and nutrient absorption. Covering it with glue can suffocate the plant and lead to its decline.
- Proper Root Trimming Techniques: When trimming roots, make clean cuts to prevent infection. Remove any roots that are brown, mushy, or excessively long.
- Alternative Cleaning Methods: If you find it difficult to remove the rock wool by hand, you can soak the roots in a small container of water for a few minutes to loosen the material.
-
Example Preparation Steps:
- Take the Anubias plant out of its pot.
- Gently rinse the roots under running water.
- Use your fingers to remove as much rock wool as possible.
- Trim any dead or damaged roots.
- Dry the roots with a paper towel.
- Locate and ensure the rhizome is clear of any debris.
By following these preparation steps, you can ensure that the Anubias plant is ready for gluing to the rock, promoting healthy growth and a visually appealing aquascape. Visit Rockscapes.net for a wide selection of Anubias plants and aquascaping supplies.
4. What Is The Best Type Of Glue To Use For Attaching Anubias To Rock?
The best type of glue to use for attaching Anubias to rock is super glue gel that contains cyanoacrylate. This type of glue is non-toxic when cured and creates a strong, durable bond in aquatic environments.
-
Why Super Glue Gel? Super glue gel is preferred over liquid super glue because its thicker consistency prevents it from running, allowing for more precise application. This is crucial for ensuring the glue adheres to the intended area without spreading onto the rhizome or other sensitive parts of the plant.
-
Cyanoacrylate: The Key Ingredient: Cyanoacrylate is a liquid acrylic resin that polymerizes rapidly in the presence of moisture, forming a strong bond. It is safe for aquarium use once it has fully cured, making it the ideal choice for attaching plants to rocks.
-
Considerations When Choosing Glue:
- Non-Toxicity: Ensure the super glue gel is labeled as safe for aquarium use. This indicates that it does not contain harmful chemicals that could leach into the water and harm your aquarium inhabitants.
- Gel Consistency: Opt for a gel consistency to prevent the glue from running and to allow for better control during application.
- Curing Time: Check the curing time of the glue. Most super glue gels cure within a few minutes, allowing for quick and efficient attachment.
-
Example Brands and Products:
- Loctite Super Glue Gel: A popular choice for its strong bond and non-toxic formula when cured.
- Gorilla Glue Gel: Another reliable option that provides a durable and waterproof bond.
- Seachem Flourish Glue: Specifically designed for aquarium use, ensuring safety and effectiveness.
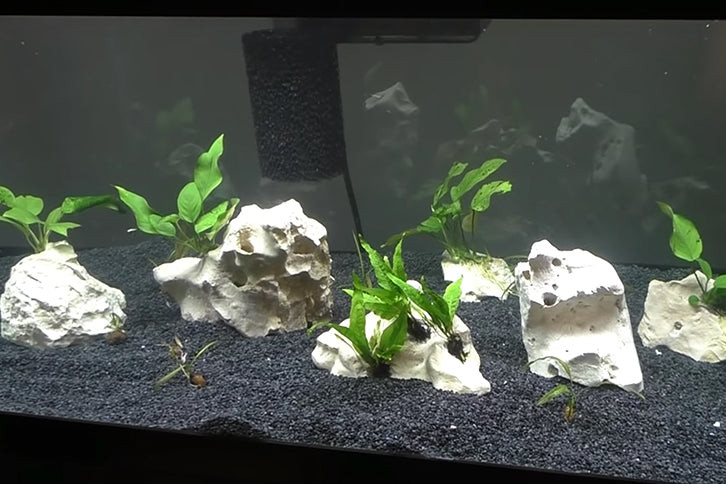
 Rock for Anubias
Rock to attach Anubias in an aquarium setup.
-
Step-by-Step Gluing Process:
- Dry the plant roots and the area on the rock where the Anubias will be attached.
- Apply a small amount of super glue gel to the chosen spot on the rock.
- Press the roots of the Anubias firmly onto the glue, holding it in place for about a minute until the glue sets.
- Ensure the rhizome is not covered in glue, as this can harm the plant.
-
Alternative Attachment Methods: While super glue is the most effective, other methods include using thread, fishing line, or rubber bands to tie the Anubias to the rock. However, these methods are less reliable and may require more maintenance.
By using super glue gel containing cyanoacrylate, you can securely attach Anubias to rocks, creating a beautiful and natural-looking aquarium display. Visit Rockscapes.net for a wide selection of aquascaping supplies and expert advice on creating stunning aquatic environments.
5. What Is The Step-By-Step Guide For Gluing Anubias To Rock?
Gluing Anubias to rock is a straightforward process that enhances the aesthetic appeal of your aquarium. Here’s a detailed step-by-step guide to ensure successful attachment:
-
Step 1: Gather Your Supplies: Collect all the necessary materials, including Anubias plants, suitable rocks, super glue gel (cyanoacrylate-based), paper towels, and optional gloves.
-
Step 2: Prepare the Anubias Plant:
- Gently remove the Anubias plant from its pot.
- Rinse the roots under running water to remove as much rock wool as possible.
- Trim any dead or damaged roots with scissors or tweezers.
- Dry the roots with a paper towel.
- Identify the rhizome (the thick stem from which the leaves and roots grow) and ensure it is clear of any debris.
-
Step 3: Prepare the Rock:
- Choose a rock with a textured surface or natural crevices for better adhesion.
- Rinse the rock to remove any dirt or debris.
- Dry the area on the rock where the Anubias will be attached.
-
Step 4: Apply the Super Glue Gel:
- Apply a small amount of super glue gel to the chosen spot on the rock. Use only enough to cover the area where the roots will be attached.
- Be careful not to apply too much glue, as it can spread and potentially harm the plant.
-
Step 5: Attach the Anubias to the Rock:
- Press the roots of the Anubias firmly onto the glue on the rock.
- Hold the plant in place for about a minute or two until the glue sets.
- Ensure the rhizome is not covered in glue, as this can cause the plant to rot.
-
Step 6: Inspect the Attachment:
- Check that the Anubias is securely attached to the rock.
- If necessary, apply a small amount of additional glue to any areas that seem loose.
-
Step 7: Place the Rock in the Aquarium:
- Once the glue has fully cured (usually within a few minutes), carefully place the rock with the attached Anubias into your aquarium.
- Position the rock in a location that provides adequate lighting and water flow for the plant.
-
Detailed Tips and Considerations:
- Working Quickly: Super glue sets quickly, so it’s important to work efficiently to ensure the plant is securely attached before the glue dries.
- Avoiding the Rhizome: Always avoid applying glue to the rhizome, as this can suffocate the plant and lead to its decline.
- Choosing the Right Rock: Select rocks that are safe for aquarium use and have a textured surface for better adhesion.
- Maintaining Water Quality: Ensure your aquarium has proper water conditions, including appropriate temperature, pH levels, and nutrient levels, to support the health and growth of the Anubias plant.
-
Troubleshooting:
- If the Anubias Doesn’t Attach: Ensure both the rock and the plant roots are completely dry before applying the glue. Also, make sure you are using super glue gel containing cyanoacrylate.
- If the Plant Starts to Rot: This is likely due to the rhizome being covered in glue. Remove the plant from the rock, trim away any rotting parts, and reattach it, ensuring the rhizome is exposed.
By following this step-by-step guide, you can successfully glue Anubias to rock, creating a beautiful and thriving aquascape. Visit Rockscapes.net for a wide selection of Anubias plants, rocks, and aquascaping supplies.
6. How Long Does It Take For Anubias To Attach To Rock After Gluing?
After gluing Anubias to rock, it typically takes a few weeks to a few months for the plant to fully attach itself to the rock with its roots. The super glue provides an immediate bond, but the Anubias needs time to grow new roots that grip the rock surface.
-
Initial Attachment: The super glue gel provides an immediate and strong bond, holding the Anubias in place. This initial attachment is crucial for preventing the plant from detaching before it can naturally adhere to the rock.
-
Root Growth Period: Over the following weeks, the Anubias will begin to send out new roots that grow along the surface of the rock. These roots will gradually attach themselves to the rock, providing a more permanent and natural connection.
-
Factors Influencing Attachment Time:
- Water Quality: Proper water conditions, including temperature, pH levels, and nutrient levels, are essential for healthy root growth.
- Lighting: Adequate lighting promotes photosynthesis and overall plant health, which in turn supports root development.
- Plant Health: A healthy Anubias plant will attach more quickly than one that is stressed or unhealthy.
- Rock Surface: A rough or porous rock surface provides more grip for the roots, facilitating faster attachment.
-
Signs of Successful Attachment:
- New Root Growth: The most obvious sign is the appearance of new roots growing along the surface of the rock.
- Firm Hold: Gently tug on the plant to see if it feels securely attached to the rock.
- Healthy Appearance: The plant should maintain a healthy green color and show signs of new leaf growth.
-
Tips for Promoting Faster Attachment:
- Maintain Optimal Water Conditions: Regularly test and adjust the water parameters to ensure they are within the ideal range for Anubias.
- Provide Adequate Lighting: Use appropriate lighting to support photosynthesis and plant growth.
- Fertilize Sparingly: Anubias are slow-growing plants and do not require heavy fertilization. Use a liquid fertilizer sparingly to provide essential nutrients.
- Ensure Good Water Flow: Good water flow helps distribute nutrients and prevents the buildup of algae, promoting a healthier environment for the plant.
-
Example Timeline:
- Week 1-2: The super glue holds the plant in place. Monitor the plant for any signs of stress or detachment.
- Week 3-4: New roots begin to emerge from the plant and start to attach to the rock surface.
- Month 2-3: The Anubias becomes firmly attached to the rock with its roots. The plant shows healthy growth and appearance.
By understanding the timeline and factors influencing attachment, you can ensure your Anubias successfully attaches to the rock, creating a beautiful and natural-looking aquascape. Visit Rockscapes.net for a wide selection of Anubias plants, rocks, and aquascaping supplies to enhance your aquarium.
7. Can You Glue Anubias To Driftwood Instead Of Rock?
Yes, you can absolutely glue Anubias to driftwood instead of rock. In fact, attaching Anubias to driftwood is a popular and effective way to create a natural and aesthetically pleasing aquascape.
-
Why Driftwood? Driftwood offers several advantages for attaching Anubias:
- Natural Look: Driftwood provides a more natural and organic look compared to rocks, enhancing the overall aesthetic of the aquarium.
- Lightweight: Driftwood is generally lighter than rocks, making it easier to position and rearrange in the aquarium.
- Texture: The textured surface of driftwood provides a good grip for the Anubias roots, facilitating attachment.
-
Types of Driftwood Suitable for Aquariums:
- Malaysian Driftwood: Known for its rich color and interesting shapes.
- Mopani Wood: Features a two-tone color pattern and a smooth surface.
- Spider Wood: Characterized by its intricate branching structure.
-
Preparation Steps:
- Soak the Driftwood: Before attaching Anubias, soak the driftwood in water for several days to leach out any tannins that could discolor the water.
- Clean the Driftwood: Scrub the driftwood with a brush to remove any dirt, algae, or loose pieces.
- Dry the Driftwood: Allow the driftwood to dry completely before attaching the Anubias.
-
Gluing Process: The gluing process for attaching Anubias to driftwood is similar to attaching it to rock:
- Prepare the Anubias: Remove the plant from its pot, clean the roots, and dry them with a paper towel.
- Apply Super Glue Gel: Apply a small amount of super glue gel (cyanoacrylate-based) to the chosen spot on the driftwood.
- Attach the Anubias: Press the roots of the Anubias firmly onto the glue, holding it in place for about a minute until the glue sets.
- Ensure the Rhizome is Exposed: Make sure the rhizome (the thick stem from which the leaves and roots grow) is not covered in glue, as this can cause the plant to rot.
-
Alternative Attachment Methods:
- Thread or Fishing Line: You can also use thread or fishing line to tie the Anubias to the driftwood. This method may take longer for the plant to attach, but it is a safe alternative to glue.
- Rubber Bands: Rubber bands can be used to secure the Anubias to the driftwood until the plant attaches on its own.
-
Post-Attachment Care:
- Maintain Water Quality: Ensure your aquarium has proper water conditions, including appropriate temperature, pH levels, and nutrient levels, to support the health and growth of the Anubias plant.
- Provide Adequate Lighting: Use appropriate lighting to support photosynthesis and plant growth.
- Ensure Good Water Flow: Good water flow helps distribute nutrients and prevents the buildup of algae, promoting a healthier environment for the plant.
By attaching Anubias to driftwood, you can create a stunning and natural-looking aquascape that enhances the beauty of your aquarium. Visit Rockscapes.net for a wide selection of Anubias plants, driftwood, and aquascaping supplies.
8. How Do You Maintain Anubias Attached To Rock?
Maintaining Anubias attached to rock involves several key practices to ensure the plant remains healthy, vibrant, and securely attached. Regular maintenance includes proper lighting, water quality management, and occasional trimming.
-
Lighting: Anubias are low-light plants and do not require intense lighting. Excessive light can promote algae growth on the leaves. Provide moderate to low lighting conditions to keep the plant healthy.
-
Water Quality: Maintain good water quality by performing regular water changes (25-50% every 1-2 weeks). Anubias can tolerate a wide range of water parameters, but they thrive in clean, stable conditions.
-
Nutrient Levels: Anubias are slow-growing plants and do not require heavy fertilization. However, they benefit from occasional supplementation with a liquid fertilizer containing micronutrients. Be careful not to over-fertilize, as this can lead to algae growth.
-
Algae Control: Algae can be a common issue with Anubias, especially in high-light environments. To control algae:
- Maintain Proper Lighting: Adjust the lighting to reduce intensity and duration.
- Introduce Algae-Eating Creatures: Add algae-eating snails (such as Nerite snails) or shrimp (such as Amano shrimp) to your aquarium.
- Manual Removal: Gently wipe the leaves with a soft cloth or toothbrush to remove algae.
-
Trimming: Trim any dead or decaying leaves to promote healthy growth. Use sharp scissors to make clean cuts at the base of the leaf stem.
-
Attachment Check: Periodically check the attachment of the Anubias to the rock. Over time, the glue may weaken, or the plant may outgrow its initial attachment point. If the plant becomes loose, you can reattach it using super glue gel.
-
Preventing Rhizome Rot: Ensure the rhizome (the thick stem from which the leaves and roots grow) is not buried in the substrate or covered in algae. Rhizome rot can occur if the rhizome is deprived of light and oxygen.
-
Detailed Tips:
- Water Circulation: Ensure good water circulation around the Anubias to prevent the buildup of detritus and promote nutrient absorption.
- Avoid Disturbing Roots: Be gentle when performing maintenance tasks to avoid disturbing the roots of the Anubias.
- Monitor for Pests: Regularly inspect the plant for any signs of pests, such as snails or insects.
-
Example Maintenance Schedule:
- Daily: Check the plant for any signs of stress or algae growth.
- Weekly: Perform a water change and clean the substrate.
- Monthly: Trim any dead or decaying leaves and check the attachment of the Anubias to the rock.
- As Needed: Fertilize sparingly with a liquid fertilizer containing micronutrients.
By following these maintenance practices, you can ensure your Anubias remains healthy, vibrant, and securely attached to the rock, enhancing the beauty of your aquarium. Visit Rockscapes.net for a wide selection of Anubias plants, rocks, and aquascaping supplies.
9. What Are Common Problems And Solutions When Gluing Anubias To Rock?
When gluing Anubias to rock, several common problems can arise. Here are some of those problems and their solutions:
-
Problem 1: Anubias Not Sticking to the Rock:
- Cause: The rock or the plant roots were not dry enough, or the glue was not applied correctly.
- Solution: Ensure both the rock and the plant roots are completely dry before applying the glue. Use super glue gel (cyanoacrylate-based) and apply a small amount to the chosen spot on the rock. Press the roots firmly onto the glue and hold for a minute or two until the glue sets.
-
Problem 2: Glue Turning White:
- Cause: Super glue can turn white when it comes into contact with water before it has fully cured.
- Solution: Allow the glue to cure completely before submerging the rock in water. If the glue turns white, it will eventually dissipate, but it is best to avoid this by allowing it to cure properly.
-
Problem 3: Anubias Rhizome Rotting:
- Cause: The rhizome (the thick stem from which the leaves and roots grow) was covered in glue, or it is buried in the substrate and not getting enough light and oxygen.
- Solution: Ensure the rhizome is not covered in glue when attaching the plant to the rock. If the rhizome is buried, gently reposition the plant so that the rhizome is exposed. Trim away any rotting parts of the rhizome with sharp scissors.
-
Problem 4: Algae Growing on Anubias Leaves:
- Cause: Excessive light or nutrient levels in the aquarium can promote algae growth on the leaves of the Anubias.
- Solution: Reduce the lighting intensity and duration in the aquarium. Perform regular water changes to lower nutrient levels. Introduce algae-eating creatures such as snails or shrimp. Manually remove algae from the leaves with a soft cloth or toothbrush.
-
Problem 5: Anubias Detaching from the Rock:
- Cause: The glue bond has weakened over time, or the plant has outgrown its initial attachment point.
- Solution: Reattach the Anubias to the rock using super glue gel. Ensure both the rock and the plant roots are dry before applying the glue. You may need to choose a new attachment point if the plant has grown larger.
-
Problem 6: Slow Growth:
- Cause: Anubias are slow-growing plants and may not show significant growth for several weeks or months.
- Solution: Be patient and provide optimal conditions for growth, including moderate to low lighting, good water quality, and occasional supplementation with a liquid fertilizer containing micronutrients.
-
Problem 7: Yellowing Leaves:
- Cause: Nutrient deficiency or poor water quality.
- Solution: Perform regular water changes to improve water quality. Supplement with a liquid fertilizer containing micronutrients to address any nutrient deficiencies.
-
Detailed Tips:
- Work Quickly: Super glue sets quickly, so it’s important to work efficiently to ensure the plant is securely attached before the glue dries.
- Choose the Right Glue: Always use super glue gel (cyanoacrylate-based) that is safe for aquarium use.
- Monitor the Plant: Regularly inspect the Anubias for any signs of stress, disease, or nutrient deficiencies.
By addressing these common problems and following the recommended solutions, you can ensure your Anubias remains healthy, securely attached to the rock, and enhances the beauty of your aquarium. Visit Rockscapes.net for a wide selection of Anubias plants, rocks, and aquascaping supplies.
10. Where Can I Buy Anubias And Rock For Aquascaping In The USA?
You can buy Anubias plants and rocks for aquascaping from a variety of sources in the USA, including local aquarium stores, online retailers, and specialty aquascaping suppliers. Here are some recommended options:
-
Local Aquarium Stores: Local aquarium stores often carry a selection of Anubias plants and rocks suitable for aquascaping. Visiting a local store allows you to inspect the plants and rocks in person before making a purchase. The staff can also provide valuable advice on selecting the right plants and materials for your aquarium.
-
Online Retailers: Online retailers offer a wide selection of Anubias plants and rocks, often at competitive prices. Some popular online retailers include:
- Rockscapes.net: Offers a variety of Anubias plants, rocks, and other aquascaping supplies. Known for high-quality products and expert advice.
- Address: 1151 S Forest Ave, Tempe, AZ 85281, United States
- Phone: +1 (480) 965-9011
- Amazon: Carries a wide range of Anubias plants and rocks from various sellers.
- Etsy: Features unique and handcrafted rocks and driftwood for aquascaping.
- Rockscapes.net: Offers a variety of Anubias plants, rocks, and other aquascaping supplies. Known for high-quality products and expert advice.
-
Specialty Aquascaping Suppliers: Specialty aquascaping suppliers focus specifically on providing high-quality plants, rocks, and other materials for creating stunning aquascapes. These suppliers often offer rare and unusual varieties of Anubias and rocks that may not be available elsewhere.
-
Considerations When Buying:
- Plant Health: When buying Anubias, look for plants with healthy green leaves and strong roots. Avoid plants with yellowing or browning leaves, as this may indicate poor health.
- Rock Quality: Choose rocks that are safe for aquarium use and have a textured surface for better adhesion of plants. Avoid rocks that may leach harmful chemicals into the water.
- Shipping: If buying online, check the retailer’s shipping policies to ensure the plants and rocks will be shipped safely and arrive in good condition.
-
Example Stores and Online Retailers:
- Local Fish Stores: Check for local fish stores in your area that specialize in aquarium plants and supplies.
- Rockscapes.net: Offers a wide selection of Anubias plants, rocks, and aquascaping supplies.
- Website: rockscapes.net
- Amazon: Carries a variety of Anubias plants and rocks from different sellers.
By exploring these options and considering the factors mentioned above, you can find the perfect Anubias plants and rocks for creating a beautiful and thriving aquascape in your aquarium. Visit Rockscapes.net for a wide selection of Anubias plants, rocks, and aquascaping supplies to enhance your aquarium.
Rockscapes.net is your ultimate resource for transforming ordinary spaces into breathtaking rockscapes. Whether you’re envisioning a tranquil water garden, a rugged desert-themed landscape, or an elegant stone pathway, Rockscapes.net provides the inspiration, information, and high-quality materials you need to bring your vision to life. Dive into our extensive collection of articles, design ideas, and expert tips to discover the endless possibilities of rockscaping. Let rockscapes.net be your guide in creating outdoor spaces that captivate and inspire.