Cutting up a rock t-shirt to create a unique quilt is a fantastic way to preserve memories and showcase your favorite bands. At rockscapes.net, we provide you with some unique ideas, along with comprehensive advice on creating rock-themed quilts. Learn how to repurpose those old concert tees into treasured keepsakes, blending your love for music with cozy craftsmanship, and find everything you need to know to get started on your rock ‘n’ roll quilt journey, from selecting the right shirts to mastering cutting and assembly techniques, and explore related rock decor concepts for your home.
1. What Is A Rock T-Shirt Quilt And Why Make One?
A rock t-shirt quilt is a unique and personalized blanket made from the logos and designs of rock band t-shirts. It’s more than just a quilt; it’s a nostalgic journey, a display of your musical passions, and a cozy piece of art.
1.1 What Are The Advantages?
Here are the advantages:
- Sentimental Value: Each t-shirt square tells a story, preserving memories of concerts, festivals, and musical milestones.
- Unique Design: No two rock t-shirt quilts are the same. The eclectic mix of band logos and colors creates a one-of-a-kind design that reflects your personal taste.
- Sustainable Crafting: Upcycling old t-shirts into a quilt is an eco-friendly way to give them new life, reducing textile waste and promoting sustainability.
- Personal Expression: Showcase your favorite bands and musical genres in a creative and functional way.
- Conversation Starter: A rock t-shirt quilt is a unique home decor item that sparks conversations and invites you to share your musical experiences.
1.2 Who Is A Rock T-Shirt Quilt For?
A rock t-shirt quilt is perfect for:
- Music Enthusiasts: Those who love rock music and want to celebrate their favorite bands in a unique way.
- Memory Keepers: People who want to preserve their concert memories and musical journey.
- DIY Crafters: Individuals who enjoy sewing and creating personalized home decor.
- Gift Givers: Those looking for a thoughtful and unique gift for a music-loving friend or family member.
- Upcyclers: Eco-conscious crafters who want to repurpose old t-shirts and reduce waste.
1.3 What Are The Challenges And Services Rockscapes.Net Provides?
Creating a rock t-shirt quilt can present a few challenges, but rockscapes.net is here to help:
- Selecting the right t-shirts: Choosing shirts with good graphics and the right fabric can be tricky. Rockscapes.net offers advice on how to assess your t-shirt collection and select the best candidates.
- Cutting and Stabilizing: T-shirt material can be stretchy and difficult to work with. We provide tips on how to properly cut and stabilize your t-shirt squares.
- Arranging the Layout: Designing an aesthetically pleasing layout requires planning and creativity. Rockscapes.net offers design ideas and layout templates to inspire your project.
- Sewing Techniques: Sewing with t-shirt material requires specific techniques to prevent stretching and distortion. We offer detailed sewing instructions and video tutorials.
- Finishing Touches: Adding borders, backing, and binding can be challenging. Rockscapes.net provides step-by-step instructions and tips for achieving a professional-looking finish.
Are you ready to rock and roll your way into a cozy creation? Visit rockscapes.net for design inspiration, expert tips, and all the resources you need to make your own rock t-shirt quilt. Let’s turn your musical memories into a treasured masterpiece.
2. Gathering Your Rock T-Shirts: A Collector’s Guide
The first step in creating your rock t-shirt quilt is gathering your materials. This involves assessing your t-shirt collection, selecting the right shirts, and preparing them for cutting.
2.1 How Do You Assess Your Rock T-Shirt Collection?
- Take Inventory: Gather all your rock t-shirts and lay them out to get a clear view of your collection.
- Check Condition: Examine each t-shirt for stains, tears, or excessive fading. Discard any shirts that are too damaged to use.
- Evaluate Graphics: Consider the size, design, and color of the graphics on each shirt. Look for shirts with bold, eye-catching designs that will stand out in your quilt.
- Consider Fabric: T-shirts made from 100% cotton or a cotton blend are ideal for quilting. Avoid shirts made from very thin or stretchy materials, as they can be difficult to work with.
2.2 Which Rock T-Shirts Should Be Chosen?
- Prioritize Favorites: Choose t-shirts that hold special meaning or represent your favorite bands, concerts, or musical eras.
- Mix and Match: Select a variety of colors, designs, and sizes to create a visually interesting quilt.
- Consider Theme: If you want to create a themed quilt, such as a tribute to a specific genre or band, choose t-shirts that fit the theme.
- Balance Design: Ensure that you have a balance of light and dark colors, as well as large and small graphics, to create a cohesive design.
2.3 How Should I Prepare Rock T-Shirts For Cutting?
- Wash and Dry: Wash and dry all t-shirts before cutting to remove any dirt, odors, or sizing.
- Iron: Iron each t-shirt to remove wrinkles and creases. This will make it easier to cut accurately.
- Stabilize: Apply fusible interfacing to the back of each t-shirt square to prevent stretching and distortion. This is especially important for t-shirts made from stretchy materials. Pellon 906F is a popular choice for lightweight stabilization.
 t shirt quilt finished
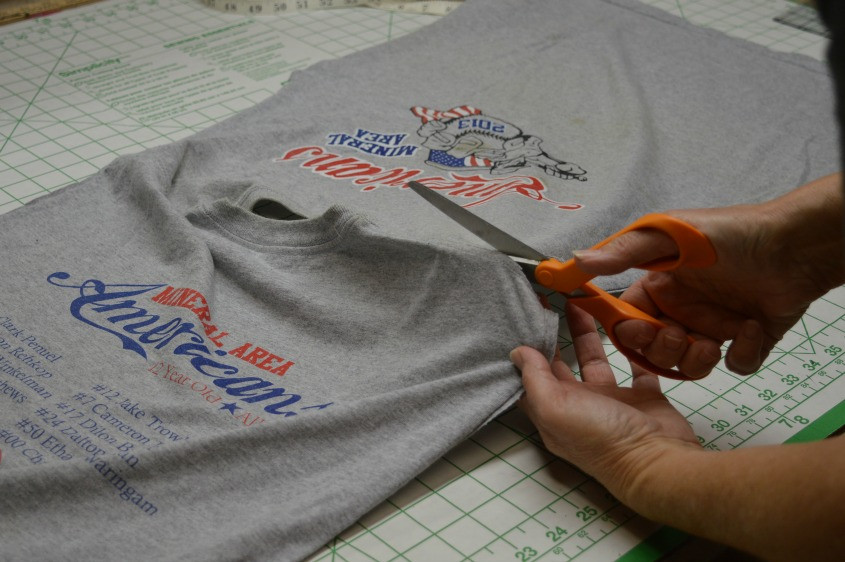
3. Cutting Rock T-Shirts: Step-By-Step Guide
Once your t-shirts are gathered and prepared, it’s time to start cutting. Accurate cutting is essential for creating a quilt with clean lines and even squares.
3.1 How Should I Determine The Rock Quilt Block Size?
- Measure Graphics: Measure the graphics on all your t-shirts to determine the largest design. This will determine the minimum size of your quilt blocks.
- Consider Design: Think about the overall design you want to achieve. Larger blocks will showcase the graphics more prominently, while smaller blocks will create a more intricate pattern.
- Standard Sizes: Common quilt block sizes range from 12″ x 12″ to 15″ x 15″. Choose a size that works well with your graphics and design.
3.2 What Materials Are Needed To Cut Accurately?
- Rotary Cutter: A rotary cutter is essential for cutting fabric accurately and efficiently.
- Cutting Mat: A self-healing cutting mat provides a smooth surface for cutting and protects your worktable.
- Acrylic Ruler: An acrylic ruler with clear markings is essential for measuring and cutting accurate squares.
- Fabric Scissors: Fabric scissors are useful for trimming excess fabric and cutting around curved designs.
- Seam Ripper: A seam ripper is handy for removing unwanted seams or mistakes.
3.3 What Is The Best Way To Cut A Rock T-Shirt?
- Prepare Shirt: Lay the t-shirt flat on your cutting mat and smooth out any wrinkles.
- Center Design: Center the graphic you want to use within the desired block size.
- Cut Sides: Use your rotary cutter and acrylic ruler to cut straight lines around the graphic, creating a square or rectangle.
- Cut Sleeves And Back: Cut away the sleeves and back of the shirt, leaving only the stabilized front panel.
4. Designing The Layout: Arranging Your Rock Blocks
Designing the layout of your rock t-shirt quilt is a creative process that involves arranging your cut blocks in a visually appealing and cohesive manner.
4.1 How Do I Choose A Layout Pattern?
- Traditional Grid: A simple grid layout is a classic choice that showcases each t-shirt block equally.
- Random Arrangement: A random arrangement creates a more eclectic and dynamic look.
- Shadow Illusion: Incorporating shadow strips adds depth and dimension to your quilt.
- Themed Layout: Arrange your blocks according to a theme, such as color, band genre, or concert year.
4.2 How Can Different Sizes Be Accommodated?
- Sashing: Use sashing strips to connect blocks of different sizes and create a uniform grid.
- Borders: Add borders to the edges of your quilt to frame the design and accommodate different block sizes.
- Creative Piecing: Use creative piecing techniques to combine smaller blocks into larger units.
- Varying Block Sizes: Intentionally incorporate blocks of different sizes to create a more dynamic and visually interesting layout.
4.3 Should I Test Layout Before Sewing?
- Floor Layout: Lay out all your blocks on the floor or a large table to get a clear view of the overall design.
- Photo Review: Take a photo of your layout and review it to see how the blocks look together.
- Adjust As Needed: Rearrange the blocks until you are satisfied with the overall design.
- Consider Balance: Ensure that there is a balance of colors, designs, and sizes throughout the quilt.
5. Sewing The Quilt Top: Assembling Rock Memories
Once your layout is finalized, it’s time to start sewing your quilt top together. Accurate sewing is essential for creating a quilt with straight lines and even seams.
5.1 Which Sewing Essentials Are Needed?
- Sewing Machine: A reliable sewing machine is essential for sewing your quilt top together.
- Thread: Choose a high-quality thread that matches the colors of your t-shirt blocks.
- Needles: Use a universal needle or a needle specifically designed for knit fabrics.
- Pins: Use straight pins to hold your fabric pieces together while sewing.
- Seam Ripper: A seam ripper is handy for removing unwanted seams or mistakes.
5.2 How To Sew Rock Quilt Blocks Together?
- Pin Fabric: Pin two blocks together with right sides facing each other.
- Sew Seam: Sew a ¼” seam along the edge of the blocks, using a straight stitch.
- Press Seam: Press the seam open or to one side, depending on your preference.
- Continue Joining: Continue joining blocks together until you have created rows.
- Join Rows: Join the rows together to create the quilt top.
5.3 How To Troubleshoot Common Issues?
- Stretching: Use a walking foot or a knit foot to prevent stretching while sewing.
- Uneven Seams: Use a consistent seam allowance and a steady hand to create even seams.
- Puckering: Reduce the presser foot pressure and use a slightly longer stitch length to prevent puckering.
- Skipped Stitches: Use a new needle and ensure that your machine is properly threaded.
6. Adding Shadow Illusion: Creating Depth
The shadow illusion technique adds depth and dimension to your rock t-shirt quilt, making it a visually stunning piece of art.
6.1 What Materials Are Needed To Create Shadow Strips?
- Black Fabric: Choose a black fabric that complements the colors of your t-shirt blocks.
- Gray Fabric: Choose a gray fabric for the corner squares that create the shadow illusion.
- Rotary Cutter: A rotary cutter is essential for cutting accurate strips of fabric.
- Acrylic Ruler: An acrylic ruler with clear markings is essential for measuring and cutting accurate strips.
6.2 How To Sew Shadow Strips To Blocks?
- Cut Strips: Cut strips of black fabric 1 ½” wide and the length of your quilt blocks.
- Cut Squares: Cut squares of gray fabric 2″ x 2″.
- Attach Squares: Sew a gray square to one end of each black strip.
- Sew Strips: Sew the black strips to the right side and bottom of each quilt block, with the gray square positioned at the corner.
6.3 How To Position Shadow Strips For Best Effect?
- Consistent Placement: Place the shadow strips on the same sides of each block to create a consistent shadow effect.
- Alternating Placement: Alternate the placement of the shadow strips to create a more dynamic and visually interesting design.
- Consider Lighting: Think about how the light will interact with the shadow strips to create the desired effect.
7. Quilting And Binding: Finishing The Rock Project
Once your quilt top is complete, it’s time to quilt and bind it to create a finished blanket.
7.1 What Are The Quilting Methods?
- Hand Quilting: Hand quilting involves sewing through all layers of the quilt with small, even stitches.
- Machine Quilting: Machine quilting involves using a sewing machine to create a quilting design.
- Longarm Quilting: Longarm quilting involves using a specialized machine to quilt large quilts quickly and efficiently.
7.2 What Batting Should Be Used?
- Cotton Batting: Cotton batting is a natural fiber that is soft, breathable, and easy to work with.
- Polyester Batting: Polyester batting is a synthetic fiber that is durable, hypoallergenic, and resistant to mildew.
- Blend Batting: Blend batting combines cotton and polyester fibers to create a batting that is both soft and durable.
7.3 How To Bind The Quilt For Durability?
- Prepare Binding: Cut strips of fabric 2 ½” wide and sew them together to create a long binding strip.
- Attach Binding: Attach the binding to the edge of the quilt, using a ¼” seam allowance.
- Fold And Hem: Fold the binding over to the back of the quilt and hem it in place, either by hand or with a sewing machine.
8. Adding A Quilt Label: Personalizing History
Adding a quilt label is a special touch that personalizes your rock t-shirt quilt and preserves its history for future generations.
8.1 What Information Should Be Included?
- Quilt Maker: Include your name as the creator of the quilt.
- Recipient: Include the name of the person the quilt was made for.
- Date: Include the date the quilt was made.
- Occasion: Include the occasion for which the quilt was made.
- Special Memories: Include any special memories or stories associated with the quilt or the t-shirts used to make it.
8.2 How To Create A DIY Quilt Label?
- Fabric Marker: Use a fabric marker to write directly on a piece of fabric.
- Embroidery: Embroider your label onto a piece of fabric.
- Freezer Paper Stencil: Use a freezer paper stencil to paint your label onto a piece of fabric.
- Computer Printing: Print your label onto fabric using a computer and printer.
8.3 Where To Position Label On The Quilt?
- Back Corner: Sew the label onto the back corner of the quilt.
- Center Back: Sew the label onto the center back of the quilt.
- Hidden Pocket: Create a hidden pocket on the back of the quilt to hold the label.
 how to make a quilt out of t shirts
9. Care And Maintenance: Keeping The Rock Quilt Alive
Proper care and maintenance will ensure that your rock t-shirt quilt remains a treasured keepsake for years to come.
9.1 How Often Should The Quilt Be Washed?
- As Needed: Wash your quilt only when it is visibly dirty or has a noticeable odor.
- Gentle Cycle: Wash your quilt on a gentle cycle with cold water.
- Mild Detergent: Use a mild detergent that is free of dyes and perfumes.
9.2 How To Dry The Quilt Properly?
- Air Dry: Air dry your quilt on a clothesline or drying rack.
- Low Heat: If you must use a dryer, dry your quilt on low heat.
- Avoid Overdrying: Avoid overdrying your quilt, as this can damage the fibers.
9.3 How Should The Quilt Be Stored When Not In Use?
- Clean Storage: Store your quilt in a clean, dry place.
- Breathable Bag: Store your quilt in a breathable cotton bag to protect it from dust and pests.
- Avoid Sunlight: Avoid storing your quilt in direct sunlight, as this can cause fading.
10. Rock T-Shirt Quilt FAQs
Here are some frequently asked questions about rock t-shirt quilts:
10.1 How Many T-Shirts Are Needed For A Quilt?
The number of t-shirts needed depends on the size of the quilt and the size of the t-shirt blocks. A twin-size quilt typically requires 20-30 t-shirts.
10.2 Can Different Types Of Fabrics Be Mixed?
It’s best to use t-shirts made from similar fabrics to ensure that the quilt drapes evenly and washes well.
10.3 How To Prevent Stretching During Sewing?
Use a walking foot or a knit foot to prevent stretching while sewing t-shirt material.
10.4 What Is The Best Way To Stabilize T-Shirt Material?
Apply fusible interfacing to the back of each t-shirt square to prevent stretching and distortion.
10.5 How To Choose A Batting For Rock Quilt?
Choose a batting that is lightweight, breathable, and easy to care for. Cotton batting and blend batting are popular choices.
10.6 Can A Quilt Be Machine Washed?
Yes, you can machine wash your quilt on a gentle cycle with cold water. Use a mild detergent and avoid overdrying.
10.7 How Often Should A Quilt Be Cleaned?
Wash your quilt only when it is visibly dirty or has a noticeable odor.
10.8 How To Store The Quilt When Not In Use?
Store your quilt in a clean, dry place in a breathable cotton bag. Avoid storing it in direct sunlight.
10.9 How To Repair A Damaged Rock T-Shirt Quilt?
Repair small tears or holes with fabric patches or embroidery. For larger damages, consider replacing the damaged block with a new one.
10.10 Can Rockscapes.Net Help Me Design My Quilt?
Yes, rockscapes.net offers design ideas, layout templates, and expert advice to help you create the perfect rock t-shirt quilt. Visit our website or contact us for more information! Address: 1151 S Forest Ave, Tempe, AZ 85281, United States. Phone: +1 (480) 965-9011. Website: rockscapes.net.
Ready to transform your rock t-shirts into a cozy, nostalgic masterpiece? Explore rockscapes.net for endless inspiration, helpful tips, and all the resources you need to create a rock t-shirt quilt that truly rocks!