Making a mosaic rock involves embedding pebbles and stones in mortar to create decorative and artistic designs. At rockscapes.net, we’re passionate about turning ordinary stones into stunning works of art, and we’re excited to share our expertise with you. With the right materials and techniques, you can transform ordinary stones into eye-catching art pieces. Dive into the world of stone artistry and explore the endless possibilities of rock mosaics.
1. What is a Mosaic Rock and Why Should You Create One?
A mosaic rock is a decorative art form where small pieces of stone, pebbles, or other materials are arranged to create a design on a larger rock surface. According to research from Arizona State University’s School of Earth and Space Exploration, in July 2025, the appeal of rock mosaics lies in their unique blend of natural elements and artistic expression. These creations can be used as garden art, decorative accents, or personalized gifts, adding a touch of nature and creativity to any space.
1.1. What Are the Benefits of Creating a Mosaic Rock?
Creating a mosaic rock offers several benefits, blending artistic expression with practical skills. Some key advantages include:
- Enhances Creativity: Mosaic art allows you to explore your creative side by designing unique patterns and images using natural materials.
- Relieves Stress: The repetitive and focused nature of mosaic work can be therapeutic and relaxing, helping to reduce stress.
- Adds Personal Touch: Mosaic rocks make personalized decorations for your garden or home, reflecting your style and interests.
- Eco-Friendly: Using pebbles and stones found in nature or recycled materials promotes environmental sustainability.
- Develops Crafting Skills: Working on mosaic projects helps improve your dexterity and attention to detail.
- Creates Unique Gifts: Handmade mosaic rocks make thoughtful and one-of-a-kind gifts for friends and family.
- Increases Property Value: Decorative stone features in your garden can enhance the aesthetic appeal and overall value of your property.
1.2. What Are the Different Styles of Mosaic Rocks?
Mosaic rocks come in various styles, each offering a unique aesthetic. Here are some popular styles:
- Geometric Patterns: These mosaics feature precise shapes and patterns, creating a structured and symmetrical look.
- Nature-Inspired Designs: These mosaics incorporate natural elements like flowers, leaves, and animals, bringing the outdoors in.
- Abstract Art: These mosaics use unconventional arrangements and colors to express emotions or ideas, offering a modern touch.
- Mandala Art: Based on circular designs, these mosaics often include intricate patterns that symbolize harmony and balance.
- Personalized Art: Customized mosaics can include initials, dates, or special symbols, making them meaningful and unique.
1.3. How Have Mosaics Been Used Throughout History?
Mosaics have a rich history, dating back thousands of years. From ancient civilizations to modern times, they have been used to decorate and commemorate significant events:
- Ancient Rome: Romans used mosaics extensively in homes and public buildings, depicting scenes from mythology and daily life.
- Ancient Greece: Greek mosaics often featured geometric designs and mythological figures, showcasing their artistic skills.
- Byzantine Empire: Byzantine mosaics were renowned for their use of gold and glass, creating stunning religious imagery in churches.
- Islamic Art: Islamic mosaics incorporated intricate geometric patterns and calligraphy, adorning mosques and palaces.
- Modern Era: Today, mosaics are used in various forms of art and decoration, from public installations to personal crafts.
2. What Materials Do You Need To Make A Mosaic Rock?
Gathering the right materials is essential for creating a stunning mosaic rock. Here’s a comprehensive list to get you started:
- Selection of Rocks:
- Base Rock: Choose a flat, stable rock to serve as the base of your mosaic.
- Pebbles and Stones: Collect a variety of small pebbles, stones, glass beads, and other decorative elements.
- Adhesive and Mortar:
- Mortar Mix: Use a premixed dry mortar for setting the stones.
- Thinset: Have some Thinset, a polymer product, for reattaching any dislodged pebbles later on.
- Tools:
- Trowel: A garden or concrete trowel for spreading mortar.
- Wheelbarrow: A contractor’s wheelbarrow for mixing mortar.
- Hoe: A garden hoe for stirring the mix.
- Hose: A garden hose with a spray nozzle for wetting stones and cleaning.
- Gloves: Sturdy rubber gloves to protect your hands.
- Dust Mask: A dust mask for use while mixing mortar.
- Plywood Sheet: A contractor’s-grade 1/2-inch thick plywood sheet for leveling the mosaic.
- Rags: Rags for cleaning.
- Pickax or Chisel: A small pickax or chisel for cleaning edges.
- Optional Materials:
- Muriatic Acid: For cleaning mortar residue (use with caution and proper protection).
- Safety Gear:
- Respirator: (optional, but recommended when working with chemicals).
- Eye Protection: Safety glasses to protect your eyes from debris and chemicals.
2.1. What Types of Rocks Are Best for Mosaics?
Selecting the right type of rock is crucial for creating a lasting and visually appealing mosaic. Here’s a guide to the best options:
| Rock Type | Characteristics | Advantages | Disadvantages | Best Uses |
|---|---|---|---|---|
| River Pebbles | Smooth, rounded, and available in various colors and sizes. | Easy to work with, natural look, and comfortable to touch. | Can be slippery when wet; limited surface area for adhesion. | Pathways, garden art, and decorative accents. |
| Slate | Flat, layered, and available in dark shades like gray and black. | Provides a modern, sleek appearance; easy to cut and shape. | Can be brittle and prone to breaking; limited color options. | Wall decor, stepping stones, and contemporary designs. |
| Granite | Durable, hard, and available in speckled patterns. | Extremely durable and weather-resistant; adds a luxurious touch. | Difficult to cut and shape; heavier than other stones. | Outdoor installations, countertops, and high-traffic areas. |
| Marble | Smooth, elegant, and available in white and pastel shades. | Offers a classic, sophisticated look; easy to polish and maintain. | Expensive and can be stained by acids; more suitable for indoor use. | Indoor decor, decorative tiles, and elegant mosaic patterns. |
| Glass Pebbles | Transparent or opaque, available in vibrant colors. | Adds sparkle and color; lightweight and easy to arrange. | Can be fragile and prone to scratching; may not withstand extreme weather. | Jewelry, decorative accents, and indoor art projects. |
| Ceramic Tiles | Pre-cut into uniform shapes and available in countless colors and patterns. | Easy to use, versatile, and provides a clean, polished look. | Less natural appearance; requires grout, which can stain. | Kitchen backsplashes, bathroom decor, and patterned mosaic art. |
| Found Stones | Any stones you find in nature, varying in shape, size, and color. | Cost-effective and adds a unique, personal touch; encourages creativity. | Quality and durability can vary; may require more preparation. | Personalized garden features and rustic art projects. |
| Quartzite | Hard, durable, and available in sparkling, crystalline colors. | Weather-resistant and offers a dazzling appearance; suitable for outdoor applications. | Can be challenging to cut and shape; limited availability compared to other stones. | Outdoor mosaics, decorative aggregates, and landscape features. |
| Limestone | Soft, porous, and available in earthy tones like beige and cream. | Easy to carve and shape; offers a warm, natural aesthetic. | Prone to erosion and staining; requires sealing and regular maintenance. | Garden sculptures, retaining walls, and indoor accent walls. |
| Fieldstones | Irregular shapes and sizes, often sourced from local fields or quarries. | Adds a rustic, natural charm; creates a sense of place and history. | Can be difficult to work with due to inconsistent shapes; requires careful selection and placement. | Dry-stacked walls, landscape borders, and naturalistic garden designs. |
2.2. Where Can You Source Your Mosaic Materials?
Sourcing mosaic materials can be an exciting part of the creative process. Here are some places to find the perfect elements for your mosaic rock:
- Local Craft Stores: These stores offer a wide variety of mosaic tiles, glass beads, and adhesives.
- Home Improvement Stores: You can find mortar, grout, and tools needed for mosaic projects.
- Rock and Gem Shops: These specialty shops provide unique stones and minerals for a distinctive mosaic design.
- Online Retailers: Websites like Amazon and Etsy offer a vast selection of mosaic supplies with the convenience of home delivery.
- Nature: Collect pebbles, stones, and shells from beaches, rivers, and forests (make sure to check local regulations regarding collecting natural materials).
- Recycling Centers: Repurpose broken dishes, tiles, and glass to add an eco-friendly touch to your mosaics.
- Flea Markets and Yard Sales: Discover vintage and unique items that can be incorporated into your mosaic art.
- Landscaping Suppliers: Source larger rocks, pebbles, and aggregates for outdoor mosaic projects.
- Ceramic Studios: Purchase handmade ceramic pieces that can be broken and used in mosaics.
- Art Supply Stores: Find specialized mosaic tools, adhesives, and finishing products.
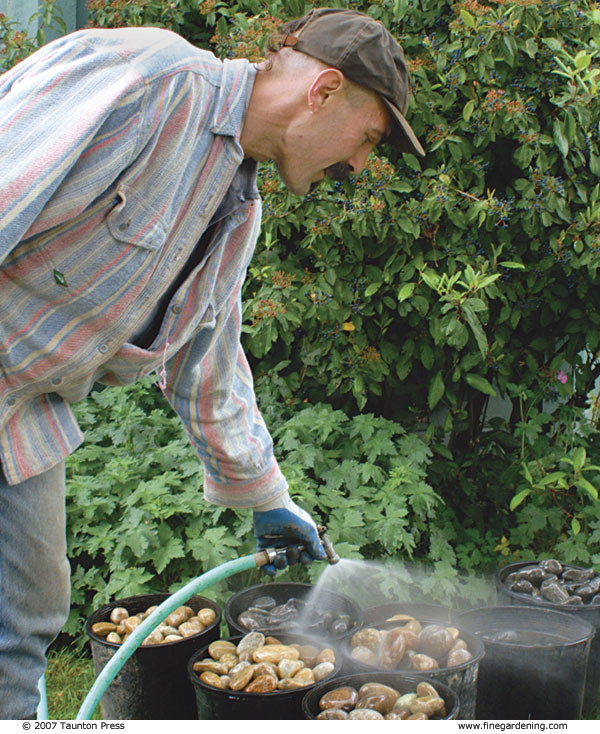 Author wetting rocks in buckets to accentuate their color distinctions.
Wet the rocks to accentuate their color distinctions.
3. How Do You Prepare the Rock and Design?
Proper preparation of both the rock surface and your mosaic design is vital for achieving a professional and durable result. Follow these steps to ensure your mosaic rock looks stunning and lasts for years.
3.1. How To Clean and Prepare the Rock Surface?
Cleaning and preparing the rock surface is the first step in creating a lasting mosaic.
- Remove Debris: Start by brushing off any loose dirt, moss, or debris from the rock surface using a stiff brush.
- Wash the Rock: Use a garden hose with a spray nozzle to thoroughly wash the rock, removing any remaining dirt and grime. For stubborn stains, you can use a mild detergent and scrub with a brush.
- Dry the Rock: Allow the rock to dry completely before proceeding. This ensures that the adhesive will bond properly.
- Smooth Rough Surfaces: If the rock has any rough or uneven surfaces, consider using a chisel or grinding stone to smooth them out. This will provide a better surface for the mosaic pieces to adhere to.
- Prime the Surface (Optional): For porous rocks, applying a primer can improve adhesion. Use a masonry primer and follow the manufacturer’s instructions.
- Test Adhesion: Before starting your mosaic, test the adhesive on a small area of the rock to ensure it bonds well.
3.2. What Design Tips Should You Consider Before Starting?
Planning your design ahead of time can greatly enhance the final look of your mosaic rock. Here are some design tips to consider:
- Sketch Your Design: Before you start gluing anything, sketch your design on paper. This will help you visualize the final product and make necessary adjustments.
- Consider Color and Texture: Think about the colors and textures of the stones, glass, or tiles you plan to use. Experiment with different combinations to find a visually appealing arrangement.
- Create a Focal Point: Choose a central element or focal point for your mosaic. This could be a larger stone, a unique pattern, or a contrasting color.
- Balance Symmetry and Asymmetry: Decide whether you want a symmetrical or asymmetrical design. Symmetrical designs offer a sense of balance and order, while asymmetrical designs can be more dynamic and eye-catching.
- Use Templates: For intricate designs, consider using templates. You can create templates from paper or cardboard and trace them onto the rock surface.
- Think About the Rock’s Shape: Use the natural shape of the rock to your advantage. Incorporate curves and contours into your design for a more organic look.
- Lay Out Your Design: Before gluing, lay out your mosaic pieces on the rock surface to ensure they fit properly and the design looks as you envisioned.
- Consider the Grout Color: The color of the grout can significantly impact the overall look of your mosaic. Choose a grout color that complements your design and enhances the colors of the stones or tiles.
- Take Photos as You Go: As you work on your mosaic, take photos of your progress. This will help you remember what you did and make it easier to replicate your design in the future.
- Incorporate Personal Touches: Add personal touches to your design to make it unique and meaningful. This could include initials, dates, or symbols that are special to you.
 These stepping stones were built without forms.
These stepping stones were built without forms.
4. How Do You Create the Mosaic?
Creating a mosaic involves carefully adhering pieces to a surface to form a design. Here’s how to do it:
4.1. How To Apply Mortar and Set Pebbles?
Applying mortar and setting pebbles requires patience and precision.
- Mix the Mortar: In a wheelbarrow, mix the dry mortar with water until it reaches a thick, pudding-like consistency. Be sure to wear a dust mask and rubber gloves during this process.
- Apply Mortar to the Rock: Using a trowel, spread a layer of mortar evenly over the area where you want to create the mosaic. The mortar should be about 1/2 inch thick, allowing space for the pebbles to be pressed in.
- Place the Pebbles: Carefully place the pebbles onto the mortar, following your design. Press each pebble firmly into the mortar, ensuring it is well-embedded.
- Arrange Pebbles Closely: Arrange the pebbles closely together, leaving as little mortar as possible showing. This will create a more visually appealing mosaic.
- Adjust as Needed: As you work, step back occasionally to assess your progress and make any necessary adjustments to the placement of the pebbles.
- Use Contrasting Colors: Incorporate pebbles of contrasting colors to make your design more visible and interesting.
- Work in Sections: If you are working on a large mosaic, work in small sections to prevent the mortar from drying out before you can set the pebbles.
4.2. How To Achieve Different Textures and Patterns?
Achieving different textures and patterns in your mosaic can add depth and interest to your design.
- Vary Pebble Sizes: Use pebbles of different sizes to create variations in texture. Larger pebbles can serve as focal points, while smaller pebbles can fill in gaps and add detail.
- Arrange Pebbles Vertically: Instead of laying pebbles flat, try setting them on their edges to create a unique, textured surface.
- Create Patterns with Colors: Use pebbles of different colors to create patterns and designs. You can create geometric patterns, floral motifs, or abstract designs.
- Incorporate Other Materials: Add glass beads, shells, or other decorative elements to your mosaic to create additional texture and visual interest.
- Use Different Mortar Techniques: Experiment with different mortar techniques to achieve unique effects. For example, you can create raised patterns by applying thicker layers of mortar.
- Add Grout: After the mortar has dried, apply grout to fill in the gaps between the pebbles. This can add a smooth, polished finish to your mosaic.
- Create Borders: Define your mosaic with a border of larger stones or tiles. This can help to frame the design and give it a finished look.
- Use Stencils: For intricate patterns, use stencils to guide your pebble placement. This can help you create precise and symmetrical designs.
- Mix Smooth and Rough Pebbles: Combine smooth, polished pebbles with rough, natural pebbles to create a contrast in texture.
- Layer Pebbles: Layer pebbles on top of each other to create a three-dimensional effect. This can add depth and visual interest to your mosaic.
4.3. What Tools Can Help With the Mosaic Process?
Using the right tools can greatly simplify the mosaic process and improve the quality of your work.
| Tool Name | Description | Use |
|---|---|---|
| Trowel | A small, flat tool with a pointed or rounded blade. | Spreading mortar evenly over the rock surface and smoothing it out. |
| Rubber Mallet | A hammer with a rubber head. | Gently tapping pebbles into the mortar to ensure they are firmly embedded. |
| Tile Nippers | Pliers with curved jaws designed for cutting tiles and stones. | Cutting pebbles or tiles to fit specific shapes or patterns in your mosaic. |
| Sponges | Soft, absorbent pads used for cleaning. | Wiping away excess mortar from the surface of the pebbles and cleaning the mosaic as you work. |
| Toothbrush | A small brush with stiff bristles. | Cleaning grout from tight spaces and adding texture to the mortar. |
| Tweezers | Small, pointed instruments used for picking up and placing small objects. | Precisely placing tiny pebbles or glass beads in intricate designs. |
| Safety Glasses | Protective eyewear. | Protecting your eyes from dust, debris, and splashes of mortar or acid. |
| Dust Mask | A covering worn over the nose and mouth to filter out dust and particles. | Preventing inhalation of mortar dust during mixing and application. |
| Rubber Gloves | Protective handwear. | Protecting your hands from irritation and abrasion while working with mortar and other materials. |
| Measuring Spoons/Cups | Utensils for measuring small quantities of liquids or powders. | Accurately measuring water and mortar mix for consistent results. |
| Stencils | Pre-cut templates with specific shapes or designs. | Guiding pebble placement to create precise and symmetrical patterns. |
| Level | A tool used to determine if a surface is perfectly horizontal or vertical. | Ensuring the mosaic surface is even and level, especially for stepping stones or wall decorations. |
| Grout Float | A rectangular tool with a rubber or foam pad used for applying grout. | Pressing grout into the spaces between pebbles and removing excess grout from the surface. |
| Shop Rags | Absorbent cloths used for cleaning and wiping. | Cleaning tools, wiping up spills, and polishing the finished mosaic. |
| Pickax or Chisel | Used to clean the edges of a section with a small pickax or chisel before starting a new section. | Cleaning the edges of a section before starting a new section. |
| Plywood Sheet | A contractor’s-grade 1/2-inch thick plywood sheet | After completing a section, lay the leveling board on top and stand on it. |
| Garden hose | Used to clean the surface and wetting rocks. | Spray off displaced mortar and wetting the rocks to accentuate their color distinctions. |
| Wheelbarrow | A contractor’s wheelbarrow | First, add an inch of water to the wheelbarrow and then a bag of mortar mix. |
| Garden hoe | For stirring the mix. | Stir the mix by moving a garden hoe back and forth, being sure to scrape the bottom so that all the mortar is moistened. |
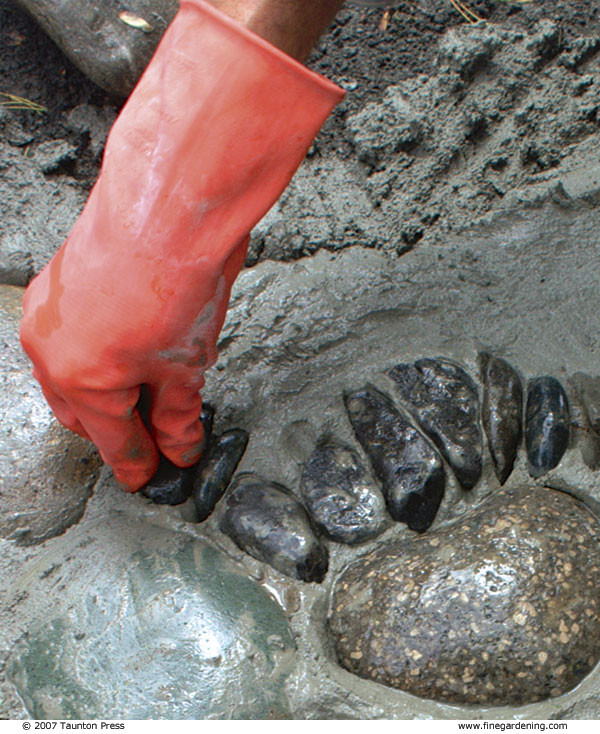 Close-up of author pressing small stones closely together into mortar, wearing gloves.
Set the pebbles close together, pressing them into the mortar.
5. How Do You Finish and Maintain Your Mosaic Rock?
Finishing and maintaining your mosaic rock properly will ensure it remains beautiful and durable for years. Here are essential steps to follow:
5.1. How To Clean and Seal the Finished Mosaic?
Cleaning and sealing the finished mosaic are crucial steps to protect and enhance its appearance.
- Remove Excess Mortar: After the mortar has dried completely (usually 24-48 hours), use a stiff brush or plastic scraper to gently remove any excess mortar from the surface of the pebbles.
- Clean with Water: Rinse the mosaic with clean water to remove any remaining debris. You can use a soft sponge or cloth to gently scrub the surface.
- Acid Wash (Optional): If there is a stubborn film of mortar on the pebbles, you can use a diluted muriatic acid solution to clean it. Always wear rubber gloves, eye protection, and a respirator when working with acid. Apply the acid solution with a rag, let it sit for a few minutes, and then rinse thoroughly with water.
- Dry the Mosaic: Allow the mosaic to dry completely before sealing. This may take several hours or even a full day, depending on the weather conditions.
- Apply Sealer: Once the mosaic is dry, apply a sealant to protect it from the elements and enhance its colors. Use a high-quality stone sealant designed for outdoor use. Apply the sealant with a brush or sponge, following the manufacturer’s instructions.
- Allow Sealer to Cure: Allow the sealant to cure completely before exposing the mosaic to water or heavy traffic. This may take 24-72 hours, depending on the product.
5.2. What Maintenance Tips Will Help Your Mosaic Last Longer?
Regular maintenance is key to keeping your mosaic rock looking its best.
- Clean Regularly: Clean the mosaic regularly to remove dirt, debris, and algae. Use a soft brush and mild detergent to scrub the surface, and then rinse with water.
- Avoid Harsh Chemicals: Avoid using harsh chemicals or abrasive cleaners, as they can damage the surface of the mosaic.
- Protect from Frost: In cold climates, protect your mosaic from frost by covering it with a tarp or blanket. This will prevent the mortar from cracking due to freezing and thawing.
- Repair Cracks Promptly: If you notice any cracks in the mortar, repair them promptly to prevent further damage. Use a small amount of mortar or Thinset to fill the cracks, and then smooth the surface with a trowel.
- Replace Loose Pebbles: If any pebbles become loose, reattach them with Thinset. Clean the area around the loose pebble, apply a small amount of Thinset to the back of the pebble, and press it firmly into place.
- Reapply Sealer: Reapply the sealant every 1-2 years to maintain its protective properties.
- Trim Surrounding Vegetation: Keep surrounding vegetation trimmed to prevent it from encroaching on the mosaic and causing damage.
- Store Indoors (if possible): If your mosaic is portable, consider storing it indoors during the winter months to protect it from the elements.
5.3. What Are Some Creative Ideas for Using Mosaic Rocks in Your Landscape?
Mosaic rocks can be used in a variety of ways to enhance your landscape and add a personal touch to your outdoor spaces.
- Garden Accents: Place mosaic rocks throughout your garden to add pops of color and texture. They can be used as focal points, border markers, or simply as decorative accents.
- Pathways and Stepping Stones: Create mosaic pathways or stepping stones to add a unique and artistic touch to your garden. Use a variety of colors and patterns to create a visually appealing walkway.
- Water Features: Incorporate mosaic rocks into water features such as ponds, fountains, or bird baths. The mosaic patterns will reflect the light and add sparkle to the water.
- Wall Decorations: Attach mosaic rocks to walls or fences to create eye-catching wall decorations. Use a strong adhesive to ensure the rocks are securely attached.
- Planters: Decorate planters with mosaic rocks to add a personal touch to your potted plants. Use a variety of colors and textures to create a unique and interesting design.
- Benches and Seating Areas: Incorporate mosaic rocks into benches or seating areas to create comfortable and inviting outdoor spaces.
- Fire Pits: Decorate the surround of your fire pit with mosaic rocks to add a touch of artistry to your outdoor gatherings.
- Signage: Create mosaic signs to mark different areas of your garden or to display your house number.
- Gifts: Give mosaic rocks as personalized gifts to friends and family. They make thoughtful and unique presents for any occasion.
- Holiday Decorations: Create mosaic rocks with holiday-themed designs to add festive cheer to your outdoor spaces.
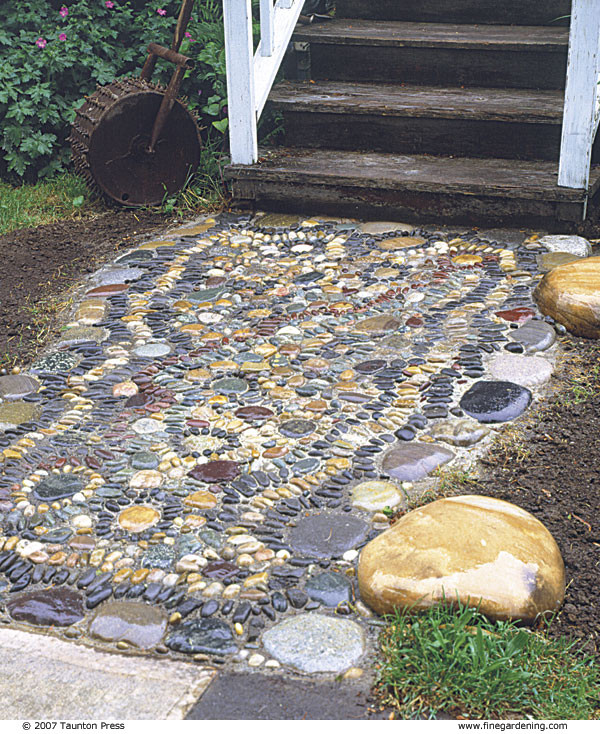 This mosaic’s design reflects the natural edge of a stream
This mosaic’s design reflects the natural edge of a stream.
6. FAQ – Frequently Asked Questions About Mosaic Rocks
Have questions about creating mosaic rocks? Here are some frequently asked questions to help you along the way:
6.1. What Is The Best Mortar To Use For Mosaic Rocks?
The best mortar for mosaic rocks is a premixed dry mortar mix. This type of mortar is specifically designed for adhering stones and tiles, and it provides a strong and durable bond. Look for a mortar mix that is suitable for outdoor use and can withstand the elements.
6.2. How Do I Prevent My Mosaic Rock From Cracking?
To prevent your mosaic rock from cracking, ensure a stable base, use quality mortar, protect it from freezing, and avoid harsh chemicals.
6.3. Can I Use Regular Glue Instead Of Mortar?
No, regular glue is not recommended for mosaic rocks. Mortar is designed to withstand outdoor conditions and provide a strong bond, while regular glue is not as durable and may not hold up over time.
6.4. How Long Does It Take For The Mortar To Dry?
The mortar typically takes 24-48 hours to dry completely. However, it is best to wait at least 72 hours before exposing the mosaic to water or heavy traffic.
6.5. Do I Need To Seal My Mosaic Rock?
Yes, sealing your mosaic rock is highly recommended. Sealing protects the mosaic from the elements, enhances its colors, and helps to prevent cracking and fading.
6.6. How Do I Clean Algae Off My Mosaic Rock?
To clean algae off your mosaic rock, use a soft brush and a solution of water and mild detergent. Gently scrub the surface to remove the algae, and then rinse with clean water. Avoid using harsh chemicals or abrasive cleaners, as they can damage the mosaic.
6.7. Can I Use Broken Tiles For Mosaic Rocks?
Yes, broken tiles can be used for mosaic rocks. In fact, using broken tiles is a great way to recycle and add a unique touch to your mosaic. Just be sure to wear safety glasses and gloves when breaking the tiles to protect yourself from sharp edges.
6.8. How Do I Make My Mosaic Rock Weather-Resistant?
To make your mosaic rock weather-resistant, use high-quality mortar and sealant, protect it from freezing, and clean it regularly to remove dirt and debris.
6.9. What Are Some Good Design Ideas For Mosaic Rocks?
Some good design ideas for mosaic rocks include geometric patterns, floral motifs, nature-inspired designs, and personalized messages. You can also incorporate glass beads, shells, or other decorative elements to add visual interest.
6.10. How Do I Store My Mosaic Rock During The Winter?
If your mosaic rock is portable, consider storing it indoors during the winter months to protect it from the elements. If it is too large to move, cover it with a tarp or blanket to protect it from frost and snow.
7. Ready To Create Your Own Mosaic Rock?
Creating a mosaic rock is a rewarding and creative project that allows you to transform ordinary stones into beautiful works of art. Whether you’re looking to add a personal touch to your garden, create unique gifts, or simply enjoy a relaxing and artistic activity, mosaic rocks offer endless possibilities. From selecting the perfect stones and designing your pattern to applying the mortar and adding the finishing touches, each step of the process is an opportunity to express your creativity and bring your vision to life.
We at rockscapes.net invite you to explore our website for even more inspiration, detailed guides, and expert advice on all things related to rock art and landscaping. Check out our wide selection of stones, tools, and supplies to get started on your next mosaic project. You can also contact us at [Address: 1151 S Forest Ave, Tempe, AZ 85281, United States. Phone: +1 (480) 965-9011] for personalized assistance and answers to any questions you may have. We’re here to help you every step of the way.