Making a Rock Paper Scissors game in Scratch is an awesome project that’s both fun and educational, and at rockscapes.net, we’re all about blending creativity with learning! This guide will walk you through creating your own version of this classic game using Scratch, a visual programming language perfect for beginners. Get ready to code your way to victory!
1. Why Create a Rock Paper Scissors Game in Scratch?
Creating a Rock Paper Scissors game in Scratch is more than just fun; it’s an excellent way to learn fundamental programming concepts. Why is this project beneficial?
- Introduces Basic Logic: The game teaches kids about conditional statements (if-then-else) and logical comparisons.
- Enhances Problem-Solving Skills: Kids learn to break down a problem (the game) into smaller, manageable steps.
- Boosts Creativity: Scratch allows for customization, encouraging kids to add their unique touches to the game.
- Develops Computational Thinking: The project fosters algorithmic thinking, which is crucial in computer science.
- Fun and Engaging: The familiarity of the game makes learning coding more enjoyable and less intimidating.
2. Understanding the Core Concepts of Scratch
Before diving into the game, let’s review some core Scratch concepts. These concepts are crucial for understanding how the game will be built.
- Sprites: These are the characters or objects in your Scratch project.
- Blocks: These are the coding instructions that you drag and drop to create scripts.
- Scripts: These are sequences of blocks that tell your sprites what to do.
- Variables: These are used to store and manage data, such as scores or choices.
- Events: These are triggers that start scripts, like clicking the green flag or pressing a key.
- Loops: These allow you to repeat a set of instructions multiple times.
- Conditional Statements: These allow you to execute different blocks of code based on certain conditions.
3. Setting Up Your Scratch Project
Let’s get started by setting up your Scratch project. This involves opening Scratch, choosing your sprites, and setting up the background.
3.1. Opening Scratch
- Go to the Scratch website (https://scratch.mit.edu) and click “Create” to start a new project.
- Alternatively, you can download the Scratch desktop application for offline use.
3.2. Choosing Your Sprites
- By default, Scratch starts with a cat sprite. You can keep it or choose new ones.
- To choose a new sprite, click on the “Choose a Sprite” button in the bottom right corner.
- Select two sprites: one for the player and one for the computer. You can use any sprites you like!
3.3. Setting Up the Background
- Click on the “Choose a Backdrop” button in the bottom right corner.
- Select a background that suits your game. A simple, clean background works best.
 Set up your characters and background
4. Creating Variables for the Game
Variables are essential for tracking the player’s and computer’s choices, as well as their scores. Let’s create the necessary variables.
4.1. Defining the Variables
- Go to the “Variables” category in the code panel.
- Click on “Make a Variable.”
- Create the following variables:
Player's Choice: Stores the player’s choice (1 for Rock, 2 for Paper, 3 for Scissors).Computer's Choice: Stores the computer’s choice (1 for Rock, 2 for Paper, 3 for Scissors).Player's Score: Stores the player’s score.Computer's Score: Stores the computer’s score.
4.2. Setting the Scope
- When creating each variable, make sure the “For all sprites” option is selected. This ensures that all sprites can access and modify the variables.
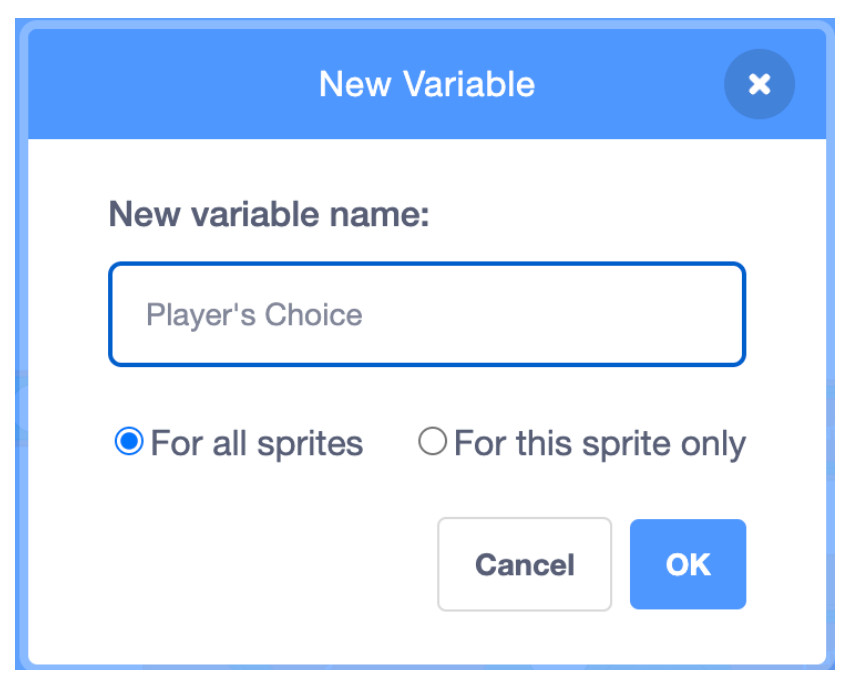 Create your variables.
4.3. Initializing Variables
- To start the game properly, you need to initialize the variables to zero. Add the following code to the player’s sprite under the Events Tab:
when green flag clicked
set [Player's Score v] to [0]
set [Computer's Score v] to [0]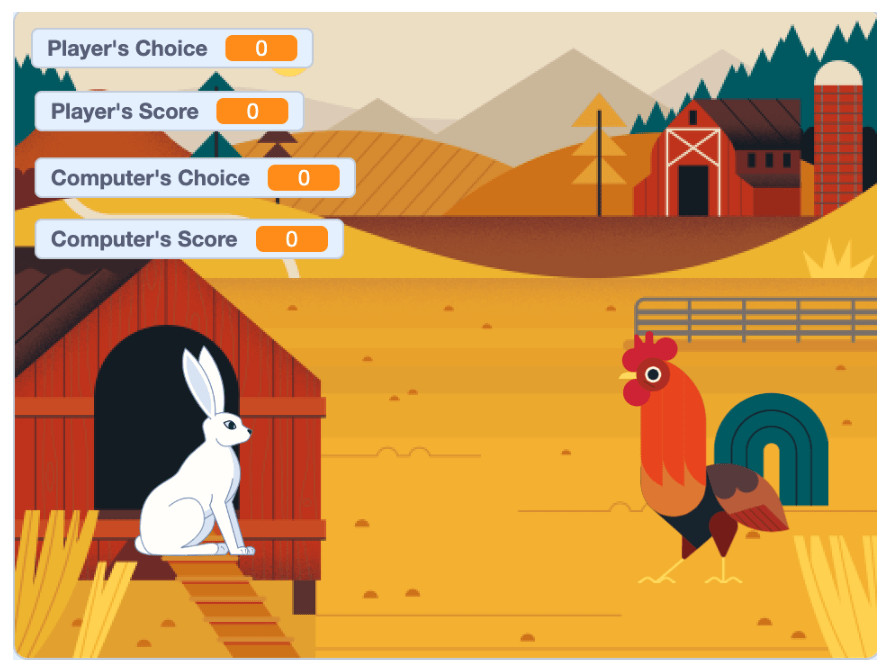 Your screen
5. Coding the Player’s Choice
Now, let’s code the player’s sprite to allow them to choose Rock, Paper, or Scissors by pressing specific keys.
5.1. Detecting Key Presses
- Use the
when key pressedblock from the “Events” category to detect when the player presses a key. - Use the
if-thenblock from the “Control” category to check which key was pressed. - Use the
set [variable] to [value]block from the “Variables” category to set thePlayer's Choicevariable based on the key pressed.
5.2. Implementing the Choices
- Add the following code to the player’s sprite:
when green flag clicked
forever
  if <key [r v] pressed?> then
    set [Player's Choice v] to [1]  // 1 represents Rock
    say [Rock!] for (0.5) secs
  end
  if <key [p v] pressed?> then
    set [Player's Choice v] to [2]  // 2 represents Paper
    say [Paper!] for (0.5) secs
  end
  if <key [s v] pressed?> then
    set [Player's Choice v] to [3]  // 3 represents Scissors
    say [Scissors!] for (0.5) secs
  end
end
5.3. Broadcasting the Message
- To signal the computer that the player has made a choice, use the
broadcastblock from the “Events” category. - Create a new message called “player made choice”.
- Add the
broadcastblock to eachif-thenblock after setting thePlayer's Choicevariable.
when green flag clicked
forever
if <key [r v] pressed?> then
set [Player's Choice v] to [1] // 1 represents Rock
say [Rock!] for (0.5) secs
broadcast [player made choice v]
end
if <key [p v] pressed?> then
set [Player's Choice v] to [2] // 2 represents Paper
say [Paper!] for (0.5) secs
broadcast [player made choice v]
end
if <key [s v] pressed?> then
set [Player's Choice v] to [3] // 3 represents Scissors
say [Scissors!] for (0.5) secs
broadcast [player made choice v]
end
end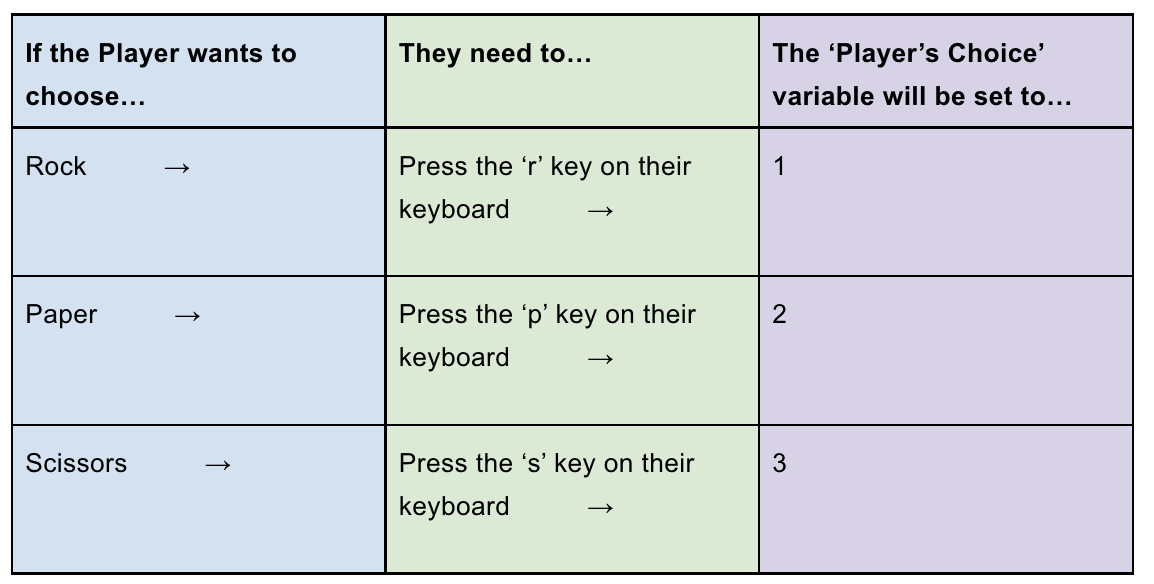 Players
6. Coding the Computer’s Choice
Now, let’s code the computer’s sprite to make a random choice after receiving the “player made choice” message.
6.1. Receiving the Message
- Use the
when I receive [message]block from the “Events” category to trigger the computer’s code. - Select the “player made choice” message.
6.2. Generating a Random Choice
- Use the
pick random [1] to [10]block from the “Operators” category to generate a random number between 1 and 3. - Use the
set [variable] to [value]block from the “Variables” category to set theComputer's Choicevariable to the random number.
6.3. Implementing the Computer’s Logic
- Add the following code to the computer’s sprite:
when I receive [player made choice v]
set [Computer's Choice v] to (pick random [1] to [3])
if <(Computer's Choice) = [1]> then
say [Rock!] for (0.5) secs
end
if <(Computer's Choice) = [2]> then
say [Paper!] for (0.5) secs
end
if <(Computer's Choice) = [3]> then
say [Scissors!] for (0.5) secs
end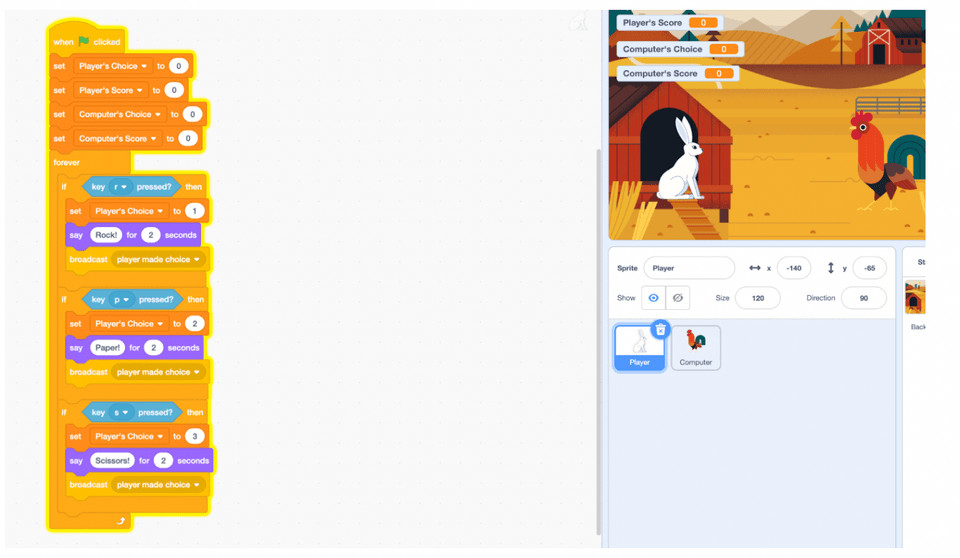 Scratch coding for rock, paper, scissors game
7. Determining the Winner and Updating Scores
The most complex part of the game is determining the winner and updating the scores accordingly. Let’s break this down into smaller steps.
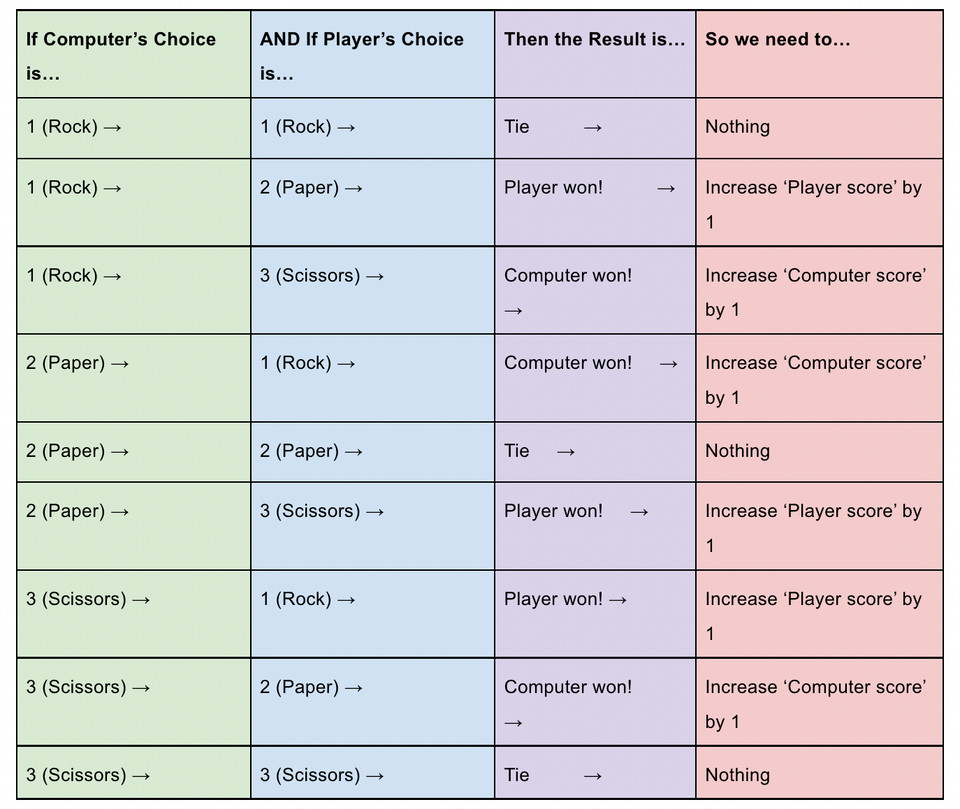
7.1. Comparing Choices
- Use nested
if-then-elseblocks to compare thePlayer's ChoiceandComputer's Choicevariables. - Check all possible outcomes:
- Rock vs. Rock (Tie)
- Rock vs. Paper (Computer Wins)
- Rock vs. Scissors (Player Wins)
- Paper vs. Rock (Player Wins)
- Paper vs. Paper (Tie)
- Paper vs. Scissors (Computer Wins)
- Scissors vs. Rock (Computer Wins)
- Scissors vs. Paper (Player Wins)
- Scissors vs. Scissors (Tie)
7.2. Updating Scores
- If the player wins, use the
change [variable] by [value]block from the “Variables” category to increase thePlayer's Scoreby 1. - If the computer wins, increase the
Computer's Scoreby 1. - If it’s a tie, do nothing.
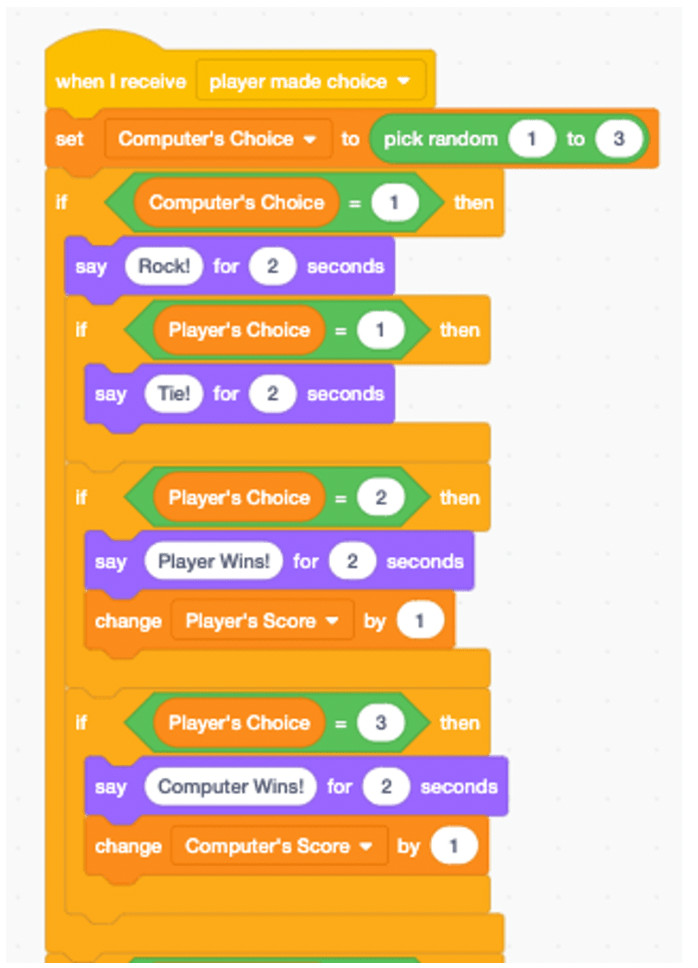
7.3. Implementing the Logic
- Add the following code to the computer’s sprite after the computer announces its choice:
when I receive [player made choice v]
set [Computer's Choice v] to (pick random [1] to [3])
if <(Computer's Choice) = [1]> then
say [Rock!] for (0.5) secs
if <(Player's Choice) = [1]> then
say [Tie!] for (1) secs
end
if <(Player's Choice) = [2]> then
say [Player Wins!] for (1) secs
change [Player's Score v] by [1]
end
if <(Player's Choice) = [3]> then
say [Computer Wins!] for (1) secs
change [Computer's Score v] by [1]
end
end
if <(Computer's Choice) = [2]> then
say [Paper!] for (0.5) secs
if <(Player's Choice) = [1]> then
say [Computer Wins!] for (1) secs
change [Computer's Score v] by [1]
end
if <(Player's Choice) = [2]> then
say [Tie!] for (1) secs
end
if <(Player's Choice) = [3]> then
say [Player Wins!] for (1) secs
change [Player's Score v] by [1]
end
end
if <(Computer's Choice) = [3]> then
say [Scissors!] for (0.5) secs
if <(Player's Choice) = [1]> then
say [Player Wins!] for (1) secs
change [Player's Score v] by [1]
end
if <(Player's Choice) = [2]> then
say [Computer Wins!] for (1) secs
change [Computer's Score v] by [1]
end
if <(Player's Choice) = [3]> then
say [Tie!] for (1) secs
end
end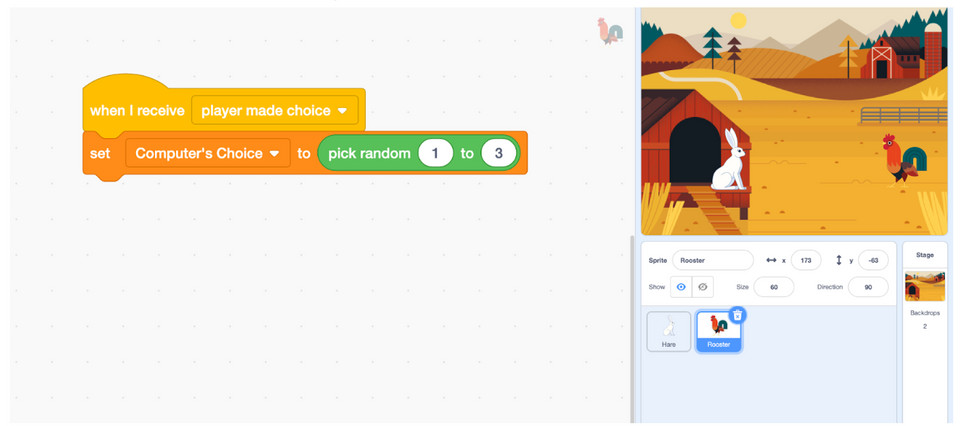 Rock, paper, scissors game in Scratch
8. Ending the Game
To make the game complete, let’s add a condition to end the game when either the player or the computer reaches a certain score.
8.1. Checking the Scores
- Use the
if-thenblock from the “Control” category to check if either thePlayer's ScoreorComputer's Scorehas reached a target score (e.g., 5).
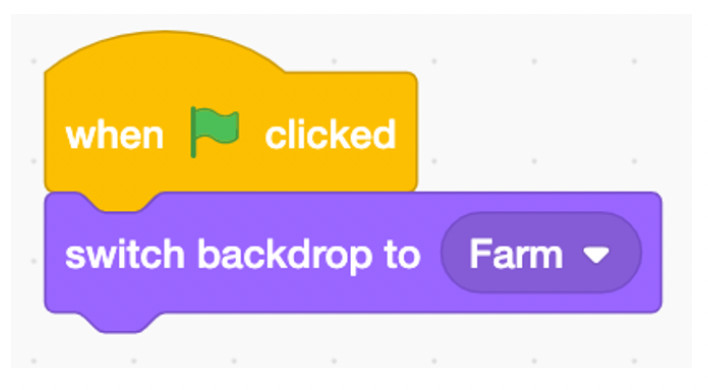
8.2. Switching the Backdrop
- Create two new backdrops: one for the player winning and one for the computer winning.
- Use the
switch backdrop to [backdrop name]block from the “Looks” category to switch to the appropriate backdrop when the game ends.
8.3. Stopping the Game
- Use the
stop [all]block from the “Control” category to stop the game when the game ends.
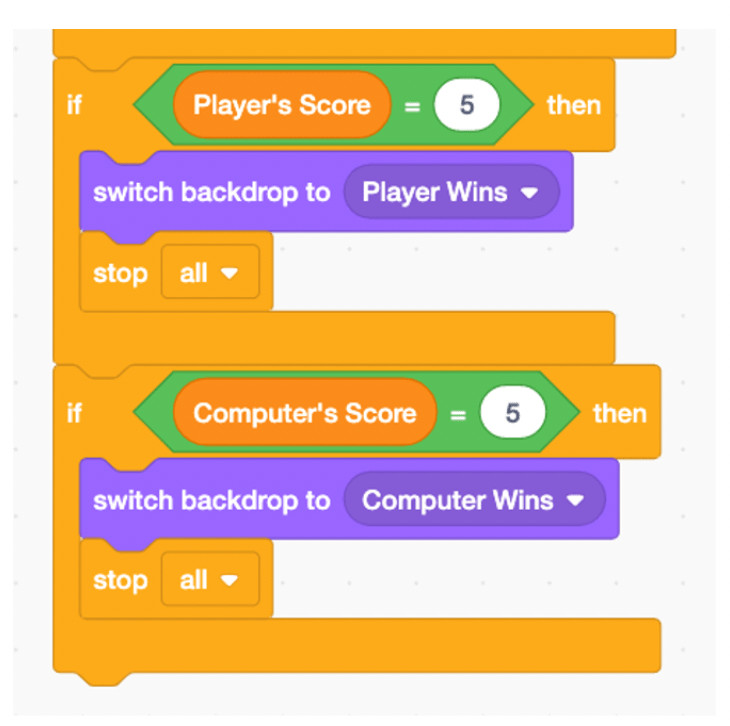
8.4. Implementing the End Game Logic
- Add the following code to the computer’s sprite after updating the scores:
if <(Player's Score) = [5]> then
switch backdrop to [Player Wins v]
stop [all v]
end
if <(Computer's Score) = [5]> then
switch backdrop to [Computer Wins v]
stop [all v]
end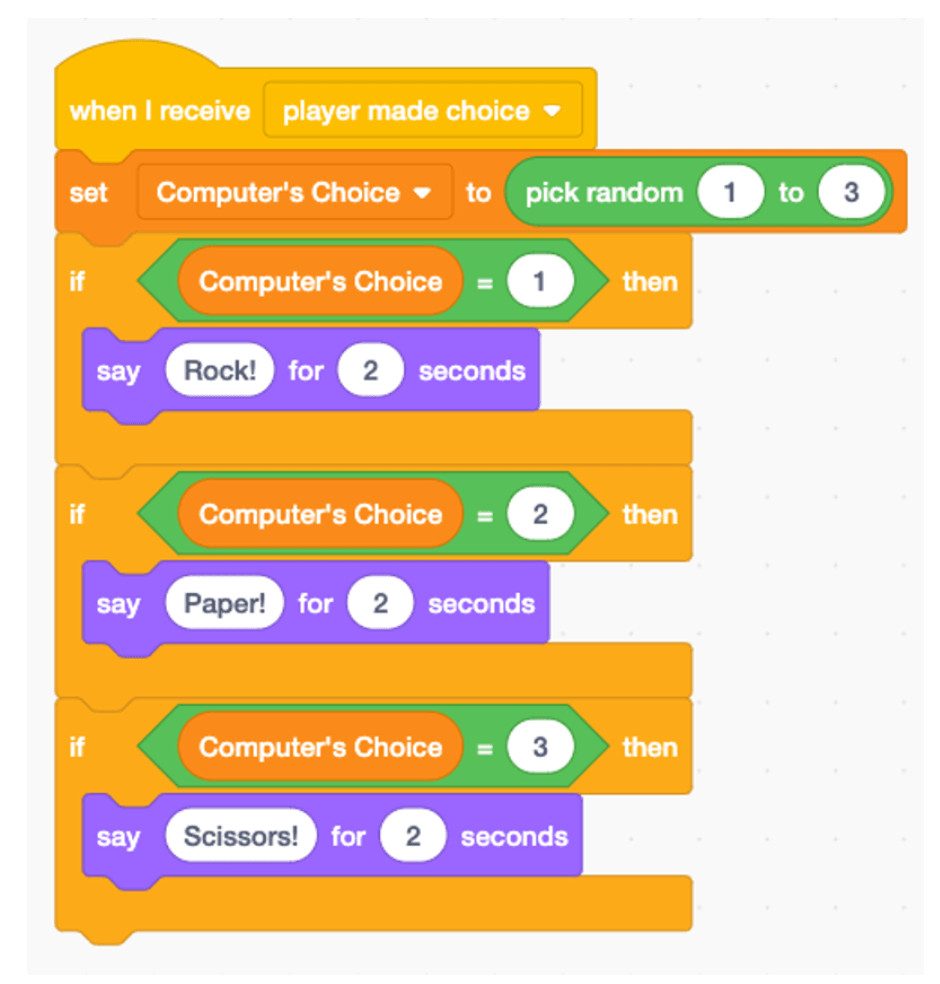 Computer code
9. Adding Visual Enhancements
To make the game more visually appealing, you can add costumes for each choice (Rock, Paper, Scissors) and switch between them based on the player’s and computer’s choices.
9.1. Creating Costumes
- For each sprite, create three costumes: one for Rock, one for Paper, and one for Scissors. You can draw these yourself or use images from the Scratch library.
9.2. Switching Costumes
- Use the
switch costume to [costume name]block from the “Looks” category to switch to the appropriate costume based on thePlayer's ChoiceandComputer's Choicevariables.
9.3. Customizing the Game
- Add sound effects when the player or computer makes a choice.
- Animate the sprites to make the game more engaging.
- Add a timer to limit the amount of time each player has to make a choice.
 All possible results
10. Testing and Debugging Your Game
Testing is a crucial part of the development process. Play your game and check for any bugs or issues. Here are some tips for debugging:
- Check Variable Values: Use the watch blocks to display the values of your variables and make sure they are being updated correctly.
- Step Through the Code: Add
waitblocks to slow down the execution of your code and observe what is happening at each step. - Use Comments: Add comments to your code to explain what each section does. This can help you understand your code and identify potential problems.
 Who wins the point
11. Encouraging Further Exploration
Once you’ve completed the basic Rock Paper Scissors game, encourage your child to explore further and add their own features. This could include:
- Adding New Choices: Expand the game to include more choices, such as Lizard and Spock (from the “Rock Paper Scissors Lizard Spock” variation).
- Implementing a Two-Player Mode: Allow two players to play against each other using the same computer.
- Creating a Tournament Mode: Implement a tournament mode where multiple players compete against each other.
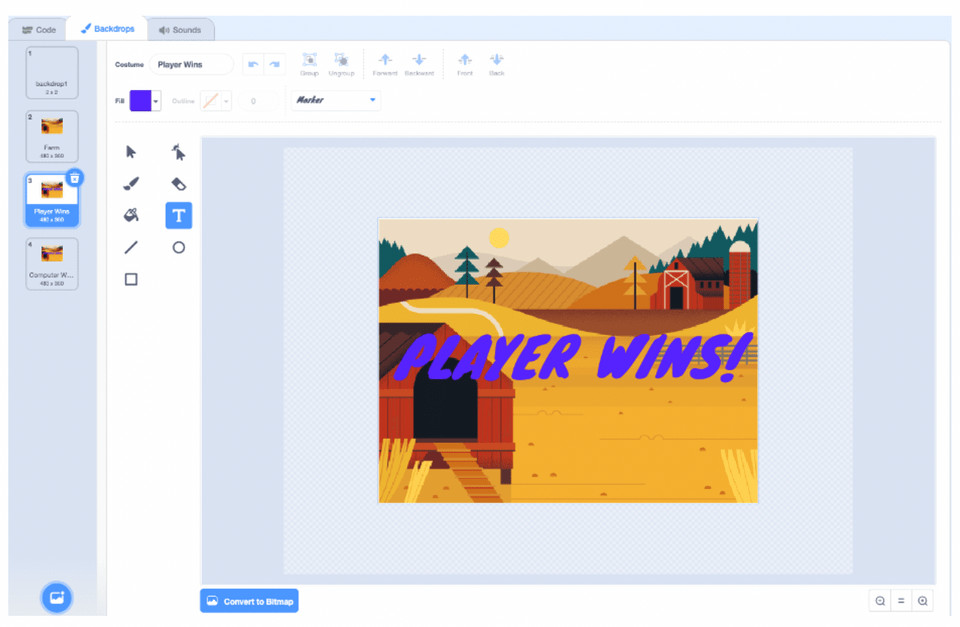 Player wins
12. Sharing Your Creation
Once your game is complete, share it with friends and family. You can upload your project to the Scratch website and share the link.
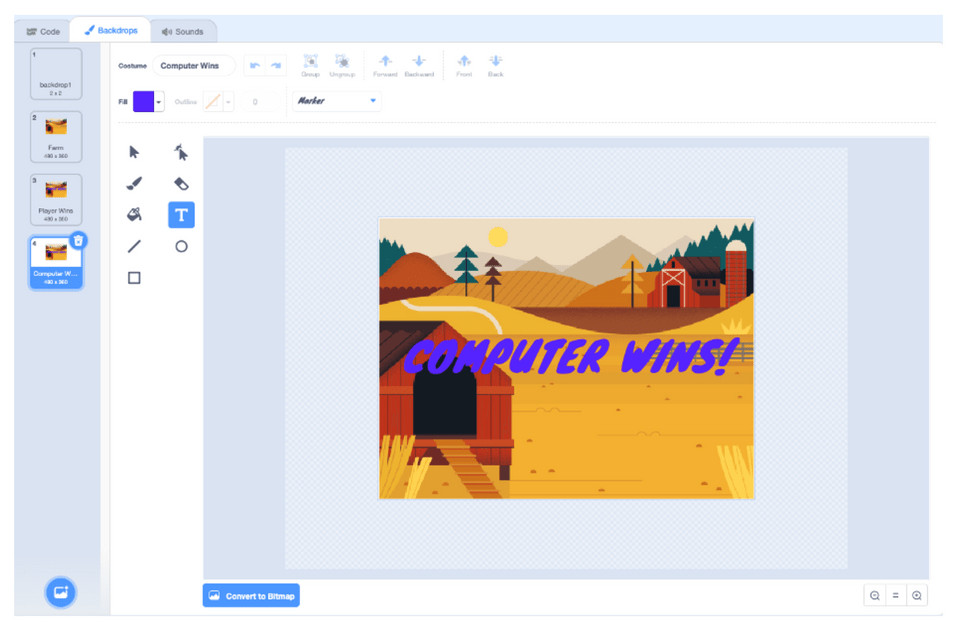 Computer wins
13. Benefits of Learning to Code with Scratch
Learning to code with Scratch offers numerous benefits for children:
- Develops Logical Thinking: Coding requires logical thinking and problem-solving skills.
- Enhances Creativity: Scratch allows children to express their creativity and imagination.
- Improves Math Skills: Coding involves mathematical concepts such as variables, loops, and conditional statements.
- Prepares for the Future: Coding skills are becoming increasingly important in today’s digital world.
 Switch the backdrop
14. Next Steps in Scratch Coding
After mastering the Rock Paper Scissors game, there are many other Scratch projects to explore, such as creating animations, interactive stories, and more complex games.
15. Rockscapes.net: Your Partner in Creative Projects
At rockscapes.net, we believe in the power of creativity and learning. Just like building a beautiful landscape with rocks, coding with Scratch allows you to construct amazing digital creations. We hope this guide has inspired you to embark on your coding journey! For more inspiration and resources, explore rockscapes.net and discover how you can blend the beauty of nature with the innovation of technology.
 Green flag in Scratch coding
16. Advanced Techniques for Rock Paper Scissors in Scratch
To elevate your Rock Paper Scissors game in Scratch, consider incorporating these advanced techniques:
- AI Opponent: Instead of a random choice, implement a simple AI that learns the player’s patterns and adjusts its choices accordingly.
- User Interface: Design a more sophisticated user interface with buttons, animations, and visual feedback.
- Sound Effects: Add sound effects for each action, such as choosing Rock, Paper, or Scissors, and for winning or losing.
- Difficulty Levels: Implement difficulty levels that adjust the AI’s behavior or the game’s speed.
17. Optimizing Your Scratch Game for Sharing
Before sharing your Scratch game, optimize it for the best possible experience:
- Reduce File Size: Compress images and sounds to reduce the project’s file size.
- Use Efficient Code: Avoid unnecessary loops or complex logic that can slow down the game.
- Test on Different Devices: Ensure that your game runs smoothly on different computers and browsers.
- Provide Instructions: Include clear instructions on how to play the game.
18. Common Mistakes to Avoid When Coding in Scratch
When coding in Scratch, be mindful of these common mistakes:
- Forgetting to Initialize Variables: Always initialize your variables at the beginning of the game.
- Incorrect Logic: Double-check your conditional statements to ensure they are correct.
- Infinite Loops: Avoid creating loops that never end, as they can freeze the game.
- Overcomplicating Code: Keep your code simple and easy to understand.
19. Integrating Real-World Concepts with Scratch
Scratch can be used to teach real-world concepts in a fun and engaging way. For example, you can use Scratch to:
- Simulate Physics: Create simulations of gravity, motion, and collisions.
- Model Ecosystems: Simulate the interactions between different species in an ecosystem.
- Teach Math Concepts: Use Scratch to visualize and interact with mathematical concepts such as geometry and algebra.
20. The Future of Scratch and Coding Education
Scratch is constantly evolving, with new features and updates being added regularly. As coding becomes increasingly important in education, Scratch will continue to play a vital role in introducing children to the world of programming.
For stunning landscape designs and innovative uses of natural stone, visit rockscapes.net. Discover how to transform your outdoor spaces with the beauty and versatility of rock. Our experts can guide you through the selection process, offering advice on the best materials and techniques to bring your vision to life. Contact us today and let us help you create a landscape that will inspire and delight for years to come!
Rockscapes.net
Address: 1151 S Forest Ave, Tempe, AZ 85281, United States
Phone: +1 (480) 965-9011
Website: rockscapes.net
FAQ: Making a Rock Paper Scissors Game in Scratch
1. What is Scratch and why is it good for learning to code?
Scratch is a visual programming language designed for beginners, making coding accessible and fun through drag-and-drop blocks. It simplifies complex coding concepts, perfect for introducing kids to programming.
2. What are the basic components needed to create a Rock Paper Scissors game in Scratch?
You’ll need sprites for the player and computer, a background, and variables to track choices and scores. Essential blocks include events, control, sensing, operators, and variables.
3. How do I set up the player’s and computer’s choices in Scratch?
Use key press events for the player and a random number generator for the computer. Assign values to variables representing Rock, Paper, or Scissors.
4. How can I determine the winner in a Rock Paper Scissors game in Scratch?
Use nested if-then-else statements to compare the player’s and computer’s choices, covering all possible outcomes and declaring the winner accordingly.
5. How do I keep track of the scores in Scratch?
Create variables for the player’s and computer’s scores, updating them based on who wins each round using the change [variable] by [value] block.
6. How can I add visual and audio enhancements to my Rock Paper Scissors game in Scratch?
Incorporate different costumes for each choice (Rock, Paper, Scissors) and add sound effects for each action to enhance the user experience.
7. How do I end the game when someone reaches a certain score?
Use an if-then block to check if either the player’s or computer’s score reaches a target score, then switch the backdrop and stop the game.
8. What are some common mistakes to avoid when coding in Scratch?
Avoid forgetting to initialize variables, using incorrect logic in conditional statements, creating infinite loops, and overcomplicating code.
9. Can I create an AI opponent in Scratch for my Rock Paper Scissors game?
Yes, you can implement a simple AI that learns the player’s patterns and adjusts its choices, making the game more challenging.
10. How do I share my Scratch game with others?
Upload your project to the Scratch website and share the link with friends and family, allowing them to play your game.