Want to add a personal touch to your rockscapes? Carving rocks with a Dremel is an excellent way to create unique and personalized decorative elements. At rockscapes.net, we’ll guide you through the process, from selecting the right tools and rocks to mastering carving techniques for stunning results. Ready to transform ordinary stones into extraordinary art with rotary tool rock carving and customized stone decor?
Table of Contents
1. What Is Rock Carving With A Dremel And Why Do It?
- 1.1. What is a Dremel and How Can It Help?
- 1.2. What Types of Rock Are Best for Carving?
- 1.3. Safety First: Essential Protective Gear
2. What Tools Do You Need To Carve Rocks With A Dremel?
- 2.1. The Dremel Rotary Tool: Choosing the Right Model
- 2.2. Essential Dremel Bits for Rock Carving
- 2.3. Other Helpful Tools and Materials
3. How To Prepare Your Rocks For Carving?
- 3.1. Cleaning and Inspecting Your Rocks
- 3.2. Sketching Your Design
- 3.3. Securing Your Rock
4. What Are The Basic Techniques For Carving Rocks With A Dremel?
- 4.1. Starting with Light Etching
- 4.2. Creating Depth and Texture
- 4.3. Smoothing and Polishing
5. What Are Some Advanced Rock Carving Techniques?
- 5.1. Adding Intricate Details
- 5.2. Drilling Holes in Rocks
- 5.3. Combining Carving with Other Materials
6. What Are Some Project Ideas For Carving Rocks With A Dremel?
- 6.1. Personalized Garden Stones
- 6.2. Decorative Rock Jewelry
- 6.3. Custom Pet Memorials
7. How To Troubleshoot Common Problems When Carving Rocks?
- 7.1. Preventing Bit Breakage
- 7.2. Dealing with Dust and Debris
- 7.3. Achieving Smooth, Even Carving
8. How To Maintain Your Dremel And Carving Bits?
- 8.1. Cleaning Your Dremel
- 8.2. Storing Your Dremel Bits
- 8.3. Replacing Worn Bits
9. What Are The Safety Precautions For Rock Carving?
- 9.1. Eye Protection
- 9.2. Respiratory Protection
- 9.3. Hand Protection
- 9.4. Work Area Safety
10. Where To Find Inspiration And Resources For Rock Carving?
- 10.1. Online Communities and Forums
- 10.2. Books and Magazines
- 10.3. Workshops and Classes
11. How to Choose the Right Rocks for Your Project?
- 11.1. Understanding Rock Hardness
- 11.2. Identifying Rock Types
- 11.3. Sourcing Your Rocks
12. What Finishes And Sealants Can Enhance Your Carved Rocks?
- 12.1. Applying Sealants
- 12.2. Using Polishes
- 12.3. Adding Color
13. How To Incorporate Carved Rocks Into Your Landscaping?
- 13.1. Garden Accents
- 13.2. Water Features
- 13.3. Pathways and Borders
14. Can You Personalize Gifts With Carved Rocks?
- 14.1. Creating Personalized Messages
- 14.2. Adding Special Dates
- 14.3. Incorporating Symbols
15. What Are Some Common Mistakes To Avoid When Carving Rocks?
- 15.1. Using the Wrong Bits
- 15.2. Applying Too Much Pressure
- 15.3. Neglecting Safety Precautions
16. FAQ About How To Carve Rocks With Dremel
Carving rocks with a Dremel opens up a world of creative possibilities, allowing you to craft unique and personalized items from natural materials. Whether you’re interested in stone engraving, creating decorative accents, or adding a personal touch to your garden, understanding how to effectively use a Dremel on rocks is essential. Let’s dive into how you can transform ordinary stones into personalized masterpieces with stone carving projects and rock art designs.
1. What Is Rock Carving With A Dremel And Why Do It?
Rock carving with a Dremel involves using a rotary tool to shape, engrave, or decorate stones. This technique allows you to create intricate designs and personalized details on various types of rocks, making it a fantastic hobby or craft for those interested in lapidary art and personalized stone art. According to research from Arizona State University’s School of Earth and Space Exploration, in July 2023, the popularity of using rotary tools like Dremels for rock carving has surged due to their versatility and precision.
1.1. What is a Dremel and How Can It Help?
A Dremel is a versatile rotary tool used for cutting, grinding, polishing, and carving various materials, including rocks. Its high-speed rotation and interchangeable bits allow for detailed work and precise control, making it ideal for rock carving projects and DIY stone crafts. The Dremel’s adaptability makes it a favorite among hobbyists and professionals for creating custom rock designs and stone engraving art.
1.2. What Types of Rock Are Best for Carving?
Softer rocks like soapstone, sandstone, and limestone are the best choices for carving with a Dremel because they are easier to shape and less likely to damage your tools. These types of rocks allow for smoother carving and more intricate designs. River rocks and beach pebbles also work well and can be sourced easily. For harder rocks such as granite or marble, diamond-tipped bits are essential.
1.3. Safety First: Essential Protective Gear
Prioritize safety by wearing safety glasses to protect your eyes from flying debris and a dust mask to avoid inhaling rock particles. Gloves can also protect your hands and provide a better grip. Working in a well-ventilated area or using a dust collector will further minimize health risks during your rock carving projects.
2. What Tools Do You Need To Carve Rocks With A Dremel?
To effectively carve rocks with a Dremel, you’ll need the right tools and accessories. This includes the Dremel tool itself, various bits designed for stone carving, and safety equipment. Here’s a detailed breakdown of the essential tools for rock carving:
2.1. The Dremel Rotary Tool: Choosing the Right Model
The best Dremel for rock carving is one that offers variable speed settings, allowing you to adjust the speed based on the type of rock and the intricacy of your design. Cordless models provide greater mobility, while corded models offer consistent power for extended use. Consider models with attachments that enhance precision and control, such as flex shafts. Popular models include the Dremel 4300 and Dremel 8220.
2.2. Essential Dremel Bits for Rock Carving
Selecting the right bits is crucial for effective rock carving. Diamond-tipped bits are ideal for harder stones like granite and marble, offering durability and precision. Silicon carbide grinding stones are suitable for softer rocks like soapstone and sandstone. Engraving cutters and carving bits help create detailed designs and remove material efficiently. Polishing wheels and compounds are used to smooth and refine the carved surfaces.
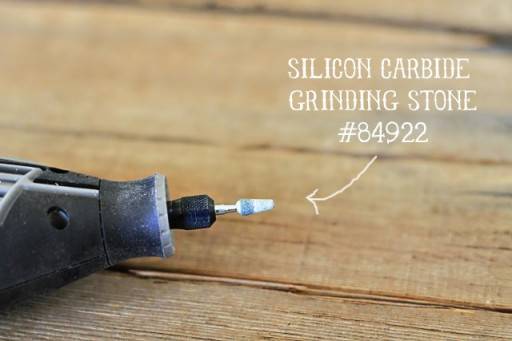 Carbide Dremel Attachment via lilblueboo.com
Here’s a list of recommended Dremel bits:
| Bit Type | Material Suitability | Use |
|---|---|---|
| Diamond-Tipped Bits | Hard Stones | Cutting, engraving, and detailed carving |
| Silicon Carbide Grinding Stones | Soft Stones | Shaping and smoothing |
| Engraving Cutters | Various | Creating fine lines and intricate designs |
| Carving Bits | Various | Removing material and creating deeper cuts |
| Polishing Wheels | Various | Smoothing and polishing carved surfaces |
2.3. Other Helpful Tools and Materials
In addition to the Dremel and bits, other tools can enhance your rock carving experience. A flexible shaft attachment provides greater control and precision, especially for intricate designs. A vise or clamp securely holds the rock in place, preventing movement during carving. A spray bottle with water keeps the rock cool and reduces dust. A soft brush helps remove debris from the carving. A well-lit workspace is essential for seeing fine details.
3. How To Prepare Your Rocks For Carving?
Proper preparation is essential for successful rock carving. This involves cleaning the rocks, sketching your design, and securing the rock to prevent movement.
3.1. Cleaning and Inspecting Your Rocks
Start by thoroughly cleaning your rocks with soap and water to remove any dirt, debris, or loose particles. Use a scrub brush to ensure the surface is clean. Inspect the rock for cracks, fractures, or weak spots that could cause it to break during carving. Select rocks that are solid and free from major imperfections to ensure a stable base for your design.
3.2. Sketching Your Design
Sketching your design onto the rock helps guide your carving and ensures accuracy. Use a pencil or marker to draw your design directly onto the rock’s surface. For complex designs, consider using stencils or transferring the design with carbon paper. Keep your design simple and consider the natural shape and texture of the rock.
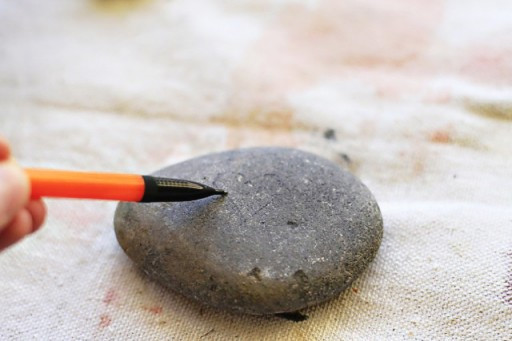 Carving River Rocks with a Dremel (Step 1) via lilblueboo.com
3.3. Securing Your Rock
Securing the rock is crucial for safety and precision. Use a vise or clamp to hold the rock firmly in place on your work surface. Ensure the rock is stable and won’t move during carving. For oddly shaped rocks, use modeling clay or rubber pads to create a more secure grip. Adjust the angle of the rock to provide comfortable access to all areas of your design.
4. What Are The Basic Techniques For Carving Rocks With A Dremel?
Mastering basic carving techniques is essential for achieving high-quality results. Start with light etching, gradually creating depth and texture, and finishing with smoothing and polishing.
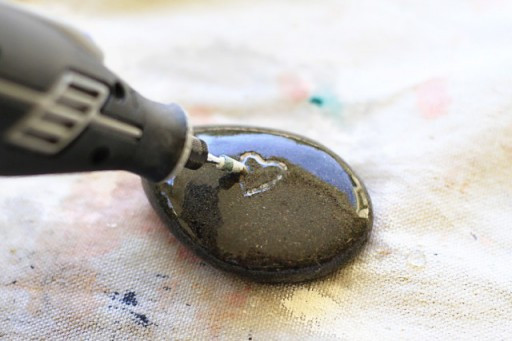
4.1. Starting with Light Etching
Begin by lightly etching the outline of your design onto the rock. Use a low-speed setting on your Dremel and a fine-tipped bit. Apply gentle pressure and move the bit in smooth, controlled strokes. Focus on creating a clear and accurate outline before proceeding to deeper carving.
 Carving River Rocks with a Dremel (Step 2) via lilblueboo.com
4.2. Creating Depth and Texture
Once you have a clear outline, begin to create depth and texture within your design. Use a medium-sized bit and gradually increase the speed as needed. Apply more pressure to remove material and create deeper cuts. Experiment with different bit shapes and angles to achieve varying textures and effects. Regularly dip the rock in water to keep it cool and reduce dust.
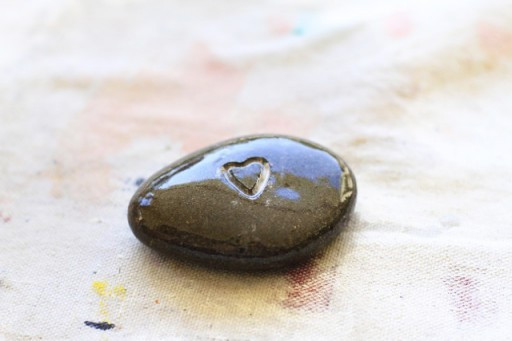
4.3. Smoothing and Polishing
After carving, smooth and polish the surface to remove any rough edges or imperfections. Use polishing wheels and compounds to achieve a smooth, glossy finish. Start with a coarse polishing compound and gradually move to finer compounds. Apply light pressure and move the polishing wheel in smooth, even strokes. The result of this step is a great-looking stone!
 Engraving River Rocks with a Dremel (Step 3) via lilblueboo.com
5. What Are Some Advanced Rock Carving Techniques?
Once you’ve mastered the basics, you can explore more advanced techniques to enhance your rock carving projects. These include adding intricate details, drilling holes in rocks, and combining carving with other materials.
5.1. Adding Intricate Details
Adding intricate details requires precision and control. Use a fine-tipped bit and a low-speed setting on your Dremel. Work slowly and carefully, paying attention to small details. Consider using magnifying glasses or a lighted magnifier to improve visibility. Practice on scrap rocks to refine your technique before working on your final piece.
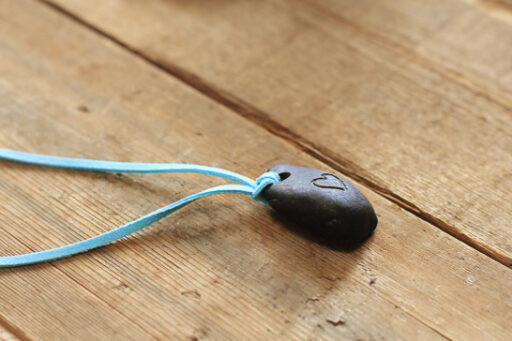
5.2. Drilling Holes in Rocks
Drilling holes in rocks allows you to create jewelry, pendants, and other decorative items. Use a diamond-tipped drill bit and a low-speed setting on your Dremel. Apply constant, gentle pressure and keep the bit cool by dipping the rock in water. Start with a small pilot hole and gradually increase the size of the hole as needed. Be patient and avoid applying too much pressure, which can cause the rock to crack or the bit to break.
 How To Drill a Hole in a Rock with a Dremel via lilblueboo.com
5.3. Combining Carving with Other Materials
Combining rock carving with other materials can add visual interest and creativity to your projects. Consider incorporating metal wire, beads, or other decorative elements into your designs. Use epoxy or other adhesives to attach the materials securely to the rock. Experiment with different combinations of materials to create unique and personalized pieces.
6. What Are Some Project Ideas For Carving Rocks With A Dremel?
Rock carving with a Dremel offers endless possibilities for creative projects. Here are a few ideas to inspire you:
6.1. Personalized Garden Stones
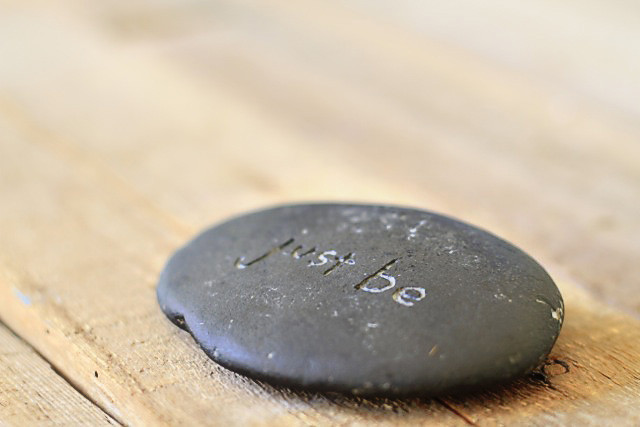
Carve personalized messages, names, or inspirational quotes onto garden stones to add a personal touch to your outdoor space. These can be placed along pathways, in flower beds, or near water features. Consider painting or staining the carved areas to enhance visibility.
 DIY Carved Rock / Pebble via lilblueboo.com
6.2. Decorative Rock Jewelry
Create unique and eye-catching jewelry by carving small rocks and drilling holes for pendants, earrings, or bracelets. Use different types of rocks and carving techniques to create a variety of styles. Add beads, wire, or other decorative elements to enhance the designs.
 DIY Rock Accessories via liblueboo.com
6.3. Custom Pet Memorials
Honor your beloved pets by creating custom pet memorials with carved rocks. Carve their names, dates, or images onto the rocks and place them in your garden or home. These personalized memorials provide a lasting tribute to your furry friends.
7. How To Troubleshoot Common Problems When Carving Rocks?
Even with the best techniques, you may encounter some common problems when carving rocks. Here are some tips for troubleshooting these issues:
7.1. Preventing Bit Breakage
Bit breakage is a common issue when carving rocks. To prevent this, use the right type of bit for the type of rock you are carving. Apply gentle pressure and avoid forcing the bit. Keep the bit cool by regularly dipping the rock in water. If a bit breaks, stop immediately and carefully remove any broken pieces from the rock.
7.2. Dealing with Dust and Debris
Rock carving can create a lot of dust and debris. To minimize this, work in a well-ventilated area or use a dust collector. Wear a dust mask to protect your lungs. Regularly clean your work surface to remove dust and debris. Use a spray bottle with water to keep the rock cool and reduce dust.
7.3. Achieving Smooth, Even Carving
Achieving smooth, even carving requires practice and patience. Use a low-speed setting on your Dremel and apply gentle pressure. Move the bit in smooth, controlled strokes. Avoid dwelling in one spot, which can create uneven carving. Regularly inspect your work and make adjustments as needed.
8. How To Maintain Your Dremel And Carving Bits?
Proper maintenance of your Dremel and carving bits is essential for ensuring their longevity and performance. Here are some tips for maintaining your tools:
8.1. Cleaning Your Dremel
After each use, clean your Dremel to remove any dust, debris, or residue. Use a soft cloth or brush to wipe down the tool. Check the air vents and remove any blockages. Periodically lubricate the moving parts of the Dremel according to the manufacturer’s instructions.
8.2. Storing Your Dremel Bits
Store your Dremel bits in a clean, dry place to prevent rust and damage. Use a bit storage case or organizer to keep the bits separate and easily accessible. Avoid storing the bits in a humid environment, which can cause them to corrode.
8.3. Replacing Worn Bits
Replace worn bits as needed to maintain optimal carving performance. Worn bits can be less effective and more likely to break. Inspect your bits regularly for signs of wear, such as dullness, cracks, or chips. Replace any worn bits with new ones of the same type and size.
9. What Are The Safety Precautions For Rock Carving?
Safety should always be your top priority when carving rocks. Here are some essential safety precautions to follow:
9.1. Eye Protection
Always wear safety glasses or goggles to protect your eyes from flying debris. Rock carving can generate small particles that can cause serious eye injuries. Ensure your eye protection fits properly and provides full coverage.
9.2. Respiratory Protection
Wear a dust mask or respirator to protect your lungs from inhaling rock particles. Prolonged exposure to rock dust can cause respiratory problems. Choose a mask that is designed to filter out fine particles and fits snugly over your nose and mouth.
9.3. Hand Protection
Wear gloves to protect your hands from cuts, abrasions, and vibrations. Gloves can also provide a better grip on the rock and Dremel. Choose gloves that are durable and flexible enough to allow for precise movements.
9.4. Work Area Safety
Work in a well-lit and well-ventilated area. Ensure your work surface is stable and free from clutter. Keep children and pets away from your work area. Use a vise or clamp to secure the rock and prevent movement during carving.
10. Where To Find Inspiration And Resources For Rock Carving?
Finding inspiration and resources can help you improve your rock carving skills and discover new ideas. Here are some valuable resources to explore:
10.1. Online Communities and Forums
Join online communities and forums dedicated to rock carving and lapidary arts. These platforms provide opportunities to share your work, ask questions, and learn from other enthusiasts. Popular online communities include Reddit’s r/RockCarving and various Facebook groups dedicated to stone carving.
10.2. Books and Magazines
Explore books and magazines that feature rock carving techniques, project ideas, and artist profiles. These resources offer in-depth knowledge and inspiration for your own projects. Look for publications such as “Rock & Gem” magazine and books on lapidary arts and stone carving.
10.3. Workshops and Classes
Attend workshops and classes to learn from experienced instructors and gain hands-on experience. These courses provide valuable insights into carving techniques, tool usage, and safety practices. Check local art centers, community colleges, and lapidary clubs for available workshops and classes.
11. How to Choose the Right Rocks for Your Project?
Selecting the right rocks is a critical step in ensuring the success of your carving project. The type, hardness, and size of the rock can significantly impact the final result. Here’s how to choose the best rocks for your needs:
11.1. Understanding Rock Hardness
Rock hardness is measured using the Mohs scale, which ranges from 1 (softest) to 10 (hardest). Softer rocks are easier to carve but may not hold fine details as well as harder rocks.
| Mohs Hardness | Rock Type | Carving Ease | Details Retention |
|---|---|---|---|
| 1-3 | Soapstone, Talc | Very Easy | Low |
| 3-5 | Limestone, Sandstone | Easy | Medium |
| 6-7 | Granite, Quartz | Difficult | High |
| 7-10 | Diamond, Topaz | Very Difficult | Very High |
11.2. Identifying Rock Types
Different rock types offer unique characteristics and are suitable for various carving projects.
- Soapstone: A very soft rock, ideal for beginners due to its ease of carving.
- Limestone: A sedimentary rock that’s easy to carve and widely available.
- Sandstone: Another sedimentary rock with a slightly rough texture, good for rustic designs.
- Granite: A hard, igneous rock that requires diamond-tipped bits and more advanced techniques.
- River Rocks: Smooth, rounded rocks that are great for simple engravings and decorative pieces.
11.3. Sourcing Your Rocks
You can source rocks from various places, including:
- Local Rock Suppliers: These suppliers offer a wide variety of rocks and can provide expert advice.
- Landscaping Companies: Often have river rocks and other decorative stones.
- Beaches and Rivers: You can collect rocks from these natural sources, but be sure to check local regulations regarding rock removal.
- Online Retailers: Offer a convenient way to purchase specific types and sizes of rocks.
12. What Finishes And Sealants Can Enhance Your Carved Rocks?
Applying finishes and sealants can enhance the appearance and durability of your carved rocks. These treatments can bring out the natural colors, protect the surface, and add a professional touch.
12.1. Applying Sealants
Sealants protect the carved rock from moisture, dirt, and UV damage. They also help to prevent the rock from crumbling or deteriorating over time.
- Acrylic Sealants: Water-based sealants that provide a clear, protective coating.
- Silicone Sealants: Offer excellent water resistance and flexibility.
- Penetrating Sealants: Soak into the rock to provide internal protection without changing the surface appearance.
12.2. Using Polishes
Polishes enhance the shine and smoothness of the carved surface. They are particularly effective on harder rocks like granite and marble.
- Diamond Polishing Compounds: Used with polishing wheels to achieve a high-gloss finish.
- Wax Polishes: Provide a protective layer and enhance the color of the rock.
- Stone Enhancers: Bring out the natural colors and patterns in the rock.
12.3. Adding Color
Adding color can make your carvings stand out and create a more personalized look.
- Acrylic Paints: Versatile and easy to apply, but may require a sealant for outdoor use.
- Stone Stains: Designed to penetrate the rock and provide a long-lasting color.
- Metallic Paints: Add a touch of elegance and can highlight intricate details.
 Use Beeswax to polish rock via lilblueboo.com
13. How To Incorporate Carved Rocks Into Your Landscaping?
Carved rocks can add a unique and personalized touch to your landscaping. Here are some creative ways to incorporate them into your outdoor spaces:
13.1. Garden Accents
Use carved rocks as focal points in your garden beds, rock gardens, or along pathways. Engrave inspirational quotes, plant names, or whimsical designs to add character and charm.
13.2. Water Features
Incorporate carved rocks into water features such as fountains, ponds, and waterfalls. The carvings can add visual interest and create a soothing ambiance.
13.3. Pathways and Borders
Use carved rocks to create unique pathways or borders for your garden beds. Engrave patterns or designs on the rocks to guide visitors and add a decorative element to your landscape.
14. Can You Personalize Gifts With Carved Rocks?
Carved rocks make thoughtful and personalized gifts for any occasion. Here are some ideas for creating unique and memorable presents:
14.1. Creating Personalized Messages
Engrave heartfelt messages, names, or special dates on rocks to create personalized keepsakes. These can be given as birthday gifts, wedding favors, or thank-you presents.
14.2. Adding Special Dates
Commemorate special events by carving dates, anniversaries, or milestones on rocks. These personalized rocks can serve as lasting reminders of important moments.
14.3. Incorporating Symbols
Incorporate meaningful symbols, such as hearts, stars, or religious icons, into your carvings to create personalized gifts that reflect the recipient’s interests and beliefs.
 How to Carve Words in Rocks using a Dremel via lilblueboo.com
15. What Are Some Common Mistakes To Avoid When Carving Rocks?
Avoiding common mistakes can save you time, effort, and frustration. Here are some pitfalls to watch out for:
15.1. Using the Wrong Bits
Using the wrong bits can damage the rock or the Dremel. Always select the appropriate bit for the type of rock you are carving. Diamond-tipped bits are best for hard rocks, while silicon carbide bits are suitable for softer rocks.
15.2. Applying Too Much Pressure
Applying too much pressure can cause the bit to break or the rock to crack. Use a gentle, steady pressure and let the Dremel do the work. Avoid forcing the bit, and take frequent breaks to prevent overheating.
15.3. Neglecting Safety Precautions
Neglecting safety precautions can lead to injuries. Always wear safety glasses, a dust mask, and gloves. Work in a well-ventilated area, and keep children and pets away from your work space.
16. FAQ About How To Carve Rocks With Dremel
-
What is the best Dremel speed for carving rocks?
The best Dremel speed for carving rocks depends on the type of rock and the bit you are using. Start with a low speed for delicate work and gradually increase the speed as needed.
-
Can I carve granite with a Dremel?
Yes, you can carve granite with a Dremel, but you will need to use diamond-tipped bits and a slow, steady technique. Granite is a hard rock, so it requires more patience and precision.
-
How do I prevent my Dremel bits from overheating?
To prevent your Dremel bits from overheating, keep the rock cool by regularly dipping it in water. Also, avoid applying too much pressure and take frequent breaks to allow the bits to cool down.
-
What is the best way to clean carved rocks?
The best way to clean carved rocks is to use a soft brush and mild soap and water. Rinse the rock thoroughly and allow it to air dry.
-
Can I use a Dremel to drill holes in rocks?
Yes, you can use a Dremel to drill holes in rocks by using diamond-tipped drill bits. Using water to cool the drill bit is recommended
-
What safety equipment do I need for rock carving with a Dremel?
You need safety glasses, a dust mask, and gloves.
-
Can I carve river rocks with a Dremel?
Yes, river rocks are excellent for carving. They are relatively soft and have smooth surfaces that are easy to work with.
-
What are some good designs to carve on rocks?
Good designs include simple patterns, geometric shapes, inspirational quotes, names, and nature-inspired motifs such as leaves and flowers.
-
How do I make my carved rocks shine?
You can make your carved rocks shine by polishing them with polishing compounds and a polishing wheel attachment on your Dremel.
-
Where can I find rocks for carving?
You can find rocks for carving at local rock suppliers, landscaping companies, beaches, rivers, and online retailers.
Ready to start your rock carving adventure? Explore a wide range of resources, from detailed guides to expert tips, at rockscapes.net. Discover the beauty and versatility of stone, and let your creativity take shape with personalized rock art designs! Contact us at 1151 S Forest Ave, Tempe, AZ 85281, United States or call +1 (480) 965-9011 for personalized advice and support.