Rock candy, also known as sugar candy, is a delightful treat that’s surprisingly simple to make at home. If you’re looking for a fun dessert project or an engaging science experiment for kids, a homemade Rock Candy Recipe is the perfect solution. You’ll be amazed by the transformation of simple sugar and water into beautiful, sparkling crystals.
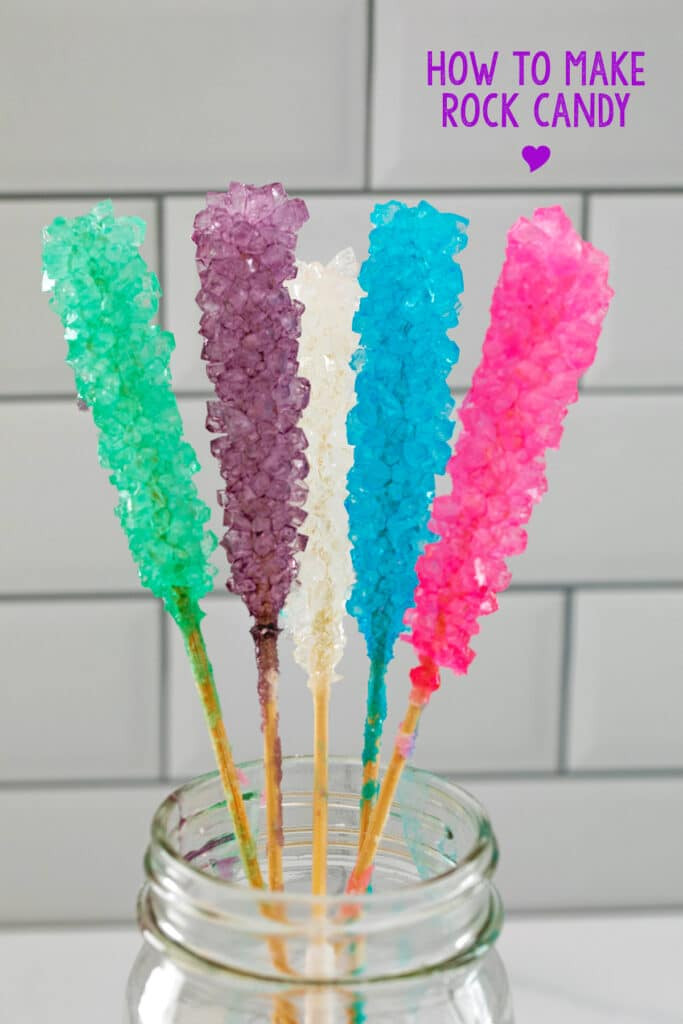 Close-up of 5 different colors rock candy in mason jar with
Colorful homemade rock candy crystals growing in mason jars, a fun and easy rock candy recipe.
My first attempt at making rock candy was years ago when I considered it for wedding décor. Let’s just say reality quickly set in! The sheer amount of sugar needed, the time commitment, and the space required to grow hundreds of rock candy sticks in my small apartment were definitely not wedding-decor friendly.
However, my initial struggles led me to refine the process, and now I’m excited to share a foolproof rock candy recipe that really works. Over the years, I’ve received countless questions, and this updated guide incorporates all the tips, tricks, and answers you need to successfully create your own crystalline candy at home.
What Exactly is Rock Candy?
Rock candy is essentially crystallized sugar. Sometimes called “sugar candy,” it’s made entirely of large, visually appealing sugar crystals, often tinted in various colors and widely available in candy stores.
The process is similar to making simple syrup, but with a twist. For rock candy, you create a supersaturated sugar solution. This means you dissolve more sugar in water than would typically dissolve at room temperature. As this solution cools, it becomes unstable because it can no longer hold all the dissolved sugar. To stabilize, the excess sugar molecules bind together and attach to a surface – in our case, a skewer – forming beautiful, large crystals.
Why Make Rock Candy Yourself?
While you can easily buy rock candy online or in stores, crafting your own rock candy recipe at home offers several unique advantages.
Firstly, it’s a fun and rewarding DIY project. Whether you want a sweet treat for yourself, a unique homemade gift, or an impressive party favor, homemade rock candy is sure to delight. Just remember, if you need large quantities, start well in advance!
Secondly, making rock candy is an excellent educational activity. It’s a fantastic science experiment for kids (and adults!) to learn about crystallization, saturation, and solutions. Watching the crystals grow day by day is a captivating visual lesson in chemistry.
Finally, rock candy adds a touch of whimsy to beverages. Use it to sweeten and garnish cocktails or create kid-friendly mocktails with a sugary, crystalline swizzle stick.
If you enjoy candy making, you might also be interested in exploring other homemade candy recipes, such as fudge or gummy candies. For a deeper dive into the science behind candy, check out resources on sugar chemistry.
How Much Time Does This Recipe Need?
The rock candy recipe itself is quick to prepare. Making the sugar solution takes very little time. However, crystal growth is a process that demands patience. You’ll need to let the sugar solution sit undisturbed for approximately 6-7 days to allow the crystals to fully form.
While it requires waiting, the daily observation of crystal growth is part of the fun. Checking on your jars and witnessing the increasing size of the crystals is a fascinating and satisfying experience.
Essential Equipment for Your Rock Candy Recipe
Good news! You probably already have most of the equipment needed for this rock candy recipe in your kitchen. Here’s a simple list:
- Granulated Sugar: The star ingredient! For approximately 5 rock candy sticks, you’ll need about 10 cups of sugar.
- Water: Plain tap water works perfectly.
- Food Coloring (Optional): For adding vibrant colors to your rock candy. Gel food coloring is recommended for intense hues.
- Mason Jars or Glass Containers: To hold the sugar solution while the crystals grow. Standard 16 oz mason jars are a great size.
- Skewers or Candy Sticks: To provide a surface for the crystals to grow on. Wooden skewers or specialized rock candy sticks work well.
- Clothespins or Clips: To suspend the skewers in the jars, preventing them from touching the bottom.
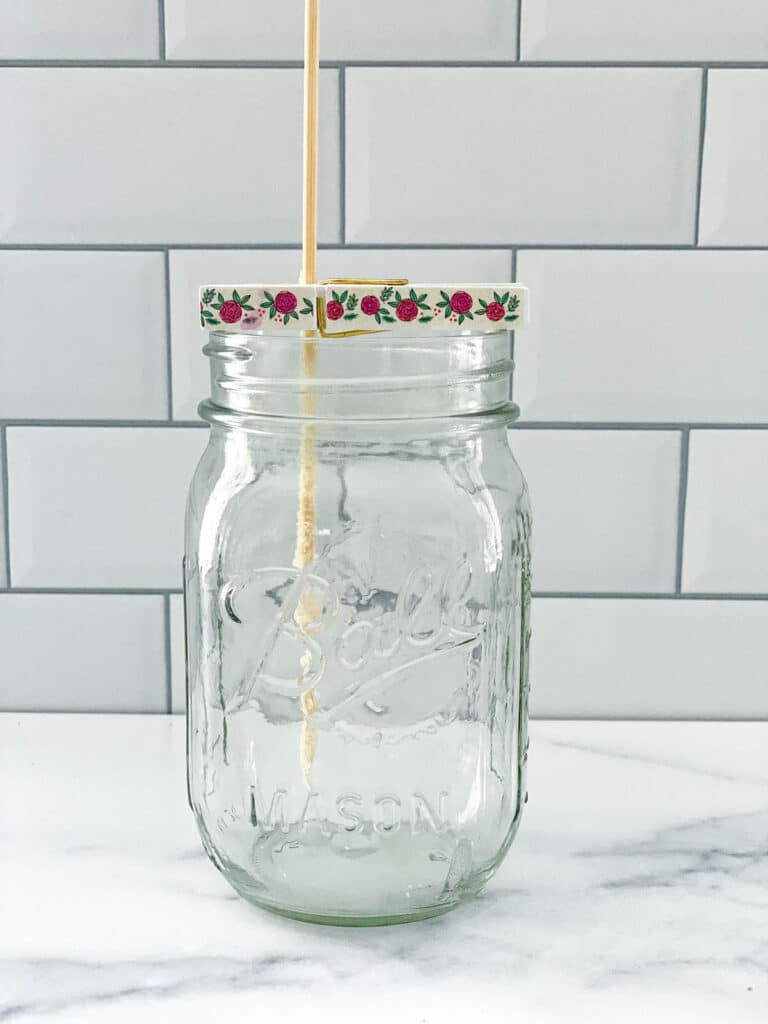 Skewer sitting in mason jar ready for rock candy sugar solution
Mason jar setup for rock candy recipe, showing a sugar-coated skewer suspended with a clothespin, ready for the sugar solution.
Step-by-Step Guide: Making Rock Candy
This rock candy recipe is designed to yield about 5 sticks of candy. By using separate jars, you can easily create a variety of colors from a single batch of sugar solution. Keeping one jar clear is helpful for monitoring crystal growth.
Step 1: Prepare the Skewers (Seeding)
To kickstart crystal growth, we need to “seed” the skewers. This provides a surface for the sugar crystals to latch onto and grow.
- If using long wooden skewers, trim them to a more manageable length and remove any sharp points.
- Dampen the skewers with water.
- Roll the damp skewers in granulated sugar, coating them evenly.
- Set the sugar-coated skewers aside to dry completely. Ideally, do this a day in advance, but at least an hour of drying time is sufficient.
Step 2: Prepare the Jars
Proper jar preparation ensures a smooth crystal-growing process.
- Thoroughly clean your mason jars. Ensure they are not cold; rinsing them with hot water before use is recommended.
- Attach a clothespin or clip to the top of each sugar-coated skewer.
- Balance the skewers over the mouth of the jars, adjusting the clothespin so the skewer hangs about an inch above the bottom of the jar. This prevents the crystals from growing onto the bottom of the jar, which can make removal difficult.
- Once set up, remove the skewers temporarily. They will be reinserted after the sugar solution is added.
Step 3: Make the Supersaturated Sugar Solution
Now, for the magic ingredient – the supersaturated sugar solution!
- Pour 4 cups of water into a large, clean saucepan.
- Bring the water to a rolling boil over medium-high heat.
- Reduce the heat to medium-low and begin adding sugar, one cup at a time.
- Stir continuously with a wooden spoon, ensuring each cup of sugar is completely dissolved before adding the next. The solution will become increasingly saturated, and dissolving the sugar will take longer. You may notice the sugar clumping slightly before dissolving, which is a good sign of supersaturation.
- Once all 10 cups of sugar are fully dissolved, allow the mixture to simmer gently for about 5 minutes.
- Remove the saucepan from the heat and let the sugar solution cool slightly for approximately 15 minutes.
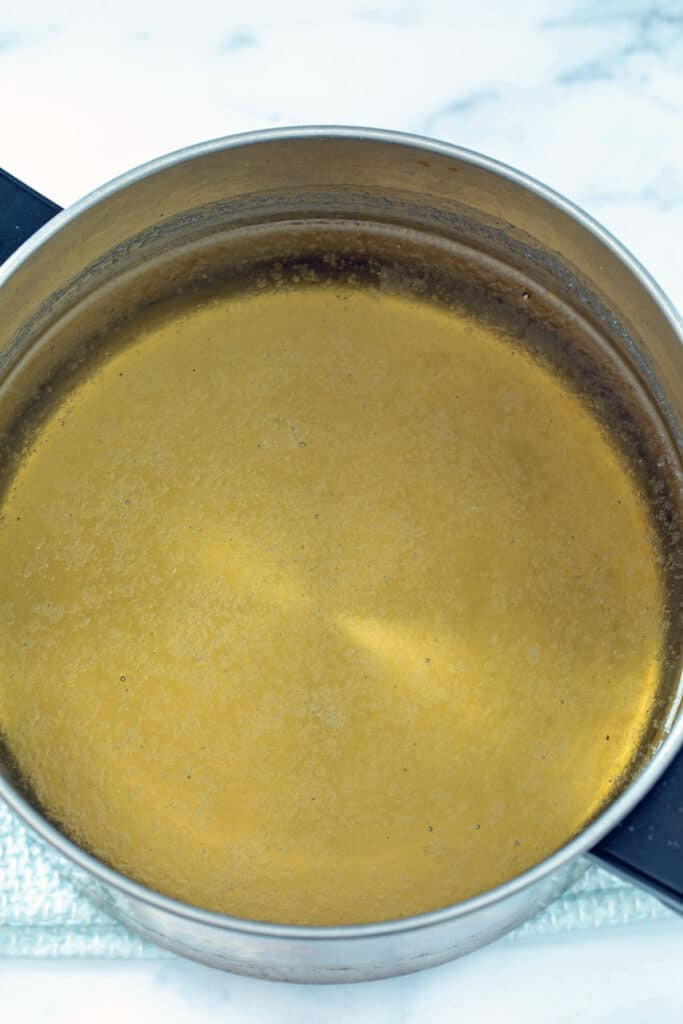 Sugar water solution simmering in saucepan
Simmering sugar water solution for rock candy recipe in a saucepan, showing the process of creating a supersaturated mixture.
Step 4: Add Color and Start Crystal Growth
The final steps bring everything together and initiate the crystal growth phase.
- Carefully divide the hot sugar solution evenly among the prepared mason jars.
- If desired, add a few drops of food coloring to each jar and gently stir to distribute the color.
- It’s best to move the jars to their undisturbed resting place before inserting the skewers, as they will be hot and moving them later could disrupt crystal formation.
- Gently place a prepared skewer into each jar, ensuring it is suspended in the sugar solution and not touching the bottom.
- Now, the waiting game begins! Minimize movement of the jars to encourage undisturbed crystal growth.
Step 5: Observe and Grow Crystals (6-7 Days)
Patience is key! Crystal formation will start relatively quickly.
- Within a day, you should begin to see small crystals forming on the sugar-coated skewers.
- Over the next 6-7 days, observe the crystals growing larger and more defined. Photos showing crystal growth at 24, 48, and 72 hours can be very helpful and visually appealing to readers, demonstrating the progression.
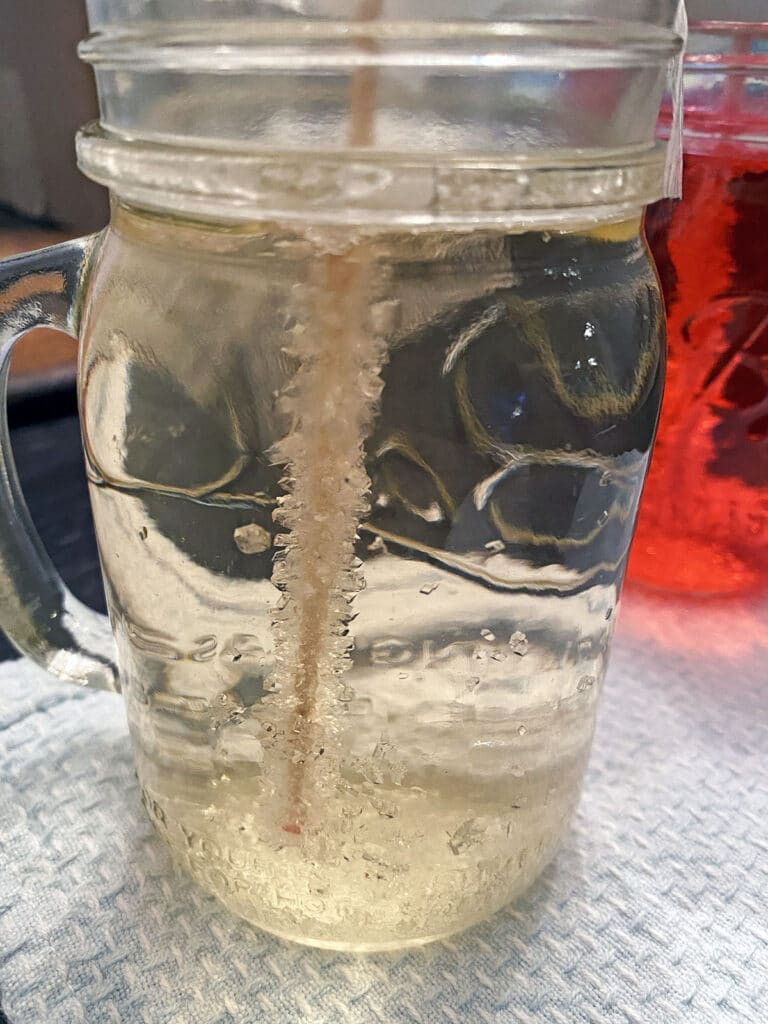
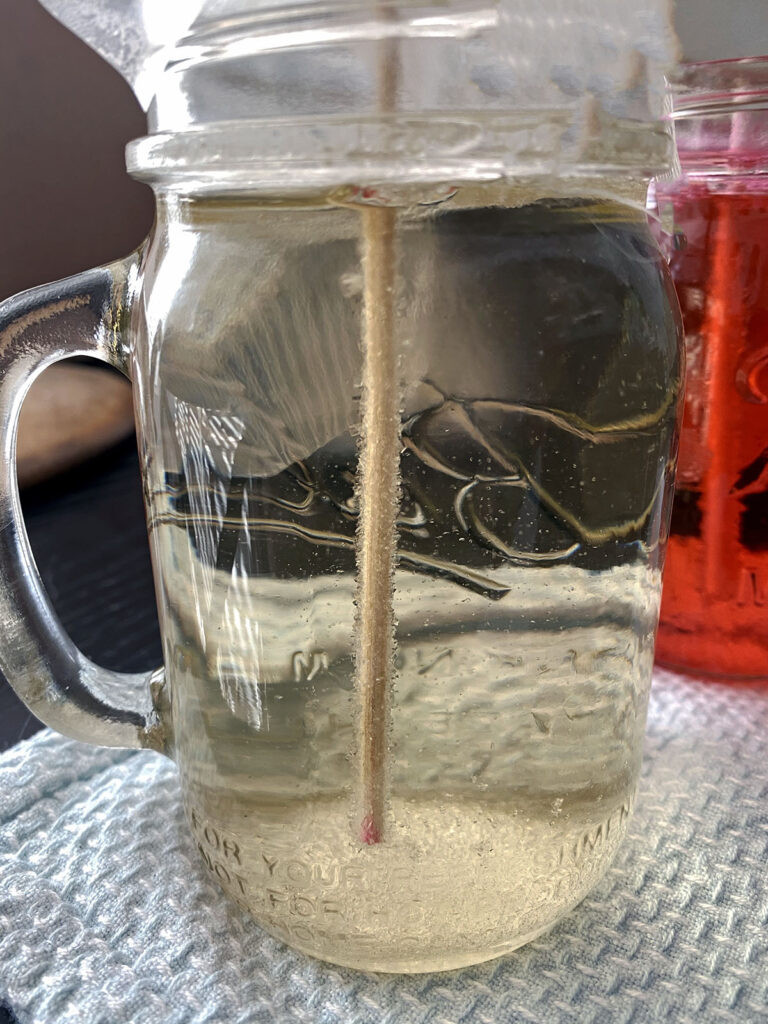 Rock candy crystals forming in jar after 1 day
Rock candy crystals starting to form on the skewer after one day, demonstrating the early stages of crystal growth in the rock candy recipe.
 Rock candy crystals forming in jar after 3 days
Rock candy crystals developing further after three days, showing the continued growth in the homemade rock candy recipe.
Step 6: Harvest Your Rock Candy
After 6-7 days (or longer, for larger crystals), it’s time to remove your homemade rock candy.
- Use your finger or the back of a spoon to gently break the hardened sugar crust that may have formed on the top of the jar.
- Carefully wiggle and twist the skewer to loosen the rock candy from the jar.
- Lift the rock candy stick out of the jar and allow excess sugar syrup to drip off. Placing it over an empty jar or bowl to drain, or setting it on a paper towel, works well.
- Once drained, your beautiful homemade rock candy is ready to enjoy!
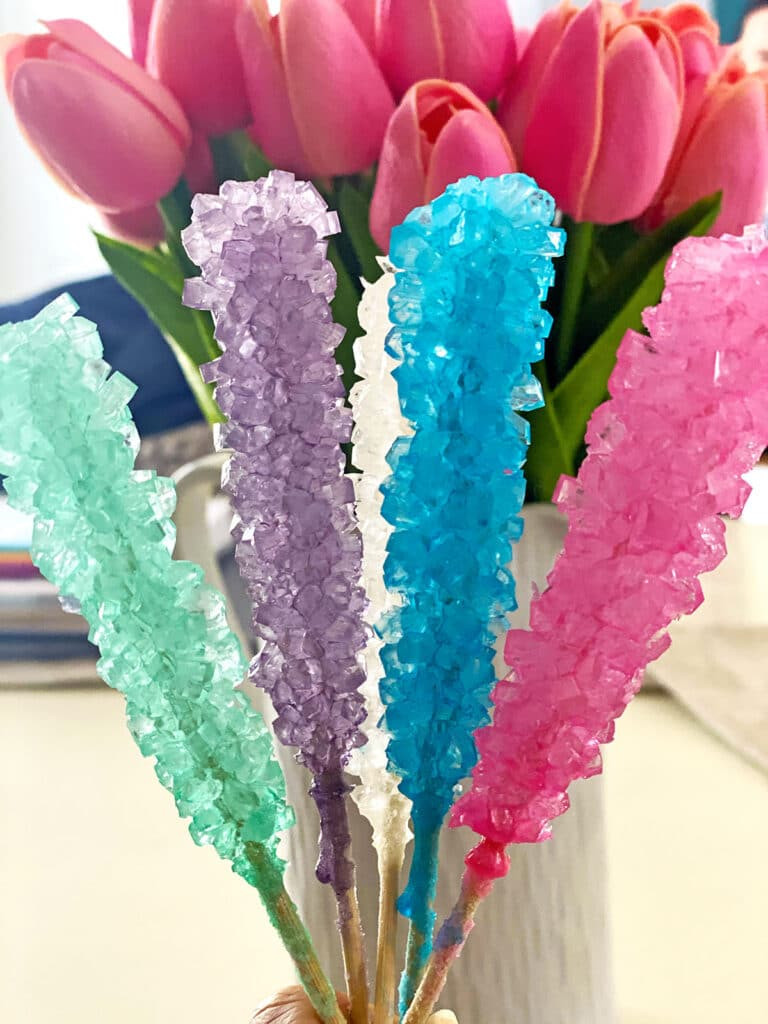 Homemade rock candy on sticks with pink tulips in the background
Finished homemade rock candy sticks in various colors, a successful result of the easy rock candy recipe.
Frequently Asked Questions About Rock Candy
Can I Reuse the Sugar Solution?
Yes, you can! Instead of discarding the leftover sugar solution, you can use it to grow more rock candy.
- Pour the used sugar solution back into a saucepan.
- Bring it to a boil over medium heat.
- Add an additional ¼ cup of sugar to re-saturate the solution and simmer for a few minutes.
- Pour the reheated solution back into a clean jar and insert a new sugar-coated skewer to grow more crystals.
Experimenting with and without reheating the solution demonstrates the importance of re-saturating for successful crystal growth.
 Purple and green rock candy made from reused sugar solution without re-heating and adding more sugar
Rock candy made from reused sugar solution without reheating, showing less crystal growth compared to reheated solutions.
Why Isn’t My Rock Candy Growing?
Several factors can prevent crystal growth. The most common reason is an insufficiently saturated sugar solution. If crystals aren’t forming after a few days:
- Pour the solution back into the saucepan.
- Bring it to a boil and add another cup of sugar, stirring to dissolve. If it dissolves easily, add a bit more sugar.
- Use new sugar-coated skewers and repeat the crystal growing process.
Ensure your jars are clean and warm, and avoid moving the jars once the skewers are in place.
How Can I Speed Up Rock Candy Growth?
Unfortunately, there’s no magic trick to drastically speed up rock candy growth. Some suggest refrigeration might slightly accelerate the process, but this is not a guaranteed method. Removing the rock candy after only a couple of days will result in smaller, less developed crystals. Patience yields the best results!
How to Store Rock Candy?
Store your homemade rock candy in a cool, dry place. For longer storage or gifting, wrap individual rock candy sticks in cellophane wrappers to prevent them from becoming sticky due to humidity. Properly stored rock candy can last for up to a year.
Helpful Tips and Tricks for Perfect Rock Candy
Mastering this rock candy recipe is easy once you grasp the science behind it. Here are some helpful tips to ensure success:
- Clean and Warm Jars: Always use thoroughly cleaned jars that are not cold to avoid temperature shock and promote crystal growth.
- Don’t Skip Seeding: Coating skewers with sugar is crucial. It provides the initial points for crystal formation; otherwise, crystals might only grow at the bottom of the jar.
- Intensify Colors: Food coloring tends to appear lighter once crystals form, so use slightly more coloring than you initially think you need for vibrant results.
- Flavoring (Use Sparingly): If you want to add flavor, use concentrated flavor extracts to avoid adding excess liquid, which can dilute the supersaturated solution.
- Minimize Movement: Once skewers are in the jars, avoid moving or bumping them to ensure undisturbed crystal growth.
Making rock candy at home is a rewarding experience that combines kitchen chemistry with a sweet treat. It requires patience and plenty of sugar, but the result is a beautiful and delicious homemade candy you can be proud of.
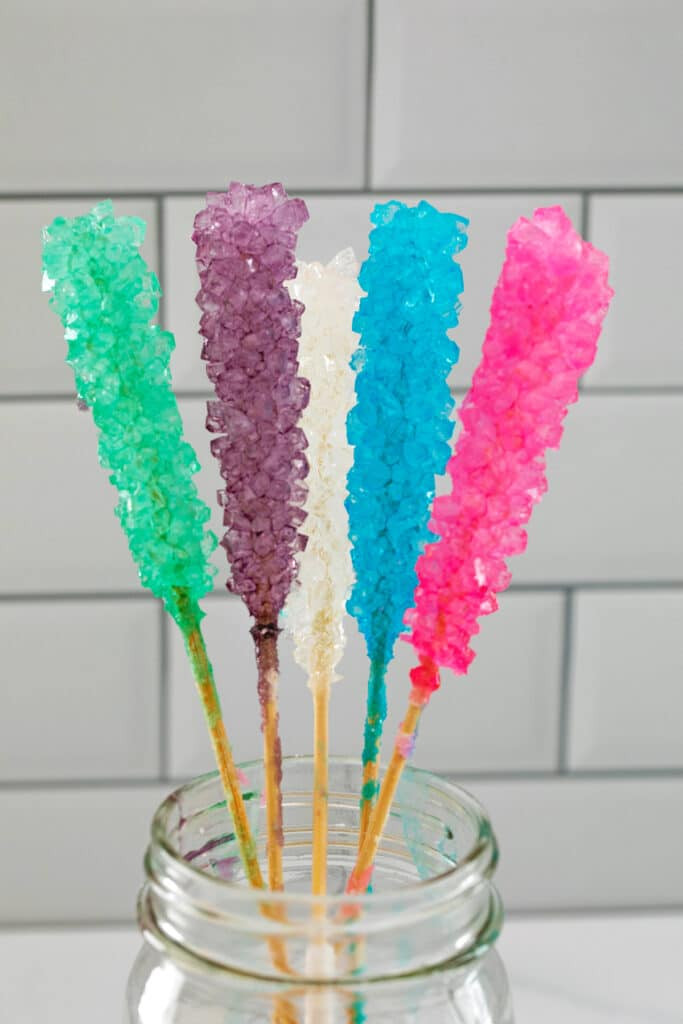 Mason jar filled with 5 different colors of rock candy on sticks
Mason jar filled with colorful homemade rock candy sticks, showcasing the final product of the DIY rock candy recipe.
Now that you’ve mastered the rock candy recipe, consider exploring fun ways to use your creations, like in rock candy cocktails!
Have you tried making rock candy at home? Share your experiences!
📖 Recipe: Homemade Rock Candy
This rock candy recipe is perfect for a fun dessert project or a fascinating science experiment. Enjoy the simple process and the sweet, crystalline results!
DIY Rock Candy
Yields: 5 sticks of candy
Prep time: 30 minutes
Crystallizing time: 6-7 days
Ingredients:
- 5 wooden skewers
- 5 mason jars (16 oz recommended)
- 5 clothespins or chip clips
- 4 cups water
- 10 cups granulated sugar, plus extra for coating skewers
- Food coloring (optional)
Instructions:
- Prepare Skewers: Dampen skewers with water, coat in sugar, and let dry for at least one hour, or preferably overnight.
- Prepare Jars: Ensure jars are clean and warm. Attach clothespins to skewers and balance them over jars, ensuring skewers hang freely about 1 inch from the bottom. Remove skewers temporarily.
- Make Sugar Solution: In a large saucepan, boil water. Reduce heat to medium-low and add sugar one cup at a time, stirring until fully dissolved before each addition. Simmer for 5 minutes after all sugar is dissolved. Let cool for 15 minutes.
- Add Color and Grow Crystals: Divide sugar solution among jars. Add food coloring if desired. Place skewers in jars, ensuring they are suspended and undisturbed.
- Crystallize: Let sit undisturbed for 6-7 days, observing crystal growth.
- Harvest: Gently break any sugar crust on top of jars. Wiggle and twist skewers to release rock candy. Let excess syrup drip off before enjoying.
Recipe Notes:
- Reusing Solution: To reuse sugar solution, boil it, add ¼ cup sugar, simmer, and cool before using with new skewers.
Useful Products (Affiliate Links):