Are you wondering if Can You Polish Petoskey Stones In A Rock Tumbler to reveal their stunning patterns? Yes, you absolutely can polish Petoskey stones in a rock tumbler, but it requires a delicate approach to protect these fossils. At rockscapes.net, we offer expert advice and resources to help you achieve a beautiful finish on your Petoskey stones, enhancing their natural beauty. By understanding the stone’s composition, hardness, and the right tumbling techniques, you can transform rough stones into polished gems, ideal for landscaping or adding to your collection.
1. What Exactly Are Petoskey Stones?
Petoskey stones are fossilized colonial coral, specifically Hexagonaria percarinata, that thrived in the Great Lakes region around 350 million years ago during the Devonian period. When these coral colonies died, they were covered in sediment and transformed into part of a rock unit referred to as Alpena Limestone. The place that the Alpena Limestone outcrops alongside the shore of the Little Traverse Bay close to Petoskey, Michigan. This is where the town earned its name.
1.1. The Composition of Petoskey Stones
The enduring calcium carbonate exoskeleton of these coral colonies became what we know as Petoskey stones. Excellent preservation occurred when the coral’s pore spaces were completely filled by calcium carbonate, forming a calcite structure. These fossil corals range in size from small specimens to large colonies that can span several feet and weigh over 1,000 pounds.
1.2. Geological History of Petoskey Stones
During the Ice Age, glaciers scoured northern Michigan, breaking up the Alpena Limestone and spreading fossil corals throughout the Great Lakes region. Streams and waves reshaped these fragments into smooth, rounded stones. These stones are now commonly found along the shores of Lake Michigan, as well as in streams, road cuts, and quarries.
1.3. Identifying a Petoskey Stone
Petoskey stones are treasured for their distinctive, rounded shape and the intricate hexagonal patterns of the fossilized coral polyps. The smooth surface and attractive gray to brown color make them easily distinguishable from other rocks. These stones have been collected by rockhounds for over a century and were named the official “state stone” of Michigan in 1965.
 Petoskey stone coral
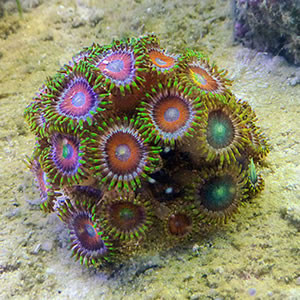
A live colony of zoanthus coral with multiple polyps open. This is an example of a colonial coral similar to the ones from which Petoskey stones formed. Photo by Kazvorpal, displayed under a Creative Commons License.
2. Can You Tumble Polish Petoskey Stones?
Yes, Petoskey stones can be polished in a rock tumbler, but it is important to understand the process and potential challenges.
2.1. Understanding the Hardness of Petoskey Stones
Petoskey stones are relatively soft, with a hardness of 3 on the Mohs Hardness Scale. This softness means they can be easily scratched or damaged during the tumbling process if not handled carefully. At rockscapes.net, we emphasize the importance of gentle polishing techniques to preserve the integrity of these delicate fossils.
2.2. Potential Risks of Using a Rock Tumbler
Using a rock tumbler for Petoskey stones carries some risks. The tumbling process can be aggressive on the edges and softer parts of the stone, potentially altering its shape. It’s crucial to monitor the stones closely during each stage to avoid over-tumbling. For those without lapidary equipment, a rock tumbler offers a convenient, though less controlled, method for polishing.
2.3. Is Hand Polishing or Lapidary Equipment Better?
Polishing Petoskey stones by hand or using lapidary equipment offers more control over the final result. However, these methods require more time and specialized tools. Many enthusiasts prefer hand polishing for the precision it allows, especially for valuable or unique specimens.
3. What is The Best Way To Polish Petoskey Stones?
To ensure the best results when polishing Petoskey stones, it’s crucial to use the appropriate method and take necessary precautions. Here’s a guide on the best ways to polish these unique stones:
3.1. Hand Polishing
Hand polishing is an effective method to achieve desired results with complete control over the procedure.
3.1.1. Materials Needed
- Wet/dry automotive sandpaper (80-grit, 220-grit, 600-grit)
- Aluminum oxide polish
- Soft cloths (corduroy, felt, or denim)
- Water
3.1.2. Step-by-Step Instructions
- Sanding with 80-Grit Sandpaper: Wet sand the entire surface of the stone to smooth it.
- Sanding with 220-Grit Sandpaper: Thoroughly wet sand the surface again to further smooth it.
- Sanding with 600-Grit Sandpaper: Repeat the sanding process for a fine finish.
- Polishing with Aluminum Oxide: Apply aluminum oxide polish on a soft, wet cloth and polish the stone until it shines.
3.2. Lapidary Equipment
If you choose to use lapidary equipment, here’s how to do it:
3.2.1. Materials Needed
- Lapidary polisher with an expanding rubber wheel
- 220-grit silicon carbide sanding belt or silicon carbide grinding wheel
- 600-grit sanding belt
- 1000-grit sanding belt (optional)
- Cerium oxide or aluminum oxide polish
- Flat lap covered with felt
- Water spray
3.2.2. Step-by-Step Instructions
- Shaping and Smoothing: Use a 220-grit silicon carbide sanding belt or grinding wheel to shape the stone.
- Sanding with 600-Grit: Wet sand the stone again with a 600-grit sanding belt to smooth every inch of the surface.
- Final Sanding (Optional): Use a 1000-grit sanding belt for a finer finish.
- Polishing: Polish the stone wet on a flat lap covered with felt, using cerium oxide or aluminum oxide polish.
3.3. Rock Tumbling
If using a rock tumbler:
3.3.1. Materials Needed
- Rock tumbler
- Medium grit (180/220)
- Fine grit (500 or 600)
- Ultra-fine grit (1000 grit)
- Ceramic media
- Vibratory tumbler
- Corn cob media
- TXP polish
3.3.2. Step-by-Step Instructions
- Shaping Step:
- Tumble the stones in medium grit (180/220) for one to two days.
- Use ceramic media to cushion the stones.
- Use one tablespoon of medium grit for each pound of material in the barrel.
- Check the stones daily to avoid over-tumbling.
- Smoothing Step:
- Tumble the stones in fine grit (500 or 600) for one to two days.
- Follow with ultra-fine grit (1000 grit) for one day.
- Thoroughly clean the stones and barrel after each step.
- Polishing Step:
- Dry polish the stones in a vibratory tumbler with corn cob media treated with TXP polish.
- Use approximately one tablespoon of TXP polish for every two pounds of vibratory bowl capacity.
- Tumble for about 24 hours, checking periodically to see if a polish is developing.
3.4. Important Considerations
- Stone Selection: Choose solid stones without pore spaces, deep pits, or bedrock encrustations.
- Dust Protection: When grinding, sanding, or polishing, always avoid inhaling rock dust by wet grinding and wearing a dust-filtering mask.
- Over-Polishing: Be cautious not to over-polish, as it can diminish the shine.
- Experimentation: Add a few more stones to the next batch.
3.5. Tips for a Great Finish
- Start with Quality Stones: The best results come from starting with stones that are already smooth and well-rounded.
- Use Proper Grit Sequence: Progressing through the different grit levels is crucial for achieving a smooth surface.
- Monitor Progress: Check the stones regularly to ensure they are not being over-tumbled or damaged.
- Cleanliness: Keep the tumbler and stones clean to avoid contamination between stages.
- Patience: Polishing Petoskey stones takes time and patience. Don’t rush the process, and be prepared to experiment to find the best method for your stones.
At rockscapes.net, we provide all the materials and guides you need to successfully polish Petoskey stones, whether by hand, with lapidary equipment, or in a rock tumbler.
4. Preparing Petoskey Stones for Polishing
Before you begin the polishing process, it’s essential to prepare your Petoskey stones properly. Proper preparation will ensure a better finish and prevent damage to the stones.
4.1. Selecting the Right Stones
Choose stones that are solid and free from significant imperfections:
- Solid Structure: Look for stones that are primarily coral and don’t have pore spaces, deep pits, or bedrock encrustations.
- Minimal Imperfections: Stones with fewer surface flaws will polish more effectively.
- Appropriate Size: Smaller stones are often easier to handle and polish in a tumbler.
4.2. Cleaning the Stones
Thoroughly clean the Petoskey stones to remove any dirt, debris, or algae:
- Soaking: Soak the stones in water with a mild detergent for several hours.
- Scrubbing: Use a brush to scrub the surface of each stone, removing any remaining dirt.
- Rinsing: Rinse the stones thoroughly with clean water to remove all traces of detergent.
4.3. Pre-Shaping (Optional)
If the stones have sharp edges or uneven surfaces, pre-shaping can be beneficial:
- Grinding: Use a coarse grinding wheel or sandpaper to smooth down any rough edges.
- Smoothing: Focus on creating a rounded, uniform shape for better tumbling results.
4.4. Initial Inspection
After cleaning and pre-shaping, inspect the stones again:
- Check for Cracks: Discard any stones with cracks or fractures, as they may break during tumbling.
- Assess Surface Quality: Evaluate the overall surface quality and decide if further preparation is needed.
4.5. Safety Measures
When preparing and polishing Petoskey stones, prioritize safety:
- Wear a Mask: Always wear a dust mask to avoid inhaling rock dust, which can be harmful.
- Use Water: Wet sanding and polishing methods help reduce dust.
- Ventilation: Work in a well-ventilated area to minimize exposure to dust and fumes.
4.6. Tips for Preparing Petoskey Stones
- Avoid Harsh Chemicals: Do not use harsh chemicals or acids to clean the stones, as they can damage the delicate coral structure.
- Gentle Handling: Handle the stones gently to prevent chipping or breaking.
- Proper Disposal: Dispose of any waste materials, such as used sandpaper and slurry, properly.
By following these steps, you can ensure that your Petoskey stones are well-prepared for polishing, leading to a beautiful and durable finish. At rockscapes.net, we provide detailed guidance and high-quality materials for every stage of the polishing process, helping you achieve professional results.
 Polished petoskey stone up close
A close-up photograph of a polished Petoskey stone showing the hexagonal chambers occupied by the coral polyps.
5. Step-by-Step Guide to Polishing Petoskey Stones in a Rock Tumbler
Polishing Petoskey stones in a rock tumbler is a labor-saving method that can yield beautiful results if done correctly. Here’s a detailed guide to help you through each stage of the process:
5.1. Stage 1: Shaping with Medium Grit
The initial shaping stage is crucial for smoothing the rough edges and surfaces of the Petoskey stones.
5.1.1. Materials Needed
- Rock tumbler
- Medium grit (180/220)
- Ceramic media
- Water
- Petoskey stones
5.1.2. Step-by-Step Instructions
- Load the Tumbler: Place the Petoskey stones in the tumbler barrel, filling it to the recommended capacity. Surround the stones with ceramic media to cushion them during tumbling.
- Add Medium Grit: For each pound of material (stones plus media), add one tablespoon of medium grit.
- Add Water: Add enough water to cover the stones and media completely.
- Seal and Tumble: Seal the barrel and start the tumbler.
- Tumbling Time: Tumble the stones for one to two days. Due to the softness of Petoskey stones, monitor the progress daily to prevent over-tumbling.
- Check the Stones: After the initial tumble, open the tumbler and inspect the stones. The edges should be smooth, and the surfaces should be starting to look even.
- Clean and Prepare: If the stones need more shaping, continue tumbling for another day. Once satisfied, clean the barrel, stones, and media thoroughly.
5.2. Stage 2: Smoothing with Fine Grit
The smoothing stage refines the surface, preparing the stones for polishing.
5.2.1. Materials Needed
- Rock tumbler
- Fine grit (500 or 600)
- Ceramic media
- Water
- Petoskey stones from Stage 1
5.2.2. Step-by-Step Instructions
- Load the Tumbler: Place the cleaned Petoskey stones and ceramic media back into the tumbler.
- Add Fine Grit: Add one tablespoon of fine grit for each pound of material in the barrel.
- Add Water: Add enough water to cover the stones and media.
- Seal and Tumble: Seal the barrel and start the tumbler.
- Tumbling Time: Tumble the stones for one to two days.
- Inspect the Stones: Check the stones to ensure their surfaces are smooth.
- Clean and Prepare: Clean the stones, media, and barrel thoroughly before moving to the next stage.
5.3. Stage 3: Pre-Polishing with Ultra-Fine Grit
Pre-polishing with ultra-fine grit prepares the stones for the final polish.
5.3.1. Materials Needed
- Rock tumbler
- Ultra-fine grit (1000 grit)
- Ceramic media
- Water
- Petoskey stones from Stage 2
5.3.2. Step-by-Step Instructions
- Load the Tumbler: Place the cleaned Petoskey stones and ceramic media into the tumbler.
- Add Ultra-Fine Grit: Add one tablespoon of ultra-fine grit for each pound of material in the barrel.
- Add Water: Add enough water to cover the stones and media.
- Seal and Tumble: Seal the barrel and start the tumbler.
- Tumbling Time: Tumble the stones for one day.
- Inspect the Stones: Ensure the surfaces are perfectly smooth and ready for the final polish.
- Clean Thoroughly: Clean the stones, media, and barrel thoroughly.
5.4. Stage 4: Polishing with a Vibratory Tumbler
The polishing stage brings out the shine in the Petoskey stones.
5.4.1. Materials Needed
- Vibratory tumbler
- Corn cob media
- TXP polish
- Petoskey stones from Stage 3
5.4.2. Step-by-Step Instructions
- Load the Tumbler: Fill the vibratory tumbler barrel with corn cob media to the recommended capacity.
- Add TXP Polish: Treat the corn cob media with TXP polish. Use about one tablespoon of polish for every two pounds of vibratory bowl capacity.
- Add Petoskey Stones: Add a few Petoskey stones to the tumbler. Ensure the stones have enough space to move freely without bumping into each other excessively.
- Tumbling Time: Tumble the stones for approximately 24 hours. Check periodically to see if a polish is developing.
- Monitor Progress: If the corn cob media cakes on the stones, reduce the number of stones in the barrel.
- Check for Polish: The stones should start to develop a polish within one to two days. Continue polishing as long as the appearance improves.
5.5. Final Inspection and Care
After polishing, inspect the Petoskey stones and take steps to maintain their shine.
5.5.1. Inspection
- Check for Over-Polishing: If the shine starts to disappear, you may be over-polishing the stones.
- Evaluate the Finish: If the polish is satisfactory, remove the stones from the tumbler.
5.5.2. Cleaning
- Rinse the Stones: Rinse the polished Petoskey stones with clean water.
- Dry Thoroughly: Dry the stones with a soft cloth.
5.5.3. Maintenance
- Regular Cleaning: Clean the stones periodically with a soft cloth to maintain their shine.
- Storage: Store the polished Petoskey stones in a safe place to prevent scratching or damage.
By following these detailed steps, you can successfully polish Petoskey stones in a rock tumbler, bringing out their natural beauty and unique patterns. At rockscapes.net, we offer all the necessary supplies and expert advice to help you achieve professional results.
6. Choosing the Right Rock Tumbler for Petoskey Stones
Selecting the right rock tumbler is crucial for achieving the best results when polishing Petoskey stones. Here’s what to consider when choosing a rock tumbler:
6.1. Types of Rock Tumblers
There are two main types of rock tumblers: rotary and vibratory.
6.1.1. Rotary Tumblers
- Mechanism: Rotary tumblers use a rotating barrel to tumble the stones with grit and water.
- Pros: They are effective for shaping and smoothing rough stones.
- Cons: They can be aggressive and may not be ideal for polishing delicate stones like Petoskey stones.
6.1.2. Vibratory Tumblers
- Mechanism: Vibratory tumblers use vibrations to move the stones through the media.
- Pros: They are gentler than rotary tumblers and better suited for polishing as they minimize impact.
- Cons: They are less effective for shaping very rough stones.
6.2. Capacity and Size
- Small Capacity: Ideal for small batches of Petoskey stones. Look for tumblers with a capacity of 1-3 pounds.
- Large Capacity: Suitable for larger quantities, but requires more media and grit.
6.3. Features to Look For
- Durable Barrel: A sturdy, leak-proof barrel is essential for rotary tumblers.
- Variable Speed Control: Allows you to adjust the tumbling speed for different stages.
- Timer: Helps you control the tumbling time accurately.
- Noise Level: Consider a tumbler with noise-dampening features, especially if you plan to use it indoors.
6.4. Recommended Tumblers for Petoskey Stones
- For Shaping: A small rotary tumbler with variable speed control.
- For Polishing: A vibratory tumbler with a capacity suitable for your batch size.
6.5. Tips for Using a Rock Tumbler
- Start with Smooth Stones: Use stones that are already relatively smooth to minimize the need for aggressive shaping.
- Use Plenty of Cushioning: Always use ceramic media to cushion the stones and prevent damage.
- Monitor Progress: Check the stones regularly to avoid over-tumbling.
- Keep it Clean: Thoroughly clean the tumbler and stones between each stage.
6.6. Where to Buy
- Online Retailers: Websites like Amazon, eBay, and specialty rockhounding stores offer a wide selection of rock tumblers.
- Local Rock Shops: Check local rock and mineral shops for knowledgeable staff and quality tumblers.
By considering these factors, you can choose the right rock tumbler for polishing your Petoskey stones and achieve the best possible results. At rockscapes.net, we offer recommendations and resources to help you make an informed decision.
7. What Kind Of Grit Is Needed To Polish Petoskey Stones?
Choosing the right grit is crucial for achieving a smooth and polished finish on Petoskey stones. Each grit type serves a specific purpose in the tumbling process, from shaping to pre-polishing. Here’s a guide to the different types of grit needed and how to use them effectively:
7.1. Medium Grit (180/220)
- Purpose: Shaping and smoothing rough edges.
- Use: Use medium grit as the first step in the tumbling process.
- Application: Tumble the stones with medium grit for one to two days, checking regularly to avoid over-tumbling.
7.2. Fine Grit (500 or 600)
- Purpose: Smoothing the surface after shaping.
- Use: Use fine grit after the medium grit stage.
- Application: Tumble the stones with fine grit for one to two days, ensuring the surface is smooth and free from scratches.
7.3. Ultra-Fine Grit (1000 or Higher)
- Purpose: Pre-polishing and preparing the stones for the final polish.
- Use: Use ultra-fine grit after the fine grit stage.
- Application: Tumble the stones with ultra-fine grit for one day to achieve a perfectly smooth surface.
7.4. Polishing Compounds
- Purpose: Achieving the final, glossy polish.
- Types:
- Aluminum Oxide: A versatile polish suitable for many types of stones, including Petoskey stones.
- Cerium Oxide: A high-quality polish that can produce a brilliant shine.
- Use: Use polishing compounds in the final stage of tumbling, typically with a vibratory tumbler and corn cob media.
7.5. Grit Application Tips
- Proper Measurement: Use one tablespoon of grit for each pound of material (stones plus media) in the tumbler.
- Thorough Cleaning: Clean the stones and tumbler thoroughly between each grit stage to prevent contamination.
- Monitor Progress: Check the stones regularly to ensure they are not being over-tumbled or damaged.
- Use Ceramic Media: Always use ceramic media to cushion the stones and help distribute the grit evenly.
- Water Level: Ensure the stones are fully covered with water in each stage.
7.6. Safety Precautions
- Wear a Mask: Always wear a dust mask when handling grit to avoid inhaling fine particles.
- Ventilation: Work in a well-ventilated area.
- Wash Hands: Wash your hands thoroughly after handling grit.
By using the right types of grit and following these tips, you can achieve a beautiful, polished finish on your Petoskey stones. At rockscapes.net, we provide high-quality grit and detailed instructions to guide you through every step of the polishing process.
 Petoskey stone necklace
A necklace made from three Petoskey stones and two Charlevoix stones (These are similar to Petoskey stones but are Favosites, a different species of coral.
8. What Are Common Problems To Polishing Petoskey Stones?
Polishing Petoskey stones can sometimes be challenging due to their relatively soft composition and unique structure. Recognizing and addressing common problems can help you achieve the best possible results. Here are some common issues and how to solve them:
8.1. Uneven Polishing
- Problem: Some areas of the stone are polished more than others.
- Cause: Uneven distribution of grit, variations in stone hardness, or improper tumbling technique.
- Solution:
- Ensure Even Grit Distribution: Make sure the grit is evenly distributed in the tumbler.
- Use Ceramic Media: Use enough ceramic media to cushion the stones and help distribute the grit evenly.
- Rotate Stones: If polishing by hand, rotate the stone frequently to ensure all areas are polished equally.
8.2. Scratches and Pits
- Problem: The polished surface has scratches or small pits.
- Cause: Coarse grit particles, contamination from previous grit stages, or stones bumping against each other.
- Solution:
- Use Proper Grit Sequence: Follow the correct grit sequence, starting with medium grit and progressing to finer grits.
- Clean Thoroughly: Clean the stones and tumbler thoroughly between each grit stage to remove any residual grit particles.
- Add Cushioning: Use ceramic media to cushion the stones and prevent them from scratching each other.
8.3. Over-Polishing
- Problem: The polished surface loses its shine and becomes dull.
- Cause: Excessive tumbling in the polishing stage.
- Solution:
- Reduce Tumbling Time: Shorten the tumbling time in the polishing stage.
- Monitor Progress: Check the stones frequently to avoid over-polishing.
- Use Gentle Polish: Use a gentle polishing compound and avoid excessive pressure if polishing by hand.
8.4. Stone Breakage
- Problem: The stones break or chip during tumbling.
- Cause: Brittle stones, aggressive tumbling, or insufficient cushioning.
- Solution:
- Select Solid Stones: Choose stones that are solid and free from cracks or fractures.
- Use Plenty of Cushioning: Use plenty of ceramic media to cushion the stones and absorb impact.
- Reduce Tumbling Speed: Reduce the tumbling speed to minimize stress on the stones.
8.5. Dull Finish
- Problem: The stones do not achieve a high shine, even after polishing.
- Cause: Insufficient polishing time, low-quality polishing compound, or improper preparation.
- Solution:
- Increase Polishing Time: Increase the tumbling time in the polishing stage.
- Use High-Quality Polish: Use a high-quality polishing compound, such as aluminum oxide or cerium oxide.
- Ensure Smooth Surface: Make sure the stones have a perfectly smooth surface before the polishing stage.
8.6. Grit Contamination
- Problem: Grit from previous stages contaminates the current stage.
- Cause: Inadequate cleaning between stages.
- Solution:
- Thorough Cleaning: Clean the stones, media, and tumbler thoroughly between each stage.
- Use Separate Tumblers: Use separate tumblers for different grit stages to prevent contamination.
8.7. Tips for Avoiding Problems
- Start with Quality Stones: Choose solid, smooth stones with minimal imperfections.
- Follow Proper Grit Sequence: Use the correct grit sequence and avoid skipping stages.
- Monitor Progress: Check the stones regularly and adjust the tumbling time as needed.
- Keep it Clean: Maintain a clean working environment and clean all equipment thoroughly.
By recognizing these common problems and implementing the appropriate solutions, you can improve your chances of achieving a beautiful, polished finish on your Petoskey stones. At rockscapes.net, we offer expert advice and high-quality supplies to help you overcome these challenges.
9. How to Maintain Polished Petoskey Stones
Maintaining the shine and beauty of your polished Petoskey stones requires proper care and attention. Here are some tips to help you keep your stones looking their best:
9.1. Regular Cleaning
- Gentle Washing: Wash the stones regularly with mild soap and water.
- Soft Cloth: Use a soft cloth to gently wipe the surface and remove any dirt or fingerprints.
- Avoid Abrasives: Avoid using abrasive cleaners or scrub brushes, as they can scratch the polished surface.
9.2. Proper Storage
- Separate Storage: Store the stones separately to prevent them from scratching each other.
- Soft Pouch: Place each stone in a soft pouch or wrap it in a soft cloth before storing.
- Avoid Direct Sunlight: Store the stones away from direct sunlight, as prolonged exposure can fade their color.
9.3. Handling Precautions
- Handle with Care: Handle the stones with clean hands to prevent transferring oils and dirt.
- Avoid Dropping: Be careful not to drop the stones, as they can chip or break.
- Limit Exposure to Chemicals: Avoid exposing the stones to harsh chemicals, such as household cleaners or perfumes.
9.4. Re-Polishing
- When Needed: If the stones lose their shine over time, consider re-polishing them.
- Hand Polishing: Use a soft cloth and a small amount of polishing compound to gently re-polish the surface by hand.
- Professional Polishing: For more significant damage, consider having the stones professionally polished.
9.5. Display Tips
- Protective Display Cases: Display the stones in protective display cases to prevent dust and damage.
- Soft Lighting: Use soft lighting to highlight the natural beauty of the stones.
- Rotate Display: Rotate the stones in the display periodically to ensure even exposure to light.
9.6. Protecting from the Elements
- Indoor Use: Keep polished Petoskey stones indoors to protect them from the elements.
- Avoid Extreme Temperatures: Avoid exposing the stones to extreme temperatures, as this can cause them to crack.
- Limit Moisture: Limit exposure to moisture, as excessive moisture can dull the polished surface.
9.7. Tips for Long-Term Care
- Regular Inspection: Inspect the stones regularly for any signs of damage or wear.
- Preventative Measures: Take preventative measures to protect the stones from potential hazards.
- Professional Advice: Seek professional advice from a jeweler or lapidary if you have any concerns about the stones.
By following these maintenance tips, you can keep your polished Petoskey stones looking beautiful for years to come. At rockscapes.net, we offer expert advice and quality products to help you care for your treasured stones.
10. What are The Creative Uses for Polished Petoskey Stones?
Polished Petoskey stones are not only beautiful but also versatile, lending themselves to a variety of creative uses. Here are some ideas to inspire you:
10.1. Jewelry Making
- Pendants: Drill a hole through a polished stone and add a bail to create a unique pendant.
- Earrings: Attach small, polished stones to earring hooks for elegant earrings.
- Rings: Set polished stones in ring blanks to create custom rings.
- Bracelets: String polished stones together to make a charming bracelet.
10.2. Home Décor
- Paperweights: Use a larger, polished stone as a decorative paperweight.
- Table Centerpieces: Arrange polished stones in a bowl or tray as a natural centerpiece.
- Bookends: Attach polished stones to bookend bases for unique bookends.
- Coasters: Glue small, polished stones to cork or felt bases to create stylish coasters.
10.3. Garden Accents
- Plant Markers: Attach polished stones to stakes and use them as plant markers in your garden.
- Fairy Gardens: Incorporate polished stones into fairy gardens for added charm.
- Pond Decorations: Place polished stones around the edges of a pond or water feature.
- Rock Gardens: Use polished stones to create a decorative rock garden.
10.4. Craft Projects
- Mosaics: Use small, polished stones to create intricate mosaics on various surfaces.
- Picture Frames: Glue polished stones to picture frames for a personalized touch.
- Mirrors: Adorn the edges of mirrors with polished stones for a unique look.
- Vases: Decorate vases with polished stones for an elegant accent.
10.5. Gifts and Souvenirs
- Personalized Gifts: Create personalized gifts by incorporating polished stones into handmade items.
- Souvenirs: Offer polished stones as memorable souvenirs for tourists and visitors.
- Party Favors: Use small, polished stones as unique party favors for special events.
10.6. Decorative Displays
- Shadow Boxes: Create shadow boxes filled with polished stones and other natural elements.
- Glass Jars: Display polished stones in glass jars for a simple yet elegant decoration.
- Wall Art: Arrange polished stones on a canvas or wooden board to create unique wall art.
10.7. Tips for Creative Use
- Mix and Match: Combine polished Petoskey stones with other natural materials, such as shells, beads, and driftwood.
- Experiment with Colors: Play with different colors and patterns to create visually appealing designs.
- Consider Functionality: Think about how the polished stones will be used and design accordingly.
- Get Inspired: Look for inspiration in nature, art, and design to spark your creativity.
By exploring these creative uses, you can showcase the natural beauty of polished Petoskey stones and add a touch of elegance to your life. At rockscapes.net, we encourage you to unleash your creativity and discover the many possibilities that these unique stones offer.
 Complete guide to petoskey stones
This is the best book for learning about Petoskey stones and how to polish them. We recently purchased a copy from the University of Michigan Press for only $12.95 and learned a lot from reading it. Highly recommended.
FAQ: Polishing Petoskey Stones
1. Can you polish Petoskey stones in a rock tumbler?
Yes, Petoskey stones can be polished in a rock tumbler, but it requires a gentle approach due to their relative softness. Using ceramic media for cushioning and monitoring the process closely is essential.
2. What is the best method for polishing Petoskey stones?
The best methods include hand polishing, using lapidary equipment, or a rock tumbler. Hand polishing and lapidary equipment offer more control, while rock tumbling is a labor-saving option.
3. What grit sequence should I use for polishing Petoskey stones in a rock tumbler?
A typical grit sequence includes medium grit (180/220) for shaping, fine grit (500 or 600) for smoothing, ultra-fine grit (1000 or higher) for pre-polishing, and a polishing compound like aluminum oxide or cerium oxide for the final shine.
4. How do I prepare Petoskey stones for polishing?
Select solid stones, clean them thoroughly to remove dirt and debris, pre-shape them if necessary to remove rough edges, and inspect them for cracks or fractures.
5. What type of rock tumbler is best for Petoskey stones?
A vibratory tumbler is generally better for polishing Petoskey stones because it is gentler than a rotary tumbler. If using a rotary tumbler, monitor the stones closely to prevent over-tumbling.