Polishing rocks with sandpaper is absolutely possible and a rewarding way to transform dull stones into gleaming treasures, achievable with a bit of patience and the right techniques, and rockscapes.net can help you learn how. Hand polishing allows for meticulous control, particularly beneficial for softer stones or those with unique features. Dive into the world of rock polishing and discover how simple materials and careful steps can unlock the hidden beauty within your rocks, enhancing your landscaping with polished perfection by visiting rockscapes.net, your ultimate guide to rock polishing and landscape design.
1. Why Choose Hand Polishing for Your Rocks?
Hand polishing is an excellent method, even for beginners and young rock enthusiasts, offering an accessible path to beautifully polished stones. It’s an economical and straightforward process, requiring minimal materials and delivering stunning results.
Hand polishing can be quite therapeutic. The repetitive motion can be calming, turning a simple task into a meditative experience. Soft stones, such as turquoise and amber, are particularly well-suited for this method. These delicate materials often don’t hold up well in a tumbler, making hand polishing the ideal choice. According to research from Arizona State University’s School of Earth and Space Exploration, hand polishing is a great way to preserve soft stones.
 Hand polishing rocks such as turquoise and amber is a great way to preserve them
2. What Materials Do You Need to Polish Rocks with Sandpaper?
Gathering the right materials is essential for successful hand polishing. Here’s a list to get you started:
- Rocks: Select the rocks you wish to polish. Softer stones like turquoise or amber are ideal for beginners.
- Bucket: A small bucket for cleaning and rinsing the rocks.
- Hot, Soapy Water: For initial cleaning to remove dirt and debris.
- Old Toothbrush: Useful for scrubbing crevices and stubborn residue.
- Sandpaper: A range of grits, typically 220, 500, and 1200.
- Cutting Board: Provides a hard, flat surface for sanding.
- Thick Cloth: Denim or a similar material for the final polishing stage.
- Toothpaste: A mild abrasive to bring out the final luster.
- Mineral Oil or Rock Polish: Enhances the shine and protects the polished surface.
- Optional: Dremel Tool: For shaping and polishing harder stones (with appropriate attachments).
- Safety Gear: Protective eyewear, gloves, and a mask if using a Dremel.
3. How Do You Prepare Your Rocks for Polishing?
Proper preparation is crucial for achieving a flawless finish. Follow these steps to clean and shape your rocks:
3.1. Cleaning the Rocks
Begin by thoroughly cleaning each rock. Fill a small bucket with hot, soapy water. Use an old toothbrush to scrub away any dirt, grime, or stubborn residue. Rinse the rocks thoroughly under clean water to remove all traces of soap. Discard the soapy water and refill the bucket with clean water for use throughout the polishing process. According to research from the Gemological Institute of America (GIA), cleaning rocks is the first step to having them polished.
3.2. Shaping the Rocks
After cleaning, it’s time to shape the rocks. Start with 220-grit sandpaper to round off any sharp corners and refine the overall shape. Wet the sandpaper and place it grit-side up on a hard, flat surface like a cutting board. Moisten the rock and begin rubbing it along the sandpaper. Keep the rock wet to remove fine particles and prevent the sandpaper from clogging.
Continue sanding until the edges are smooth and rounded or you achieve the desired shape. For harder rocks, you may need to start with a coarser grit like 80, but be cautious with softer stones, as this can cause excessive scratching. The key is to gradually refine the shape without causing damage.
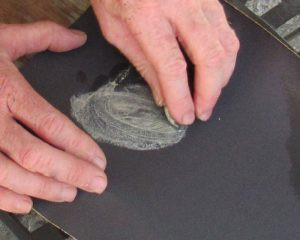 Shaping and polishing a stone such as amber with 220-grit sandpaper
4. What Are the Step-by-Step Instructions for Polishing Rocks With Sandpaper?
With your rocks cleaned and shaped, you can now begin the polishing process. Here’s a detailed guide to achieving a professional-looking finish:
4.1. Step 1: Start with 220-Grit Sandpaper
Begin by shaping your rock using 220-grit sandpaper. This coarse grit is perfect for removing any rough edges and beginning to smooth the surface. Place the sandpaper on a flat, hard surface, such as a cutting board, and moisten it thoroughly. Wet your rock, hold it firmly, and rub it against the sandpaper in a consistent, back-and-forth motion. This step is essential for creating a smooth foundation for the subsequent polishing stages. Remember to keep both the sandpaper and the rock consistently wet to help remove any particles and to prevent the sandpaper from clogging.
4.2. Step 2: Move to 500-Grit Sandpaper
Once you’ve smoothed the edges and established a basic shape with the 220-grit sandpaper, transition to 500-grit sandpaper. This finer grit will help to remove any deeper scratches left by the initial shaping process. Repeat the sanding process as before, ensuring that both the sandpaper and the rock remain wet. The 500-grit sandpaper refines the surface further, preparing it for the final polishing stages. Continue until you notice that the rock’s surface is becoming smoother and the scratches are less visible.
4.3. Step 3: Polish With 1200-Grit Sandpaper
The next step is to use 1200-grit sandpaper, an extra-fine grit that begins to bring out the shine in your rock. As you sand with this grit, you’ll notice the surface of the rock becoming increasingly reflective. Continue to keep the rock wet and rinse it frequently to monitor your progress. This step is critical for achieving a smooth, polished surface. Apply consistent pressure and motion to ensure an even finish across the entire surface of the rock.
4.4. Step 4: Final Polish With Cloth and Toothpaste
For the final polishing touch, grab a square of thick cloth, such as denim or canvas, and dampen it slightly. Apply a small amount of toothpaste to the cloth. Toothpaste contains mild abrasives that will help to buff the surface of the rock, enhancing its shine. Rub the rock against the toothpaste-covered cloth, using a circular motion and moderate pressure. As you continue to polish, the rock will develop a beautiful luster. This final step brings out the full potential of your hand-polished rock.
4.5. Step 5: Apply Mineral Oil
After you’ve achieved the desired level of shine, rinse the rock thoroughly to remove any remaining toothpaste residue. Allow the rock to dry completely, then apply a thin coat of mineral oil or commercial rock polish. This step enhances the color and luster of the rock, giving it a professional-looking finish. Mineral oil penetrates the surface, enriching the natural hues and providing a protective layer that helps to maintain the shine over time.
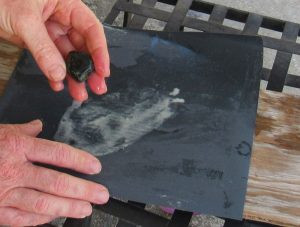 Checking stone polishing progress after using 500-grit and 1200-grit sandpaper
5. How Can You Use a Dremel for Rock Polishing?
A Dremel rotary tool can significantly speed up the shaping and polishing process, especially for harder stones or those with intricate details. Here’s how to use a Dremel effectively:
5.1. Safety First
Always wear safety glasses, gloves, and a mask when using a Dremel. The high-speed rotation can send small chips flying, posing a risk to your eyes and skin. A mask protects you from inhaling fine particles produced during grinding.
5.2. Choose the Right Attachments
Select the appropriate Dremel attachments for each stage of polishing. Use coarser grinding stones for initial shaping and finer polishing wheels for the final shine. Many Dremel kits come with a variety of attachments specifically designed for rock polishing.
5.3. Shaping with a Dremel
Start by using a coarse grinding stone to remove any sharp edges or unwanted material. Hold the Dremel firmly and apply gentle pressure, moving the tool evenly across the surface of the rock. Avoid applying too much pressure, as this can cause the tool to slip or damage the rock.
5.4. Polishing with a Dremel
Once the rock is shaped, switch to finer polishing wheels. Apply polishing compounds as needed and continue to work the surface until you achieve the desired level of shine. The Dremel allows for precise control, making it ideal for polishing intricate details and hard-to-reach areas.
5.5. Final Touches
After polishing with the Dremel, you can still use the cloth and toothpaste method for a final buff. This step enhances the shine and removes any remaining imperfections.
6. Rock Tumbling Vs. Hand Polishing: Which Is Right for You?
Both rock tumbling and hand polishing have their advantages and disadvantages. Here’s a comparison to help you decide which method is best for your needs:
| Feature | Rock Tumbling | Hand Polishing |
|---|---|---|
| Time | Several days to weeks | Hours, depending on the rock’s hardness |
| Labor | Less labor-intensive (machine does the work) | More labor-intensive (requires manual effort) |
| Control | Less control over the final shape and finish | More control over the final shape and finish |
| Best For | Harder rocks and large batches | Softer rocks, intricate shapes, and single specimens |
| Initial Cost | Higher (requires a rock tumbler) | Lower (minimal materials needed) |
| Level of Expertise | Beginner-friendly, minimal skill required | Requires some skill and patience |
6.1. Rock Tumbling
Rock tumbling is ideal for polishing large batches of harder rocks. The process involves placing the rocks in a rotating barrel with abrasive grits and water. Over several days or weeks, the rocks are gradually smoothed and polished. While rock tumbling requires less manual effort, it offers less control over the final shape and finish.
6.2. Hand Polishing
Hand polishing, on the other hand, is better suited for softer rocks, intricate shapes, and single specimens. It requires more manual effort but gives you greater control over the final result. Hand polishing is also a faster process, allowing you to achieve a polished finish in a matter of hours.
7. What Are the Benefits of Polishing Rocks by Hand?
Hand polishing offers several unique benefits that make it a worthwhile endeavor for rock enthusiasts:
7.1. Greater Control
Hand polishing provides unparalleled control over the final shape and finish of your rocks. You can focus on specific areas, refine intricate details, and achieve a level of precision that is impossible with machine polishing.
7.2. Faster Turnaround
Compared to rock tumbling, hand polishing is a much faster process. You can transform a dull, rough rock into a gleaming gem in just a few hours, making it ideal for those who want quick results.
7.3. Suitable for Delicate Stones
Hand polishing is particularly well-suited for delicate stones that may not withstand the rigors of rock tumbling. Soft stones like turquoise and amber can be easily damaged in a tumbler, but they can be safely and effectively polished by hand.
7.4. Therapeutic and Relaxing
Many people find the rhythmic motion of hand polishing to be therapeutic and relaxing. It’s a mindful activity that allows you to connect with the natural world and appreciate the beauty of each individual stone.
7.5. Sense of Accomplishment
There’s a unique sense of accomplishment that comes with hand polishing rocks. Knowing that you have transformed a rough, ordinary stone into a polished gem through your own skill and effort is incredibly rewarding.
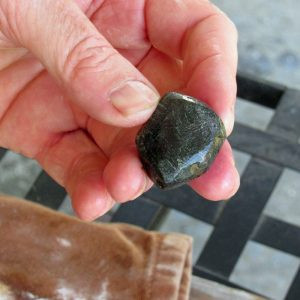 The transformation of a dull stone after shaping and polishing
8. What Types of Rocks Are Best Suited for Hand Polishing?
While hand polishing can be used on a variety of rocks, some are better suited for this method than others. Here are some of the best types of rocks to polish by hand:
- Turquoise: A soft, beautiful stone that polishes up easily by hand.
- Amber: Fossilized tree resin that can be transformed into a lustrous gem with hand polishing.
- Obsidian: Volcanic glass that can be polished to a mirror-like finish.
- Malachite: A vibrant green mineral that requires gentle hand polishing to preserve its delicate structure.
- Soapstone: A soft, easily carved stone that polishes well by hand.
- Jasper: An opaque form of chalcedony that comes in a variety of colors and patterns, perfect for hand polishing.
These stones, with their unique properties and characteristics, are ideally suited for the nuanced and controlled process of hand polishing. The method allows for the preservation of their inherent beauty while enhancing their aesthetic appeal.
9. Where Can You Find Inspiration for Rock Landscaping Ideas?
Looking for creative ways to incorporate your polished rocks into your landscape? Rockscapes.net offers a wealth of inspiration and ideas for transforming your outdoor spaces with natural stone:
9.1. Garden Accents
Use polished rocks to create stunning garden accents. Place them around flower beds, along pathways, or as focal points in rock gardens. The polished surfaces will catch the sunlight, adding a touch of sparkle to your landscape.
9.2. Water Features
Incorporate polished rocks into water features such as fountains, ponds, and streams. The smooth, reflective surfaces will enhance the beauty of the water and create a serene, natural ambiance.
9.3. Pathways and Borders
Use polished rocks to create unique pathways and borders. Arrange them in decorative patterns or mix them with other materials like gravel and mulch. The polished surfaces will provide a durable and attractive walking surface.
9.4. Decorative Mulch
Replace traditional mulch with polished rocks for a low-maintenance and visually appealing ground cover. The rocks will help retain moisture in the soil, suppress weeds, and add a touch of elegance to your landscape.
9.5. Rock Art
Get creative and use your polished rocks to create unique rock art. Arrange them into mosaics, sculptures, or other decorative designs. The possibilities are endless, and the results can be truly stunning.
For example, consider these beautiful landscaping options for inspiration:
Rock Garden with Succulents:
| Rock Type | Description |
|---|---|
| River Rocks | Smooth, rounded rocks of various sizes, providing a natural and organic look. |
| Lava Rocks | Porous, lightweight rocks that add texture and contrast to the garden. |
| Flagstone | Flat, sedimentary rocks used for pathways and stepping stones, creating a structured and elegant feel. |
| Succulents | Drought-tolerant plants with unique shapes and colors, thriving in rocky environments. |
| Ornamental Grasses | Adds movement and softness to the rock garden, complementing the hardscape with delicate foliage. |
Zen Garden with Sand and Rocks:
| Rock Type | Description |
|---|---|
| Granite Boulders | Large, imposing rocks that represent mountains and islands, providing a sense of stability and permanence. |
| Smooth Pebbles | Small, polished stones used to create patterns in the sand, symbolizing water and promoting a sense of tranquility. |
| Raked Sand | Fine sand carefully raked to create patterns that evoke water ripples or waves, enhancing the meditative atmosphere. |
| Moss | Soft, green moss used to soften the edges of rocks and add a touch of naturalness to the zen garden. |
| Bamboo | Vertical element that brings height and a sense of enclosure to the garden, creating a peaceful retreat. |
Desert Landscape with Cacti and Rocks:
| Rock Type | Description |
|---|---|
| Desert Boulders | Weathered rocks with unique shapes and textures, blending seamlessly into the arid environment. |
| Gravel | Small, loose rocks used as ground cover, providing drainage and preventing soil erosion. |
| Cacti | Spiny plants that thrive in arid conditions, adding architectural interest and a touch of the exotic. |
| Yucca | Sword-like leaves that provide a vertical accent, complementing the horizontal lines of the rocks and gravel. |
| Agave | Rosette-shaped plants with bold foliage, adding texture and contrast to the desert landscape. |
10. How to Maintain the Shine on Your Polished Rocks?
To keep your polished rocks looking their best, it’s important to maintain their shine. Here are some tips for long-term care:
- Clean Regularly: Dust and dirt can dull the surface of polished rocks. Clean them regularly with a soft cloth and mild soap and water.
- Avoid Abrasive Cleaners: Harsh chemicals and abrasive cleaners can scratch the surface of polished rocks. Stick to gentle cleaning solutions.
- Reapply Mineral Oil: Over time, the mineral oil coating may wear off. Reapply a thin coat of mineral oil or rock polish every few months to maintain the shine.
- Protect from the Elements: Prolonged exposure to sunlight and harsh weather conditions can fade the color and dull the surface of polished rocks. Protect them by placing them in shaded areas or bringing them indoors during extreme weather.
By following these simple maintenance tips, you can ensure that your polished rocks retain their beauty and luster for years to come.
FAQ: Frequently Asked Questions About Polishing Rocks With Sandpaper
1. Can you polish any type of rock with sandpaper?
While sandpaper can be used on various rocks, softer stones like turquoise and amber are best suited for this method.
2. What sandpaper grit should I start with?
Begin with 220-grit sandpaper for shaping and then move to finer grits like 500 and 1200 for polishing.
3. Is it necessary to use water during the sanding process?
Yes, keeping the sandpaper and rock wet helps remove particles and prevents the sandpaper from clogging.
4. Can I use a Dremel tool instead of sanding by hand?
Yes, a Dremel can speed up the process, especially for harder stones. Be sure to use appropriate attachments and safety gear.
5. What is the best way to achieve a high shine?
After sanding, use a cloth and toothpaste for a final buff. Applying mineral oil or rock polish will enhance the shine.
6. How long does it take to polish a rock by hand?
It depends on the hardness of the rock, but hand polishing typically takes a few hours.
7. Can I use regular toothpaste for polishing?
Yes, most toothpastes work well as a mild abrasive for the final polishing stage.
8. What safety precautions should I take when polishing rocks?
Wear safety glasses, gloves, and a mask, especially when using a Dremel.
9. How do I maintain the shine on my polished rocks?
Clean regularly with a soft cloth and mild soap and water, and reapply mineral oil as needed.
10. Where can I find inspiration for using polished rocks in my landscape?
Visit rockscapes.net for a wealth of ideas and inspiration for incorporating polished rocks into your outdoor spaces.
Ready to transform your rocks into stunning landscape features? Visit rockscapes.net today for expert advice, design inspiration, and the highest-quality materials. Let us help you create the outdoor oasis of your dreams! You can find us at 1151 S Forest Ave, Tempe, AZ 85281, United States or call us at +1 (480) 965-9011.