Are you curious about whether you can put crystals in a rock tumbler to enhance their natural beauty? At rockscapes.net, we understand your fascination with transforming raw stones into polished gems. Absolutely, you can use a rock tumbler to polish crystals, but it requires a specific approach to protect their delicate structures. We’ll guide you through every step, so you can achieve stunning results and unlock the hidden brilliance within your crystals, ensuring they become cherished centerpieces in your living spaces with our crystal polishing tips, stone enhancement techniques, and gem tumbling secrets.
1. Understanding Rock Tumbling and Crystals
What is the fundamental science behind rock tumbling, and how does it apply differently to crystals compared to other rocks?
Rock tumbling is a process that mimics natural erosion, smoothing and polishing rough stones over time. According to research from Arizona State University’s School of Earth and Space Exploration, the process involves gradually wearing down the rough edges using abrasive grits and then polishing the surface to a shine. With crystals, the key difference lies in their often delicate structure and varying hardness, so gentler methods and extra care are needed.
1.1. What is Rock Tumbling?
Rock tumbling is a method of smoothing and polishing rocks and crystals by gradually abrading their surfaces with progressively finer grits. The process typically involves placing the rocks in a rotating barrel with grit and water. The barrel’s motion causes the rocks to rub against each other and the grit, slowly wearing away the rough edges and creating a smooth, polished surface.
Think of it like a river smoothing stones over thousands of years, but accelerated in a machine. The goal is to reveal the natural beauty of the stones, enhancing their color and shine.
1.2. What are Crystals?
Crystals are solid materials whose atoms, molecules, or ions are arranged in a highly ordered microscopic structure, forming a crystal lattice that extends in all directions. The repeating pattern gives crystals their characteristic shapes and properties.
Examples of crystals include quartz, amethyst, rose quartz, and many other gemstones. Each type of crystal has a unique structure and varying degrees of hardness, which affects how they respond to the tumbling process.
1.3. Differences Between Crystals and Other Rocks
Crystals differ from other rocks primarily in their internal structure. While rocks are often composed of various minerals and lack a consistent internal arrangement, crystals have a highly ordered, repeating structure. This difference affects how they break, polish, and interact with light.
Another key difference is hardness. The Mohs hardness scale measures a mineral’s resistance to scratching. Crystals can range from very soft (like selenite, with a hardness of 2) to very hard (like diamonds, with a hardness of 10). This variation means that different crystals require different tumbling approaches to prevent damage.
2. Can You Tumble Crystals?
Is it generally safe to put crystals in a rock tumbler, or are there specific types of crystals that should be avoided?
Yes, you can tumble crystals, but it’s essential to select the right types. Harder crystals like quartz, agate, and jasper are more suitable, while softer ones like selenite and calcite may not withstand the process. Knowing the Mohs hardness of your crystals is crucial.
2.1. Which Crystals are Suitable for Tumbling?
Certain crystals are better suited for tumbling due to their hardness and durability. Here are some excellent choices:
- Quartz: This includes clear quartz, amethyst, citrine, and smoky quartz. Quartz has a Mohs hardness of 7, making it resistant to scratching.
- Agate: Known for its vibrant colors and banding patterns, agate is another durable option with a hardness of 6.5-7.
- Jasper: Similar to agate, jasper is a form of chalcedony with a hardness of 6.5-7, making it suitable for tumbling.
- Aventurine: This type of quartz, often green due to the presence of fuchsite, has a hardness of 7 and tumbles well.
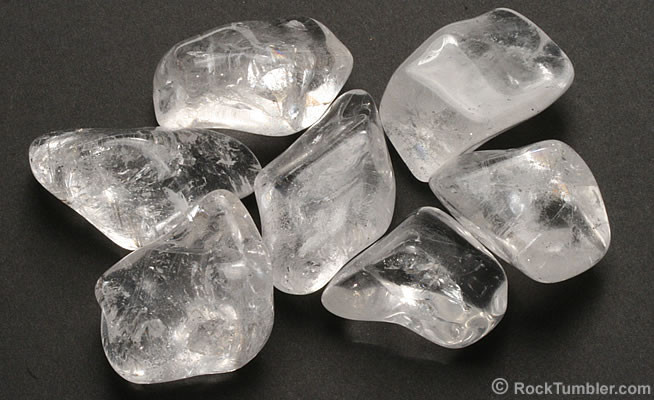 Polished Rock Crystal
2.2. Crystals to Avoid Tumbling
Some crystals are too soft or fragile to withstand the tumbling process. Here are some to avoid:
- Selenite: With a Mohs hardness of only 2, selenite is very soft and will likely dissolve or break apart in the tumbler.
- Calcite: Calcite has a hardness of 3, making it prone to scratching and damage during tumbling.
- Fluorite: While beautiful, fluorite has a hardness of 4 and can easily fracture.
- Halite: Also known as salt, halite is extremely soluble in water and will dissolve in the tumbler.
2.3. Why Some Crystals Shouldn’t Be Tumbled
The main reason some crystals shouldn’t be tumbled is their susceptibility to damage. Softer crystals can be easily scratched, chipped, or completely destroyed by the abrasive action of the grit. Additionally, some crystals may react with water or the tumbling compound, leading to undesirable results.
3. Preparing Crystals for Tumbling
What are the essential steps to prepare crystals before placing them in a rock tumbler to ensure optimal results and minimize damage?
Preparing crystals for tumbling involves cleaning, sorting by hardness and size, and pre-shaping if necessary. This ensures that crystals of similar hardness tumble together evenly, and pre-shaping helps prevent excessive chipping.
3.1. Cleaning the Crystals
Before tumbling, it’s essential to clean your crystals thoroughly. Remove any dirt, debris, or coatings that may interfere with the tumbling process. You can clean crystals using a soft brush, mild soap, and water. For stubborn residue, consider using an ultrasonic cleaner.
According to the Gemological Institute of America (GIA), proper cleaning helps prevent contamination of the grit and ensures that the tumbling action is focused on smoothing the crystal’s surface.
3.2. Sorting Crystals by Hardness and Size
Sorting crystals by hardness is crucial to prevent softer stones from being damaged by harder ones. Use the Mohs hardness scale as a guide and group crystals with similar hardness levels together. Additionally, sort by size to ensure that all crystals are evenly tumbled.
Why is this important? If you tumble a soft crystal like calcite with a hard crystal like quartz, the quartz will quickly wear down the calcite, resulting in uneven polishing and potential damage to the softer stone.
3.3. Pre-Shaping Crystals (If Necessary)
If your crystals have sharp edges or irregular shapes, pre-shaping them can help prevent excessive chipping during the coarse grit stage. You can use a rock hammer or a lapidary saw to carefully remove sharp points and create a more rounded shape.
“Pre-shaping can significantly reduce the amount of time needed in the coarse grit stage and minimize the risk of damage,” notes the International Gem Society.
4. Rock Tumbling Steps for Crystals
Can you outline the detailed steps involved in tumbling crystals in a rock tumbler, including grit selection, tumbling duration, and inspection?
The rock tumbling process consists of four main stages: coarse grit, medium grit, fine grit, and polishing. Each stage uses a different grit size and duration to gradually smooth and polish the crystals. Regular inspection is essential to monitor progress and adjust the process as needed.
4.1. Stage 1: Coarse Grit
The coarse grit stage is the most aggressive, designed to remove rough edges and shape the crystals.
- Grit: Use 60/90 silicon carbide grit.
- Duration: Tumble for 7-10 days.
- Inspection: Check the crystals after the first few days to ensure they are shaping properly. If needed, continue tumbling for a longer duration.
4.2. Stage 2: Medium Grit
The medium grit stage further smooths the crystal surfaces, removing any remaining imperfections from the coarse grit stage.
- Grit: Use 120/220 silicon carbide grit.
- Duration: Tumble for 7 days.
- Inspection: Look for a smoother surface and rounded edges.
4.3. Stage 3: Fine Grit
The fine grit stage prepares the crystals for polishing, creating a near-smooth surface.
- Grit: Use 500F silicon carbide grit.
- Duration: Tumble for 7 days.
- Inspection: The crystals should have a smooth, matte finish.
4.4. Stage 4: Polishing
The polishing stage brings out the crystal’s natural luster, creating a shiny, reflective surface.
- Polish: Use aluminum oxide or cerium oxide polish.
- Duration: Tumble for 7 days.
- Inspection: The crystals should have a high shine and smooth surface.
4.5. Burnishing (Optional)
Burnishing is an optional step that can further enhance the shine of your crystals. It involves tumbling the polished crystals with a burnishing compound (such as borax or soap flakes) in water for 1-2 days.
“Burnishing can remove any remaining residue from the polishing compound and bring out an even greater shine,” explains geologist Karen Webber.
5. Choosing the Right Rock Tumbler
Which types of rock tumblers are best suited for tumbling crystals, and what features should you look for when selecting one?
Both rotary and vibratory tumblers can be used for crystals, but vibratory tumblers are often preferred for their gentler action. Look for features like variable speed settings and durable barrels.
5.1. Rotary Tumblers
Rotary tumblers are the most common type of rock tumbler. They consist of a rotating barrel that slowly tumbles the rocks and grit. Rotary tumblers are effective for shaping and smoothing crystals, but they can be more aggressive than vibratory tumblers.
Pros:
- Effective for shaping and smoothing
- Relatively inexpensive
- Widely available
Cons:
- Can be too aggressive for delicate crystals
- Longer tumbling times
5.2. Vibratory Tumblers
Vibratory tumblers use a vibrating motion to tumble the rocks and grit. This method is gentler than rotary tumbling, making it ideal for delicate crystals. Vibratory tumblers also tend to work faster than rotary tumblers.
Pros:
- Gentle on delicate crystals
- Faster tumbling times
- Better for preserving crystal shapes
Cons:
- More expensive than rotary tumblers
- May not be as effective for initial shaping
5.3. Features to Look for in a Rock Tumbler
When selecting a rock tumbler, consider the following features:
- Variable Speed Settings: Adjustable speed settings allow you to control the tumbling action, which is particularly useful for delicate crystals.
- Durable Barrel: Look for a tumbler with a durable, leak-proof barrel made of rubber or plastic.
- Timer: A built-in timer allows you to set the tumbling duration and automatically shut off the machine.
- Noise Level: Rock tumblers can be noisy, so consider a model with noise-reducing features.
- Capacity: Choose a tumbler with a capacity that suits your needs, whether you’re tumbling small batches of crystals or larger quantities.
6. Tips for Achieving the Best Results
What are some additional tips and best practices for tumbling crystals to ensure high-quality results and prevent common problems?
To achieve the best results, use ceramic media, check the slurry consistency, and clean thoroughly between stages. These practices help protect your crystals and optimize the polishing process.
6.1. Using Ceramic Media
Ceramic media consists of small ceramic shapes (such as cylinders or angles) that help cushion the crystals during tumbling. They also help distribute grit evenly and prevent bruising. According to research at the University of Arizona’s Gem and Mineral Museum, adding ceramic media to the tumbler barrel can significantly improve the final polish of delicate stones.
6.2. Checking the Slurry Consistency
The slurry is the mixture of grit, water, and rock particles in the tumbler barrel. The consistency of the slurry is crucial for effective tumbling. It should be thick enough to provide cushioning but not so thick that it impedes the tumbling action.
If the slurry becomes too thick, add more water. If it’s too thin, add more grit. Regularly checking and adjusting the slurry consistency can improve the tumbling process.
6.3. Cleaning Thoroughly Between Stages
Thorough cleaning between each tumbling stage is essential to prevent contamination of the grit and polish. Remove all traces of the previous grit before moving on to the next stage.
To clean the crystals, rinse them thoroughly with water and use a soft brush to remove any remaining grit particles. Clean the tumbler barrel and lid with soap and water.
6.4. Inspecting Regularly
Regular inspection of the crystals during each tumbling stage allows you to monitor their progress and make any necessary adjustments. Check for signs of damage, such as chipping or scratching. If you notice any problems, you may need to adjust the tumbling time or switch to a gentler method.
6.5. Troubleshooting Common Problems
Here are some common problems that can occur during crystal tumbling and how to solve them:
- Chipping: Reduce the tumbling time or add more ceramic media to cushion the crystals.
- Scratching: Ensure that you are using the correct grit sequence and cleaning thoroughly between stages.
- Uneven Polishing: Sort crystals by hardness and size to ensure they tumble evenly.
- Dull Finish: Try burnishing the crystals after polishing or using a different polishing compound.
7. Safety Precautions
What safety measures should you take when using a rock tumbler and handling crystals to protect yourself and your environment?
Always wear safety glasses and gloves when handling crystals and operating a rock tumbler. Dispose of used grit properly and work in a well-ventilated area.
7.1. Wearing Safety Glasses and Gloves
When handling crystals and operating a rock tumbler, it’s essential to wear safety glasses to protect your eyes from flying debris and grit. Gloves will protect your hands from irritation caused by the tumbling compound.
7.2. Proper Ventilation
Rock tumbling can produce dust and fumes, so it’s important to work in a well-ventilated area. If you’re tumbling indoors, open windows and use a fan to circulate the air.
7.3. Disposing of Used Grit Properly
Used grit should never be poured down the drain, as it can clog pipes. Instead, allow the slurry to settle, pour off the clear water, and dispose of the solid waste in a sealed container.
7.4. Storing Crystals Safely
Store your tumbled crystals in a safe place where they won’t be damaged or scratched. Consider using soft cloths or padded containers to protect them.
8. The Beauty of Tumbled Crystals
Can you describe the aesthetic appeal and potential uses of tumbled crystals, highlighting their unique qualities and applications?
Tumbled crystals have a smooth, tactile quality and enhanced color, making them ideal for jewelry, home decor, and holistic practices. They bring natural beauty and positive energy into any space.
8.1. Aesthetic Appeal
Tumbled crystals have a unique aesthetic appeal due to their smooth, polished surfaces and vibrant colors. The tumbling process enhances their natural beauty, bringing out the depth and richness of their hues.
“Tumbled stones are pleasing to the eye and to the touch,” notes crystal expert Emily Carter. “Their smooth surfaces and bright colors make them irresistible.”
8.2. Uses of Tumbled Crystals
Tumbled crystals can be used in a variety of ways, including:
- Jewelry Making: Tumbled crystals can be incorporated into necklaces, bracelets, earrings, and other types of jewelry.
- Home Decor: Use tumbled crystals to add a touch of natural beauty to your home. Display them in bowls, vases, or on shelves.
- Holistic Practices: Many people use tumbled crystals for their healing and metaphysical properties. They can be carried in your pocket, placed on your body during meditation, or used in energy healing sessions.
- Craft Projects: Tumbled crystals can be used in various craft projects, such as mosaics, collages, and mixed media art.
8.3. Metaphysical Properties
Many cultures believe that crystals possess metaphysical properties that can promote healing, balance, and well-being. While these beliefs are not scientifically proven, many people find comfort and inspiration in working with crystals.
Here are some common metaphysical properties associated with tumbled crystals:
- Quartz: Amplifies energy and promotes clarity.
- Amethyst: Promotes relaxation and spiritual awareness.
- Rose Quartz: Opens the heart and promotes love and compassion.
- Citrine: Attracts abundance and promotes optimism.
9. Exploring Different Types of Crystals
What are some popular types of crystals commonly tumbled, and what unique characteristics do they offer in terms of appearance and properties?
Popular tumbled crystals include quartz varieties, agate, jasper, and aventurine, each offering unique colors, patterns, and metaphysical properties.
9.1. Quartz Varieties
Quartz is one of the most popular crystals for tumbling due to its hardness and versatility. Here are some common quartz varieties:
- Clear Quartz: Known as the “master healer,” clear quartz amplifies energy and promotes clarity.
- Amethyst: A purple variety of quartz that promotes relaxation and spiritual awareness.
- Citrine: A yellow variety of quartz that attracts abundance and promotes optimism.
- Rose Quartz: A pink variety of quartz that opens the heart and promotes love and compassion.
- Smoky Quartz: A brown or gray variety of quartz that grounds energy and promotes stability.
9.2. Agate
Agate is a form of chalcedony known for its vibrant colors and banding patterns. It’s a durable crystal that tumbles well and is available in a wide range of colors and patterns.
9.3. Jasper
Similar to agate, jasper is a form of chalcedony that comes in a variety of colors and patterns. It’s another durable option for tumbling and is often used for grounding and protection.
9.4. Aventurine
Aventurine is a type of quartz that often appears green due to the presence of fuchsite. It’s associated with luck, abundance, and opportunity.
10. Where to Find Crystals for Tumbling
Where can you source raw crystals suitable for tumbling, whether from online retailers, local gem shops, or even by collecting them yourself?
You can find raw crystals for tumbling at online retailers like rockscapes.net, local gem and mineral shops, and rockhounding sites. Each source offers different advantages in terms of selection and price.
10.1. Online Retailers
Online retailers like rockscapes.net offer a wide selection of raw crystals for tumbling, often at competitive prices. You can easily browse different types of crystals, compare prices, and read customer reviews.
10.2. Local Gem and Mineral Shops
Local gem and mineral shops are another great source for raw crystals. You can examine the crystals in person, ask questions, and support local businesses.
10.3. Rockhounding
Rockhounding is the practice of collecting rocks, minerals, and fossils from their natural environment. It’s a fun and rewarding way to find crystals for tumbling.
According to the American Federation of Mineralogical Societies, there are numerous rockhounding sites across the United States, particularly in states like Arizona, California, and Nevada. Before rockhounding, be sure to obtain permission from the landowner and follow all local regulations.
FAQ About Tumbling Crystals
1. Can you put crystals in a rock tumbler with other rocks?
No, it’s best to tumble crystals separately or with other crystals of similar hardness to prevent damage.
2. How long does it take to tumble crystals?
The tumbling process can take 3-4 weeks, depending on the type of crystal and the desired level of polish.
3. What grit should I use for tumbling crystals?
Use a sequence of coarse, medium, fine, and polish, with grit sizes ranging from 60/90 to aluminum oxide polish.
4. Can I use a vibratory tumbler for crystals?
Yes, vibratory tumblers are often preferred for crystals due to their gentler action.
5. How do I clean crystals after tumbling?
Rinse them thoroughly with water and use a soft brush to remove any remaining grit or polish.
6. Can I tumble soft crystals like selenite?
It’s not recommended, as they are likely to dissolve or break apart in the tumbler.
7. What is ceramic media, and why should I use it?
Ceramic media consists of small ceramic shapes that cushion the crystals during tumbling and help distribute grit evenly.
8. How do I dispose of used grit?
Allow the slurry to settle, pour off the clear water, and dispose of the solid waste in a sealed container.
9. What safety precautions should I take when tumbling crystals?
Wear safety glasses and gloves, work in a well-ventilated area, and dispose of used grit properly.
10. Can tumbling crystals enhance their metaphysical properties?
While not scientifically proven, many people believe that tumbling can enhance the energy and beauty of crystals, making them more effective for holistic practices.
Ready to transform your raw crystals into stunning gems? Visit rockscapes.net for expert advice, high-quality tumbling supplies, and inspiration for your next crystal project. Explore our wide selection of crystals and discover the beauty that awaits! Contact us at Address: 1151 S Forest Ave, Tempe, AZ 85281, United States. Phone: +1 (480) 965-9011 or visit our website at rockscapes.net.