Can You Put Rocks Around Bushes? Yes, but the type of rock and how you use it is very important. rockscapes.net provides information on how to use rocks effectively and aesthetically in landscaping. Using the right rocks can enhance your garden, promote plant health, and improve curb appeal.
1. What are the Pros and Cons of Using Rocks Around Bushes?
Using rocks around bushes has benefits and drawbacks. The important thing to know is the use of the correct rocks and implementing the right methods. Here’s what you need to consider:
-
Pros:
- Aesthetic Appeal: Rocks can add texture, color, and visual interest to your landscape design.
- Weed Control: Rocks can act as a barrier, preventing weed growth around your bushes.
- Moisture Retention: Rocks can help retain moisture in the soil by reducing evaporation.
- Erosion Control: Rocks can prevent soil erosion, especially on slopes or in areas with heavy rainfall.
- Low Maintenance: Rock mulching is generally low maintenance compared to organic mulches.
-
Cons:
- Heat Retention: Rocks can absorb and retain heat, potentially harming plant roots, especially in hot climates like Arizona. According to research from Arizona State University’s School of Earth and Space Exploration, dark-colored rocks can significantly increase soil temperature.
- Soil Compaction: Heavy rocks can compact the soil, hindering root growth and water infiltration.
- Difficult to Remove: Once installed, rocks can be challenging and time-consuming to remove or relocate.
- pH Imbalance: Some rocks can alter the soil pH, affecting the health of acid-loving plants.
- Poor Drainage: If not installed correctly, rocks can impede drainage, leading to root rot.
2. What Types of Rocks Are Best to Use Around Bushes?
Selecting the right type of rock is essential for the health and appearance of your plants. Here are some suitable options:
| Type of Rock | Description | Benefits | Considerations |
|---|---|---|---|
| River Rock | Smooth, rounded stones of various sizes and colors. | Excellent drainage, natural look, suitable for dry creek beds and borders. | Can be expensive, may require a liner to prevent weed growth, avoid using around acid-loving plants due to potential pH increase. |
| Lava Rock | Porous, lightweight rock with a reddish-brown or black color. | Good drainage and aeration, retains moisture, adds a unique textural element. | Can be sharp, handle with care, may fade in direct sunlight over time. |
| Pea Gravel | Small, rounded pebbles, typically less than 3/8 inch in diameter. | Inexpensive, easy to install, provides good drainage, suitable for pathways and ground cover. | Can be easily displaced, may require frequent replenishment, not ideal for steep slopes. |
| Crushed Granite | Angular, crushed rock with a variety of colors and textures. | Provides good drainage and stability, resists compaction, adds a modern look. | Can be dusty, may require a base layer of landscape fabric to prevent weed growth, can be abrasive to bare feet. |
| Flagstone | Flat, sedimentary rock, typically sandstone or slate. | Versatile, can be used for pathways, patios, and edging, adds a natural, rustic look. | Can be expensive, requires careful installation to ensure stability and proper drainage, may become slippery when wet. |
| Decomposed Granite (DG) | A gravel-like material that can be compacted for pathways or ground cover. | Natural look that blends well with landscapes, permeable allowing water to easily reach plants, cost-effective, and easy to install, making it a popular choice for many gardens. | Requires additional maintenance than other rock types, as it can be prone to erosion and may need to be replenished periodically. Not suitable for areas with heavy foot traffic. |
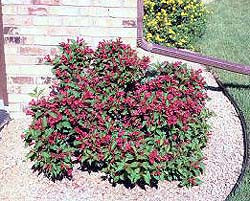 River rock surrounding shrubs
3. How Do You Prepare the Area Before Placing Rocks?
Proper site preparation is crucial for the success of your rock landscaping project. Follow these steps:
- Clear the Area: Remove all existing vegetation, weeds, and debris from the area around your bushes.
- Level the Ground: Rake the soil to create a smooth, even surface.
- Amend the Soil: If necessary, amend the soil with compost or other organic matter to improve drainage and fertility. This is especially important if your soil is compacted or nutrient-poor.
- Install Landscape Fabric: Lay down a layer of high-quality landscape fabric to prevent weed growth and keep the rocks from sinking into the soil. Overlap the edges of the fabric by at least 6 inches and secure it with landscape staples.
- Plan for Drainage: Ensure that the area has adequate drainage to prevent water from pooling around your bushes. If necessary, install a drainage system or create a slight slope to direct water away from the plants.
4. What is the Best Way to Arrange Rocks Around Bushes?
Arranging rocks effectively can greatly enhance the aesthetic appeal of your landscape. Here’s how to do it:
- Consider the Size and Shape of the Rocks: Choose rocks that are appropriate for the size and shape of your bushes. Larger rocks can be used as focal points, while smaller rocks can be used to fill in the gaps.
- Create a Natural Look: Arrange the rocks in a way that mimics natural rock formations. Avoid creating straight lines or symmetrical patterns. Vary the size, shape, and color of the rocks to create a more organic look.
- Leave Space for Growth: Make sure to leave enough space around your bushes for them to grow and spread. Avoid placing rocks too close to the base of the plants, as this can restrict airflow and promote disease.
- Incorporate Other Elements: Consider incorporating other elements into your rock landscaping design, such as pathways, water features, or decorative objects. This can add visual interest and create a more cohesive look.
- Use Mulch: Consider using natural mulch like wood chips. This allows the soil to breathe.
5. How Deep Should the Rock Layer Be?
The depth of the rock layer is important for weed control, moisture retention, and plant health. A general guideline is to apply a layer of rock that is 2-3 inches deep. Here’s why:
- Weed Control: A 2-3 inch layer of rock is thick enough to suppress weed growth by blocking sunlight from reaching the soil.
- Moisture Retention: The rock layer helps retain moisture in the soil by reducing evaporation.
- Plant Health: Avoid applying too much rock, as this can compact the soil and restrict airflow to the roots. A 2-3 inch layer allows for adequate air circulation and drainage.
- Aesthetics: A 2-3 inch layer of rock provides a consistent, visually appealing surface that complements your bushes and other landscape elements.
6. Can Rocks Help with Weed Control Around Bushes?
Yes, rocks can be an effective weed control method when used correctly. Here’s how:
- Barrier: Rocks act as a physical barrier, preventing weed seeds from reaching the soil and germinating.
- Sunlight Blockage: A thick layer of rocks blocks sunlight, which is essential for weed growth.
- Landscape Fabric: When combined with landscape fabric, rocks create an even more effective weed control system. The fabric prevents weeds from growing up from the soil, while the rocks prevent weeds from germinating on the surface.
- Maintenance: While rocks can significantly reduce weed growth, some weeds may still manage to sprout. Regularly inspect the area and remove any weeds that appear.
7. How Do You Maintain Rocks Around Bushes?
Maintaining rocks around bushes is relatively simple, but it’s essential to keep the area looking its best and ensure the health of your plants. Here are some maintenance tips:
- Remove Debris: Regularly remove leaves, twigs, and other debris from the rock surface. This will prevent the buildup of organic matter, which can promote weed growth.
- Weed Control: As mentioned earlier, inspect the area regularly and remove any weeds that appear. Hand-pulling is the most effective method, but you can also use a weed torch or herbicide if necessary.
- Replenish Rocks: Over time, rocks may settle into the soil or be displaced by wind or rain. Replenish the rock layer as needed to maintain a consistent depth and appearance.
- Clean the Rocks: If the rocks become stained or dirty, you can clean them with a garden hose or pressure washer. For stubborn stains, use a mild detergent or vinegar solution.
- Check for Drainage Issues: Inspect the area regularly for drainage issues. If water is pooling around your bushes, take steps to improve drainage, such as installing a drainage system or adjusting the slope of the ground.
8. What are Some Design Ideas for Using Rocks Around Bushes?
There are endless design possibilities for using rocks around bushes. Here are a few ideas to inspire you:
- Rock Gardens: Create a rock garden by incorporating a variety of rocks, plants, and other elements into a visually appealing display.
- Dry Creek Beds: Use rocks to create a dry creek bed that meanders through your landscape. This can add visual interest and help with drainage.
- Borders and Edging: Use rocks to create borders and edging around your flower beds, pathways, or other landscape features.
- Focal Points: Use large rocks as focal points in your landscape design. These can be placed strategically to draw the eye and add visual interest.
- Container Gardens: Use rocks as a decorative element in your container gardens. This can add texture and visual interest to your potted plants.
9. Are There Any Plants That Don’t Do Well with Rocks Around Them?
Certain plants may not thrive when surrounded by rocks, primarily due to heat retention and soil pH changes. Plants that prefer cooler soil temperatures or acidic soil conditions may struggle. Here are some examples:
- Acid-Loving Plants: Azaleas, rhododendrons, and camellias prefer acidic soil and may not do well if the rocks alter the soil pH.
- Shade-Loving Plants: Hostas, ferns, and other shade-loving plants may suffer from heat stress if surrounded by rocks that absorb and radiate heat.
- Alpine Plants: These plants are adapted to cool, moist conditions and may not tolerate the heat and dryness associated with rocks.
Always research the specific needs of your plants before using rocks around them. Consider using organic mulches or other alternatives for plants that are sensitive to heat or soil pH changes.
10. Where Can You Find Quality Rocks for Your Landscaping Project?
Finding high-quality rocks is essential for creating a beautiful and long-lasting landscape. Here are some places to find rocks for your landscaping project:
- Local Nurseries and Garden Centers: These are great sources for a variety of rocks, including river rock, lava rock, and pea gravel.
- Stone Yards and Quarries: Stone yards and quarries offer a wider selection of rocks, including flagstone, crushed granite, and boulders.
- Landscape Supply Stores: These stores specialize in landscaping materials and typically carry a variety of rocks and other supplies.
- Online Retailers: Online retailers such as Amazon and Home Depot offer a convenient way to purchase rocks and have them delivered to your doorstep.
- Rockscapes.net: For Arizona homeowners, Rockscapes.net at 1151 S Forest Ave, Tempe, AZ 85281, United States, provides a wide variety of decorative rocks to suit your project needs. Contact them at +1 (480) 965-9011.
 Landscaping rocks
11. How to Use Rocks to Enhance Curb Appeal?
Rocks can significantly enhance your home’s curb appeal by adding texture, color, and visual interest to your landscape. Here are some ideas:
- Create a Rock Garden: A well-designed rock garden can be a stunning focal point that draws the eye and adds value to your property.
- Define Pathways: Use rocks to define pathways and create a welcoming entrance to your home.
- Accentuate Architectural Features: Use rocks to accentuate architectural features such as walls, pillars, or steps.
- Add a Water Feature: Incorporate a water feature such as a fountain or waterfall into your rock landscaping design.
- Use Rocks as Mulch: Replace traditional mulch with rocks to create a low-maintenance and visually appealing landscape.
12. How Can I Avoid Common Mistakes When Using Rocks in Landscaping?
Avoiding common mistakes can save you time, money, and frustration. Here are some tips:
- Don’t Use Rocks as a Substitute for Soil: Rocks should not be used as a substitute for soil. Plants need soil to grow and thrive.
- Don’t Overuse Rocks: Too many rocks can make your landscape look cluttered and unnatural. Use rocks sparingly and strategically.
- Don’t Choose the Wrong Type of Rock: Select rocks that are appropriate for your climate, soil type, and plant species.
- Don’t Forget About Drainage: Ensure that the area has adequate drainage to prevent water from pooling around your plants.
- Don’t Neglect Maintenance: Regularly remove debris, control weeds, and replenish rocks as needed.
13. How Do I Choose the Right Color of Rocks for My Bushes?
Selecting the right rock color can complement your home’s exterior, foliage, and overall landscape design. Here’s how to choose:
- Complementary Colors: Choose rock colors that complement the colors of your home and plants. For example, if your home is painted in warm tones, consider using rocks in cool tones to create contrast.
- Neutral Colors: Neutral-colored rocks such as gray, beige, and brown can blend seamlessly with any landscape design.
- Consider the Foliage: Choose rock colors that complement the foliage of your bushes. For example, if your bushes have green leaves, consider using rocks in contrasting colors such as white or black.
- Match the Style of Your Home: Choose rock colors that match the style of your home. For example, if you have a modern home, consider using sleek, minimalist rocks in neutral colors.
14. What Are the Environmental Benefits of Using Rocks in Landscaping?
Using rocks in landscaping can have several environmental benefits:
- Water Conservation: Rocks can help conserve water by reducing evaporation from the soil.
- Erosion Control: Rocks can prevent soil erosion, especially on slopes or in areas with heavy rainfall.
- Reduced Use of Chemicals: By suppressing weed growth, rocks can reduce the need for herbicides and other chemicals.
- Habitat Creation: Rocks can provide habitat for beneficial insects, lizards, and other wildlife.
- Sustainable Materials: Rocks are a natural and sustainable material that can last for many years with proper care.
15. How Can I Incorporate Boulders into My Bush Landscaping?
Boulders can add a dramatic and eye-catching element to your landscape. Here’s how to incorporate them:
- Focal Points: Use large boulders as focal points in your landscape design. These can be placed strategically to draw the eye and add visual interest.
- Natural Barriers: Use boulders to create natural barriers or retaining walls.
- Water Features: Incorporate boulders into water features such as waterfalls or ponds.
- Rock Gardens: Use boulders as part of a rock garden design.
- Consider Placement: Ensure that the boulders are placed in a way that looks natural and complements the surrounding landscape.
16. What Tools and Materials Do I Need to Put Rocks Around Bushes?
Gathering the right tools and materials will make your landscaping project easier and more efficient. Here’s a list:
- Shovel: For digging and moving soil.
- Rake: For leveling the ground and spreading rocks.
- Wheelbarrow: For transporting rocks and other materials.
- Landscape Fabric: To prevent weed growth.
- Landscape Staples: To secure the landscape fabric.
- Gloves: To protect your hands.
- Measuring Tape: To measure the area and determine how much rock you need.
- Safety Glasses: To protect your eyes from dust and debris.
- Rocks: The type and quantity of rocks you need will depend on your design and the size of the area.
17. How to Plan a Rock Landscaping Project on a Budget?
Landscaping with rocks doesn’t have to be expensive. Here’s how to plan a rock landscaping project on a budget:
- Use Local Rocks: Source rocks from local quarries or stone yards to save on transportation costs.
- DIY Installation: Install the rocks yourself to save on labor costs.
- Use Smaller Rocks: Smaller rocks such as pea gravel are typically less expensive than larger rocks or boulders.
- Repurpose Existing Rocks: If you have rocks on your property, consider repurposing them for your landscaping project.
- Shop Around: Compare prices from different suppliers to find the best deals.
18. How to Keep Animals from Moving Rocks in My Garden?
Animals can sometimes move rocks around in your garden, disrupting your landscape design. Here are some tips to prevent this:
- Use Larger Rocks: Larger rocks are more difficult for animals to move.
- Bury the Rocks: Bury the bottom portion of the rocks to make them more stable.
- Use Netting: Cover the rocks with netting to prevent animals from digging or moving them.
- Apply Repellents: Use animal repellents to deter animals from entering your garden.
- Create Barriers: Create barriers such as fences or walls to keep animals out of your garden.
19. How to Choose Rocks That Complement My Home’s Architecture?
Selecting rocks that complement your home’s architecture can enhance its curb appeal and create a cohesive look. Here’s how:
- Match the Style: Choose rocks that match the style of your home. For example, if you have a traditional home, consider using natural, rustic rocks.
- Consider the Color: Choose rock colors that complement the colors of your home. For example, if your home is painted in warm tones, consider using rocks in cool tones to create contrast.
- Use Similar Materials: If your home features certain materials such as brick or stone, consider using rocks that are similar in color and texture.
- Scale and Proportion: Choose rocks that are proportionate to the size of your home. Large boulders may overwhelm a small house, while small rocks may get lost in a large landscape.
20. What Are the Latest Trends in Rock Landscaping?
Staying up-to-date with the latest trends can help you create a modern and stylish landscape. Here are some current trends in rock landscaping:
- Xeriscaping: Xeriscaping is a landscaping technique that uses drought-tolerant plants and materials such as rocks to conserve water.
- Natural Stone: Using natural stone such as flagstone, limestone, and granite is a popular trend in rock landscaping.
- Zen Gardens: Creating a Zen garden with rocks, sand, and carefully placed plants is a calming and meditative trend.
- Dry Creek Beds: Dry creek beds are a popular way to add visual interest and help with drainage in your landscape.
- Minimalist Designs: Minimalist rock landscaping designs featuring clean lines, simple shapes, and neutral colors are gaining popularity.
Choosing the right rocks and implementing them thoughtfully can greatly improve your landscape, offering both visual appeal and functional benefits. By understanding the pros and cons of using rocks around bushes, preparing the area properly, and maintaining the rock layer, you can create a beautiful and healthy landscape that enhances your home’s curb appeal.
Need help choosing the perfect rocks for your landscaping project? Visit rockscapes.net for expert advice, design inspiration, and a wide selection of high-quality rocks. Let us help you create the landscape of your dreams. Contact us today. Address: 1151 S Forest Ave, Tempe, AZ 85281, United States. Phone: +1 (480) 965-9011.