Can You Use Any Rocks In A Rock Tumbler? Yes, you can use some rocks in a rock tumbler, but not all rocks are suitable. At rockscapes.net, we help you select the best rocks for achieving stunning polished stones. Choosing the right materials and techniques will allow you to create beautiful, smooth, and shiny gems.
Selecting the right rocks is crucial for successful rock tumbling. Rocks like agate and jasper, known for their hardness and vibrant colors, yield the best results, enhancing your rock garden and landscape designs. Discover how to choose the perfect rocks and get expert tips on rock finishing at rockscapes.net, ensuring your projects shine with quality and beauty.
1. Understanding Rock Tumbling Suitability
Can you use any rocks in a rock tumbler? The answer is nuanced. While the idea of transforming rough stones into polished gems is appealing, not all rocks are up to the task. The key lies in understanding the properties that make certain rocks ideal candidates for tumbling.
Rocks that are hard, dense, and free of fractures are most suitable for rock tumbling. According to the Gemological Institute of America (GIA), the best rocks for tumbling have a Mohs hardness of 6 to 8. This ensures they can withstand the abrasive process without breaking apart.
Here’s a quick breakdown of essential qualities:
- Hardness: Rocks should be hard enough to withstand the tumbling process.
- Density: Dense rocks without pores polish more effectively.
- Texture: Smooth textures are preferable to avoid creating abrasive grit.
2. Why Some Rocks Aren’t Suitable
Many types of rocks are not suitable for a rock tumbler. Soft, porous, or fractured rocks can cause problems during tumbling, potentially ruining the entire batch. Imagine mixing low-quality material with excellent rough; the result would be a disappointing finish on all stones.
Here are common issues with unsuitable rocks:
- Soft Rocks: These can wear down too quickly, creating a muddy slurry.
- Porous Rocks: Grit gets trapped in pores, contaminating later polishing stages.
- Fractured Rocks: These can break apart, damaging other stones in the tumbler.
Using unsuitable rocks can lead to wasted time, grit, and electricity, and it may even damage your tumbler. Always carefully inspect your rocks to ensure they meet the necessary criteria.
3. Best Rock Types for Tumbling
When considering what rocks can you use in a rock tumbler, certain types consistently deliver exceptional results. These rocks are durable, visually appealing, and readily available, making them perfect for both beginners and experienced hobbyists.
3.1. Agate
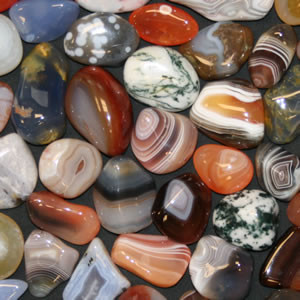 Tumbled Agates
Agate is a favorite for rock tumbling due to its vibrant colors, intricate patterns, and translucent quality.
Agate stands out as a top choice. This microcrystalline variety of quartz forms in groundwater deposits, often showcasing bands, eyes, and mossy formations. Agate’s translucence and ability to take a high polish make it visually stunning.
Key features of agate:
- Color Variety: Agate comes in a wide range of colors.
- Pattern Diversity: Bands, eyes, clouds, and plumes add visual interest.
- Translucence: Gives an internal glow, enhancing its beauty.
Agate forms when groundwater deposits minerals in rock cavities, such as air pockets in basalts and limestones. Its resistance to weathering means you can often find agate nodules in stream beds and dry washes.
3.2. Jasper
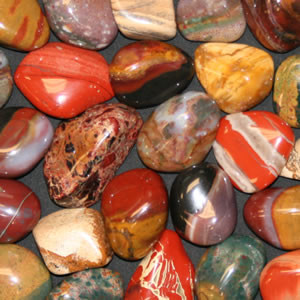 Tumbled Jasper Stones
Jasper is a popular tumbling material because of its variety of colors and ability to polish easily.
Jasper is another excellent choice, known for its durability and ease of polishing. This opaque to semi-translucent material comes in various colors, including red, yellow, orange, and brown.
Key features of jasper:
- Color Range: Includes white, gray, red, yellow, orange, and brown.
- Pattern Variety: Offers variegations, plumes, swirls, and brecciation.
- Durability: A robust material that polishes well.
Like agate, jasper is a microcrystalline quartz variety found in fracture fillings and mineralizations. While similar to chert and flint, jasper is distinguished by its opaque nature and vibrant color patterns.
3.3. Quartz
 Variety of Tumbled Quartz
Quartz is the most abundant mineral on Earth and polishes very well in a rock tumbler.
Quartz, the most abundant mineral in Earth’s crust, is another fantastic option. Its hardness and variety of colors make it a versatile choice for tumbling.
Popular quartz varieties include:
- Amethyst: Known for its purple hues.
- Clear Quartz: A transparent and classic choice.
- Rose Quartz: Characterized by its pink color.
- Smoky Quartz: Features a smoky gray to brown color.
Aventurine, with its glittering inclusions of mica or iron oxide, and Tiger’s-eye, with its silky luster, are also popular within the quartz family.
3.4. Petrified Wood
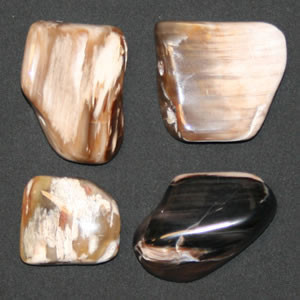 Tumbled Petrified Wood Stones
Tumbled petrified wood reveals preserved plant structures that appeal to many rock tumbling enthusiasts.
Petrified wood offers a unique appeal due to its preserved plant structures. Formed when woody material is replaced by siliceous or carbonate materials, petrified wood can exhibit cell walls, bark, and growth rings.
Key features of petrified wood:
- Unique Patterns: Preserves plant structures.
- Color Variety: Can be colorful depending on the minerals present.
- Novelty: Polished stones reveal fascinating details.
Though not as abundant as other tumbling materials, the novelty of petrified wood makes it a favorite among rock tumbling enthusiasts.
3.5. Obsidian
 Varieties of Obsidian for Tumbling
Obsidian presents a challenge to tumble because it tends to chip and bruise, but careful work yields beautiful results.
Obsidian, a volcanic glass formed from rapidly cooled molten rock, presents a unique challenge. Its glass-like properties, including conchoidal fracture and low toughness, make it prone to chipping and bruising.
Tips for tumbling obsidian:
- Use Cushioning: Employ ceramic media or plastic pellets.
- Handle with Care: Be gentle during each tumbling stage.
- Choose Varieties: Snowflake and mahogany obsidian offer visual appeal.
Despite its challenges, the careful tumbling of obsidian can yield stunning results.
4. Size and Shape Considerations
When deciding what rocks can you use in a rock tumbler, size and shape play a significant role. The ideal size allows rocks to tumble freely without causing damage, while the right shape ensures even abrasion and polishing.
For small tumblers (holding less than two cups of water), rocks should be between 3/8 inch and 1 1/4 inches in size. Larger rocks won’t tumble freely, resulting in slow shaping.
Here are some tips for optimizing size and shape:
- Uniform Size: Use rocks of similar size for even wear.
- Rounded Shapes: Start with naturally rounded rocks to reduce chipping.
- Avoid Sharp Edges: Break off sharp edges to prevent scratching.
By paying attention to size and shape, you can improve the efficiency and outcome of your rock tumbling projects.
5. Step-by-Step Guide to Rock Tumbling
Knowing what rocks can you use in a rock tumbler is just the beginning. The actual process involves several stages, each with specific grit types and durations. Follow this step-by-step guide to achieve the best results.
5.1. Stage 1: Coarse Grind
The initial coarse grind shapes the rocks and removes any rough edges. This stage typically lasts 7-10 days.
Steps:
- Fill the tumbler barrel 1/2 to 2/3 full with rocks of similar hardness.
- Add coarse grit (60/90 silicon carbide) according to the tumbler’s instructions.
- Add water until the rocks are just covered.
- Tumble for 7-10 days, checking periodically and adding water if needed.
- Clean the rocks and barrel thoroughly before moving to the next stage.
5.2. Stage 2: Medium Grind
The medium grind smooths the surfaces and prepares the rocks for finer polishing. This stage usually lasts about a week.
Steps:
- Place the cleaned rocks back in the tumbler barrel.
- Add medium grit (120/220 silicon carbide) as instructed.
- Add water to cover the rocks.
- Tumble for 7 days, checking and adding water as needed.
- Clean the rocks and barrel meticulously before the next stage.
5.3. Stage 3: Pre-Polish
The pre-polish stage refines the surfaces, removing any remaining scratches from the previous stages. This typically lasts for 7 days.
Steps:
- Return the cleaned rocks to the tumbler barrel.
- Add pre-polish grit (500-600 aluminum oxide).
- Add water to cover the rocks.
- Tumble for 7 days, checking and adding water if necessary.
- Thoroughly clean the rocks and barrel.
5.4. Stage 4: Polish
The final polish stage gives the rocks their glossy finish. This is often the most exciting part of the process, revealing the true beauty of your stones. This stage also lasts 7 days.
Steps:
- Place the cleaned rocks in the tumbler barrel.
- Add polishing compound (such as 0.3 micron aluminum oxide).
- Add water to cover the rocks.
- Tumble for 7 days, checking water levels.
- Remove and wash the rocks, then admire your polished gems!
6. Troubleshooting Common Tumbling Issues
Even with the best rocks and a meticulous approach, problems can arise. Here are common issues and how to address them:
- Rocks Not Polishing: Ensure you’re using the correct grit sequence and that your rocks are hard enough. Contamination from previous stages can also hinder polishing.
- Rocks Breaking Apart: This often happens with fractured or soft rocks. Select more durable materials and cushion with ceramic media.
- Dull Finish: Check for grit contamination or insufficient tumbling time in the polishing stage.
7. Advanced Tumbling Techniques
For those looking to take their rock tumbling to the next level, consider these advanced techniques:
- Using Ceramic Media: Ceramic media cushions delicate stones and helps distribute grit evenly.
- Adding Plastic Pellets: Plastic pellets provide extra cushioning and help carry grit to all surfaces.
- Burnishing: Burnishing after polishing can enhance the shine. Use a mild soap and tumble for a few hours.
8. Safety Precautions
Safety should always be a priority. When working with rock tumblers and abrasive grits, take these precautions:
- Wear a Dust Mask: Prevent inhalation of fine particles.
- Use Gloves: Protect your hands from irritation.
- Work in a Well-Ventilated Area: Minimize dust exposure.
- Dispose of Waste Properly: Follow local guidelines for disposing of used grit and slurry.
9. Exploring Rockscapes.net for Inspiration
Ready to start your own rock tumbling adventure? Rockscapes.net is your go-to source for inspiration and information. Discover stunning landscape designs, learn about different rock types, and get expert tips on creating your own polished masterpieces.
At Rockscapes.net, located at 1151 S Forest Ave, Tempe, AZ 85281, United States, you can find a wealth of resources to fuel your creativity. Our team of experts is here to help you choose the perfect rocks and master the art of rock tumbling. You can reach us at +1 (480) 965-9011 or visit our website, rockscapes.net, to explore the possibilities.
10. Frequently Asked Questions (FAQs)
10.1. Can you use any rocks in a rock tumbler?
No, not all rocks are suitable. The best rocks for tumbling are hard, dense, and free of fractures.
10.2. What hardness should rocks be for tumbling?
Rocks should have a Mohs hardness between 6 and 8 for optimal tumbling results.
10.3. What are the best types of rocks for beginners to tumble?
Jasper and agate are excellent choices for beginners due to their durability and ease of polishing.
10.4. How do I clean rocks between tumbling stages?
Thoroughly wash the rocks and tumbler barrel with water and a scrub brush to remove any grit residue.
10.5. Can I mix different types of rocks in the same tumbler barrel?
It’s best to tumble rocks of similar hardness together to ensure even wear and polishing.
10.6. What is ceramic media and why is it used in rock tumbling?
Ceramic media cushions delicate stones and helps distribute grit evenly, preventing damage.
10.7. How long does each stage of rock tumbling take?
Each stage typically lasts about 7 days, but this can vary depending on the type of rock and grit used.
10.8. What do I do if my rocks aren’t polishing properly?
Check for grit contamination, ensure you’re using the correct grit sequence, and consider extending the polishing stage.
10.9. Where can I find high-quality rocks for tumbling?
Rockscapes.net offers a wide selection of rocks suitable for tumbling, along with expert advice and resources.
10.10. Are there any safety precautions I should take while rock tumbling?
Yes, wear a dust mask and gloves, work in a well-ventilated area, and dispose of waste properly.
By understanding the nuances of rock selection and tumbling techniques, you can transform ordinary stones into extraordinary gems. Whether you’re a beginner or an experienced hobbyist, Rockscapes.net is here to support your passion for rock tumbling and landscape design. Explore our website, rockscapes.net, today and discover the endless possibilities that await. Don’t forget to check out our blog and resource library for more insightful articles and tips to perfect your rock polishing skills. Join our community and share your creations – we can’t wait to see what you’ll tumble next!