Do Rocks Come Back In Animal Crossing? Yes, rocks do respawn in Animal Crossing, adding a dynamic element to your island’s resource management. At rockscapes.net, we know that understanding the ins and outs of resource gathering is key to enjoying the game to its fullest, and knowing how rocks behave is part of creating your dream island landscape. With our tips and tricks, you’ll master rock management in no time, enhancing your island’s beauty with stones and rock arrangements.
1. Understanding Rock Mechanics in Animal Crossing
In Animal Crossing: New Horizons, rocks serve as vital sources of materials. These materials are essential for crafting tools, furniture, and other items that contribute to the development and personalization of your island. Each rock can yield up to eight resources per day, making them valuable assets for players.
1.1. The Importance of Rocks
Rocks are not just decorative elements; they are functional resources. When struck with a shovel or axe, they produce:
- Iron nuggets
- Stone
- Clay
- Gold nuggets (rare)
- Bells (money rock)
These materials are fundamental for crafting and upgrading tools, allowing players to progress through the game and engage in various activities.
1.2. Maximizing Resource Yield
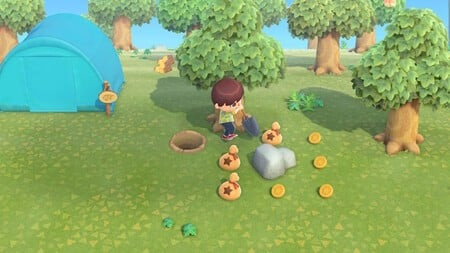
To get the most out of each rock, players often employ a technique to prevent being pushed back after each strike. This involves digging holes behind the player to brace themselves, ensuring all eight resources are collected efficiently.
2. Rock Respawn Mechanics Explained
One of the most frequently asked questions by Animal Crossing players is whether rocks respawn after being destroyed. The answer is yes, but with specific conditions.
2.1. How Rocks Disappear
Rocks can be destroyed if a player consumes fruit, which grants temporary strength, and then strikes the rock with a shovel or axe. This action breaks the rock, leaving an empty space in its place.
2.2. The Respawn Process
After a rock is destroyed, it will respawn on the island the following day. However, there are a few crucial details to keep in mind:
- One Rock at a Time: Only one rock will respawn per day. If multiple rocks are destroyed, it will take several days for all of them to reappear.
- Random Location: The respawned rock will appear in a random location on the island. This can sometimes be inconvenient, as it might appear in an undesirable spot.
- Island Design Considerations: Players planning to terraform or design specific areas of their island need to manage rock placement carefully to avoid disruptions.
2.3. Controlling Rock Placement
While the respawn location is random, there are methods to influence where rocks appear. By covering most of the island with designs, flowers, or furniture, players can limit the available spaces for rocks to spawn. This forces the rocks to appear in the few remaining open areas, allowing for more controlled placement.
3. Step-by-Step Guide to Rock Farming
Rock farming involves strategically destroying and respawning rocks to place them in a specific, easily accessible location. This method requires patience and planning but can significantly streamline resource gathering.
3.1. Preparation
Before starting the rock farming process, ensure the following:
- Clear Island Space: Remove weeds, flowers, and any unnecessary items from the island to provide more open spaces for rocks to spawn initially.
- Gather Resources: Stock up on shovels and axes, as you’ll be using them frequently.
- Fruit Supply: Have plenty of fruit on hand to gain the strength needed to break the rocks.
3.2. Destroying Existing Rocks
Eat a piece of fruit and strike each rock with a shovel or axe until it breaks. Remember, only one rock will respawn each day, so this process will take several days to complete.
3.3. Controlling Respawn Locations
To control where the rocks respawn, cover most of your island with:
- Custom Designs: Place custom design patterns on the ground in areas where you don’t want rocks to spawn.
- Flowers: Plant flowers densely to prevent rocks from appearing in those spots.
- Furniture: Place furniture items strategically to block potential spawn locations.
By limiting the available spaces, you can guide the rocks to respawn in a designated area, such as a rock garden.
3.4. Creating a Rock Garden
A rock garden is a specific area on your island where all the rocks are clustered together for easy access. To create one:
- Choose a Location: Select a convenient spot for your rock garden, preferably near your crafting area or house.
- Block Unwanted Areas: Cover the rest of your island as described above to prevent rocks from spawning outside the garden.
- Wait and Adjust: Each day, a rock will respawn in one of the few available spots in your garden. If a rock spawns outside the garden, adjust your blocking strategy and continue the process until all rocks are in the desired location.
3.5. Maintaining Your Rock Garden
Once your rock garden is complete, maintain it by ensuring the surrounding areas remain covered to prevent rocks from spawning elsewhere.
4. Common Issues and Solutions
Even with careful planning, issues can arise during the rock farming process. Here are some common problems and their solutions:
4.1. Rocks Spawning in Unexpected Locations
Problem: Despite blocking most of the island, rocks occasionally spawn in unexpected places.
Solution: Double-check all blocked areas to ensure there are no gaps. Even a small uncovered space can allow a rock to spawn. Use custom designs to fill in any overlooked areas.
4.2. Time Consumption
Problem: Rock farming can be time-consuming, especially when waiting for rocks to respawn one at a time.
Solution: Break up the process into smaller tasks. Destroy one or two rocks each day and focus on other activities while waiting for them to respawn.
4.3. Accidental Rock Destruction
Problem: Accidentally destroying a rock before you’re ready can disrupt your plans.
Solution: Avoid eating fruit unless you are ready to destroy a rock. If you accidentally eat fruit, be extra cautious when using tools near rocks.
5. Incorporating Rocks into Your Landscape Design
Beyond resource gathering, rocks can be used creatively to enhance your island’s aesthetic. Here are some ideas for incorporating rocks into your landscape design:
5.1. Natural Rock Formations
Create natural-looking rock formations by placing rocks of different sizes and shapes together. Add plants, moss, and other decorative items to enhance the realism.
5.2. Rock Pathways and Bridges
Use rocks to create pathways and bridges, adding texture and visual interest to your island. Combine rocks with dirt paths or wooden planks for a rustic look.
5.3. Zen Gardens
Design a tranquil zen garden using rocks, sand, and carefully placed plants. This can create a peaceful retreat on your island.
5.4. Water Features
Incorporate rocks into water features such as ponds and waterfalls. Rocks can add depth and dimension to these elements, making them more visually appealing.
5.5. Accent Pieces
Use rocks as accent pieces throughout your island. Place a large, unique rock in a prominent location to draw attention and add character to your landscape.
6. The Aesthetic Appeal of Rocks
Rocks offer more than just resources; they bring a sense of natural beauty and timelessness to your Animal Crossing island. Their rugged textures and varied shapes provide a counterpoint to the softer elements of the game, such as flowers and trees.
6.1. Textural Contrast
The rough texture of rocks contrasts beautifully with the smooth surfaces of paths and furniture. This contrast adds depth and visual interest to your island’s landscape.
6.2. Color Variation
Rocks come in various shades and colors, from light gray to dark brown. This variation allows you to create different moods and effects in your designs.
6.3. Natural Harmony
Incorporating rocks into your landscape helps create a sense of natural harmony. They blend seamlessly with other natural elements, such as trees, flowers, and water, creating a cohesive and balanced environment.
7. Advanced Rock Manipulation Techniques
For players looking to take their rock management skills to the next level, there are advanced techniques that can further refine the process.
7.1. Precision Placement
Achieving perfect rock placement requires meticulous planning and execution. Use custom designs to create a grid on your island, allowing you to visualize exactly where each rock will spawn.
7.2. Time Travel Considerations
Some players use time travel to speed up the rock farming process. While this can be effective, it can also have unintended consequences, such as affecting the growth of plants and the availability of certain items. Use time travel with caution.
7.3. Collaborating with Other Players
Collaborate with other players to exchange tips and resources. Visiting other islands can provide inspiration and help you refine your rock management strategies.
8. Leveraging Rockscapes.net for Your Animal Crossing Needs
At rockscapes.net, we understand the passion and creativity that Animal Crossing inspires. That’s why we’re dedicated to providing you with the information and inspiration you need to create the island of your dreams.
8.1. Design Inspiration
Explore our gallery of stunning rock formations and landscape designs to spark your imagination. See how other players have used rocks to create unique and beautiful environments.
8.2. Expert Tips and Tutorials
Access our comprehensive library of tips and tutorials on rock management, island design, and more. Learn from experienced players and discover new techniques to enhance your gameplay.
8.3. Community Forum
Connect with other Animal Crossing enthusiasts in our community forum. Share your creations, ask questions, and get feedback from fellow players.
8.4. Resource Guides
Utilize our detailed resource guides to learn about the different types of rocks available in the game and how to use them effectively.
9. The Future of Rock Management in Animal Crossing
As Animal Crossing continues to evolve with new updates and features, the role of rocks in the game may also change. Staying informed about the latest developments will help you adapt your rock management strategies and continue creating innovative and beautiful landscapes.
9.1. Potential Updates
Keep an eye out for potential updates that could affect rock mechanics, such as new types of rocks, changes to the respawn process, or new ways to use rocks in crafting and design.
9.2. Community Innovations
The Animal Crossing community is constantly developing new techniques and strategies for rock management. Stay connected with the community to learn about these innovations and incorporate them into your gameplay.
10. Frequently Asked Questions About Rocks in Animal Crossing
Still have questions about rocks in Animal Crossing? Here are some frequently asked questions and their answers:
10.1. Can I move rocks after they have spawned?
No, rocks cannot be moved once they have spawned. The only way to change their location is to destroy them and allow them to respawn elsewhere.
10.2. How many rocks can I have on my island?
You can have a maximum of six rocks on your island at any given time.
10.3. Do rocks respawn on mystery island tours?
No, rocks do not respawn on mystery island tours. The rocks on these islands are fixed and do not change.
10.4. Can I customize the appearance of rocks?
No, you cannot customize the appearance of rocks. They have a fixed design that cannot be altered.
10.5. What happens if a rock spawns in a building or structure?
Rocks cannot spawn inside buildings or structures. If a potential spawn location is blocked by a building, the rock will respawn in the next available space.
10.6. Do rocks affect my island rating?
The presence of rocks does not directly affect your island rating. However, the overall appearance and organization of your island, including how you incorporate rocks into your landscape, can influence your rating.
1. 7. How do I know which rock is the money rock?
The money rock is determined randomly each day. Hit each rock on your island to discover which one yields Bells instead of other materials.
10.8. Can I prevent rocks from spawning altogether?
No, you cannot prevent rocks from spawning altogether. The game requires a certain number of rocks to be present on your island.
10.9. What is the best tool to use for hitting rocks?
Both shovels and axes can be used to hit rocks. Shovels are generally preferred for their durability and ease of use.
10.10. Can I create a rock garden on the beach?
No, rocks cannot spawn on the beach. They can only spawn on the grassy areas of your island.
Rocks are more than just resources in Animal Crossing; they are integral to the game’s economy and aesthetics. By mastering rock management techniques, you can optimize your resource gathering and create stunning landscapes that reflect your personal style. At rockscapes.net, we’re here to support you every step of the way. Explore our website for more tips, inspiration, and resources to enhance your Animal Crossing experience. Let’s transform your island into a masterpiece of rock and design!
Address: 1151 S Forest Ave, Tempe, AZ 85281, United States
Phone: +1 (480) 965-9011
Website: rockscapes.net{width=450 height=253}
Money Rock in Animal Crossing yielding Bells
{width=450 height=253}
Digging holes to maximize resource collection from rocks