Do you want to learn how to craft a unique rock feature for your landscape? Making your own rocks opens up a world of creative possibilities for garden design and personalized rockscapes. At rockscapes.net, we’ll guide you through various methods of rock creation, from simple DIY projects to more advanced techniques, ensuring you achieve the perfect natural stone look for your outdoor space. Explore the art of creating artificial rock, constructing captivating rock gardens, and discovering the beauty of manufactured stone for your landscapes.
1. What are the Basic Methods for Making a Rock?
There are several ways to make a rock, each with its own set of materials and techniques. Ultimately, the method you choose will depend on the desired appearance and the rock’s purpose.
Here’s a look at three popular methods for creating rocks:
- Cement-Based Rocks: This method is great for creating large, sturdy rocks. You’ll need cement, sand, water, and a mold or framework.
- Hypertufa Rocks: Using a mix of cement, perlite, peat moss, and water, hypertufa is lighter than concrete and offers a more natural look.
- DIY Rocks with Glue and Sand: This is the simplest method, perfect for small decorative rocks. It involves layering sand, pebbles, and glue in a cup.
No matter your chosen method, creating rocks involves a blend of science and creativity. Understanding the properties of your materials and the geological processes they mimic can lead to stunning and realistic results.
2. What Materials Do You Need to Make Cement-Based Rocks?
For creating sturdy, sizable rocks with a natural stone appearance, cement-based rocks are a popular choice. Here’s what you’ll need:
- Portland Cement: This is the binder that holds everything together, providing strength and durability.
- Sand: Sand acts as a filler and adds texture to the mix. Use clean, washed sand for best results.
- Water: Water activates the cement and allows the mixture to be workable.
- Reinforcement (Optional): Wire mesh or rebar can be added for extra strength, especially for larger rocks.
- Coloring Agents (Optional): Concrete dyes or pigments can be added to tint the cement and achieve a more natural rock color.
- Mold or Framework: This can be a simple cardboard box, a custom-built frame, or even a hole dug in the ground.
- Tools: You’ll need tools like a mixing container, shovel or trowel, gloves, and a wire brush for texturing.
2.1. Material Selection Tips
- Cement: Choose a high-quality Portland cement for optimal strength.
- Sand: Use a mix of coarse and fine sand for a more natural texture.
- Coloring Agents: Experiment with different colors to achieve the desired rock appearance. Browns, grays, and blacks are popular choices.
- Reinforcement: For large rocks, consider using rebar for maximum strength.
Properly preparing your materials ensures a successful rock-making project. Using quality ingredients and the right tools will allow you to create durable and visually appealing artificial rocks for any rock feature.
3. How Do You Make Cement-Based Rocks Step-by-Step?
Creating cement-based rocks can seem daunting, but it’s a manageable process with a little patience. Here’s a step-by-step guide:
- Prepare the Mold: Line your mold with plastic sheeting to prevent the cement from sticking. If you’re using a framework, ensure it’s sturdy and the desired shape.
- Mix the Cement: In a mixing container, combine Portland cement, sand, and water according to the manufacturer’s instructions. The mixture should be thick enough to hold its shape but still workable. Add coloring agents if desired.
- Pour the Cement: Pour the cement mixture into the mold, filling it evenly. If using reinforcement, embed wire mesh or rebar into the cement as you pour.
- Add Texture: While the cement is still wet, use a wire brush, trowel, or other tools to create texture. You can also press in small stones or pebbles for added realism.
- Cure the Cement: Cover the mold with plastic sheeting and let it cure for at least 24-48 hours. This allows the cement to harden properly.
- Remove the Rock: Once the cement is fully cured, carefully remove the rock from the mold.
- Final Touches: Use a chisel or hammer to refine the rock’s shape or add more texture. You can also apply a concrete sealant for added protection.
3.1. Tips for Success
- Work in Layers: Pour the cement in layers to prevent cracking and ensure even distribution.
- Experiment with Texture: Don’t be afraid to get creative with texturing tools. Natural rocks have a variety of textures, so try to mimic this in your artificial rock.
- Cure Properly: Curing is essential for the strength and durability of your rock. Keep the cement moist during the curing process to prevent cracking.
With these steps and tips, you can create impressive cement-based rocks that will enhance any rock garden or water feature.
4. What are Hypertufa Rocks and How Do You Make Them?
Hypertufa rocks offer a lighter, more natural-looking alternative to traditional cement-based rocks. The mix is porous, allowing plants to grow directly in the rock, making them perfect for rock gardens.
Hypertufa is a lightweight concrete made from a mixture of:
- Portland Cement: Provides the structure and hardness.
- Peat Moss: Adds organic matter, making the mixture lighter and more porous.
- Perlite or Vermiculite: Improves drainage and aeration.
- Water: Activates the cement and binds the ingredients.
4.1. Step-by-Step Guide to Making Hypertufa Rocks
- Mix the Ingredients: In a large container, combine equal parts of Portland cement, peat moss, and perlite or vermiculite. Add water gradually until the mixture is damp but not soggy. It should hold its shape when squeezed.
- Create the Form: You can use a mold, such as a cardboard box or plastic container, or sculpt the hypertufa freehand.
- Apply the Mixture: Press the hypertufa mixture into the mold, ensuring it’s evenly distributed. If sculpting freehand, build up the rock gradually, adding texture as you go.
- Cure the Hypertufa: Cover the rock with plastic sheeting and let it cure for at least 24-48 hours. Keep the hypertufa moist during the curing process.
- Remove and Refine: Once cured, remove the rock from the mold. Use a wire brush or other tools to refine the texture and shape.
- Age the Hypertufa: To give the rock a more weathered look, soak it in water for several weeks, changing the water regularly. This will leach out excess lime and create a more hospitable environment for plants.
4.2. Tips for Working with Hypertufa
- Wear Gloves: Hypertufa can be harsh on the skin, so wear gloves when working with it.
- Experiment with Texture: Use a variety of tools and techniques to create a natural rock texture.
- Add Drainage: Make sure to include drainage holes in your hypertufa rock, especially if you plan to plant in it.
Hypertufa rocks blend seamlessly into rock gardens, providing a unique and natural touch. The ability to grow plants directly in the rock enhances its aesthetic appeal, creating a living, breathing element in your landscape.
5. How to Make Small Decorative Rocks with Glue and Sand?
For smaller, decorative rocks, a simple method using glue and sand is an excellent choice. This is a fun and easy project, perfect for adding accents to planters, fairy gardens, or other small-scale landscapes.
5.1. Materials You’ll Need
- Sand: Fine or coarse sand, depending on the desired texture.
- Pebbles: Small pebbles or gravel for added dimension.
- Glue: White glue or craft glue.
- Disposable Cups: To act as molds.
5.2. Step-by-Step Instructions
- Layer the Materials: In a disposable cup, alternate layers of sand, glue, and pebbles. Start with a layer of sand, followed by a layer of glue, then a layer of pebbles. Repeat this process until the cup is about one-third full.
- Allow to Dry: Let the mixture dry completely. This may take several days, depending on the humidity and temperature.
- Remove the Rock: Once the rock is dry, carefully cut the cup away from the rock.
- Examine the Rock: Observe the layers and textures of your new rock. Each rock will be unique, offering a personalized touch to your decor.
5.3. Tips for Success
- Thin Layers: Use thin layers of sand and glue to ensure the rock dries properly.
- Outdoor Drying: If possible, let the rocks dry outside in the sun to speed up the process.
- Experiment: Try different types of sand, pebbles, and even small shells to create unique rock formations.
This simple method of making decorative rocks is a fun and easy way to add a personal touch to your landscape. These rocks can be used in a variety of ways, from accenting planters to creating miniature rock gardens.
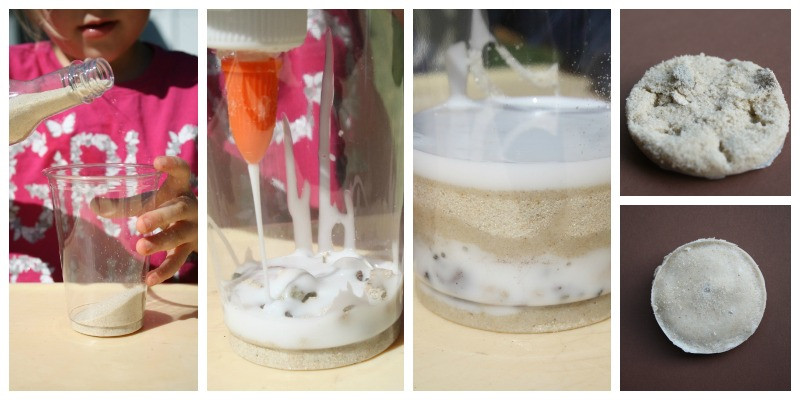 DIY Rock Making Steps
Creating a DIY rock with layering sand, glue, and pebbles in a cup for a fun and educational activity.
6. How Do You Incorporate Color into Artificial Rocks?
Adding color to artificial rocks can enhance their realism and allow you to match them to the surrounding landscape. There are several ways to incorporate color into your rock-making projects:
- Concrete Dyes: These are specially formulated pigments designed to be mixed with cement. They come in a wide range of colors and can be used to create realistic rock hues.
- Acrylic Paints: Acrylic paints can be applied to the surface of the rock after it has cured. This allows for more detailed coloring and shading.
- Natural Pigments: Natural pigments, such as iron oxide, can be added to the cement mixture for a more subtle, earthy color.
6.1. Tips for Coloring Artificial Rocks
- Mix Colors: Experiment with mixing different colors to achieve the desired rock appearance.
- Apply in Layers: Apply color in layers to create depth and dimension.
- Use Reference Photos: Use photos of natural rocks as a reference when coloring your artificial rocks.
- Seal the Color: Apply a concrete sealant after coloring to protect the color and prevent fading.
By incorporating color into your artificial rocks, you can create a more realistic and visually appealing landscape.
7. How to Texture Artificial Rocks for a Natural Look?
Texture is key to making artificial rocks look realistic. Natural rocks have a variety of textures, from smooth and rounded to rough and jagged. Here are some techniques for adding texture to your artificial rocks:
- Wire Brush: Use a wire brush to create a rough, weathered texture on the surface of the rock.
- Trowel: Use a trowel to create smooth, rounded edges and surfaces.
- Stamps: Use rubber stamps or other textured objects to create patterns on the surface of the rock.
- Natural Objects: Press natural objects, such as leaves, twigs, or small stones, into the cement to create unique textures.
- Chisels and Hammers: Use chisels and hammers to create cracks, fissures, and other natural rock formations.
7.1. Texturing Tips
- Vary the Texture: Use a variety of texturing techniques to create a more natural look.
- Study Natural Rocks: Observe the textures of natural rocks in your area and try to mimic them in your artificial rocks.
- Don’t Overdo It: Too much texture can make the rock look artificial. Aim for a subtle, natural look.
Texturing is a crucial step in creating realistic artificial rocks. By using a variety of techniques and paying attention to detail, you can create rocks that look like they’ve been weathered and shaped by nature.
8. How Do You Ensure the Durability of Your Artificial Rocks?
Durability is a key consideration when making artificial rocks, especially if they will be used in outdoor settings. Here are some tips for ensuring the longevity of your artificial rocks:
- Use Quality Materials: Use high-quality Portland cement, sand, and other materials for optimal strength.
- Reinforce the Rock: Add wire mesh or rebar to the cement mixture for extra strength.
- Cure Properly: Cure the cement properly to allow it to harden fully.
- Apply a Sealant: Apply a concrete sealant to protect the rock from weathering and erosion.
- Provide Drainage: Ensure the rock has adequate drainage to prevent water from pooling and causing damage.
8.1. Additional Tips
- Avoid Thin Sections: Avoid creating thin sections in the rock that are prone to cracking.
- Protect from Freezing: In cold climates, protect the rock from freezing temperatures to prevent damage.
- Maintain Regularly: Inspect the rock regularly and repair any cracks or damage promptly.
By following these tips, you can create artificial rocks that will withstand the elements and provide years of enjoyment.
9. How to Integrate Artificial Rocks into Your Landscape Design?
Artificial rocks can be a versatile addition to any landscape design. Here are some ideas for integrating them into your outdoor space:
- Rock Gardens: Use artificial rocks to create a stunning rock garden. Arrange the rocks in a natural-looking pattern and fill in the spaces with plants.
- Water Features: Incorporate artificial rocks into waterfalls, ponds, and other water features.
- Pathways: Use artificial rocks to create pathways and stepping stones.
- Retaining Walls: Use artificial rocks to build retaining walls.
- Accents: Use artificial rocks as accents in planters, flower beds, and other garden areas.
9.1. Design Tips
- Consider Scale: Choose rocks that are the appropriate size for your landscape.
- Create Balance: Arrange the rocks in a way that creates balance and harmony.
- Use Natural Patterns: Mimic the patterns of natural rock formations in your area.
- Add Plants: Plants can soften the look of artificial rocks and help them blend into the landscape.
Integrating artificial rocks into your landscape design can add a unique and natural touch to your outdoor space. With careful planning and execution, you can create a stunning landscape that showcases the beauty of artificial rocks.
10. What are the Advantages of Using Artificial Rocks in Landscaping?
Artificial rocks offer several advantages over natural rocks in landscaping:
- Lightweight: Artificial rocks are much lighter than natural rocks, making them easier to handle and install.
- Customizable: Artificial rocks can be customized to fit your specific needs and design preferences.
- Durable: Artificial rocks are durable and weather-resistant.
- Cost-Effective: Artificial rocks can be more cost-effective than natural rocks, especially for large-scale projects.
- Environmentally Friendly: Artificial rocks can be made from recycled materials, making them an environmentally friendly choice.
10.1. Other Benefits
- Consistent Appearance: Artificial rocks offer a consistent appearance, which can be beneficial for creating a uniform landscape.
- Easy to Repair: Artificial rocks are easy to repair if they become damaged.
- Versatile: Artificial rocks can be used in a variety of landscaping applications.
The advantages of using artificial rocks in landscaping make them a popular choice for homeowners, landscapers, and designers. Their versatility, durability, and cost-effectiveness make them an excellent option for creating stunning outdoor spaces.
11. What are the Safety Precautions to Take When Making Artificial Rocks?
When working with cement, glue, and other materials used to create artificial rocks, it’s important to take certain safety precautions:
- Wear Protective Gear: Always wear gloves, safety glasses, and a dust mask when working with cement or other potentially hazardous materials.
- Work in a Well-Ventilated Area: Work in a well-ventilated area to avoid inhaling dust or fumes.
- Follow Manufacturer’s Instructions: Follow the manufacturer’s instructions for mixing and using all materials.
- Keep Out of Reach of Children: Keep all materials and tools out of reach of children.
11.1. Additional Safety Tips
- Wash Hands: Wash your hands thoroughly after working with cement or other materials.
- Avoid Eye Contact: Avoid getting cement or other materials in your eyes. If contact occurs, rinse immediately with water.
- Seek Medical Attention: Seek medical attention if you experience any adverse reactions to the materials you are using.
By following these safety precautions, you can protect yourself and others from potential hazards while making artificial rocks.
12. Where Can You Find Inspiration for Rock Garden Designs?
Finding inspiration for rock garden designs is easier than ever with a wealth of resources available online and in print. Here are some great places to look:
- Rockscapes.net: Explore our gallery of stunning rock garden designs for inspiration and ideas.
- Gardening Magazines: Look through gardening magazines for articles and photos of rock gardens.
- Online Forums: Join online gardening forums and communities to share ideas and get feedback from other gardeners.
- Botanical Gardens: Visit local botanical gardens to see rock gardens in person and get a sense of what works well in your area.
- Pinterest: Browse Pinterest for a vast collection of rock garden designs and ideas.
12.1. Tips for Gathering Inspiration
- Take Photos: Take photos of rock gardens that you like and use them as a reference when designing your own.
- Consider Your Climate: Choose plants and rocks that are appropriate for your climate.
- Think About Scale: Consider the scale of your rock garden and choose rocks and plants that are the appropriate size.
- Experiment: Don’t be afraid to experiment with different designs and ideas.
With a little research and creativity, you can find plenty of inspiration for creating a rock garden that is both beautiful and functional.
13. What Types of Plants Thrive in Rock Gardens?
Rock gardens provide a unique environment for plants that prefer well-drained soil and full sun. Here are some types of plants that thrive in rock gardens:
- Succulents: Succulents are drought-tolerant plants that store water in their leaves and stems. They are perfect for rock gardens in dry climates.
- Alpine Plants: Alpine plants are adapted to growing in high-altitude, rocky environments. They are typically small and compact, making them ideal for rock gardens.
- Dwarf Conifers: Dwarf conifers add structure and texture to rock gardens. They are slow-growing and require little maintenance.
- Creeping Groundcovers: Creeping groundcovers spread quickly and help to fill in the spaces between rocks. They also help to prevent soil erosion.
- Ornamental Grasses: Ornamental grasses add movement and texture to rock gardens. They are low-maintenance and drought-tolerant.
13.1. Plant Selection Tips
- Consider Your Climate: Choose plants that are appropriate for your climate.
- Choose Plants with Similar Needs: Choose plants that have similar soil, water, and sunlight requirements.
- Consider Bloom Time: Choose plants that bloom at different times of the year to provide continuous color.
- Add Texture and Interest: Choose plants with a variety of textures, colors, and shapes to add interest to your rock garden.
By selecting the right plants for your rock garden, you can create a beautiful and thriving landscape that is both low-maintenance and visually appealing.
14. How Can You Use Lighting to Enhance Your Rock Garden?
Lighting can dramatically enhance the beauty and ambiance of your rock garden, especially at night. Here are some ways to use lighting to highlight your rock garden:
- Uplighting: Use uplighting to highlight individual rocks and plants. This creates a dramatic effect and emphasizes the textures and shapes of the rocks.
- Path Lighting: Use path lighting to illuminate pathways and steps in your rock garden. This provides safety and adds a warm, inviting glow to the landscape.
- Spotlighting: Use spotlights to focus on specific features in your rock garden, such as a waterfall or a specimen plant.
- String Lights: Use string lights to add a festive and whimsical touch to your rock garden.
14.1. Lighting Tips
- Use Low-Voltage Lighting: Low-voltage lighting is safer and more energy-efficient than traditional lighting.
- Choose Weather-Resistant Fixtures: Choose fixtures that are designed to withstand the elements.
- Consider the Color Temperature: Choose a color temperature that complements the colors of your rocks and plants.
- Use a Timer: Use a timer to automatically turn the lights on and off.
By using lighting effectively, you can transform your rock garden into a magical and inviting space that can be enjoyed day or night.
15. What are Some Common Mistakes to Avoid When Building a Rock Garden?
Building a rock garden can be a rewarding experience, but it’s important to avoid some common mistakes that can detract from the beauty and functionality of your landscape:
- Using Rocks That Are Too Small: Using rocks that are too small can make the rock garden look cluttered and unnatural.
- Arranging Rocks in a Symmetrical Pattern: Arranging rocks in a symmetrical pattern can make the rock garden look artificial and uninspired.
- Using the Wrong Type of Soil: Using the wrong type of soil can prevent plants from thriving in the rock garden.
- Overcrowding Plants: Overcrowding plants can make the rock garden look cluttered and prevent plants from getting the sunlight and air circulation they need.
- Failing to Provide Drainage: Failing to provide adequate drainage can lead to waterlogged soil and root rot.
15.1. Tips for Avoiding Mistakes
- Use a Variety of Rock Sizes: Use a variety of rock sizes to create a more natural-looking landscape.
- Arrange Rocks in a Natural Pattern: Arrange rocks in a way that mimics natural rock formations.
- Use Well-Drained Soil: Use well-drained soil that is appropriate for the types of plants you are growing.
- Space Plants Properly: Space plants properly to allow them to grow and thrive.
- Provide Adequate Drainage: Provide adequate drainage to prevent waterlogged soil.
By avoiding these common mistakes, you can create a rock garden that is both beautiful and functional.
16. How Can Rockscapes.Net Help You With Your Rock Garden Project?
At rockscapes.net, we understand the appeal of beautiful rock gardens and personalized outdoor spaces. That’s why we offer a wealth of resources to help you with every step of your rock garden project. Whether you’re looking for inspiration, information, or expert advice, we have you covered.
16.1. Rockscapes.net Resources
- Extensive Gallery: Browse our extensive gallery of rock garden designs for inspiration and ideas.
- Detailed Guides: Access our detailed guides on how to build a rock garden, choose the right plants, and incorporate lighting and other features.
- Expert Advice: Get expert advice from our team of landscaping professionals.
- Supplier Directory: Find reputable suppliers of rocks, plants, and other materials in your area.
16.2. Contact Information
If you need personalized assistance or have any questions, don’t hesitate to reach out to us:
- Address: 1151 S Forest Ave, Tempe, AZ 85281, United States
- Phone: +1 (480) 965-9011
- Website: rockscapes.net
16.3. Take the Next Step
Ready to bring your rock garden dreams to life? Visit rockscapes.net today to explore our resources, find inspiration, and get started on your project. Let us help you create a stunning and personalized outdoor space that you’ll enjoy for years to come.
FAQ: How Do You Make a Rock?
17.1. Can you really make a rock?
Yes, you can create artificial rocks using various methods such as cement-based mixtures, hypertufa, or even simple glue and sand techniques. These methods allow you to customize the size, shape, and appearance of the rocks for your landscaping needs.
17.2. What is hypertufa and how is it used to make rocks?
Hypertufa is a lightweight concrete mixture made from Portland cement, peat moss, perlite or vermiculite, and water. It is used to create porous, natural-looking rocks ideal for rock gardens, as plants can grow directly in them.
17.3. What are the main ingredients for cement-based artificial rocks?
The primary ingredients are Portland cement, sand, and water. Optional ingredients include wire mesh or rebar for reinforcement and concrete dyes for coloring.
17.4. How do you add texture to artificial rocks to make them look natural?
You can add texture using tools like wire brushes, trowels, stamps, or by pressing natural objects like leaves or stones into the cement mixture before it dries.
17.5. What safety precautions should you take when making artificial rocks?
Always wear protective gear such as gloves, safety glasses, and a dust mask. Work in a well-ventilated area, follow the manufacturer’s instructions for all materials, and keep materials out of reach of children.
17.6. How can you ensure the durability of artificial rocks?
Use high-quality materials, reinforce the rock with wire mesh or rebar, cure the cement properly, apply a sealant, and ensure adequate drainage to prevent water damage.
17.7. Can you paint artificial rocks?
Yes, you can paint artificial rocks with acrylic paints after they have cured. Apply the paint in layers to create depth and dimension, and seal the color to prevent fading.
17.8. What are some design ideas for incorporating artificial rocks into a landscape?
Artificial rocks can be used in rock gardens, water features, pathways, retaining walls, or as accents in planters and flower beds. Consider scale, balance, and natural patterns when integrating them into your landscape design.
17.9. What types of plants thrive in rock gardens?
Plants that prefer well-drained soil and full sun, such as succulents, alpine plants, dwarf conifers, creeping groundcovers, and ornamental grasses, thrive in rock gardens.
17.10. How can Rockscapes.net assist with a rock garden project?
Rockscapes.net offers an extensive gallery of rock garden designs, detailed guides on building rock gardens, expert advice from landscaping professionals, and a directory of reputable suppliers for rocks, plants, and materials.
By following these guidelines and exploring the resources available at rockscapes.net, you can confidently embark on your rock-making journey and create stunning, personalized rock features for your landscape.