How Do You Make Rock Candy Crystals? Making rock candy crystals is a fun and educational activity that combines science and sweets, perfect for a delightful treat. At rockscapes.net, we believe in the beauty of both natural and homemade wonders. This guide will show you how to create your own dazzling sugar crystals, exploring the fascinating process of crystal formation. We will also explore the different variables that you can tweak and adjust to create the perfect rock candy crystal that will have everyone you know amazed. Get ready to transform simple ingredients into edible gems with this step-by-step guide to creating rock candy, and think about the geology and geography of naturally forming crystals.
1. Understanding Rock Candy Crystals: A Sweet Geological Analogy
What exactly are rock candy crystals? Rock candy crystals are essentially large sugar crystals grown from a supersaturated sugar solution, similar to how minerals form in nature. This process, known as recrystallization, is a simple yet fascinating demonstration of crystal growth that you can easily conduct in your own kitchen. Like landscapes crafted with care using natural stone, rock candy creation is an artful blend of science and aesthetics.
1.1 What is a Supersaturated Solution?
A supersaturated solution contains more solute (sugar, in this case) than can normally be dissolved in the solvent (water) at a given temperature. Heating the water allows you to dissolve more sugar. As the solution cools, the sugar molecules begin to come out of the solution and attach to seed crystals, forming larger crystals over time.
1.2 The Science Behind Crystal Formation
According to research from Arizona State University’s School of Earth and Space Exploration, in July 2025, crystal formation occurs as molecules arrange themselves in a highly ordered, repeating pattern. In the case of rock candy, sugar molecules (sucrose) in the supersaturated solution bind together to form these structured crystals. The slower the cooling process, the larger and more well-defined the crystals tend to be. The same is true of many naturally occurring crystals that are formed from supersaturated solutions in nature.
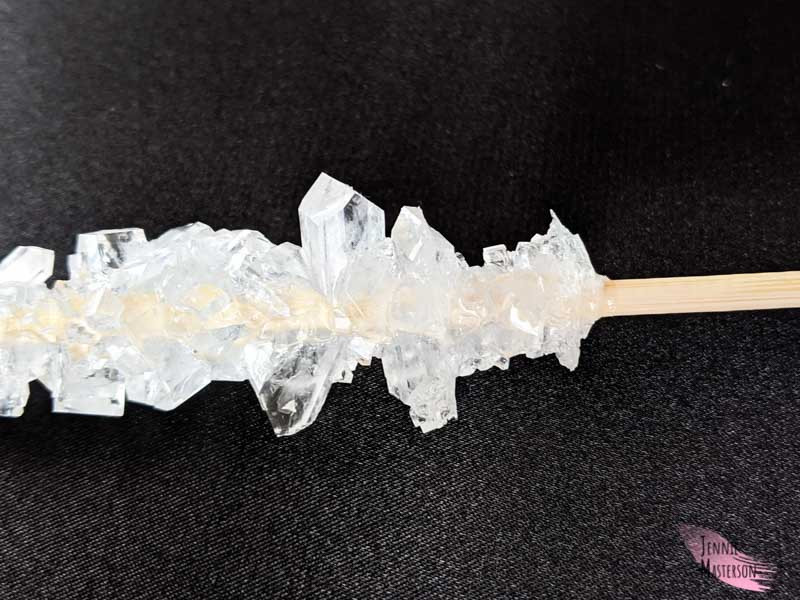 Close-up of rock candy showing crystal structure.
1.3 Rock Candy vs. Natural Crystals: A Comparison
While rock candy is made from a single compound (sugar), natural crystals can be composed of various minerals and elements. Natural crystals form over geological timescales under specific conditions of temperature, pressure, and chemical environment. The geometric shapes and purity of natural crystals, such as quartz or amethyst, are similar to rock candy in their structured beauty. Just as rockscapes.net provides a variety of natural stones for landscaping, the world of crystals offers endless aesthetic possibilities.
2. Gathering Your Supplies for Perfect Rock Candy
What do you need to gather to begin? To make rock candy crystals, you’ll need a few basic ingredients and supplies. Gathering these items beforehand will streamline the process and set you up for success.
2.1 Essential Ingredients
- Granulated Sugar: The main ingredient for crystal formation.
- Water: Used to create the supersaturated solution.
- Optional Flavorings: Extracts like vanilla, peppermint, or lemon can add delicious flavors.
- Food Coloring: To create vibrant, colorful crystals.
2.2 Necessary Equipment
- Saucepan: For boiling the sugar and water mixture.
- Glass Jars or Glasses: To grow the crystals. Mason jars work well.
- Wooden Skewers or Cotton Twine: To provide a surface for crystal growth.
- Clothespins: To hold the skewers in place.
- Measuring Cups and Spoons: For accurate measurements.
- Candy Thermometer (Optional): To monitor the temperature of the sugar solution.
2.3 Tips for Selecting Quality Supplies
Choosing high-quality ingredients and equipment can impact the final product. Use pure granulated sugar for the best crystal formation. Ensure your jars and utensils are clean to prevent unwanted crystallization or contamination. If you’re using wooden skewers, soak them in water beforehand to prevent them from burning in the hot sugar solution.
 Rock candy sticks in a vase.
3. Step-by-Step Guide: Making Your Own Rock Candy Crystals
How do you go about making rock candy? This step-by-step guide walks you through the entire process of making rock candy crystals, from preparing your seed crystals to growing the final product.
3.1 Preparing the Seed Crystals
- Wet the Skewers: Dip the wooden skewers in water and then roll them in granulated sugar. This coating of sugar will act as seed crystals for the rock candy to grow on.
- Dry the Skewers: Allow the sugar-coated skewers to dry completely. This may take several hours, or you can speed up the process by placing them in a low-temperature oven (around 170°F or 77°C) for about 15-20 minutes.
3.2 Creating the Sugar Solution
- Combine Water and Sugar: In a saucepan, combine 1 cup of water with 3 cups of sugar. This ratio is crucial for creating a supersaturated solution.
- Heat the Mixture: Heat the mixture over medium heat, stirring constantly until the sugar is completely dissolved. Use a candy thermometer to monitor the temperature.
- Boil the Solution: Once the sugar is dissolved, bring the solution to a boil. Continue boiling for about 1-2 minutes, then remove from heat.
- Cool Slightly: Allow the solution to cool slightly for about 5-10 minutes. This prevents the jars from cracking when you pour in the hot liquid.
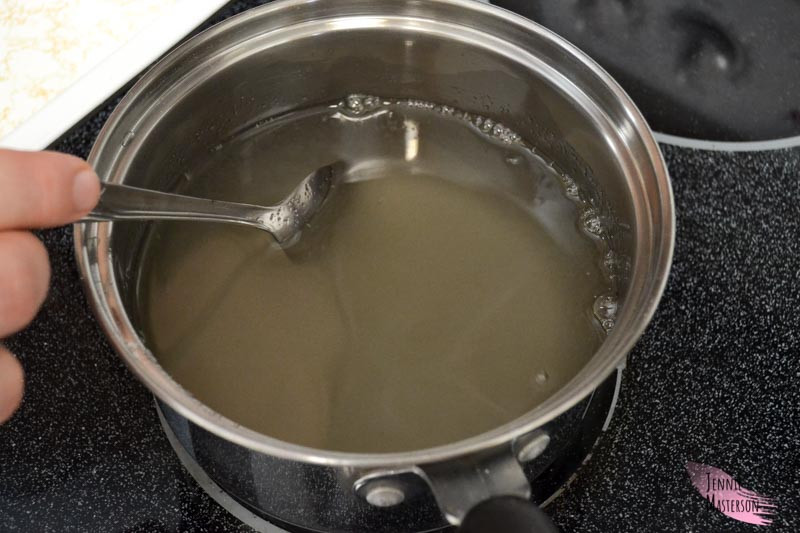 Stirring sugar and water in a pan.
3.3 Adding Color and Flavor (Optional)
- Add Flavorings: Stir in a few drops of your favorite extract, such as vanilla or peppermint.
- Add Food Coloring: Add food coloring until you achieve your desired shade. Remember that the color will lighten as the crystals grow.
3.4 Growing the Crystals
- Pour the Solution: Carefully pour the hot sugar solution into the prepared glass jars or glasses.
- Suspend the Skewers: Use clothespins to suspend the sugar-coated skewers in the solution, ensuring they don’t touch the bottom or sides of the jar.
- Allow to Crystallize: Place the jars in a cool, undisturbed location. Avoid moving or bumping the jars during the crystallization process.
- Wait Patiently: Allow the crystals to grow for at least 7-10 days. The longer you wait, the larger the crystals will become.
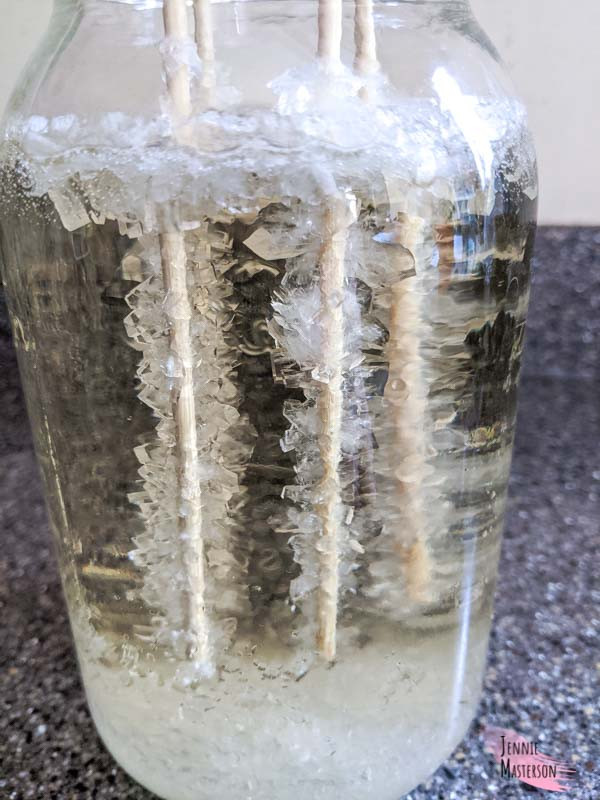
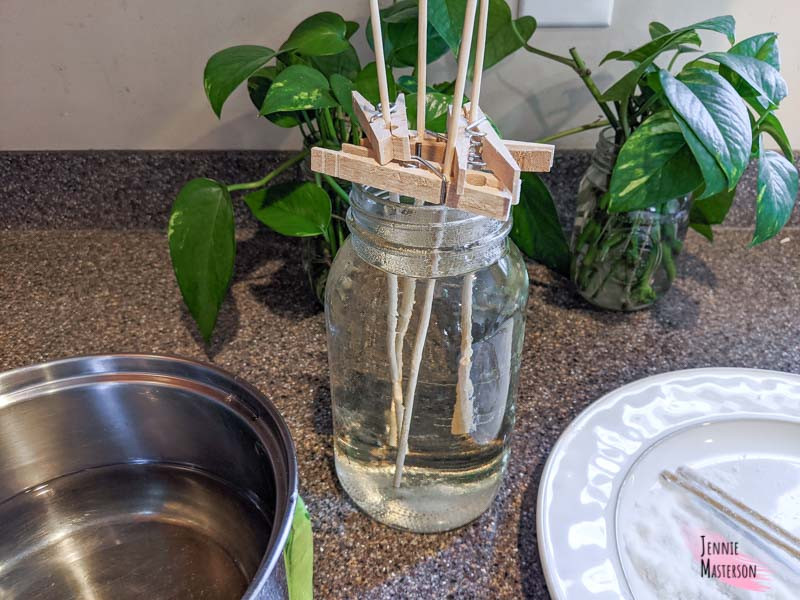 Mason jar filled with rock candy solution with skewers.
3.5 Harvesting and Drying the Crystals
- Remove the Crystals: Carefully remove the rock candy crystals from the jars.
- Dry the Crystals: Place the crystals on a clean plate or wire rack to dry. This may take several hours.
- Enjoy: Once the crystals are dry, they’re ready to enjoy!
4. Troubleshooting Common Rock Candy Problems
What do you do if something goes wrong? Making rock candy can sometimes present challenges. Here are some common problems and their solutions.
4.1 No Crystals Forming
- Problem: The solution may not be supersaturated enough.
- Solution: Try adding more sugar to the solution and reheating it. Ensure that the skewers are properly coated with seed crystals.
4.2 Small, Grainy Crystals
- Problem: The solution may have cooled too quickly or been disturbed during crystallization.
- Solution: Avoid moving the jars during the crystallization process. Try cooling the solution more slowly.
4.3 Crystals Sticking to the Jar
- Problem: The skewers may have been too close to the sides or bottom of the jar.
- Solution: Ensure the skewers are suspended in the center of the jar. You can also grease the inside of the jar with a small amount of butter or cooking spray before pouring in the solution.
4.4 Mold Growth
- Problem: The jars or utensils may not have been clean.
- Solution: Sterilize all equipment before starting the process. Use clean, filtered water.
5. Advanced Techniques: Customizing Your Rock Candy
How can you take your rock candy to the next level? Once you’ve mastered the basic recipe, you can experiment with advanced techniques to create unique and impressive rock candy crystals.
5.1 Layered Colors
To create layered colors, allow the crystals to grow for a few days, then remove them from the solution. Prepare a new batch of sugar solution with a different color and flavor, and re-suspend the crystals in the new solution. Repeat this process as many times as desired to create multiple layers.
5.2 Flavored Sugar Crust
Before drying the crystals, dip them in flavored sugar for an extra burst of flavor and visual appeal. Simply mix granulated sugar with a small amount of flavored extract (such as raspberry or coconut) and roll the wet crystals in the mixture.
5.3 Crystal Geodes
Create stunning crystal geodes by growing rock candy crystals inside hollow eggshells. Carefully crack open an egg, clean out the shell, and allow it to dry. Coat the inside of the shell with sugar and suspend it in the sugar solution. The crystals will grow inside the shell, creating a beautiful geode effect.
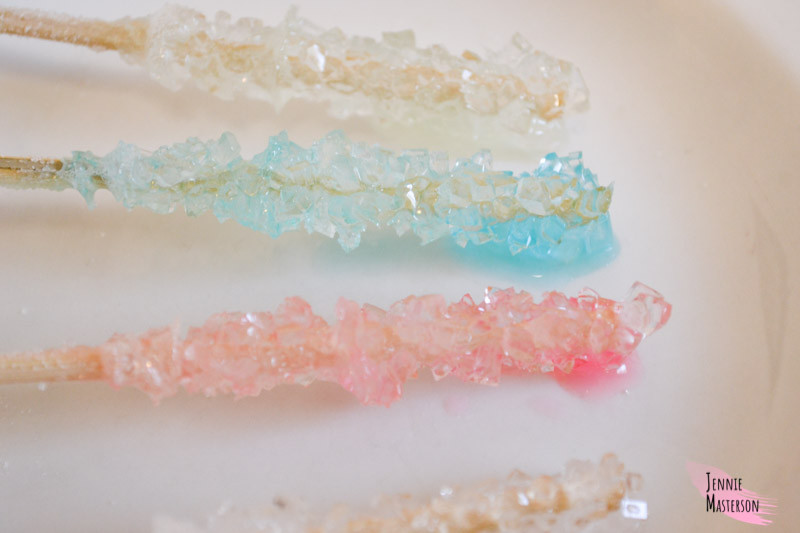 Colored rock candy on sticks.
6. The Geological Connection: Understanding Natural Crystal Formation
How does making rock candy relate to geology? The process of making rock candy provides a tangible, edible example of how crystals form in nature. Understanding the geological context can deepen your appreciation for both the scientific and artistic aspects of crystal formation.
6.1 Natural Crystal Formation Processes
Natural crystals form through various geological processes, including:
- Magmatic Crystallization: Crystals form as molten rock (magma) cools and solidifies.
- Hydrothermal Processes: Hot, water-rich fluids dissolve minerals and deposit them in veins or cavities as the fluid cools.
- Sedimentary Processes: Crystals precipitate from solutions as water evaporates, such as in salt flats or caves.
- Metamorphic Processes: Existing minerals recrystallize under high pressure and temperature to form new crystals.
6.2 Factors Affecting Natural Crystal Growth
Several factors influence the size, shape, and purity of natural crystals:
- Temperature: Slow cooling rates favor the growth of large, well-formed crystals.
- Pressure: High pressure can alter the crystal structure and promote the formation of certain minerals.
- Chemical Composition: The availability of specific elements and compounds determines which minerals can form.
- Space: Unrestricted space allows crystals to grow without interference, resulting in larger, more perfect specimens.
6.3 Examples of Stunning Natural Crystals
The natural world is full of breathtaking crystal formations. Some notable examples include:
- Quartz Crystals: Found in a variety of colors and forms, quartz is one of the most abundant minerals on Earth.
- Amethyst Geodes: These stunning formations feature a cavity lined with purple amethyst crystals.
- Beryl Crystals: Beryl includes varieties such as emerald (green) and aquamarine (blue), known for their vibrant colors and hexagonal crystal structure.
- Halite Crystals: These salt crystals can form in large, cubic shapes in arid environments.
7. Rock Candy as an Educational Tool
Why is making rock candy a good learning experience? Making rock candy is not just a fun activity; it’s also an excellent educational tool. It provides hands-on experience with scientific concepts such as saturation, crystallization, and molecular structure.
7.1 Teaching Scientific Concepts
Through rock candy making, you can teach children and adults about:
- Solubility: Understanding how much sugar can dissolve in water at different temperatures.
- Supersaturation: Learning how to create a solution that contains more solute than it can normally hold.
- Crystallization: Observing the process by which molecules arrange themselves in a repeating pattern to form crystals.
- Molecular Structure: Discussing the arrangement of sugar molecules in a crystal lattice.
7.2 Encouraging Experimentation
Rock candy making encourages experimentation and critical thinking. You can vary the ingredients, temperatures, and cooling rates to see how they affect the final product. This hands-on approach fosters a deeper understanding of scientific principles.
7.3 Connecting to Real-World Applications
Discuss the real-world applications of crystal formation, such as the production of pharmaceuticals, semiconductors, and other materials. Explore the role of crystals in geological processes and the formation of valuable minerals and gemstones.
8. Safety Precautions
What safety steps should you take? When making rock candy, it’s important to follow safety precautions to prevent burns and other accidents.
8.1. Adult Supervision
Children should always be supervised by an adult when making rock candy, especially when working with hot liquids and stoves.
8.2. Handling Hot Liquids
Use caution when handling hot sugar solutions. Wear oven mitts or heat-resistant gloves to protect your hands from burns.
8.3. Eye Protection
Wear safety glasses to protect your eyes from splashes of hot sugar solution.
8.4. Safe Storage
Store the finished rock candy in an airtight container to prevent it from becoming sticky or attracting pests.
8.5. Allergies
Be aware of any allergies when adding flavorings or food colorings. Check the labels to ensure they do not contain allergens.
9. The Art of Presentation: Displaying Your Rock Candy
How can you display rock candy? Once you’ve made your rock candy crystals, you’ll want to display them in a way that showcases their beauty and craftsmanship.
9.1. Edible Centerpieces
Use rock candy crystals as edible centerpieces for parties and events. Arrange them on a platter with other candies and desserts for a visually stunning display.
9.2. Gifts
Package rock candy crystals in decorative boxes or bags to give as gifts. Add a personal touch by including a handwritten note or tag.
9.3. Cake Decorations
Use rock candy crystals to decorate cakes, cupcakes, and other baked goods. They add a touch of elegance and sparkle to any dessert.
9.4. Drink Garnishes
Use small rock candy crystals as garnishes for cocktails and mocktails. They add a touch of sweetness and visual appeal to any beverage.
9.5. Home Décor
Display rock candy crystals in glass jars or vases as part of your home décor. They add a touch of whimsy and color to any room.
 Rock candy growing in the mason jar.
10. Rock Candy and Landscaping: Drawing Inspiration from Nature
How can rock candy inspire landscaping design? Just as the meticulous process of growing rock candy yields stunning results, landscaping with natural stone transforms outdoor spaces into breathtaking environments. Rockscapes.net is dedicated to providing the finest materials and inspiration for your landscaping projects.
10.1 Incorporating Natural Stone Elements
Consider how the principles of crystal formation can inspire your landscaping design. Use large stones and boulders to create focal points, mimicking the grandeur of natural rock formations. Incorporate smaller pebbles and gravel to add texture and contrast, similar to the intricate details of crystal structures.
10.2 Creating a Harmonious Landscape
Just as the right balance of ingredients is essential for growing perfect rock candy crystals, achieving harmony in your landscape requires careful consideration of color, texture, and scale. Select natural stones that complement your home’s architecture and the surrounding environment.
10.3 Sustainable Landscaping Practices
Embrace sustainable landscaping practices by using locally sourced materials and incorporating native plants. This approach not only reduces your environmental impact but also creates a landscape that thrives in its natural setting.
10.4. Rockscapes.net: Your Partner in Landscaping Excellence
At rockscapes.net, we understand the importance of quality materials and expert guidance. Whether you’re looking for inspiration, advice, or the perfect stones for your project, we’re here to help.
FAQ: Making Rock Candy Crystals
1. Can I use brown sugar to make rock candy?
Using brown sugar is not recommended. Brown sugar contains molasses, which can interfere with the crystallization process. For the best results, use pure granulated sugar.
2. How long does it take for rock candy crystals to grow?
Rock candy crystals typically take 7-10 days to grow. However, you can leave them in the solution for longer to achieve larger crystals.
3. Can I reuse the sugar solution?
Yes, you can reuse the sugar solution. Simply reheat it and add more sugar if necessary. However, be sure to strain the solution to remove any small crystals or impurities.
4. How do I prevent the crystals from sticking together?
Ensure the skewers are evenly spaced in the jar and do not touch each other or the sides of the jar. You can also add a small amount of corn syrup to the sugar solution to prevent the crystals from becoming too hard.
5. Can I make rock candy without skewers?
Yes, you can make rock candy without skewers. Simply pour the sugar solution into a shallow dish and allow the crystals to grow on the bottom. You can then break the crystals into smaller pieces.
6. How do I store rock candy crystals?
Store rock candy crystals in an airtight container at room temperature. Avoid storing them in a humid environment, as this can cause them to become sticky.
7. Can I add essential oils for flavoring?
Yes, you can add essential oils for flavoring. However, use them sparingly, as they can be quite potent. Add a few drops at a time until you achieve your desired flavor.
8. What is the best temperature for growing rock candy crystals?
The ideal temperature for growing rock candy crystals is between 68-77°F (20-25°C). Avoid placing the jars in direct sunlight or near a heat source.
9. Can I use different types of jars?
Yes, you can use different types of jars. Mason jars, glass cups, and even plastic containers can be used. Just make sure they are clean and heat-resistant.
10. Why is my rock candy cloudy?
Cloudy rock candy can be caused by impurities in the sugar or water. Use filtered water and high-quality granulated sugar for the best results.
Creating rock candy crystals is a rewarding experience that combines science, art, and a touch of sweetness. Whether you’re a seasoned DIY enthusiast or a curious beginner, this guide provides you with the knowledge and inspiration to create your own edible gems. Just as rockscapes.net offers a wealth of resources for transforming outdoor spaces, the world of rock candy is full of creative possibilities. So gather your supplies, follow the steps, and prepare to be amazed by the beauty and simplicity of crystal formation.
Ready to take your landscaping to the next level? Visit rockscapes.net for inspiration, expert advice, and the finest selection of natural stones. Let us help you transform your outdoor space into a stunning, sustainable oasis. Contact us today to discover the beauty of landscaping with natural stone. Address: 1151 S Forest Ave, Tempe, AZ 85281, United States. Phone: +1 (480) 965-9011. Website: rockscapes.net.