Wiring a rocker switch doesn’t have to be intimidating! At rockscapes.net, we’ll break down the process of wiring a rocker switch, whether it’s a simple on/off model or one with LED illumination, making it accessible for homeowners and DIY enthusiasts alike. This guide will provide you with clear, easy-to-follow instructions and diagrams to confidently tackle your next electrical project, ensuring safety and functionality every step of the way with electrical components and landscape lighting.
1. Understanding Rocker Switches: An Overview
Are you familiar with rocker switches and how they function within electrical circuits? Simply put, rocker switches are electromechanical components that control the flow of electricity in a circuit by either completing or breaking the connection. These switches are widely used in various applications, from household appliances to automotive systems, due to their ease of use and reliable performance.
1.1 The Basic On/Off Rocker Switch
The most common type of rocker switch is the simple on/off switch. It has two positions: “on,” which allows current to flow, and “off,” which stops the current flow. These switches typically have two terminals that need to be connected to the circuit, ensuring that power is safely delivered.
1.2 Illuminated Rocker Switches
Illuminated rocker switches feature a built-in LED that lights up when the switch is in the “on” position. This visual indication is particularly useful in dimly lit areas or for devices that might not have other indicators. Wiring an illuminated rocker switch requires connecting the LED to a power source and ground, in addition to the standard circuit connections.
2. Essential Tools and Materials
What tools and materials do you need to successfully wire a rocker switch? Before starting your project, gather the necessary tools and materials to ensure a smooth and safe process.
- Rocker Switch: Choose the appropriate rocker switch based on your application needs (e.g., on/off, illuminated).
- Wire Strippers: Used to safely remove insulation from wires without damaging the conductor.
- Wire Connectors: These include crimp connectors, wire nuts, or terminal blocks to securely join wires together.
- Pliers: Helpful for gripping and bending wires.
- Screwdriver: Depending on the type of terminals on the switch, you may need a flathead or Phillips screwdriver.
- Electrical Tape: Used to insulate and protect wire connections.
- Multimeter: A useful tool for testing continuity and voltage in the circuit.
- Wiring: Ensure you have the correct gauge and type of wire for your application.
- Power Source: A 12-volt power source is commonly used for many applications.
- Safety Glasses: Protect your eyes from debris.
3. Safety First: Important Precautions
What safety measures should you take before wiring a rocker switch? Electrical work can be dangerous if not handled properly. Prioritize safety by following these essential precautions:
- Turn Off the Power: Always disconnect the power source to the circuit you’ll be working on. Locate the appropriate circuit breaker or fuse and switch it off before starting any work.
- Test the Circuit: Use a multimeter to verify that the circuit is indeed de-energized. Place the multimeter probes on the wires you’ll be working with to ensure no voltage is present.
- Wear Safety Gear: Wear safety glasses to protect your eyes from any potential hazards.
- Work in a Dry Area: Avoid working in damp or wet conditions, as water conducts electricity and increases the risk of electric shock.
- Know Your Limits: If you’re uncomfortable or unfamiliar with electrical work, it’s best to consult a qualified electrician. Incorrect wiring can lead to electrical hazards and damage to your equipment.
4. How to Wire a Basic On/Off Rocker Switch
How do you wire a basic on/off rocker switch? Wiring a simple on/off rocker switch is straightforward. Follow these steps to ensure a proper connection:
- Identify the Terminals: Locate the two terminals on the back of the rocker switch. These terminals are usually labeled or marked with symbols.
- Connect the Power Wire: Connect the power wire (usually red or black) to one of the terminals. Use wire strippers to remove about 1/2 inch of insulation from the end of the wire.
- Connect the Load Wire: Connect the load wire (the wire leading to the device you want to control) to the other terminal. Again, strip about 1/2 inch of insulation from the end of the wire.
- Secure the Connections: Use wire connectors (crimp connectors, wire nuts, or terminal blocks) to securely attach the wires to the terminals. Ensure the connections are tight and won’t come loose.
- Insulate the Connections: Wrap electrical tape around the connections to provide additional insulation and protection.
- Test the Switch: After wiring, turn the power back on and test the switch to ensure it works correctly. The device should turn on and off as expected.
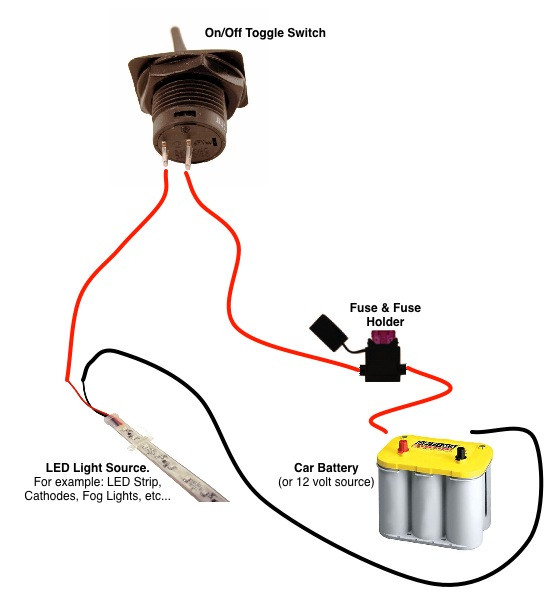 Basic on/off rocker switch wiring diagram showing power and load connections
Image showing the basic wiring diagram for an on/off rocker switch.
5. How to Wire an LED Rocker Switch
How do you wire an LED rocker switch? Wiring an LED rocker switch is a bit more complex due to the additional connections required for the LED. Here’s how to do it:
- Identify the Terminals: LED rocker switches typically have three terminals: power, ground, and accessory (or load). These terminals are usually labeled or marked with symbols.
- Connect the Power Wire: Connect the power wire to the terminal labeled “power” or “+”.
- Connect the Ground Wire: Connect the ground wire (usually black or green) to the terminal labeled “ground” or “-“.
- Connect the Load Wire: Connect the load wire to the terminal labeled “accessory” or “load”.
- Secure the Connections: Use wire connectors to securely attach the wires to the terminals.
- Insulate the Connections: Wrap electrical tape around the connections to provide additional insulation and protection.
- Test the Switch: Turn the power back on and test the switch. The LED should light up when the switch is in the “on” position, and the device should turn on and off as expected.
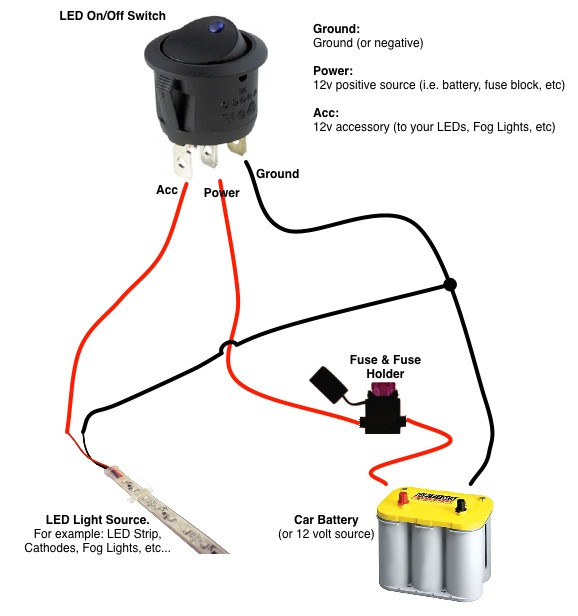 LED rocker switch wiring diagram detailing ground, power, and accessory pin positions
Image illustrating the wiring configuration for an LED rocker switch, highlighting the placement of ground, power, and accessory pins.
6. Wiring a Scion OEM Style Rocker Switch
How do you wire a Scion OEM style rocker switch? Scion OEM style rocker switches often come with a built-in LED that lights up when the switch is in the “on” position. Wiring these switches requires careful attention to the markings on the pins:
- Identify the Terminals: These switches usually have multiple terminals. Refer to the wiring diagram that comes with the switch to identify each terminal.
- Connect the Power Wire: Connect the power wire to the appropriate terminal as indicated in the diagram.
- Connect the Ground Wire: Connect the ground wire to the correct terminal.
- Connect the Load Wire: Connect the load wire to the terminal designated for the load.
- Secure the Connections: Ensure all connections are secure using wire connectors.
- Insulate the Connections: Wrap electrical tape around each connection to prevent shorts.
- Test the Switch: Turn the power back on and test the switch to ensure the LED lights up and the device functions correctly.
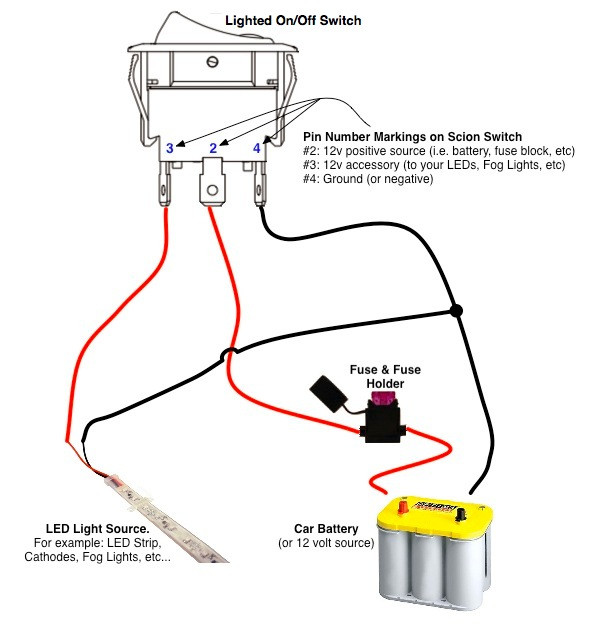 Wiring diagram for a Scion OEM style rocker switch, emphasizing attention to pin markings
Image providing a detailed wiring diagram for a Scion OEM style rocker switch, with a focus on accurately identifying pin markings for correct connections.
7. Wiring a 3-Way or 2-Way Switch for RV
How do you wire a 3-way or 2-way switch for an RV setup? In an RV, you might want to control a light from two different locations, such as the bedroom and the kitchen. This can be achieved using two on/off/on switches wired in a 3-way configuration:
- Prepare the Switches: Ensure you have two on/off/on switches.
- Wiring the First Switch:
- Connect the power source to the common terminal on the first switch.
- Connect one of the traveler wires (wires that connect the two switches) to one of the remaining terminals on the first switch.
- Connect the other traveler wire to the last remaining terminal on the first switch.
- Wiring the Second Switch:
- Connect the corresponding traveler wires from the first switch to the corresponding terminals on the second switch.
- Connect the load wire (the wire going to the light) to the common terminal on the second switch.
- Secure the Connections: Use wire connectors to secure all connections.
- Insulate the Connections: Wrap electrical tape around all connections.
- Test the Switches: Turn the power back on and test both switches. You should be able to control the light from either switch.
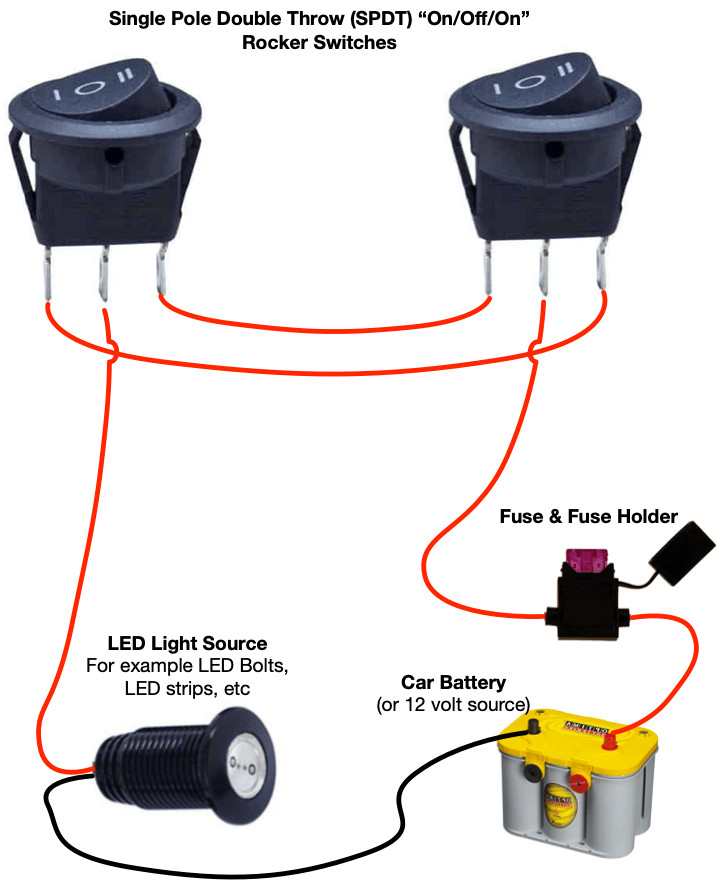 Wiring configuration for a 2-way or 3-way switch setup in an RV, allowing control from multiple locations
Image detailing the 2-way or 3-way switch wiring configuration for an RV, enabling control of a single light from two switch locations.
8. Troubleshooting Common Issues
What are some common issues you might encounter and how can you troubleshoot them? Even with careful wiring, issues can sometimes arise. Here are some common problems and how to troubleshoot them:
- Switch Not Working:
- Problem: The switch does not turn the device on or off.
- Solution: Check the power source to ensure it is active. Verify that all wire connections are secure. Use a multimeter to test the switch for continuity.
- LED Not Lighting Up:
- Problem: The LED on an illuminated rocker switch does not light up.
- Solution: Ensure the ground wire is properly connected. Check the LED’s power connection. The LED may be faulty and need replacement.
- Flickering Light:
- Problem: The light connected to the switch flickers.
- Solution: Check for loose wire connections. The switch itself may be faulty and need replacement.
- Short Circuit:
- Problem: The circuit breaker trips when the switch is turned on.
- Solution: Check for crossed wires or damaged insulation. Ensure that the wiring is correct and there are no exposed conductors.
9. Choosing the Right Rocker Switch for Your Project
What factors should you consider when selecting a rocker switch? Selecting the appropriate rocker switch for your project is crucial for ensuring safety and functionality. Consider the following factors:
- Amperage and Voltage: Ensure the switch is rated for the amperage and voltage of the circuit it will be used in. Using a switch with a lower rating can lead to overheating and failure.
- Switch Type: Choose the appropriate switch type based on your needs (e.g., on/off, on/off/on, momentary).
- LED or Non-LED: Decide whether you need an illuminated switch for visual indication.
- Mounting Style: Consider the mounting style of the switch and ensure it fits your application (e.g., snap-in, screw terminal).
- Environmental Conditions: If the switch will be exposed to moisture or harsh conditions, choose a waterproof or weather-resistant model.
- Aesthetics: Select a switch that matches the aesthetic of your project. Rocker switches come in various colors and styles.
10. Advanced Rocker Switch Applications
What are some more advanced applications of rocker switches? Beyond basic on/off control, rocker switches can be used in more advanced applications:
- Motor Control: Rocker switches can be used to control the direction and speed of electric motors.
- Lighting Systems: They can be integrated into complex lighting systems with multiple zones and dimming capabilities.
- Automotive Applications: Rocker switches are commonly used in vehicles for controlling lights, accessories, and other functions.
- Industrial Equipment: They can be found in industrial machinery and equipment for controlling various processes and functions.
- Home Automation: Rocker switches can be integrated into home automation systems for controlling lights, appliances, and other devices remotely.
11. Maintaining Your Rocker Switches
How do you ensure the longevity and reliability of your rocker switches? Proper maintenance can extend the life of your rocker switches and ensure reliable performance:
- Regular Inspections: Periodically inspect the switches for signs of wear or damage.
- Cleaning: Clean the switches with a soft, dry cloth to remove dust and debris. Avoid using harsh chemicals or solvents.
- Tightening Connections: Check and tighten wire connections as needed to prevent loose connections.
- Replacing Worn Switches: Replace switches that show signs of wear, damage, or malfunction.
- Protecting from the Elements: If the switches are exposed to moisture or harsh conditions, provide protection such as waterproof enclosures.
12. Innovative Rocker Switch Designs
What are some of the latest trends in rocker switch design? Rocker switches are not just functional; they can also be stylish and innovative. Here are some of the latest trends in rocker switch design:
- Touch-Sensitive Rocker Switches: These switches use touch-sensitive technology for a modern and sleek look.
- Customizable Rocker Switches: Some manufacturers offer customizable rocker switches with various colors, symbols, and text.
- Smart Rocker Switches: These switches can be controlled remotely via smartphone or voice commands.
- Backlit Rocker Switches: Backlit rocker switches provide enhanced visibility in low-light conditions.
- Rocker Switches with Integrated Displays: These switches feature small displays that show the status of the connected device.
13. Frequently Asked Questions (FAQs)
Here are some frequently asked questions about wiring rocker switches:
13.1. Can I use a rocker switch for a 220V circuit?
Yes, provided the rocker switch is rated for 220V. Always check the voltage rating on the switch before installation.
13.2. What does the amperage rating on a rocker switch mean?
The amperage rating indicates the maximum amount of current the switch can safely handle. Exceeding this rating can cause the switch to overheat and fail.
13.3. How do I know if my rocker switch is faulty?
Signs of a faulty rocker switch include not turning on/off the connected device, flickering lights, or a burning smell.
13.4. Can I replace a toggle switch with a rocker switch?
Yes, you can replace a toggle switch with a rocker switch as long as they have similar voltage and amperage ratings.
13.5. What is the difference between a 2-way and 3-way rocker switch?
A 2-way switch is a simple on/off switch, while a 3-way switch allows you to control a light from two different locations.
13.6. Do I need a special tool to install a rocker switch?
Basic tools like wire strippers, screwdrivers, and wire connectors are usually sufficient for installing a rocker switch.
13.7. How do I wire a rocker switch with more than three terminals?
Refer to the wiring diagram that comes with the switch. The diagram will indicate the purpose of each terminal.
13.8. Can I use a dimmer switch instead of a rocker switch?
Yes, if you want to control the brightness of a light, you can use a dimmer switch. However, ensure the dimmer switch is compatible with the type of light you are controlling.
13.9. What is the best way to secure wire connections on a rocker switch?
Using wire connectors like crimp connectors, wire nuts, or terminal blocks is the best way to secure wire connections.
13.10. How do I prevent electrical shock when wiring a rocker switch?
Always turn off the power to the circuit before working on the switch. Use a multimeter to verify that the circuit is de-energized.
14. Real-World Applications and Case Studies
Where are rocker switches commonly used, and what are some examples of their effective use? Rocker switches are ubiquitous in both residential and commercial settings. Here are some real-world applications and case studies:
- Residential Lighting: Rocker switches are commonly used for controlling indoor and outdoor lights in homes. Their ease of use and reliable performance make them a popular choice for homeowners.
- Automotive Industry: Rocker switches are used in vehicles for controlling headlights, windshield wipers, and other accessories. Their durability and resistance to vibration make them suitable for automotive applications.
- Marine Applications: In boats and other marine vessels, rocker switches are used to control navigation lights, pumps, and other equipment. Waterproof rocker switches are essential in these environments to prevent corrosion and electrical failures.
- Industrial Machinery: Rocker switches are used in industrial machinery for controlling motors, valves, and other components. Their rugged construction and high amperage ratings make them suitable for demanding industrial environments.
- Consumer Electronics: Rocker switches are found in various consumer electronics devices, such as power supplies, audio amplifiers, and kitchen appliances. Their compact size and ease of integration make them a versatile choice for electronic applications.
- Case Study: Smart Home Integration: A homeowner integrated smart rocker switches into their home automation system, allowing them to control lights and appliances remotely via a smartphone app. This enhanced convenience, energy efficiency, and security.
15. Expert Tips and Tricks
What advice do experts have for ensuring a successful rocker switch wiring project? Here are some expert tips and tricks to help you achieve a successful rocker switch wiring project:
- Double-Check Wiring Diagrams: Always refer to the wiring diagram that comes with the rocker switch to ensure correct connections.
- Use Quality Wire Connectors: Invest in high-quality wire connectors to ensure secure and reliable connections.
- Label Wires: Label wires with tape to easily identify them during installation and troubleshooting.
- Test Continuity: Use a multimeter to test continuity between connections before turning on the power.
- Follow Local Electrical Codes: Adhere to local electrical codes and regulations to ensure safety and compliance.
- Consult a Professional: If you are unsure about any aspect of the wiring process, consult a qualified electrician.
16. The Future of Rocker Switch Technology
How might rocker switch technology evolve in the coming years? Rocker switch technology continues to evolve, driven by advancements in materials, electronics, and user interface design. Here are some potential future trends:
- Wireless Rocker Switches: Wireless rocker switches that communicate with devices via Bluetooth or Wi-Fi could offer greater flexibility and control.
- Energy-Harvesting Rocker Switches: Rocker switches that harvest energy from their own operation could eliminate the need for external power sources.
- Biometric Rocker Switches: Rocker switches with biometric authentication could provide enhanced security and personalized control.
- Self-Healing Rocker Switches: Rocker switches made from self-healing materials could automatically repair damage, extending their lifespan.
- 3D-Printed Rocker Switches: 3D printing technology could enable the rapid prototyping and customization of rocker switches with complex geometries and features.
17. Rockscapes.net: Your Partner in Landscape Lighting and Design
At rockscapes.net, we understand the importance of reliable and aesthetically pleasing lighting in your landscape. From choosing the right fixtures to ensuring proper wiring, we’re here to help you create the perfect outdoor environment.
17.1 Explore Our Range of Landscape Lighting Solutions
Whether you’re looking to illuminate pathways, highlight architectural features, or create a cozy outdoor living space, rockscapes.net offers a wide selection of landscape lighting solutions to suit your needs. Our products include:
- Path Lights: Guide visitors safely through your garden.
- Spotlights: Accentuate trees, shrubs, and other landscape elements.
- Flood Lights: Provide broad illumination for security and safety.
- String Lights: Create a festive and inviting atmosphere.
- Underwater Lights: Add drama and interest to ponds and water features.
17.2 Expert Advice and Design Assistance
Our team of landscape lighting experts is available to provide personalized advice and design assistance. We can help you:
- Choose the right fixtures for your landscape.
- Create a lighting plan that meets your needs and budget.
- Ensure proper wiring and installation.
- Troubleshoot any lighting issues.
17.3 Visit Our Showroom
Visit our showroom at 1151 S Forest Ave, Tempe, AZ 85281, United States, to see our landscape lighting solutions in person. Our knowledgeable staff can answer your questions and provide hands-on demonstrations.
17.4 Contact Us
Contact us at +1 (480) 965-9011 or visit our website at rockscapes.net to learn more about our landscape lighting products and services.
18. Take Action: Transform Your Landscape Today
Ready to enhance your landscape with beautiful and functional lighting? Here’s how rockscapes.net can help:
18.1 Discover Design Ideas
Browse our website for inspiration and design ideas. Our portfolio showcases a wide range of landscape lighting projects, from small residential gardens to large commercial properties.
18.2 Find the Perfect Stones
Explore our extensive selection of natural stones, perfect for adding texture and visual interest to your landscape.
18.3 Get Expert Advice
Contact our team of landscape lighting experts for personalized advice and guidance. We can help you:
- Choose the right stones for your project.
- Create a landscape design that meets your needs and budget.
- Ensure proper installation.
- Troubleshoot any issues.
18.4 Visit Our Website
Visit rockscapes.net today to discover the beauty of rock landscapes and transform your outdoor space into a stunning oasis. Let us help you bring your vision to life!
Remember, whether you’re a seasoned DIY enthusiast or a homeowner tackling a new project, rockscapes.net is your go-to resource for all things landscape and lighting. With our expert advice, high-quality products, and commitment to customer satisfaction, we’re here to help you create the outdoor space of your dreams.