How Does A 4 Pin Rocker Switch Work? A 4 pin rocker switch functions as a simple on/off switch while also illuminating an LED indicator, and at rockscapes.net, we provide various options perfect for your outdoor projects, enhancing both functionality and aesthetics. Using these switches allows for easy control of landscape lighting, water features, and other electrical elements within your rockscapes, making your designs safer and more user-friendly. Consider using these switches with durable materials and weather-resistant enclosures to guarantee long-lasting performance in outdoor environments.
1. Understanding the Basics of a 4 Pin Rocker Switch
What is a 4 pin rocker switch? A 4 pin rocker switch is an electrical component used to control the on/off state of a circuit while simultaneously providing an illuminated indicator. This type of switch is frequently employed in various applications, from automotive to household appliances, and is particularly valuable in rockscapes for its ability to manage landscape lighting and water features.
1.1 How Does It Differ from Other Switches?
How is a 4 pin rocker switch different than other switches? Unlike simpler switches with only two or three pins, a 4 pin rocker switch includes separate terminals for the power input, power output, and LED illumination. This separation allows the LED to light up either when the switch is on or independently, depending on the wiring configuration. The added functionality provides a visual indication of the switch’s state, enhancing user convenience and safety, especially in outdoor settings.
1.2 Key Components and Their Functions
What are the key components of a 4 pin rocker switch? A 4 pin rocker switch consists of four main terminals, each serving a distinct purpose:
- Power Input: This terminal connects to the main power source.
- Power Output: This terminal delivers power to the connected device or circuit.
- LED Positive (+): This terminal provides the positive connection for the LED indicator.
- LED Negative (-): This terminal provides the ground connection for the LED indicator.
These components work together to ensure that the switch not only controls the flow of electricity but also provides a visual cue as to whether the circuit is open or closed.
2. Pin Configuration Explained
How do I understand the pin configuration of a 4 pin rocker switch? Grasping the pin configuration of a 4 pin rocker switch is crucial for proper wiring and functionality. Each pin has a specific role, and incorrect wiring can lead to damage or malfunction.
2.1 Identifying the Pins
How can I identify the pins on a 4 pin rocker switch? Typically, the pins are labeled or can be identified through a datasheet provided by the manufacturer. If labels are absent, a multimeter can be used to determine the function of each pin. The common configurations include:
- Pin 1: Power Input (Source)
- Pin 2: Power Output (Load)
- Pin 3: LED Positive (+)
- Pin 4: LED Negative (-)
Understanding these designations is the first step in ensuring a successful wiring process.
2.2 Reading a Datasheet
How do I read a datasheet for a 4 pin rocker switch? A datasheet provides detailed information about the electrical characteristics and pinout of the switch. Key sections to focus on include:
- Pin Diagram: A visual representation of the pin layout.
- Electrical Ratings: Specifies the maximum voltage and current the switch can handle.
- LED Specifications: Details the voltage and current requirements for the LED indicator.
Consulting the datasheet ensures that you operate the switch within its specified limits, preventing damage and ensuring longevity.
2.3 Using a Multimeter to Identify Pins
How can I use a multimeter to identify the pins on a 4 pin rocker switch? A multimeter can be used to verify the pin configuration, especially when the pins are not clearly labeled. Here’s how:
- Continuity Test: Set the multimeter to continuity mode.
- Identify Input and Output: With the switch in the OFF position, test for continuity between different pin pairs. When the switch is toggled ON, the input and output pins will show continuity.
- Identify LED Pins: Connect the multimeter leads to the remaining two pins. If the LED lights up faintly, you’ve identified the LED positive and negative pins.
This method helps confirm the pin functions and ensures accurate wiring.
3. Wiring Diagrams and Connections
What are the common wiring diagrams and connections for a 4 pin rocker switch? Proper wiring is essential for the 4 pin rocker switch to function correctly and safely. Various wiring diagrams can be used depending on the desired functionality, such as independent or dependent LED illumination.
3.1 Basic Wiring Diagram
What is the basic wiring diagram for a 4 pin rocker switch? In its most basic configuration, the wiring involves connecting the power source to the input pin, the load to the output pin, and the LED pins to a suitable power source and ground.
- Power Source (+) → Pin 1 (Power Input)
- Pin 2 (Power Output) → Load (+)
- Resistor → Pin 3 (LED +)
- Pin 4 (LED -) → Ground (-)
The resistor is crucial for limiting the current to the LED, preventing it from burning out.
3.2 Wiring for Independent LED Illumination
How do I wire a 4 pin rocker switch for independent LED illumination? For independent LED illumination, the LED is wired to a separate power source so it can be lit regardless of the switch position. This setup is useful for indicating the presence of power in the circuit.
- Power Source (+) → Pin 1 (Power Input)
- Pin 2 (Power Output) → Load (+)
- Separate Power Source (+) → Resistor → Pin 3 (LED +)
- Pin 4 (LED -) → Ground (-)
3.3 Wiring for Dependent LED Illumination
How do I wire a 4 pin rocker switch for dependent LED illumination? In dependent illumination, the LED lights up only when the switch is in the ON position, indicating that the load is receiving power.
- Power Source (+) → Pin 1 (Power Input)
- Pin 2 (Power Output) → Load (+) and Resistor → Pin 3 (LED +)
- Pin 4 (LED -) → Ground (-)
This configuration is straightforward and effectively shows when the connected device is active.
3.4 Common Mistakes to Avoid
What are some common mistakes to avoid when wiring a 4 pin rocker switch? Avoiding common wiring mistakes is crucial for safety and functionality:
- Incorrect Pin Identification: Always verify the pin configuration with a datasheet or multimeter.
- No Resistor for LED: Always use a resistor in series with the LED to prevent burnout.
- Reversed Polarity: Ensure correct polarity for the LED connections to avoid damage.
- Loose Connections: Make sure all connections are secure to prevent intermittent issues.
4. Selecting the Right Switch
How do I select the right 4 pin rocker switch for my project? Choosing the right 4 pin rocker switch depends on the specific requirements of your project, including the voltage, current, and environmental conditions.
4.1 Voltage and Current Ratings
What voltage and current ratings should I consider when selecting a 4 pin rocker switch? Ensure that the switch’s voltage and current ratings meet or exceed the requirements of your circuit. Overloading the switch can lead to failure and potential safety hazards. Check the ratings of the connected devices and choose a switch with appropriate specifications.
4.2 Environmental Considerations
What environmental factors should I consider when selecting a 4 pin rocker switch? For outdoor applications like rockscapes, consider factors such as moisture, temperature, and UV exposure. Look for switches with:
- Waterproof or Weather-Resistant Ratings: To protect against rain and humidity.
- Temperature Ratings: To ensure functionality in extreme hot or cold conditions.
- UV Resistance: To prevent degradation from sunlight exposure.
Selecting a switch designed for these conditions ensures long-term reliability.
4.3 Types of Rocker Switches
What are the different types of 4 pin rocker switches available? Various types of 4 pin rocker switches cater to different needs:
- Standard On/Off Switches: Simple switches that toggle a circuit on or off.
- Momentary Switches: Switches that activate a circuit only when held in position.
- Illuminated Switches: Switches with built-in LEDs for visual indication.
Choose the type that best fits the functional requirements of your project.
5. Applications in Rockscapes
How can I use a 4 pin rocker switch in my rockscapes? The versatility of 4 pin rocker switches makes them ideal for various applications in rockscapes, from controlling lighting to managing water features.
5.1 Controlling Landscape Lighting
How can I use a 4 pin rocker switch to control landscape lighting? Landscape lighting is a key element in rockscapes, and 4 pin rocker switches offer a convenient way to control it. You can use these switches to:
- Turn On/Off Garden Lights: Control pathway lights, spotlights, and decorative lighting.
- Manage Feature Lighting: Highlight specific rock formations or water features.
- Zone Lighting: Divide your landscape lighting into zones for customized control.
The illuminated indicator on the switch provides a clear visual cue, especially useful in dark outdoor settings.
5.2 Managing Water Features
How can I use a 4 pin rocker switch to manage water features in my rockscapes? Water features such as fountains, waterfalls, and ponds can be easily managed using 4 pin rocker switches. You can use these switches to:
- Control Water Pumps: Turn pumps on or off to activate water flow.
- Manage Underwater Lighting: Illuminate water features for added visual appeal.
- Activate Waterfalls: Control the flow of water in waterfall systems.
Ensure that all electrical components used near water are properly sealed and grounded for safety.
5.3 Integrating with Other Electrical Components
How can I integrate a 4 pin rocker switch with other electrical components in my rockscapes? Integrating 4 pin rocker switches with other electrical components allows for sophisticated control systems in your rockscapes. Consider integrating with:
- Timers: Set schedules for lighting and water features.
- Sensors: Use light or motion sensors to automate switch operation.
- Smart Home Systems: Integrate switches with smart home systems for remote control.
This integration enhances convenience and energy efficiency in your landscape design.
6. Step-by-Step Wiring Guide
Can you provide a step-by-step wiring guide for a 4 pin rocker switch? Follow these steps for safely and effectively wiring a 4 pin rocker switch.
6.1 Gathering Necessary Tools and Materials
What tools and materials do I need to wire a 4 pin rocker switch? Before starting, gather the necessary tools and materials:
- 4 Pin Rocker Switch: Select the appropriate switch for your application.
- Wiring: Use appropriately sized wiring for the current load.
- Wire Strippers: To remove insulation from the wires.
- Screwdrivers: To secure the switch in place.
- Multimeter: To verify pin configurations and connections.
- Resistor: To protect the LED indicator.
- Electrical Tape or Connectors: To insulate and secure connections.
Having these items on hand will streamline the wiring process.
6.2 Preparing the Wires
How do I prepare the wires for connecting to a 4 pin rocker switch? Proper wire preparation is essential for secure and reliable connections:
- Strip the Wires: Use wire strippers to remove approximately 1/2 inch of insulation from the ends of each wire.
- Tin the Wires (Optional): Tinning the wires with solder can prevent fraying and improve conductivity.
- Inspect the Wires: Check for any damage or corrosion and replace if necessary.
6.3 Connecting the Wires
How do I connect the wires to the 4 pin rocker switch? Follow the appropriate wiring diagram based on your desired functionality:
- Connect Power Input: Connect the positive wire from the power source to Pin 1.
- Connect Power Output: Connect the positive wire to the load to Pin 2.
- Connect LED Positive: Connect a resistor in series with the positive wire to Pin 3.
- Connect LED Negative: Connect the negative wire to Pin 4.
- Secure Connections: Use electrical tape or connectors to insulate and secure all connections.
6.4 Testing the Connection
How do I test the connection after wiring a 4 pin rocker switch? After wiring, test the connection to ensure everything is working correctly:
- Visual Inspection: Check all connections for any loose wires or exposed metal.
- Continuity Test: Use a multimeter to verify continuity between the input and output pins when the switch is ON.
- Functionality Test: Turn on the power and test the connected device to ensure it is functioning properly.
- LED Test: Verify that the LED illuminates as expected based on the wiring configuration.
If any issues are detected, recheck the wiring and connections before proceeding.
7. Safety Precautions
What safety precautions should I take when working with a 4 pin rocker switch? Prioritize safety when working with electrical components to prevent injury and damage.
7.1 Disconnecting Power
Why is it important to disconnect power before working with a 4 pin rocker switch? Always disconnect the power source before working on any electrical connections. This prevents the risk of electric shock and potential damage to the components.
7.2 Using Insulated Tools
Why should I use insulated tools when wiring a 4 pin rocker switch? Use insulated tools to further minimize the risk of electric shock. Insulated handles provide an extra layer of protection when working with live wires.
7.3 Following Local Electrical Codes
Why is it important to follow local electrical codes when working with a 4 pin rocker switch? Adhere to local electrical codes and regulations to ensure that your wiring meets safety standards. These codes are in place to protect people and property from electrical hazards.
7.4 Seeking Professional Help
When should I seek professional help when working with a 4 pin rocker switch? If you are uncomfortable working with electrical wiring or unsure about any aspect of the process, seek professional help from a qualified electrician. It’s always better to be safe than sorry.
8. Troubleshooting Common Issues
What are some common issues and how do I troubleshoot them with a 4 pin rocker switch? Even with careful wiring, issues can sometimes arise. Here are some common problems and how to troubleshoot them.
8.1 LED Not Lighting Up
What should I do if the LED on my 4 pin rocker switch is not lighting up? If the LED is not lighting up, check the following:
- Polarity: Ensure that the LED positive and negative wires are connected correctly.
- Resistor: Verify that the resistor is properly connected and has the correct value.
- LED Condition: Test the LED with a multimeter to ensure it is not burnt out.
- Connections: Check for loose or corroded connections.
8.2 Switch Not Turning On/Off
What should I do if my 4 pin rocker switch is not turning on or off? If the switch is not turning the connected device on or off, check the following:
- Wiring: Verify that the power input and output wires are connected correctly.
- Continuity: Use a multimeter to check for continuity between the input and output pins when the switch is ON.
- Switch Condition: Test the switch with a multimeter to ensure it is functioning properly.
- Load Condition: Ensure that the connected device is functioning correctly.
8.3 Intermittent Connection
What should I do if my 4 pin rocker switch has an intermittent connection? An intermittent connection can be frustrating. Here’s how to troubleshoot it:
- Check Connections: Ensure that all connections are secure and free from corrosion.
- Inspect Wiring: Look for any damaged or frayed wires.
- Test Switch: Test the switch with a multimeter to check for consistent continuity.
- Replace Components: If necessary, replace the switch or wiring.
9. Rockscapes.net: Your Source for Rockscape Solutions
Why should I choose rockscapes.net for my rockscape needs? At rockscapes.net, we understand the importance of quality components and expert guidance in creating stunning rockscapes. Our website offers a wealth of resources, from design ideas to product recommendations, to help you bring your vision to life.
9.1 Design Ideas and Inspiration
How can rockscapes.net provide me with design ideas and inspiration for my rockscapes? Explore our gallery of rockscape designs for inspiration. We showcase a variety of styles and applications, helping you find the perfect look for your outdoor space. Discover creative ways to use rocks, lighting, and water features to transform your landscape.
9.2 Product Recommendations
What kind of product recommendations can I find at rockscapes.net? We provide detailed information and recommendations on various types of rocks, lighting, and electrical components suitable for rockscapes. Our product selections are curated to ensure quality, durability, and aesthetic appeal. Find the perfect 4 pin rocker switch and other components for your project.
9.3 Expert Advice and Guidance
How can rockscapes.net provide me with expert advice and guidance on my rockscape project? Our team of experts is available to provide personalized advice and guidance on all aspects of rockscape design and installation. Whether you need help selecting the right materials or troubleshooting a wiring issue, we’re here to support you. Contact us for expert assistance and ensure the success of your project.
9.4 Contact Information
Want to get in touch with rockscapes.net?
- Address: 1151 S Forest Ave, Tempe, AZ 85281, United States
- Phone: +1 (480) 965-9011
- Website: rockscapes.net
10. Frequently Asked Questions (FAQ)
10.1 What is the purpose of a 4 pin rocker switch?
A 4 pin rocker switch is used to control the on/off state of a circuit and includes an LED indicator for visual confirmation.
10.2 How do I know which pin is which on a 4 pin rocker switch?
Refer to the datasheet provided by the manufacturer or use a multimeter to identify the pins.
10.3 Can I use a 4 pin rocker switch for both AC and DC circuits?
Yes, but ensure that the switch’s voltage and current ratings match the requirements of the circuit.
10.4 Do I need a resistor for the LED on a 4 pin rocker switch?
Yes, a resistor is necessary to limit the current to the LED and prevent it from burning out.
10.5 What does it mean when the LED lights up only when the switch is on?
This indicates dependent LED illumination, where the LED is wired to light up only when the connected device is receiving power.
10.6 What does it mean when the LED is always on, regardless of the switch position?
This indicates independent LED illumination, where the LED is wired to a separate power source and can be lit regardless of the switch position.
10.7 What type of wire should I use for wiring a 4 pin rocker switch?
Use appropriately sized wiring for the current load to ensure safety and prevent overheating.
10.8 How do I troubleshoot a 4 pin rocker switch that is not working?
Check the wiring, connections, LED condition, and switch functionality using a multimeter.
10.9 What safety precautions should I take when wiring a 4 pin rocker switch?
Disconnect power, use insulated tools, follow local electrical codes, and seek professional help if needed.
10.10 Where can I find quality 4 pin rocker switches for rockscapes?
Explore rockscapes.net for a wide selection of high-quality 4 pin rocker switches and other components for your rockscape projects.
Ready to bring your rockscape dreams to life? Visit rockscapes.net today for design inspiration, expert advice, and the perfect components to create a stunning outdoor space. Let us help you transform your landscape into a beautiful and functional oasis.
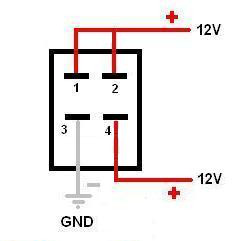 4 Pin LED Switch Wiring Diagram
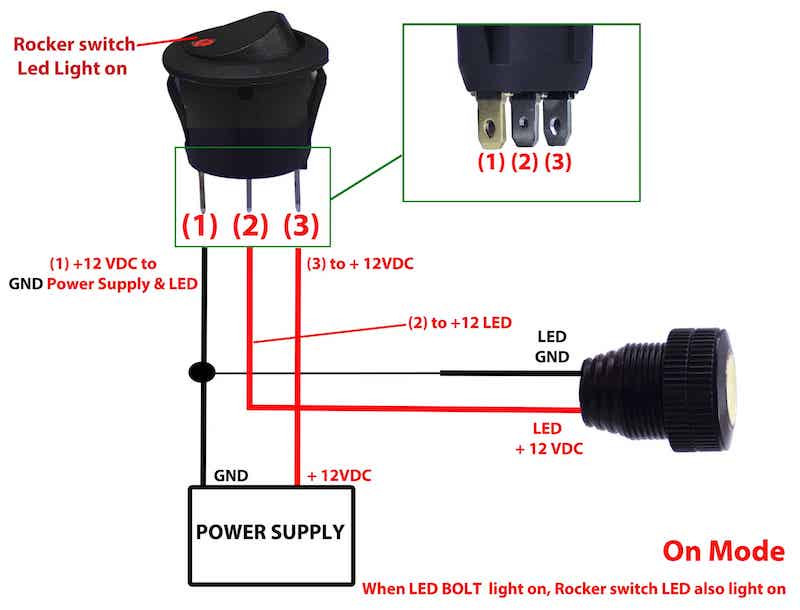 Round rocker switch connection wiring diagram
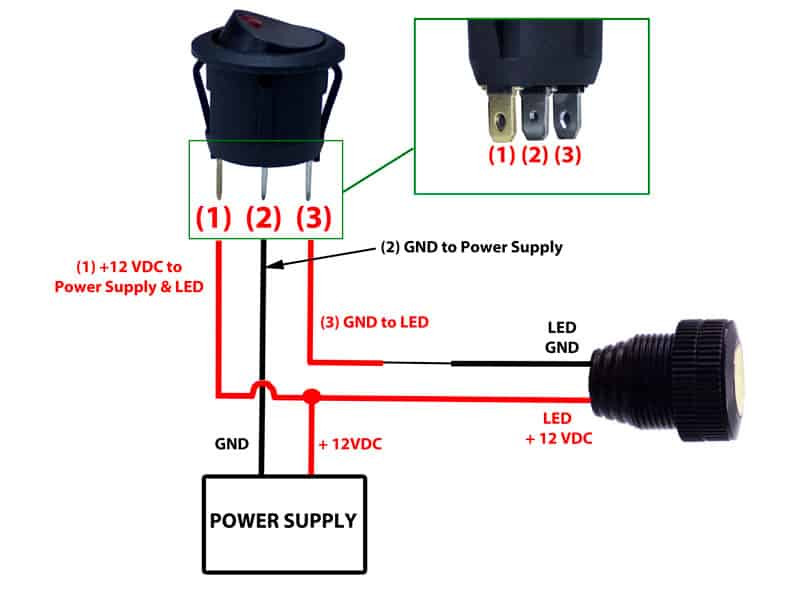 LED Rocker Switch Wiring Diagram alternative 2
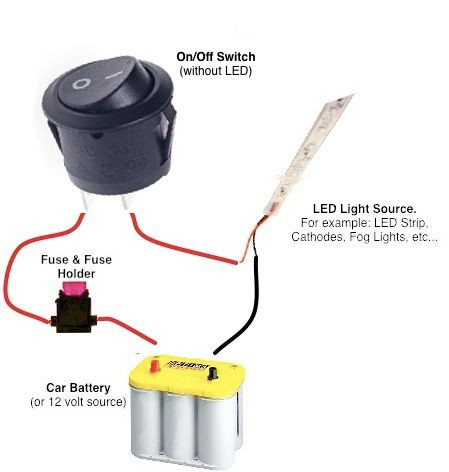 on/off Rocker Switch Wiring Diagram