How Long Does It Take For Rock Candy To Grow? Rock candy, a delightful treat made from crystallized sugar, offers a fun and engaging project for all ages, especially when sourced with inspiration from rockscapes.net. The crystal formation process typically takes between 6 to 7 days, allowing you to witness the fascinating transformation from sugar solution to shimmering, edible gems. Explore our collection at rockscapes.net for more sweet inspirations, candy-making insights, and sugary landscapes.
1. What is Rock Candy and Why Make it at Home?
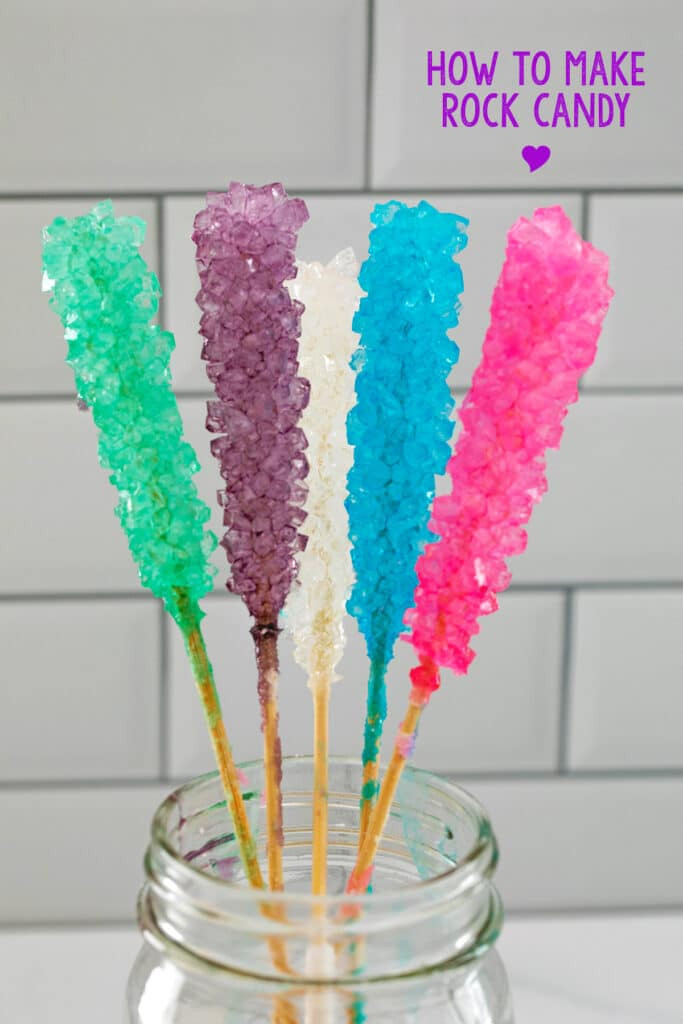
Rock candy is pure crystallized sucrose, also known as sugar. It’s also known as sugar candy and it is made of large sugar crystals. Making your own rock candy is a great activity that’s both fun and educational.
- Pure Sugar Delight: Rock candy is essentially pure, crystallized sugar, making it a simple yet satisfying treat.
- Fun and Educational: Making rock candy is an engaging activity for kids and adults alike, teaching about supersaturation and crystallization.
- Customizable: You can customize the color and flavor of your rock candy to suit your preferences.
- Great for Gifting: Homemade rock candy makes a unique and thoughtful gift for friends and family.
Instead of buying pre-made rock candy, creating your own allows for customization and offers a hands-on learning experience. You can choose your favorite colors and flavors, making it a personalized treat. Plus, it’s a fantastic way to understand the science behind crystallization.
 Assortment of colorful rock candy in mason jars for decoration
2. What is the Timeline for Growing Rock Candy?
The actual process of making the sugar solution is quite quick. However, patience is key when waiting for the crystals to grow.
- Preparation: Making the sugar solution takes about 30 minutes.
- Crystallization: The crystal formation process typically takes 6-7 days.
- Observation: You can check on your jars daily to observe the crystal growth.
While the solution is easy to prepare, the crystal growth requires patience, typically taking 6-7 days. This waiting period allows you to observe the crystal formation daily, adding to the excitement of the project.
3. What Equipment Do You Need to Grow Rock Candy?
Gathering the right equipment is essential for a successful rock candy-making venture. Here’s a list of what you’ll need:
| Item | Description |
|---|---|
| Granulated Sugar | The main ingredient; you’ll need about 10 cups for 5 sticks of candy. |
| Water | To dissolve the sugar and create the supersaturated solution. |
| Food Coloring | To add color to your rock candy. |
| Mason Jars | To hold the sugar solution while the crystals grow; 16 oz jars are recommended. |
| Skewers or Sticks | To provide a surface for the crystals to grow on; wooden kabob skewers or specialized rock candy sticks work well. |
| Clothespins or Clips | To balance the skewers on the jars, preventing them from touching the bottom. |
| Saucepan | Large saucepan to create the sugar solution |
| Wooden Spoon | Long wooden spoon to stir the solution with |
Having these items on hand will ensure a smooth and enjoyable rock candy-making experience.
4. How to Make Rock Candy: A Step-by-Step Guide
Follow these detailed steps to create your own dazzling rock candy:
-
Prepare the Skewers:
- Submerge skewers in water, coat them in sugar, and then set out to dry.
- This “seeds” the skewers, giving the crystals something to adhere to.
- Let them dry for at least an hour, or ideally overnight.
-
Prep the Jars:
- Ensure your mason jars are clean and warm (run hot water through them).
- Attach a clothespin or chip clip to each skewer.
- Balance the skewers over the jars, ensuring they hang about an inch from the bottom.
- Remove the skewers temporarily until the sugar solution is ready.
-
Make the Sugar Solution:
- Add 4 cups of water to a large saucepan and bring to a boil.
- Add sugar one cup at a time, stirring until each cup is fully dissolved.
- Continue until you’ve added 10 cups of sugar. The solution will become supersaturated, meaning it can’t absorb any more sugar at the cooler temperature.
- Let the mixture simmer for about 5 minutes, then remove from heat.
-
Add Color and Pour:
- Let the mixture rest for about 15 minutes.
- Divide the mixture among the prepared jars.
- Stir in food coloring to your desired shade.
- Carefully move the jars to their resting spots, as they will be very hot.
-
Insert Skewers and Wait:
- Place the prepared skewers into the solution.
- Try not to move the jars once the skewers are in place.
-
Observe Crystal Growth:
- Crystals should start forming within a day.
-
Remove and Enjoy:
- Allow at least 6 days for the crystals to fully form.
- Gently crack the hardened sugar on top of the jar and wiggle the stick to release.
- Let the syrup drip off over an empty jar or bowl.
- Enjoy your homemade rock candy.
Following these steps will guide you through the process of creating beautiful and delicious rock candy.
5. Can You Re-Use Sugar Solution?
Yes, you can reuse the sugar solution, but with a few caveats.
- Re-boil the Solution: After removing the sticks, pour the solution back into a saucepan and bring it to a boil.
- Add More Sugar: Add an additional ¼ cup of sugar and let it simmer for a few minutes.
- Pour Back into Jar: Then, pour it back into the jar.
Reusing the solution without re-heating and adding more sugar may result in less successful crystal growth. Re-boiling and adding sugar ensures the solution remains supersaturated for optimal results.
6. What If Your Rock Candy Isn’t Growing?
Sometimes, despite your best efforts, the rock candy may not grow as expected. Here are some troubleshooting tips:
- Supersaturation: Ensure your sugar solution was oversaturated. If not, put the mixture back into the saucepan, bring it to a boil, and add another cup of sugar, stirring to dissolve.
- New Skewers: Use new sugar-coated skewers.
- Clean Jars: Double-check that your jars are clean and warm.
- Avoid Movement: Ensure you didn’t move the jars around once you added the sticks.
Addressing these potential issues can help you salvage your rock candy project and encourage crystal growth.
7. Is There a Way to Make Rock Candy Faster?
Unfortunately, there isn’t a reliable way to speed up the rock candy growing process significantly.
- Refrigeration: Some suggest that putting the jars in the fridge might speed it up a bit, but this isn’t guaranteed.
- Early Removal: You can remove the rock candy after a couple of days, but the sticks will likely be sparse.
Patience remains the key ingredient in rock candy making. Allowing sufficient time ensures the crystals have ample opportunity to form fully.
8. How Should You Store Your Rock Candy?
Proper storage is essential to keep your rock candy fresh and prevent it from becoming sticky or dissolving.
- Cool, Dry Place: Store your rock candy in a cool, dry place.
- Cellophane Wrappers: Wrap the sticks individually in cellophane wrappers.
- Shelf Life: When stored properly, rock candy can last for up to a year.
Storing your rock candy correctly will help maintain its quality and appearance, whether you’re enjoying it yourself or giving it as a gift.
9. Helpful Tips and Tricks for Perfect Rock Candy
To ensure your rock candy turns out perfectly every time, consider these helpful tips and tricks:
- Clean, Warm Jars: Ensure your mason jars are completely clean and not cold.
- Don’t Skip Sugar Coating: Do not skip the step of coating your sticks in sugar.
- Darker Colors: Make the color a bit darker than you think you should, as it will look lighter once the crystals form.
- Concentrated Flavoring: If adding flavoring, use a concentrated flavoring so you don’t have to add too much liquid.
- Avoid Jostling: Once you’ve poured your sugar mixture and placed your sticks in the jars, take care not to move them or jostle the sticks.
These tips will help you avoid common pitfalls and achieve the best possible results with your homemade rock candy.
10. Why Choose Rockscapes.net for Your Rock Candy Inspiration?
At rockscapes.net, we’re passionate about bringing the beauty of natural landscapes into your everyday life, and that includes the simple joy of making rock candy.
- Creative Inspiration: Discover unique ways to incorporate your homemade rock candy into desserts, cocktails, and even decorative displays.
- Quality Information: Access detailed guides and tips for making perfect rock candy every time.
- Community Support: Connect with a community of fellow rock candy enthusiasts to share ideas and troubleshoot challenges.
Visit rockscapes.net today to explore our collection of rock candy-inspired content and start your sweet, crystal-growing adventure.
11. The Science Behind Rock Candy Formation
Understanding the science behind rock candy can make the process even more fascinating. The key is creating a supersaturated solution.
What is a Supersaturated Solution?
A supersaturated solution is one that contains more dissolved solute (in this case, sugar) than would normally dissolve in a given amount of solvent (water) at a particular temperature. This is achieved by heating the water, which allows more sugar to dissolve. As the solution cools, the sugar molecules are eager to come out of the solution and form crystals.
Crystallization Process
The crystallization process begins when the sugar molecules start to attach to a seed crystal. In this case, the sugar crystals on the skewer act as the seed. As more sugar molecules come out of the solution, they join the existing crystal structure, causing it to grow larger over time.
Factors Affecting Crystal Growth
Several factors can influence the size and quality of the rock candy crystals:
- Temperature: A stable temperature is crucial for even crystal growth. Avoid sudden temperature changes, which can disrupt the crystallization process.
- Purity of Ingredients: Using high-quality granulated sugar and clean water ensures that there are no impurities to interfere with crystal formation.
- Saturation Level: The higher the concentration of sugar in the solution, the faster and larger the crystals will grow.
- Disturbances: Minimizing disturbances, such as moving or bumping the jars, allows the crystals to grow undisturbed and form more perfect structures.
University Research on Crystallization
According to research from Arizona State University’s School of Molecular Sciences, the crystallization process is influenced by factors such as temperature, impurities, and the presence of seed crystals. Their studies have shown that controlling these variables can lead to the formation of larger and more uniform crystals.
12. Creative Uses for Homemade Rock Candy
Once you’ve mastered the art of making rock candy, you can explore various creative uses for your sugary creations:
- Edible Decorations: Use rock candy to decorate cakes, cupcakes, and other desserts. They add a touch of sparkle and elegance to any sweet treat.
- Cocktail Garnishes: Elevate your cocktails by using rock candy as a garnish. They not only look beautiful but also add a hint of sweetness to your drink. Check out rockscapes.net for rock candy cocktail recipes.
- Party Favors: Individually wrapped rock candy sticks make delightful party favors for birthdays, weddings, and other special occasions.
- Gifts: Package your homemade rock candy in decorative jars or boxes to create unique and personalized gifts for friends and family.
- Science Projects: Use rock candy as a fun and educational science project to teach kids about supersaturation, crystallization, and the properties of sugar.
13. Exploring Different Flavors and Colors
One of the best parts about making rock candy at home is the ability to customize the flavors and colors to your liking. Here are some ideas to get you started:
Flavorings
- Extracts: Add a few drops of your favorite extracts, such as vanilla, almond, lemon, or peppermint, to the sugar solution for a burst of flavor.
- Essential Oils: Use food-grade essential oils sparingly to add unique and intense flavors.
- Spices: Infuse the sugar solution with spices like cinnamon, cloves, or cardamom for a warm and aromatic twist.
- Fruit Juices: Replace some of the water with fruit juice to add natural sweetness and flavor.
Colors
- Food Coloring: Use gel or liquid food coloring to achieve vibrant and eye-catching colors.
- Natural Food Dyes: Experiment with natural food dyes derived from fruits, vegetables, and herbs for a more wholesome approach.
- Layered Colors: Create stunning layered effects by dividing the sugar solution into multiple jars and adding different colors to each.
14. Advanced Techniques for Rock Candy Making
If you’re looking to take your rock candy skills to the next level, consider exploring these advanced techniques:
- Geode Rock Candy: Create rock candy that resembles geodes by growing crystals inside hollowed-out citrus fruits or eggshells.
- Rock Candy Swizzle Sticks: Make rock candy on decorative swizzle sticks to add a touch of elegance to cocktails and other beverages.
- Rock Candy Lollipops: Pour the sugar solution into lollipop molds and insert sticks to create beautiful and delicious rock candy lollipops.
- Rock Candy Sculptures: Experiment with creating intricate rock candy sculptures by carefully controlling the crystallization process and using various molds and supports.
15. Frequently Asked Questions About Rock Candy
Here are some frequently asked questions about making rock candy at home:
-
How long does it take for rock candy to grow?
- Typically, it takes 6-7 days for rock candy crystals to fully form.
-
Can I use tap water to make rock candy?
- It’s best to use filtered water to avoid any impurities that may affect crystal growth.
-
What type of sugar should I use?
- Granulated sugar is the most commonly used and recommended type of sugar for making rock candy.
-
Why are my crystals growing at the bottom of the jar instead of on the stick?
- This may be due to a lack of seed crystals on the stick. Make sure to thoroughly coat the stick in sugar before placing it in the solution.
-
How can I prevent my rock candy from getting cloudy?
- Avoid stirring the solution while the crystals are growing, as this can introduce air bubbles and cause cloudiness.
-
Can I add flavoring to the sugar solution?
- Yes, you can add extracts, essential oils, or spices to the sugar solution to customize the flavor of your rock candy.
-
How do I remove the rock candy from the jar without breaking it?
- Gently crack the hardened sugar on top of the jar and wiggle the stick to release. If necessary, you can run warm water around the outside of the jar to loosen the candy.
-
Can I use metal skewers instead of wooden sticks?
- It’s generally recommended to use wooden sticks, as metal skewers may interfere with the crystallization process.
-
What is the best way to clean the jars after making rock candy?
- Soak the jars in hot water to dissolve the remaining sugar, then wash them with soap and water.
-
How do I prevent my rock candy from sticking together during storage?
- Wrap each stick individually in cellophane wrappers to prevent them from sticking together and to protect them from moisture.
16. Why Rock Candy Makes a Great DIY Project
Making rock candy at home is a rewarding DIY project for several reasons:
- Educational Value: It’s a fun and hands-on way to learn about science concepts like supersaturation and crystallization.
- Customization: You have complete control over the flavors, colors, and shapes of your rock candy.
- Creativity: It allows you to express your creativity and create unique and personalized treats for yourself and others.
- Cost-Effective: Making your own rock candy can be more cost-effective than buying it pre-made, especially if you’re making large quantities.
- Sense of Accomplishment: There’s a sense of satisfaction that comes from creating something beautiful and delicious from scratch.
17. Rock Candy and Landscape Design: A Sweet Harmony
While rock candy is a delicious treat, it also shares a connection with landscape design. The crystalline structures and vibrant colors of rock candy can inspire unique and creative landscaping ideas.
Inspiration from Geodes
Geodes, natural rock formations with crystal-lined interiors, can serve as a muse for creating stunning rock gardens. Incorporating various types of rocks and minerals with different colors and textures can mimic the natural beauty of geodes.
Color Palettes
The vibrant colors of rock candy can inspire color palettes for your garden. Use flowers, foliage, and decorative stones in hues that complement each other to create a visually appealing landscape.
Crystalline Structures
The crystalline structures of rock candy can be replicated in landscape design through the use of geometric shapes and patterns. Incorporate angular rocks, pavers, and plant arrangements to create a modern and sophisticated look.
Rock Features
Create rock features that resemble giant pieces of rock candy by using colored glass or resin to fill in the gaps between rocks. This can add a whimsical and playful touch to your garden.
rockscapes.net: Your Partner in Landscape Design
At rockscapes.net, we offer a wide range of resources to help you bring your landscape design visions to life. From expert advice and design inspiration to high-quality materials and tools, we have everything you need to create a stunning and unique outdoor space.
18. How rockscapes.net Can Help You Create a Stunning Rock Garden
If you’re inspired to create a rock garden, rockscapes.net is your ultimate resource. Here’s how we can help:
- Extensive Selection of Rocks and Stones: We offer a wide variety of rocks and stones in different shapes, sizes, colors, and textures to suit any landscape design.
- Design Inspiration: Our website features a gallery of stunning rock garden designs to spark your creativity and help you visualize your own project.
- Expert Advice: Our team of landscape design experts is available to provide personalized advice and guidance to help you plan and execute your rock garden project.
- Step-by-Step Tutorials: We offer detailed step-by-step tutorials on how to build a rock garden, from site preparation to plant selection and placement.
- High-Quality Materials: We source only the highest quality rocks, stones, and other landscaping materials to ensure that your rock garden looks beautiful and lasts for years to come.
19. Real-World Examples of Stunning Rock Gardens in the USA
The United States boasts a diverse range of stunning rock gardens that showcase the beauty and versatility of natural stone. Here are a few notable examples:
The Japanese Garden at the Huntington Library, California
This serene garden features meticulously arranged rocks, gravel, and plants to create a tranquil and contemplative space. The garden’s dry landscape evokes the essence of mountains and streams, providing a peaceful retreat from the hustle and bustle of everyday life.
The Denver Botanic Gardens, Colorado
The Denver Botanic Gardens is home to several impressive rock gardens, including the Mordecai Children’s Garden and the Rock Alpine Garden. These gardens showcase a wide variety of alpine plants and rock formations, creating a diverse and educational experience for visitors.
The Desert Botanical Garden, Arizona
Located in the heart of the Sonoran Desert, this garden features a stunning collection of cacti, succulents, and other desert plants arranged among natural rock formations. The garden celebrates the unique beauty and resilience of desert landscapes.
Local Arizona Inspiration
For those in Arizona, take inspiration from the natural rock formations and desert landscapes. Incorporate native plants and local stones to create a rock garden that reflects the unique character of the region.
20. Getting Started with Rockscapes.net
Ready to transform your outdoor space with the beauty of natural stone? Here’s how to get started with rockscapes.net:
- Visit Our Website: Explore our website at rockscapes.net to discover our extensive selection of rocks, stones, and landscaping materials.
- Browse Our Design Gallery: Get inspired by our gallery of stunning rock garden designs and start visualizing your own project.
- Contact Our Experts: Reach out to our team of landscape design experts for personalized advice and guidance.
- Address: 1151 S Forest Ave, Tempe, AZ 85281, United States
- Phone: +1 (480) 965-9011
- Website: rockscapes.net
- Place Your Order: Once you’ve selected your materials and finalized your design, place your order online or by phone.
- Start Creating: Follow our step-by-step tutorials and expert advice to bring your rock garden vision to life.
With rockscapes.net, creating a stunning rock garden is easier than ever. Let us help you transform your outdoor space into a beautiful and inspiring oasis.
Visit rockscapes.net today and discover the endless possibilities of landscape design with natural stone. Whether you’re creating a serene Japanese garden, a vibrant desert landscape, or a whimsical rock candy-inspired oasis, we have everything you need to bring your vision to life.
Don’t just dream about a beautiful outdoor space – make it a reality with rockscapes.net.