How Long Does It Take To Make Rock Candy? Rock candy creation isn’t instantaneous, but it’s definitely a fun project. Rockscapes.net can guide you through the sweet science of crystal formation and landscape design, providing inspiration and resources for both indoor and outdoor projects. Embrace the beauty of crystallization and the potential of your rock candy creations, exploring the possibilities of sugar crystals and edible landscaping.
1. What Exactly Is Rock Candy?
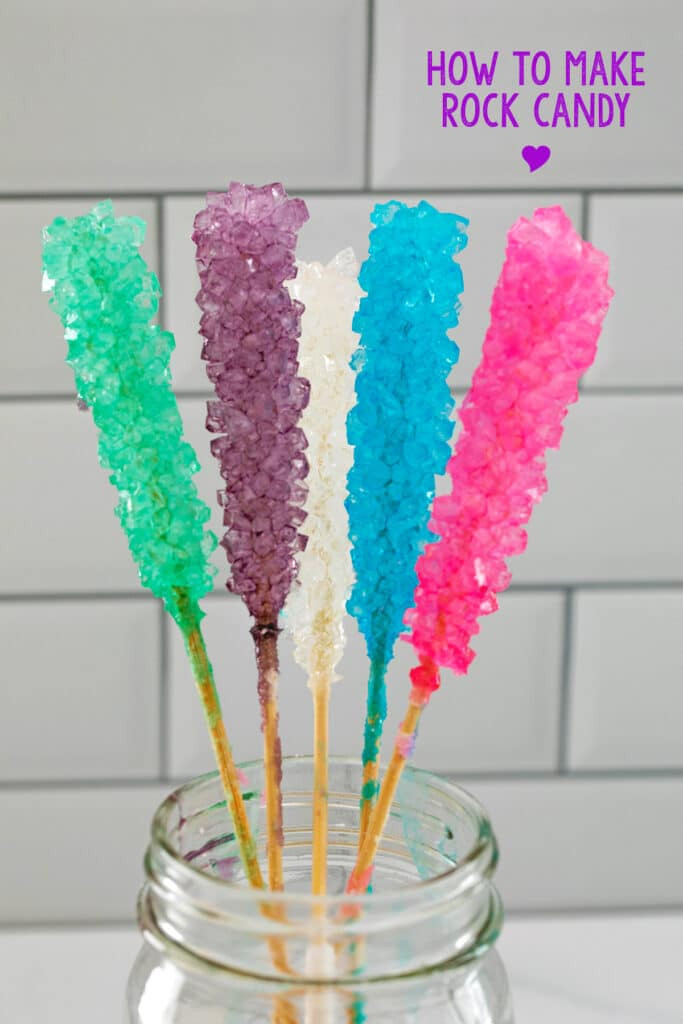
Rock candy is indeed crystalized sugar. Often referred to as “sugar candy,” it’s essentially large sugar crystals that are sometimes colored. They’re often available in candy stores.
Rock candy shares similarities with making simple syrup, but with a twist. Instead of just dissolving sugar, you oversaturate the solution. This process involves adding more sugar than the water can hold at a given temperature, then allowing it to cool and rest so sugar crystals can form.
Because the solution is supersaturated, it cannot absorb the extra sugar at cooler temperatures. As the solution cools, it becomes unstable. Since all the sugar cannot stay dissolved, it attaches itself to a skewer, creating the candy.
2. Why Make Rock Candy Yourself?
While you can purchase rock candy in stores or online, crafting your own at home brings unique joy. Making your own can be a delightful activity whether you wish to enjoy it or offer it as gifts. If you need a large quantity for wedding decor, be sure to plan well in advance.
Making your own rock candy is a great science experiment. Children and adults can learn about crystallization and solution saturation levels. According to the American Chemical Society, the science of candy making involves understanding how sugar molecules interact and form different structures.
Also, rock candy makes fun cocktails and mocktails.
You may also want to make other candies such as homemade fudge and gummy candy.
3. What’s the Time Commitment?
The solution is easy to make and it doesn’t take long at all. After making the solution, it needs to sit for 6-7 days, which allows the crystals to fully form.
Patience is needed. You can check on your jars every day to see how your crystals are growing.
4. What Equipment Do You Need?
You likely already have all the necessary equipment for making rock candy. Here’s what you’ll need:
| Item | Description |
|---|---|
| Granulated Sugar | You’ll need about 10 cups for 5 sticks of candy. |
| Water | The base liquid for dissolving the sugar. |
| Food Coloring | Optional, for adding color to your candy. |
| Mason Jars | Use these or other receptacles to hold the sugar solution, a standard 16 oz. mason jar is recommended. |
| Skewers/Sticks | Use skewers or sticks to grow the rock candy on. Wooden kabob skewers are common. |
| Clothespins/Clips | To balance the stick on the jar without touching the bottom. |
5. How Do You Make Rock Candy?
This recipe will yield 5 sticks of rock candy. Because each candy grows in a separate jar, you can make different colors with one recipe. It’s a good idea to keep one jar clear, making it easier to monitor crystal growth.
Step 1: Prepare the Skewers
Coat your skewers or sticks in granulated sugar. The purpose of this is to “seed” the rock candy and give the crystals something to adhere to as they grow.
 Skewer coated in sugar for rock candy
It is best to trim the skewers, since they’re usually long and pointy.
Submerge the skewers in water, coat them in sugar, and then set out to dry.
This can be done a day ahead of time, but as long as you let them dry for an hour, they should be fine.
Step 2: Prep the Jars
The next step is to prep your jars.
Make sure your jars are clean and not cold. Hot water is recommended. Attach a clothespin or chip clip to each skewer and balance over the tops of the jars.
Make sure the skewer is about an inch from the bottom of the jar, so the rock candy crystals don’t stick to the bottom, which would make it harder to remove the skewers.
Take the skewer out of the jar once it’s set up. It will be added back once the sugar solution is in.
Step 3: Make the Sugar Solution
Add 4 cups of water to a large saucepan. Bring to a boil and add sugar one cup at a time, stirring with a wooden spoon. Allow each cup to fully dissolve before adding the next.
It will become harder for the sugar to dissolve as you add more, and the sugar will start to clump before dissolving.
That means the solution is supersaturated and crystals should have no problem growing.
Once the final cup of sugar has been dissolved, let the mixture simmer for about 5 minutes before removing from heat.
Remove the saucepan from the heat and let the mixture rest for about 15 minutes.
Step 4: Add Color and Start Crystalizing
Divide the mixture between your 5 prepared jars and stir in your food coloring at this time.
It’s a good idea to bring your jars to where they’ll be resting for the next 6-7 days before you place the skewer in the jar. Be cautious when moving the jars, as they will be very hot.
Once the jars are in their resting spots, place prepared skewers into the solution, doing your best not to move them around much.
Now comes the tough part: waiting for the rock candy to grow.
Crystals should start growing on your sticks within a day.
Here’s how it will look after 48 hours:
And here’s how it will look after 72 hours:
The skewers can be removed from the jars whenever you want, but it is best to give them at least 6 days to fully form.
When you’re ready to remove rock candy sticks from jars, use your finger to gently crack the hardened sugar on top of the jar and gently wiggle the stick to release.
Let the syrup drizzle from the stick. The candy can be set over an empty jar or bowl to let it drip, or it can be placed on a paper towel.
Now you can enjoy your homemade rock candy.
6. Can You Re-Use the Sugar Solution?
Once the sticks are taken out of the jars, you might want to pour the rest of the sugar solution in the trash. But can it be reused? Yes, it can.
Before you plop another sugar-coated stick in the solution, pour it back into a saucepan and bring it back to a boil. Add another ¼ cup of sugar to it and let it simmer for a few minutes, then pour it back in the jar.
Reusing the solution without re-heating and adding more sugar to the solution results in this after a week:
Re-heating and adding an additional ¼ cup sugar will result in this:
That’s proof that you’ll want to re-boil the solution and add more sugar.
7. Why Isn’t Your Rock Candy Growing?
Making rock candy can be a bit finicky. There are many reasons it may not work on your first try. However, if you follow these instructions closely and use the full 10 cups of sugar in 4 cups of water, you should have a supersaturated solution and your chances of it working are high.
If your sticks don’t seem to have crystals growing at all after a few days, it may because your sugar solution wasn’t oversaturated for whatever reason. In that case, you can put the mixture back into the saucepan, bring it to a boil and add in another cup of sugar, stirring to dissolve. Add more sugar in if the first cup dissolved easily.
You’ll want to use new sugar-coated skewers, too.
Also be sure to double-check that your jars are clean and not cold and that you didn’t move your jars around once you added the stick in.
8. Can You Make Rock Candy Fast?
Unfortunately, there isn’t really a way to make rock candy grow quickly. Putting the jars in the fridge will speed up the process a bit, but that may not work.
The rock candy can be taken out of the jar after a couple days, but your sticks will probably be a bit sparse.
9. How Should You Store Candy?
Store your rock candy in a cool, dry place. If you’re planning on keeping it for a while or giving it as gifts, wrapping them in cellophane wrappers is recommended.
When stored properly, your rock candy should stay good for a year.
10. Helpful Tips & Tricks
Once you have the process down and understand the science behind it, making your own rock candy is super simple. Here are some tips and tricks that should help you troubleshoot if you’re having problems:
-
Make sure your mason jars are completely clean and not cold. Clean them out with hot water before using them.
-
Do not skip coating your sticks in sugar. It’s very important that the crystals have something to adhere to as they grow.
-
It is best to make the color a bit darker than you think you should, as it will look lighter once the crystals form.
-
You can add flavoring to the rock candy, but try to use a concentrated flavoring so you don’t have to add too much liquid to get the flavor level you want.
-
Once you’ve poured your sugar mixture and placed your sticks in the jars, take care not to move them or jostle the sticks.
FAQ
1. Can I use tap water to make rock candy?
Using filtered water instead of tap water is recommended because tap water has minerals that can affect the formation of crystals.
2. What type of sugar works best for rock candy?
Granulated white sugar works best for rock candy because it dissolves easily and yields clear crystals.
3. How do I prevent the sugar from crystallizing too quickly?
Add a tablespoon of corn syrup or vinegar to your sugar solution. This will help prevent the sugar from crystallizing too quickly.
4. Can I add flavors to my rock candy?
Yes, you can add flavors to your rock candy by using extracts or flavorings. Add a few drops of your desired flavoring to the sugar solution after it has been removed from the heat.
5. How do I store rock candy to keep it from getting sticky?
Store rock candy in an airtight container with a desiccant to absorb any moisture. Do not store it in the refrigerator, as this can cause it to become sticky.
6. What do I do if my rock candy doesn’t form crystals?
If your rock candy doesn’t form crystals, try adding a small amount of seed crystals to the solution. You can do this by dipping a clean toothpick into the sugar solution and then dipping it into some sugar. Place the toothpick into the solution and wait for the crystals to form.
7. How long does rock candy last?
Rock candy can last for several months if stored properly in an airtight container in a cool, dry place.
8. Can I make rock candy without skewers?
Yes, you can make rock candy without skewers by pouring the sugar solution into a shallow dish and allowing the crystals to form on the bottom.
9. How do I clean up the sticky pots and utensils after making rock candy?
Soak the pots and utensils in hot water for a few hours to dissolve the sugar. Then, wash them with soap and water.
10. Is making rock candy safe for children?
Making rock candy can be a fun activity for children, but it is important to supervise them closely, as the sugar solution can be very hot.
DIY rock candy is pretty easy to make as long as you understand the process. It mostly just requires patience and a whole lot of sugar.
Rockscapes.net: Bringing Natural Beauty to Your Landscape
Inspired by the beauty of crystal formations? At Rockscapes.net, we help you bring that same natural artistry to your outdoor spaces. Just as each sugar crystal finds its place in rock candy, we can help you discover the perfect stones to create a landscape that’s uniquely yours.
Whether you want a Zen garden or a rock-lined walkway, Rockscapes.net is your partner in design. Our experts offer advice on rock selection and placement, and our network of suppliers offers quality materials.
Ready to start your own landscape project? Contact us today at 1151 S Forest Ave, Tempe, AZ 85281, United States or call +1 (480) 965-9011. Visit our website, rockscapes.net, for inspiration and let your imagination take root.