Tumbling rocks to a polished finish can take anywhere from one to eight weeks, but How Long To Tumble Rocks In Polish specifically? At rockscapes.net, we’ll guide you through the factors determining the ideal polishing time to achieve stunning results, plus share insights on selecting the right rocks and tumbling techniques. Discover how to transform rough stones into dazzling gems with our expert advice on rock polishing, lapidary techniques, and rock tumbling grit.
1. Understanding Rock Tumbling Basics
Rock tumbling is the art and science of transforming rough, jagged rocks into smooth, polished gems. This process simulates natural erosion but accelerates it using specialized equipment and abrasive materials. The results are not only aesthetically pleasing but can also reveal the inner beauty of the stones, making them perfect for jewelry, crafts, or decorative landscaping.
1.1 What is Rock Tumbling?
Rock tumbling involves using a machine to continuously rotate rocks with abrasive grits and water, gradually smoothing and polishing them. The tumbler’s barrel, filled with rocks, grit, and water, spins for days or weeks, replicating the natural erosion process that occurs over thousands of years in rivers and streams.
1.2 Why Tumble Rocks?
Tumbling rocks serves several purposes:
- Aesthetic Enhancement: Transforms rough rocks into smooth, shiny gems.
- Revealing Inner Beauty: Polishing uncovers unique colors and patterns within the stones.
- Craft and Decorative Use: Polished rocks are ideal for jewelry, crafts, and landscaping.
- Therapeutic Hobby: The process can be relaxing and rewarding, fostering creativity and patience.
1.3 Types of Rocks Suitable for Tumbling
Not all rocks are created equal when it comes to tumbling. The best candidates are those that are relatively hard, dense, and free of fractures. Here are some popular and suitable rocks for tumbling:
- Agate: Known for its vibrant colors and banding patterns.
- Jasper: A variety of chalcedony, offering a wide range of colors and patterns.
- Quartz: Including clear quartz, rose quartz, amethyst, and citrine, all durable and beautiful.
- Petrified Wood: Fossilized wood with unique textures and patterns.
- Obsidian: Volcanic glass that can produce a high-gloss polish.
1.4 Tools and Materials Needed for Rock Tumbling
To embark on your rock tumbling journey, you’ll need the following essentials:
- Rock Tumbler: Either a rotary or vibratory tumbler, depending on your preference.
- Tumbling Grit: Abrasive materials of varying coarseness (coarse, medium, fine, and polish).
- Rocks: A selection of rocks suitable for tumbling.
- Water: To keep the rocks and grit moist during the tumbling process.
- Optional: Ceramic media as filler, plastic pellets for cushioning, and a sieve for rinsing rocks.
2. Rotary vs. Vibratory Tumblers: Which is Right for You?
Choosing the right type of tumbler is crucial for achieving the desired results. Rotary and vibratory tumblers each have their strengths and weaknesses, making them suitable for different types of rocks and desired finishes.
2.1 Rotary Tumblers: The Traditional Choice
Rotary tumblers are the most common type, consisting of a barrel that rotates horizontally. Rocks are tumbled inside the barrel with grit and water, slowly grinding against each other.
- Pros:
- Excellent for rounding rocks.
- More affordable than vibratory tumblers.
- Suitable for beginners.
- Cons:
- Longer tumbling times (4-8 weeks).
- Can be noisy.
- May not be ideal for fragile rocks.
2.2 Vibratory Tumblers: The Fast Track to Polished Stones
Vibratory tumblers use vibrations to agitate the rocks, grit, and water. This method is faster than rotary tumbling but produces a different finish.
- Pros:
- Shorter tumbling times (1-2 weeks).
- Gentler on rocks, reducing the risk of breakage.
- Less noisy than rotary tumblers.
- Cons:
- More expensive than rotary tumblers.
- Does not round rocks as effectively.
- Requires more frequent monitoring.
2.3 Comparison Table: Rotary vs. Vibratory Tumblers
| Feature | Rotary Tumbler | Vibratory Tumbler |
|---|---|---|
| Tumbling Time | 4-8 weeks | 1-2 weeks |
| Rock Shape | Rounds rocks effectively | Smooths rocks, less rounding |
| Noise Level | Louder | Quieter |
| Cost | More Affordable | More Expensive |
| Best For | Harder rocks, beginners | Fragile rocks, faster results |
| Maintenance | Less Frequent | More Frequent |
2.4 Hybrid Approach: Rotary Followed by Vibratory
Some rock enthusiasts use a combination of both types of tumblers. They start with a rotary tumbler to round the rocks and then transfer them to a vibratory tumbler for the final polishing stages. This hybrid approach can yield the best of both worlds: well-rounded stones with a high-gloss polish in a shorter amount of time.
3. The Four Stages of Rock Tumbling
Rock tumbling typically involves four distinct stages: coarse grind, medium grind, fine grind (pre-polish), and polish. Each stage uses a different grit size to gradually refine the rocks’ surface.
3.1 Stage 1: Coarse Grind (7-10 Days)
The coarse grind stage is where the initial shaping and smoothing of the rocks occur. This stage removes sharp edges and rough surfaces, preparing the rocks for further refinement.
- Grit Used: 60/90 silicon carbide grit.
- Purpose: To remove sharp edges, shape the rocks, and eliminate major imperfections.
- Duration: 7-10 days.
- Tips: Check the rocks periodically to ensure they are rounding properly. If not, extend the coarse grind stage.
3.2 Stage 2: Medium Grind (7 Days)
The medium grind stage continues the smoothing process, removing any remaining imperfections and preparing the rocks for the finer grits.
- Grit Used: 120/220 silicon carbide grit.
- Purpose: To further smooth the rocks and remove any remaining blemishes.
- Duration: 7 days.
- Tips: Clean the rocks and tumbler barrel thoroughly before moving on to the next stage.
3.3 Stage 3: Fine Grind (Pre-Polish) (7 Days)
The fine grind stage, also known as the pre-polish stage, refines the surface of the rocks, making them ready for the final polishing step.
- Grit Used: 500F silicon carbide grit.
- Purpose: To prepare the rocks for polishing by creating a smooth, even surface.
- Duration: 7 days.
- Tips: Ensure the rocks are thoroughly cleaned to avoid contaminating the polishing stage.
3.4 Stage 4: Polish (7-10 Days)
The polishing stage is where the magic happens, transforming the dull, smooth rocks into shiny, polished gems.
- Polish Used: Cerium oxide, aluminum oxide, or tin oxide.
- Purpose: To create a high-gloss finish on the rocks.
- Duration: 7-10 days.
- Tips: Use plastic pellets or ceramic media to cushion the rocks and prevent chipping.
3.5 Troubleshooting Common Issues in Each Stage
| Stage | Issue | Possible Cause | Solution |
|---|---|---|---|
| Coarse Grind | Rocks not rounding | Insufficient grit, too many flat rocks | Add more grit, remove overly flat rocks |
| Medium Grind | Scratches still visible | Contamination from coarse grit, insufficient time | Clean thoroughly, extend tumbling time |
| Fine Grind | Dull surface | Insufficient grit, contamination | Add more grit, ensure cleanliness |
| Polish | No shine | Contamination, wrong polish, insufficient time | Clean thoroughly, use correct polish, extend tumbling time |
| All Stages | Rock breakage | Too much weight, fragile rocks | Reduce weight, use cushioning media, avoid fragile rocks |
4. How Long to Tumble Rocks in Polish: Factors Affecting Polishing Time
The polishing stage is crucial for achieving that desired shine, but several factors can influence the duration required. Understanding these factors will help you fine-tune your tumbling process for optimal results.
4.1 Type of Rock
Different types of rocks have varying hardness levels, which directly affect how quickly they polish. Softer rocks like calcite and obsidian will polish faster than harder rocks like agate and jasper.
- Soft Rocks (Calcite, Obsidian): 3-5 days
- Medium Rocks (Fluorite, Turquoise): 5-7 days
- Hard Rocks (Agate, Jasper, Quartz): 7-10 days
4.2 Type of Polish
The type of polishing compound used can also influence the polishing time. Cerium oxide is generally faster than aluminum oxide or tin oxide.
- Cerium Oxide: Known for its fast polishing action, ideal for most rocks.
- Aluminum Oxide: A versatile polish that works well on a variety of materials.
- Tin Oxide: Produces a high-quality finish but may require longer tumbling times.
4.3 Tumbler Type
As mentioned earlier, vibratory tumblers generally polish rocks faster than rotary tumblers. If using a vibratory tumbler, you may need to reduce the polishing time accordingly.
- Rotary Tumbler: 7-10 days
- Vibratory Tumbler: 3-5 days
4.4 Desired Level of Shine
The level of shine you want to achieve will also dictate the polishing time. If you’re aiming for a mirror-like finish, you may need to tumble the rocks for a longer period.
- Slight Shine: 5-7 days
- High Shine: 7-10 days
- Mirror-Like Finish: 10-14 days
4.5 Water Quality
Using clean, distilled water can improve the polishing process. Minerals and impurities in tap water can interfere with the polishing action, potentially increasing the required time.
5. Step-by-Step Guide to the Polishing Stage
The polishing stage is where the magic happens, transforming dull, smooth rocks into shiny, polished gems. Follow these steps to achieve a professional-looking finish.
5.1 Cleaning the Rocks Thoroughly
Before starting the polishing stage, it’s crucial to clean the rocks thoroughly to remove any residual grit from the previous stages. Even a small amount of contamination can ruin the polish.
- Rinse: Rinse the rocks under running water until all visible grit is gone.
- Soak: Soak the rocks in a solution of water and mild detergent for several hours.
- Scrub: Use a soft brush to scrub each rock, removing any remaining grit.
- Final Rinse: Rinse the rocks again until the water runs clear.
5.2 Preparing the Tumbler
Ensure the tumbler barrel is clean and free of any abrasive particles. Use a separate barrel dedicated solely to the polishing stage to prevent contamination.
- Clean: Wash the barrel with soap and water, then rinse thoroughly.
- Inspect: Check for any cracks or damage that could compromise the polishing process.
- Dry: Allow the barrel to dry completely before adding the rocks and polish.
5.3 Adding Polish and Water
Add the recommended amount of polishing compound to the tumbler barrel, followed by enough water to create a slurry. The slurry should have a consistency similar to thin mud.
- Amount of Polish: Follow the manufacturer’s instructions, typically 1-2 tablespoons per pound of rocks.
- Water Level: Add enough water to cover the rocks, but not so much that it dilutes the polish.
- Mixing: Stir the polish and water to ensure it’s evenly distributed.
5.4 Adding Cushioning Media (Plastic Pellets or Ceramic Media)
Adding cushioning media like plastic pellets or ceramic media can help protect the rocks during the polishing stage, preventing chipping and improving the overall finish.
- Purpose: To cushion the rocks, distribute the polish evenly, and prevent damage.
- Amount: Add enough media to fill about 1/4 to 1/3 of the barrel.
- Types: Plastic pellets are gentler, while ceramic media is more durable.
5.5 Tumbling the Rocks
Seal the tumbler barrel and place it on the tumbler machine. Allow the rocks to tumble for the recommended duration, typically 7-10 days for rotary tumblers and 3-5 days for vibratory tumblers.
- Rotary Tumbler: Tumble for 7-10 days, checking periodically for progress.
- Vibratory Tumbler: Tumble for 3-5 days, monitoring the rocks closely.
- Inspection: Check the rocks every 24 hours to assess the shine and adjust the tumbling time accordingly.
5.6 Checking for Shine and Repeating if Necessary
After the initial polishing period, remove a few rocks from the tumbler and check their shine. If they haven’t reached the desired level, return them to the tumbler and continue polishing for another 24-48 hours.
- Inspection: Rinse the rocks and examine them under bright light.
- Re-Tumbling: If the shine is insufficient, add a small amount of fresh polish and continue tumbling.
- Patience: Polishing can be a slow process, so be patient and persistent.
5.7 Final Cleaning and Polishing Tips
Once the rocks have achieved the desired shine, give them a final cleaning to remove any remaining polish residue.
- Rinse: Rinse the rocks thoroughly under running water.
- Buff: Use a soft cloth or buffing wheel to enhance the shine.
- Wax: Apply a thin coat of rock polishing wax to protect the finish and add extra luster.
6. Advanced Techniques for Achieving a High-Gloss Finish
For those seeking a truly exceptional, mirror-like finish, consider these advanced techniques.
6.1 Burnishing
Burnishing involves tumbling the polished rocks in a mild soap solution for 12-24 hours. This process removes any remaining polish residue and enhances the shine.
- Purpose: To remove residue and enhance shine.
- Solution: Mix a small amount of mild dish soap with water.
- Duration: 12-24 hours.
6.2 Using Specialized Polishes
Experiment with different types of polishing compounds to find the one that works best for your rocks. Some specialized polishes are designed to produce a higher gloss on specific types of stones.
- Diamond Paste: Ideal for very hard stones.
- Chrome Oxide: Works well on softer materials.
- Magnesium Oxide: Produces a brilliant shine on certain types of agate.
6.3 Tumbling with Leather or Fabric
Adding small pieces of leather or fabric to the tumbler during the polishing stage can help distribute the polish evenly and create a smoother finish.
- Materials: Small scraps of leather, denim, or felt.
- Purpose: To distribute polish and create a smoother finish.
- Amount: Add a few small pieces to the tumbler barrel.
6.4 Monitoring and Adjusting the Slurry
Pay close attention to the consistency of the slurry during the polishing stage. If it becomes too thick or too thin, adjust the amount of water accordingly.
- Consistency: The slurry should be similar to thin mud.
- Adjustments: Add water if the slurry is too thick, or more polish if it’s too thin.
- Regular Checks: Monitor the slurry every 12-24 hours and make adjustments as needed.
6.5 Using a Dedicated Polishing Barrel
To prevent contamination, use a separate tumbler barrel dedicated solely to the polishing stage. This will ensure that no abrasive particles from previous stages interfere with the polishing process.
- Labeling: Clearly label the barrel for polishing only.
- Cleaning: Clean the barrel thoroughly after each use.
- Storage: Store the barrel separately from other tumbling equipment.
7. Common Mistakes to Avoid When Polishing Rocks
Even with the best techniques, mistakes can happen. Here are some common pitfalls to avoid when polishing rocks.
7.1 Contamination from Previous Grits
The most common mistake is failing to thoroughly clean the rocks and tumbler between stages. Even a small amount of coarse grit can scratch the polished surface.
- Prevention: Clean the rocks and tumbler meticulously after each stage.
- Dedicated Barrels: Use separate barrels for each stage to minimize contamination.
- Inspection: Inspect the rocks carefully before moving on to the next stage.
7.2 Using the Wrong Type of Polish
Using the wrong type of polishing compound can result in a dull or uneven finish. Always use a polish that is appropriate for the type of rock you are tumbling.
- Research: Research the best polishing compounds for your specific rocks.
- Experiment: Try different polishes to see which one produces the best results.
- Manufacturer’s Instructions: Follow the manufacturer’s instructions carefully.
7.3 Overloading or Underloading the Tumbler
Overloading the tumbler can prevent the rocks from tumbling properly, while underloading can cause them to bang against each other and chip.
- Optimal Load: Fill the tumbler barrel about 2/3 to 3/4 full.
- Adjustments: Add ceramic media or plastic pellets if needed to reach the optimal load.
- Weight: Ensure the total weight of the rocks and media is within the tumbler’s capacity.
7.4 Insufficient Tumbling Time
Rushing the polishing stage can result in a lackluster finish. Be patient and allow the rocks to tumble for the recommended duration.
- Patience: Polishing takes time, so be patient and persistent.
- Monitoring: Check the rocks periodically to assess the progress.
- Re-Tumbling: If the shine is insufficient, continue tumbling for another 24-48 hours.
7.5 Neglecting Water Quality
Using hard water or water with impurities can interfere with the polishing process. Always use clean, distilled water for best results.
- Distilled Water: Use distilled water to avoid mineral buildup.
- Water Changes: Change the water every 24-48 hours to keep the slurry clean.
- Water Softeners: If you have hard water, consider using a water softener.
8. Safety Precautions When Working with Rock Tumblers and Polishing Compounds
Rock tumbling can be a safe and enjoyable hobby, but it’s essential to take certain precautions to protect yourself and your equipment.
8.1 Wearing Protective Gear
When handling polishing compounds, wear gloves and a dust mask to avoid inhaling or coming into contact with the chemicals.
- Gloves: Protect your hands from irritation and chemical exposure.
- Dust Mask: Prevent inhalation of fine particles.
- Eye Protection: Wear safety glasses to protect your eyes from splashes.
8.2 Working in a Well-Ventilated Area
Always operate your rock tumbler in a well-ventilated area to prevent the buildup of fumes or dust.
- Ventilation: Open windows or use a fan to circulate air.
- Dust Collection: Consider using a dust collector to remove airborne particles.
- Outdoor Use: If possible, operate the tumbler outdoors.
8.3 Storing Polishing Compounds Properly
Store polishing compounds in a cool, dry place, away from children and pets.
- Original Containers: Keep the compounds in their original containers, tightly sealed.
- Labeling: Clearly label each container with its contents and any safety warnings.
- Secure Storage: Store the compounds in a locked cabinet or on a high shelf.
8.4 Handling Tumblers Safely
When lifting or moving a rock tumbler, use proper lifting techniques to avoid straining your back.
- Bend Your Knees: Bend your knees and keep your back straight when lifting.
- Get Help: Ask for assistance if the tumbler is too heavy.
- Stable Surface: Place the tumbler on a stable, level surface.
8.5 Disposing of Waste Properly
Dispose of used polishing compounds and slurry properly to avoid contaminating the environment.
- Settling: Allow the slurry to settle before pouring off the clear water.
- Solid Waste: Dispose of the solid waste in a sealed container.
- Local Regulations: Follow local regulations for disposal of hazardous waste.
9. Rockscapes.net: Your Ultimate Resource for Rock Tumbling and Landscaping with Stone
At rockscapes.net, we are passionate about rocks and the beauty they bring to landscapes and personal collections. Whether you’re a seasoned rockhound or a beginner, we offer a wealth of information, inspiration, and resources to fuel your passion.
9.1 Explore Our Extensive Rock and Mineral Gallery
Browse our extensive gallery featuring a wide variety of rocks and minerals, from agates and jaspers to quartz and petrified wood. Each specimen is carefully photographed and described, providing valuable information about its origin, properties, and uses.
9.2 Discover Creative Landscaping Ideas with Stone
Get inspired by our stunning collection of landscaping ideas featuring natural stone. From rock gardens and pathways to water features and retaining walls, we showcase innovative ways to incorporate rocks into your outdoor spaces.
9.3 Access Expert Advice and Tutorials
Tap into our expertise with in-depth articles and tutorials on rock tumbling, stone selection, landscaping techniques, and more. Our team of experienced geologists and landscapers share their knowledge and insights to help you achieve your goals.
9.4 Find Local Suppliers and Services
Connect with local suppliers and service providers who can provide you with the rocks, tools, and expertise you need. Our directory includes rock yards, landscaping companies, and lapidary equipment dealers in your area.
9.5 Join Our Community of Rock Enthusiasts
Become part of our vibrant community of rock enthusiasts. Share your experiences, ask questions, and connect with like-minded individuals who share your passion for rocks and minerals.
10. Frequently Asked Questions (FAQs) About Rock Tumbling Polish
10.1 How Long Should I Tumble Rocks in the Polishing Stage?
The polishing stage typically takes 7-10 days in a rotary tumbler and 3-5 days in a vibratory tumbler. However, the exact duration depends on the type of rock, the type of polish, and the desired level of shine.
10.2 Can I Use the Same Tumbler for All Stages of Rock Tumbling?
While it’s possible to use the same tumbler for all stages, it’s best to use separate barrels for each stage to prevent contamination from coarser grits.
10.3 What is the Best Type of Polish for Rock Tumbling?
Cerium oxide is generally considered the best all-around polish for rock tumbling. However, aluminum oxide and tin oxide are also effective, depending on the type of rock you’re polishing.
10.4 How Do I Know if My Rocks Are Polished Enough?
Check the rocks periodically under bright light. They should have a smooth, glossy surface with no visible scratches or imperfections. If the shine is insufficient, continue tumbling for another 24-48 hours.
10.5 Can I Polish Rocks by Hand?
Yes, you can polish rocks by hand using a lapidary polishing wheel or a buffing wheel. This method is more time-consuming but allows for greater control over the polishing process.
10.6 What is Burnishing and Why Should I Do It?
Burnishing involves tumbling the polished rocks in a mild soap solution for 12-24 hours. This process removes any remaining polish residue and enhances the shine.
10.7 How Do I Dispose of Used Polishing Compounds?
Allow the slurry to settle before pouring off the clear water. Dispose of the solid waste in a sealed container and follow local regulations for disposal of hazardous waste.
10.8 Can I Tumble Soft and Hard Rocks Together?
It’s generally not recommended to tumble soft and hard rocks together, as the softer rocks may wear down too quickly.
10.9 What is the Purpose of Adding Plastic Pellets or Ceramic Media to the Tumbler?
Plastic pellets or ceramic media help cushion the rocks, distribute the polish evenly, and prevent chipping.
10.10 Where Can I Find More Information About Rock Tumbling and Landscaping with Stone?
Visit rockscapes.net for a wealth of information, inspiration, and resources on rock tumbling, stone selection, landscaping techniques, and more.
Ready to transform your rough rocks into dazzling gems? Explore rockscapes.net today for expert advice, stunning design ideas, and the resources you need to create breathtaking landscapes with stone. Contact us at 1151 S Forest Ave, Tempe, AZ 85281, United States, or call +1 (480) 965-9011 to speak with our team of experts. Let’s bring your vision to life with the timeless beauty of natural stone.
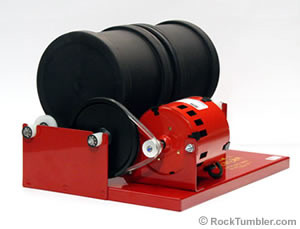 Rotary rock tumbler