There are six rocks on every island in Animal Crossing: New Horizons. If you’re looking to enhance your island’s landscape, rockscapes.net can guide you in creating stunning rock gardens and designs. Our expertise in stone placement and design can help you achieve the perfect aesthetic.
1. Understanding the Rock Landscape in Animal Crossing
1.1 The Standard Number of Rocks
The number of rocks in Animal Crossing: New Horizons is fixed. Every island is generated with exactly six rocks, which are essential for gathering resources. These rocks provide valuable materials, making them a crucial part of the game’s economy and design.
1.2 Why Rocks Matter in Animal Crossing
Rocks in Animal Crossing: New Horizons aren’t just obstacles; they’re resource hubs and design elements. By hitting rocks with a shovel, you can gather essential resources like iron nuggets, stones, clay, and even bells (the game’s currency). Understanding how to maximize these resources can significantly enhance your gameplay and island development. Moreover, rocks can be strategically placed to create beautiful rock gardens, enhancing the visual appeal of your island. This requires careful planning and manipulation of the game’s mechanics to ensure rocks spawn where you desire.
1.3 Rock Placement and Island Design
Manipulating rock placement in Animal Crossing: New Horizons is a creative endeavor that allows players to customize their island landscapes. While the game initially scatters rocks randomly, dedicated players can relocate them to form rock gardens or other visually appealing arrangements. Achieving this involves understanding the game’s spawning mechanics and employing strategic blocking techniques. By covering undesired spawn locations with patterns or objects, players can force rocks to appear only in designated areas, thus curating their island’s aesthetic according to their vision. This meticulous process transforms the island into a personalized work of art, blending resource management with creative expression.
2. Maximizing Resource Gathering from Rocks
2.1 Hitting Rocks for Maximum Yield
To get the most resources from each rock, use the “hole-digging” technique. This involves digging two holes behind you before hitting the rock with a shovel. These holes prevent you from being knocked back, allowing you to hit the rock repeatedly and quickly.
2.2 The Eight-Hit Combo
The goal is to hit each rock eight times in quick succession. Each hit yields a different resource, and maximizing this output is crucial for efficient resource gathering. This method ensures you collect the maximum amount of materials from each rock every day.
2.3 Resource Types and Their Uses
The resources obtained from rocks include:
- Iron Nuggets: Used for crafting tools, furniture, and various DIY recipes.
- Stones: Essential for building stone-based items and structures.
- Clay: Used in crafting and DIY projects, especially for creating pottery and figurines.
- Bells: The game’s currency, which can be used to purchase items, upgrade your home, and pay off debts.
2.4 Optimizing Your Rock-Hitting Routine
To optimize your rock-hitting routine, choose a durable shovel and plan your route around the island to hit all six rocks efficiently. Keep an eye out for rocks that may be hidden behind trees or buildings, and clear the area around each rock to ensure you have enough space to dig your holes and swing your shovel. Regular practice will help you master the timing and technique required for the eight-hit combo.
3. Creating a Rock Garden: Step-by-Step Guide
3.1 Planning Your Rock Garden
Before starting, plan the location and design of your rock garden. Consider the overall aesthetic of your island and choose a spot that complements your theme. Sketch out a rough layout to visualize how the rocks will be arranged.
3.2 Blocking Undesired Spawn Locations
To control where rocks spawn, you must block all other potential locations on your island. This can be done using various methods:
- Patterns: Place custom patterns on the ground to prevent rocks from spawning.
- Furniture: Drop furniture items all over the island to block potential spawn locations.
- Trees: Plant trees to fill up empty spaces and prevent rocks from spawning.
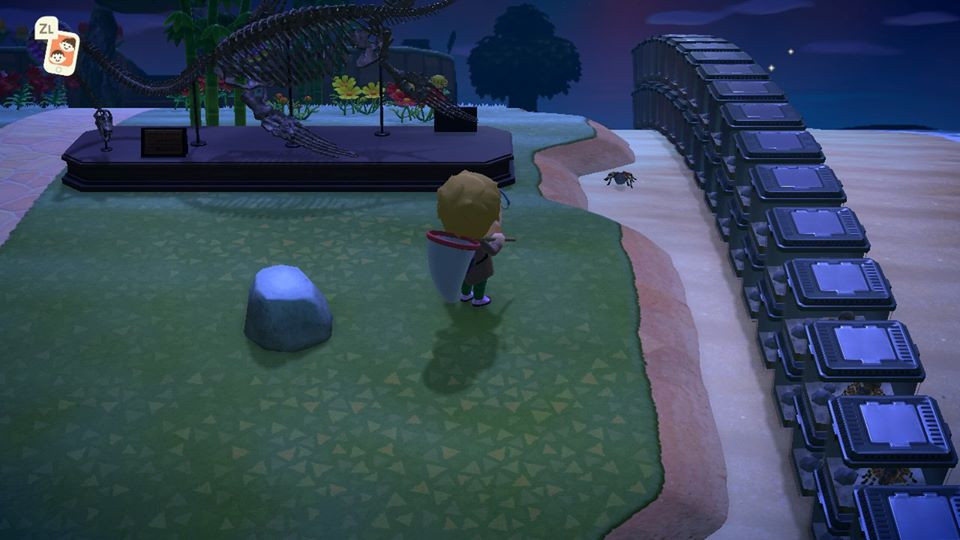
3.3 The Chicken Pattern Method
The “chicken pattern” method, as described in the original article, involves covering the island with custom-designed patterns. This ensures that rocks can only spawn in the designated rock garden area.
3.4 Terraforming and Landscaping
Use the terraforming tool to shape the landscape around your rock garden. Add sand, paths, and other decorative elements to create a visually appealing environment.
3.5 Breaking and Respawning Rocks
To move a rock, eat a piece of fruit and hit it with a shovel until it breaks. The rock will respawn in a random location the next day, as long as there are eligible spaces available.
3.6 Patience and Persistence
Creating a rock garden requires patience and persistence. It may take several days to move all six rocks to the desired location. Don’t get discouraged if things don’t go according to plan, and be prepared to adjust your strategy as needed.
4. Common Challenges and Solutions in Rock Garden Creation
4.1 Rocks Spawning in Unexpected Places
Even with careful planning, rocks may sometimes spawn in unexpected places. This can be frustrating, but it’s important to remain flexible and adjust your blocking strategy accordingly.
4.2 Overcoming Visual Obstructions
Sometimes, the game may perceive visual obstructions that prevent rocks from spawning. Try removing any nearby objects, such as furniture, fences, or decorations, to clear the path for the rock to appear.
4.3 The Importance of Clear Spaces
Ensure that the designated spawn locations are clear of any obstructions. Rocks require a 3×3 grid of open space to spawn, so make sure there are no flowers, weeds, or other items blocking the area.
4.4 Time Management and Planning
Creating a rock garden can be time-consuming, so it’s important to plan your activities and manage your time effectively. Set aside a few hours each day to work on your rock garden, and break the task into smaller, more manageable steps.
5. Creative Rock Garden Design Ideas
5.1 Zen Gardens
Create a serene zen garden with carefully placed rocks, sand patterns, and minimalist decorations. This design evokes a sense of peace and tranquility, perfect for relaxation and meditation.
5.2 Natural Rock Formations
Mimic natural rock formations with varying sizes and shapes. Add plants, moss, and other greenery to create a realistic and organic look.
5.3 Themed Rock Gardens
Design a themed rock garden inspired by your favorite movies, books, or games. This adds a personal touch to your island and showcases your unique style.
5.4 Rock Mazes
Construct a rock maze with winding paths and hidden surprises. This creates an interactive and engaging experience for visitors to your island.
5.5 Combining Rocks with Water Features
Integrate rocks with water features, such as ponds, streams, and waterfalls, to create a dynamic and visually stunning landscape.
6. Using Rocks in Other Island Design Elements
6.1 Rock Pathways
Create natural-looking pathways using rocks and stones. These pathways add texture and visual interest to your island, guiding visitors through your landscape.
6.2 Rock Fences and Borders
Use rocks to create fences and borders around gardens, yards, and other areas. This adds a rustic and charming touch to your island’s design.
6.3 Rock Bridges
Construct rock bridges over rivers and streams to connect different parts of your island. These bridges are not only functional but also visually appealing, enhancing the overall aesthetic of your landscape.
6.4 Rock Sculptures
Create rock sculptures and art installations to add a unique and artistic element to your island. This showcases your creativity and transforms your island into a living gallery.
7. Advanced Techniques for Rock Manipulation
7.1 Time Traveling for Faster Rock Placement
For those who want to speed up the process, time traveling can be used to advance the game one day at a time, allowing rocks to respawn more quickly. However, be aware of the potential consequences of time traveling, such as weeds growing and villagers moving out.
7.2 Using Custom Design Slots Effectively
Optimize your custom design slots to create a variety of patterns for blocking and decorating your island. This allows you to customize your landscape with intricate designs and personalized touches.
7.3 Coordinating with Friends for Resources
Collaborate with friends to gather resources more efficiently. Share resources, trade items, and help each other with rock garden creation and island design projects.
7.4 Utilizing Online Resources and Communities
Take advantage of online resources and communities to learn new techniques, share ideas, and get inspiration for your rock garden and island design projects.
8. Preserving Your Rock Garden: The Toilet Gate Strategy
8.1 The Importance of Protecting Your Rocks
Once your rock garden is complete, it’s important to protect it from accidental destruction. Breaking a rock means having to start the entire process over again, which can be incredibly frustrating.
8.2 Understanding the Pooping Mechanic
As mentioned in the original article, eating fruit and then sitting on a toilet will automatically remove your ability to break rocks. This mechanic can be used to prevent accidental rock breakages.
8.3 Creating a Toilet Gate
By placing a toilet at the entrance to your rock garden, you can create a “toilet gate” that prevents accidental rock breakages. Anyone entering the garden must sit on the toilet and “poop out” their fruit, thus removing their ability to break the rocks.
8.4 Additional Security Measures
Consider adding additional security measures, such as fences, signs, and warnings, to further protect your rock garden from accidental damage.
9. The Joy of a Completed Rock Garden
9.1 Streamlined Resource Gathering
With all six rocks in one convenient location, resource gathering becomes much more efficient. No more running all over the island to hit rocks – now you can collect everything in a matter of minutes.
9.2 Enhanced Island Aesthetics
A well-designed rock garden adds a touch of beauty and elegance to your island. It enhances the overall aesthetic and creates a visually appealing environment for you and your visitors.
9.3 Personal Satisfaction and Accomplishment
Creating a rock garden is a challenging but rewarding endeavor. The sense of personal satisfaction and accomplishment that comes from completing this project is immense, knowing that you have transformed your island into a personalized work of art.
9.4 Sharing Your Creation with Others
Share your completed rock garden with friends, family, and the online Animal Crossing community. Get feedback, exchange ideas, and inspire others to create their own unique island landscapes.
10. Rockscapes.net: Your Partner in Island Design
10.1 Expert Advice and Guidance
Rockscapes.net offers expert advice and guidance on all aspects of Animal Crossing island design, including rock garden creation, landscaping, and resource management. Our team of experienced designers can help you bring your vision to life.
10.2 Inspiration and Ideas
Explore our extensive gallery of rock garden designs and island landscapes for inspiration and ideas. Discover new techniques, learn from the best, and create your own unique style.
10.3 Resources and Tools
Access a wide range of resources and tools to help you plan, design, and execute your island design projects. From custom pattern generators to resource calculators, we have everything you need to succeed.
10.4 Community and Support
Join our vibrant community of Animal Crossing enthusiasts and connect with like-minded individuals. Share your creations, get feedback, and find support and encouragement along the way.
Ready to transform your Animal Crossing: New Horizons island into a stunning paradise? Visit rockscapes.net today and discover the endless possibilities of rock garden design. Explore our design ideas, learn about stone types, and get expert advice to bring your vision to life. Contact us at 1151 S Forest Ave, Tempe, AZ 85281, United States, or call +1 (480) 965-9011. Let rockscapes.net be your partner in creating the island of your dreams.
 A rock in Animal Crossing: New Horizons, showcasing its texture and resource-yielding potential.
 Custom chicken pattern design laid on the ground in Animal Crossing: New Horizons, a creative method for blocking rock spawns.
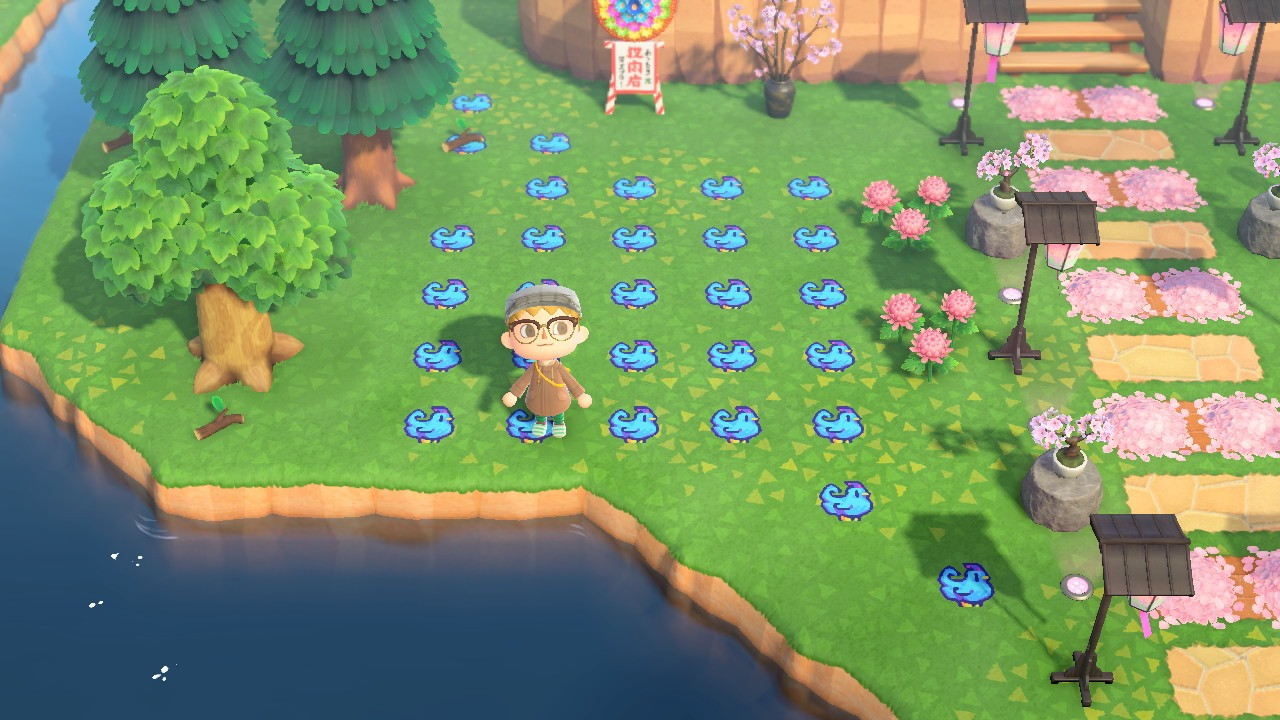
 A partially completed rock garden in Animal Crossing: New Horizons, surrounded by patterns and landscaping elements.
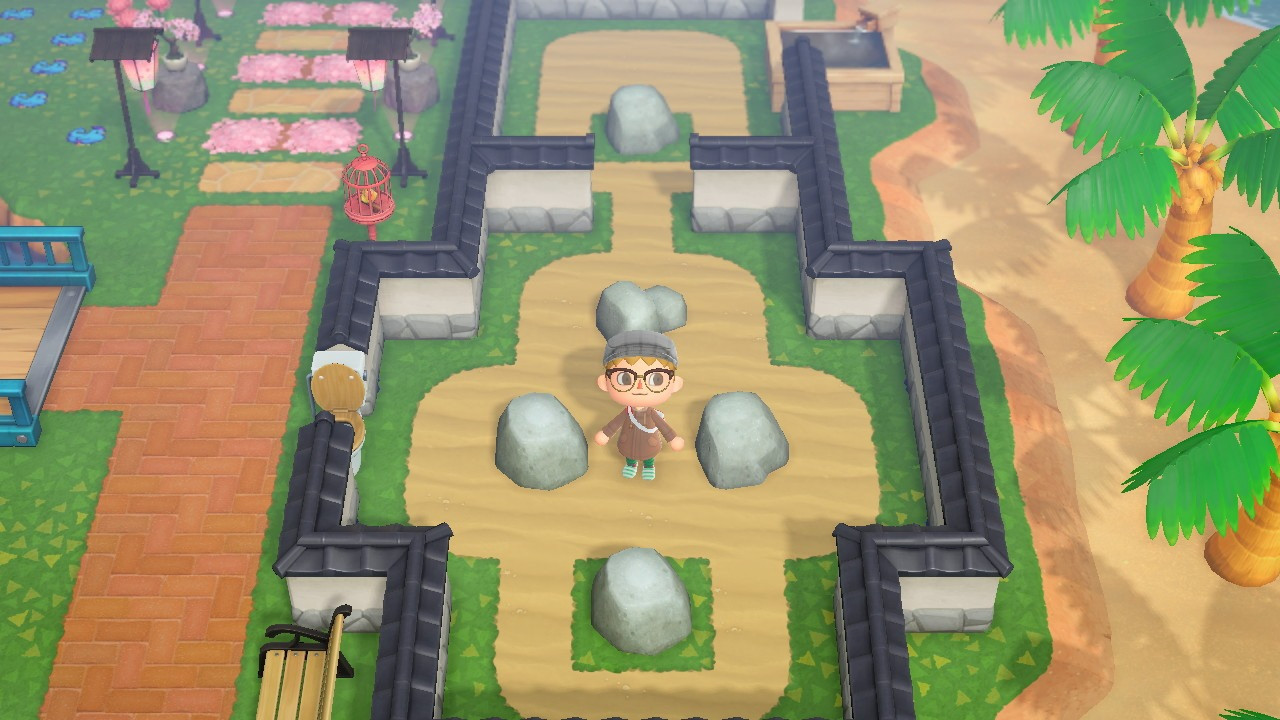
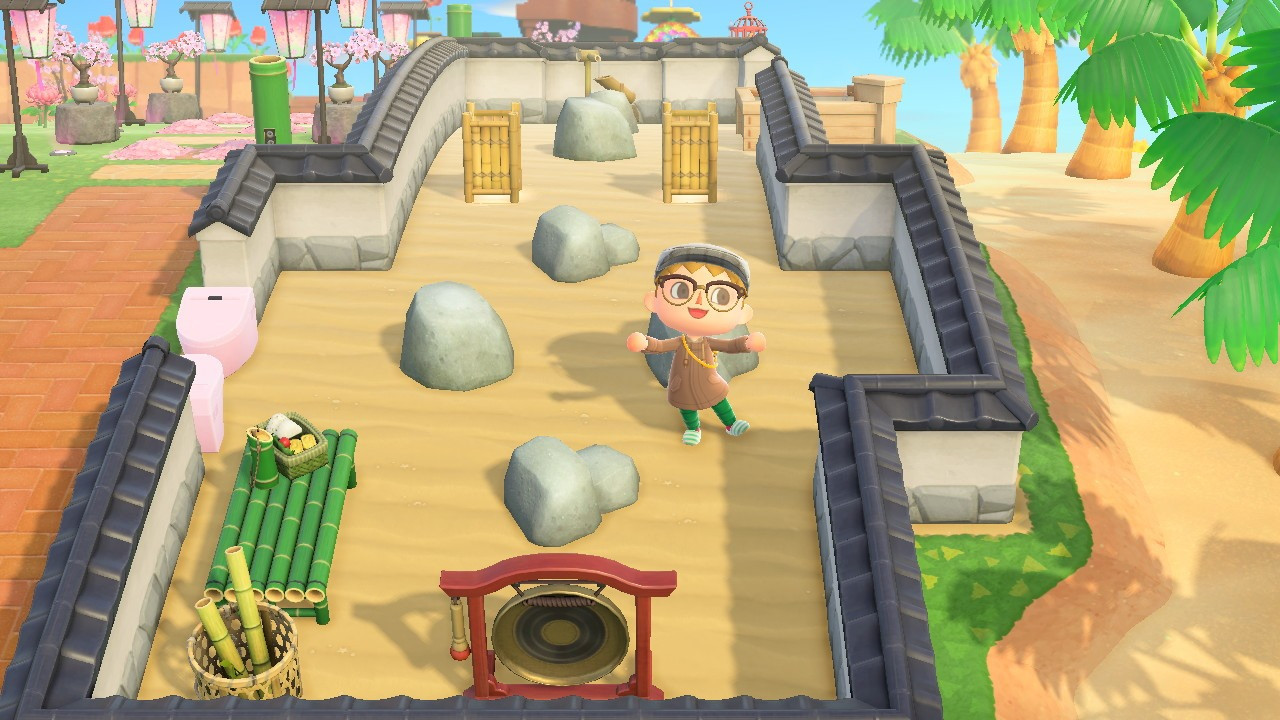 A player standing proudly in their completed rock garden in Animal Crossing: New Horizons, a testament to patience and creativity.
Frequently Asked Questions (FAQ) About Rocks in Animal Crossing: New Horizons
1. How Many Rocks Can I Have on My Island in Animal Crossing: New Horizons?
You can have six rocks on your island in Animal Crossing: New Horizons. This is a fixed number, and every island starts with exactly six rocks.
2. What Resources Can I Get from Hitting Rocks in Animal Crossing?
Hitting rocks with a shovel can yield iron nuggets, stones, clay, and bells in Animal Crossing: New Horizons. The type and quantity of resources vary each day, making it a daily activity for many players.
3. How Do I Maximize the Resources I Get from Each Rock in Animal Crossing?
To maximize resources, dig two holes behind you before hitting the rock in Animal Crossing: New Horizons. This prevents knock-back and allows you to hit the rock up to eight times in quick succession.
4. Can I Move Rocks in Animal Crossing: New Horizons?
Yes, you can move rocks by breaking them after eating fruit in Animal Crossing: New Horizons. The rock will respawn in a random eligible location the next day.
5. What Is a Rock Garden in Animal Crossing: New Horizons?
A rock garden is a designated area where you strategically place all your island’s rocks in Animal Crossing: New Horizons. This involves blocking all other potential spawn locations.
6. How Do I Create a Rock Garden in Animal Crossing: New Horizons?
To create a rock garden, block all undesired spawn locations with patterns, furniture, or trees, ensuring only the rock garden area is available in Animal Crossing: New Horizons. Then, break the rocks and wait for them to respawn in the desired location.
7. What Can Block a Rock from Spawning in Animal Crossing?
Furniture, trees, cliff sides, fences, and custom patterns can block a rock from spawning in Animal Crossing: New Horizons. Anything that prevents an open space will deter rock spawns.
8. How Can I Protect My Rock Garden from Accidental Damage in Animal Crossing?
You can protect your rock garden by creating a “toilet gate” in Animal Crossing: New Horizons. Eating fruit and sitting on a toilet removes your ability to break rocks, preventing accidental damage.
9. Is Time Traveling Necessary to Create a Rock Garden in Animal Crossing?
No, time traveling is not necessary, but it can speed up the process of creating a rock garden in Animal Crossing: New Horizons. Without time traveling, it may take several days to move all the rocks.
10. Where Can I Find Inspiration and Ideas for My Rock Garden in Animal Crossing?
You can find inspiration and ideas for your rock garden at rockscapes.net in Animal Crossing: New Horizons. We offer expert advice, design ideas, and a community of Animal Crossing enthusiasts.