Figuring out how much ground a ton of rock will cover is a common question for homeowners and landscapers. At rockscapes.net, we’ll show you how to calculate rock coverage, select the right rock, and master installation techniques for stunning rock landscapes. This guide provides expert tips, practical advice, and design inspiration for all your landscaping needs, covering everything from rock depth to rock type.
1. Understanding Rock Coverage Basics
So, How Much Square Feet Does A Ton Of Rock Cover? The answer depends on the rock type and the depth you want to achieve. Typically, a ton of rock can cover anywhere from 20 to 240 square feet, give or take.
1.1. Factors Influencing Coverage
Several key factors determine the coverage you’ll get from a ton of rock:
- Rock Size: Smaller rocks (like pebbles or gravel) tend to cover more area than larger rocks (like boulders or riprap). This is because they pack together more tightly, filling in gaps.
- Rock Type: Different rock types have different densities. For example, heavier rocks like granite will cover less area compared to lighter rocks like lava rock.
- Desired Depth: The depth of the rock layer you want to achieve significantly impacts the coverage. A thin layer will cover more area, while a thicker layer will cover less.
- Rock Shape: Angular rocks tend to interlock, which can reduce coverage compared to rounded rocks.
- Moisture Content: Wet rocks are heavier, and that can affect the estimated coverage area calculated based on weight.
1.2. General Coverage Guidelines
Here’s a general guideline for the coverage you can expect from one ton of rock, assuming average density:
| Depth of Rock | Approximate Coverage (Square Feet) |
|---|---|
| 1 inch | 240 |
| 2 inches | 120 |
| 3 inches | 80 |
| 4 inches | 60 |
| 6 inches | 40 |
| 12 inches | 20 |
 Decorative landscape rock covering a garden bed
1.3. Coverage Chart
| One Ton of Rock Covers: | One Cubic Yard of Soil or Wood Mulch Covers: |
|---|---|
| 240 square feet (1″ deep) | 300 square feet (1″ deep) |
| 120 square feet (2″ deep) | 150 square feet (2″ deep) |
| 80 square feet (3″ deep) | 100 square feet (3″ deep) |
| 60 square feet (4″ deep) | 75 square feet (4″ deep) |
| 50 square feet (5″ deep) | 50 square feet (6″ deep) |
| 40 square feet (6″ deep) | 25 square feet (12″ deep) |
| 20 square feet (12″ deep) |
Keep in mind that these figures are approximate, and actual coverage may vary. For precise calculations, it’s always best to consult with professionals at rockscapes.net.
2. Calculating Rock Coverage for Your Project
To accurately calculate the amount of rock you need, follow these steps:
2.1. Measure the Area
First, measure the area you want to cover in square feet. For rectangular areas, this is simply length times width. For irregular shapes, divide the area into smaller, more manageable sections, calculate the area of each section, and then add them together.
2.2. Determine Desired Depth
Decide how deep you want the rock layer to be. This will depend on the rock size, its intended use, and your aesthetic preferences. For pathways, a depth of 2-3 inches is usually sufficient. For ground cover, 3-6 inches may be necessary to suppress weeds effectively.
2.3. Choose Your Rock Type
Select the type of rock you want to use. Consider factors like color, size, shape, and availability. Once you’ve chosen your rock, find out its approximate weight per cubic foot. This information is usually available from the supplier.
2.4. Use the Formula
Use the following formula to calculate the amount of rock needed in tons:
Tons of Rock = (Area in Square Feet x Depth in Inches) / (Coverage Factor x 12)Where the coverage factor is the square feet covered by one ton of rock at a 1-inch depth. If you don’t know the exact coverage factor, you can estimate it based on the rock size:
- Small rocks (under 1 inch): 240 square feet
- Medium rocks (1-3 inches): 120 square feet
- Large rocks (3-6 inches): 80 square feet
2.5. Example Calculation
Let’s say you want to cover a 200 square foot area with 3-inch river rock, aiming for a depth of 3 inches. You can use the formula:
Tons of Rock = (200 sq ft x 3 inches) / (120 sq ft x 12) = 5 TonsYou would need approximately 5 tons of river rock to cover the area.
2.6. Consult with Experts
For complex projects or if you’re unsure about your calculations, consult with the experts at rockscapes.net. We can provide accurate estimates and help you choose the right rock for your needs.
3. Types of Rocks and Their Coverage
Different types of rocks offer different aesthetics and coverage capabilities. Here’s an overview of common rock types and their typical coverage per ton:
3.1. River Rock
River rock is smooth, rounded stones that come in various sizes and colors. It’s popular for pathways, garden beds, and drainage areas. A ton of river rock typically covers 80-120 square feet at a depth of 3 inches.
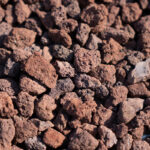
3.2. Lava Rock
Lava rock is lightweight and porous, making it an excellent choice for ground cover and planting beds. Its reddish-brown color adds warmth to any landscape. A ton of lava rock can cover 120-160 square feet at a depth of 3 inches.
 Lava rock used as ground cover in a xeriscape garden
3.3. Crushed Stone
Crushed stone is angular and comes in various sizes, from fine gravel to larger stones. It’s often used for driveways, walkways, and drainage. A ton of crushed stone typically covers 100-140 square feet at a depth of 3 inches.
3.4. Pea Gravel
Pea gravel consists of small, rounded stones that are smooth and comfortable to walk on. It’s ideal for playgrounds, pathways, and dog runs. A ton of pea gravel usually covers 120-150 square feet at a depth of 3 inches.
3.5. Flagstone
Flagstone is flat, irregular-shaped stones that are perfect for creating patios, walkways, and stepping stones. Coverage depends on the thickness of the flagstone. At a thickness of 1-1.5 inches, a ton of flagstone covers about 120 square feet.
| Material Category | Area Per Ton Coverage |
|---|---|
| Flagstone coverage | 120 sq. ft. per ton up to 1″ – 1 1/2″ thick |
| Flagstone coverage | 80 sq. ft. per ton up to 2″ – 2 1/4″ thick |
| 2″ – 4″ rock coverage | 60 sq. ft. per ton |
| 4″ – 8″ rock coverage | 40 sq. ft. per ton |
| 4″ strip stone coverage | 55 sq. ft. per ton |
| 8″ wall rock coverage | 20 sq. ft. per ton |
3.6. Boulders
Boulders are large, impressive rocks that make a statement in any landscape. They can be used as focal points, retaining walls, or natural seating. Coverage is highly variable depending on the size and shape of the boulders.
3.7. Decomposed Granite
Decomposed granite (DG) is a fine, gravel-like material that’s popular for pathways, patios, and driveways. It compacts well, creating a stable surface. A ton of DG typically covers 100-120 square feet at a depth of 3 inches.
4. Installation Tips for Rock Landscapes
Proper installation is crucial for achieving a beautiful and long-lasting rock landscape. Here are some essential tips:
4.1. Prepare the Area
Before installing the rock, prepare the area by removing any existing vegetation, debris, and large rocks. Grade the soil to ensure proper drainage.
4.2. Install Weed Barrier
To prevent weeds from growing through the rock, install a landscape fabric weed barrier. Overlap the edges of the fabric by at least 4 inches and secure it in place with landscape staples. Water penetrates landscape fabric, draining into the soil beneath it while controlling weed growth. Landscape fabric also withstands extreme temperatures and ultraviolet rays and can be installed close to plant material.
4.3. Add Edging
Install edging around the perimeter of the area to contain the rock and create a clean, defined look. Edging can be made of plastic, metal, wood, or stone.
4.4. Spread the Rock
Spread the rock evenly over the prepared area using a wheelbarrow and shovel. Rake the rock smooth to create a uniform surface. Begin installing product at the low end of the area, work toward high end. This offers a foundation to work from, walking on installed product, not fabric. When all area is covered sufficiently, rake smooth for uniformity of appearance.
4.5. Wash the Rock
After installation, wash the rock with a garden hose to remove any dirt or dust. This will also enhance the color of the rock.
4.6. Safety Considerations
- Wear appropriate safety gear: Always wear gloves, eye protection, and sturdy shoes when handling rocks.
- Use proper lifting techniques: When lifting heavy rocks, bend your knees and keep your back straight to avoid injury.
- Work in good weather: Avoid working in wet or icy conditions, as rocks can become slippery.
4.7. Ongoing Maintenance
- Rake regularly: Rake the rock periodically to remove leaves and debris.
- Control weeds: Pull any weeds that manage to grow through the rock.
- Replenish as needed: Over time, the rock layer may thin out due to settling or displacement. Replenish the rock as needed to maintain the desired depth.
5. Design Ideas for Rock Landscapes
Rock landscapes can be both beautiful and functional. Here are some design ideas to inspire your next project:
5.1. Rock Gardens
Create a rock garden by arranging various sizes and types of rocks in a natural-looking setting. Add drought-tolerant plants like succulents, cacti, and ornamental grasses for a stunning display.
5.2. Pathways
Use rock to create inviting pathways through your garden or yard. Choose a comfortable size and shape of rock for walking, such as pea gravel or flagstone.
 A winding pathway made of flagstone through a lush garden
5.3. Water Features
Incorporate rocks into water features like ponds, streams, and waterfalls. Rocks can create a natural-looking edge and provide habitat for aquatic life.
5.4. Retaining Walls
Build retaining walls using large rocks or boulders to create level areas and prevent soil erosion. Choose rocks that are durable and can withstand the weight of the soil behind them.
5.5. Ground Cover
Use rock as a ground cover to suppress weeds, conserve moisture, and add visual interest to your landscape. Choose a rock size and color that complements your home and garden. For high-traffic areas, driveways and walkways, we recommend 3/4″ rock, road base or breeze products. Where pedestrian traffic is not expected, and on slopes, borders, and around foundations, 1 1/2″ rock is usually appropriate. For berms or steep slopes, we recommend larger cobblestone or rip rap for best results. A combination of materials, sizes and colors can provide for striking results. Weed prevention and water drainage issues should be addressed prior to installation.
6. Where to Buy Rock and Materials
When it comes to buying rock and materials for your landscape project, it’s essential to choose a reputable supplier. Here are some tips for finding the best sources:
6.1. Local Nurseries and Garden Centers
Local nurseries and garden centers often carry a variety of rocks and materials for landscaping. They can provide expert advice and help you choose the right products for your needs.
6.2. Stone Yards and Quarries
Stone yards and quarries specialize in selling rocks and stones for construction and landscaping. They typically have a larger selection and better prices than nurseries or garden centers.
6.3. Online Retailers
Online retailers offer a convenient way to shop for rocks and materials from the comfort of your home. However, it’s essential to read reviews and compare prices before making a purchase.
6.4. Rockscapes.net
At rockscapes.net, we offer a wide selection of high-quality rocks and materials for all your landscaping needs. Our knowledgeable staff can help you choose the right products and provide expert advice on installation and maintenance.
6.5. Factors to Consider When Choosing a Supplier
- Selection: Choose a supplier that offers a wide variety of rocks and materials to suit your needs.
- Quality: Make sure the rocks are of high quality and free from defects.
- Price: Compare prices from different suppliers to find the best deal.
- Delivery: Check if the supplier offers delivery services and what the delivery fees are.
- Customer Service: Choose a supplier that provides excellent customer service and is willing to answer your questions.
7. Addressing Common Challenges
Working with rock landscapes can present some challenges. Here are some tips for addressing common issues:
7.1. Weed Control
Weeds can be a persistent problem in rock landscapes. To prevent weeds, install a landscape fabric weed barrier before adding the rock. Regularly inspect the area and pull any weeds that manage to grow through the rock.
7.2. Drainage Issues
Poor drainage can lead to waterlogged soil and plant problems. To improve drainage, grade the soil to slope away from your home and install drainage pipes if necessary.
7.3. Erosion Control
Erosion can be a problem on slopes and hillsides. To control erosion, build retaining walls or terraces using large rocks or boulders.
7.4. Settling
Over time, the rock layer may settle and become uneven. To correct this, add more rock to the affected areas and rake smooth.
7.5. Color Fading
The color of some rocks may fade over time due to exposure to the sun and weather. To restore the color, wash the rocks with a garden hose or apply a sealant.
8. Optimizing Rock Landscapes for Different Climates
Different climates require different approaches to rock landscaping. Here are some tips for optimizing rock landscapes for various climates:
8.1. Arid Climates
In arid climates, choose drought-tolerant plants and use rock mulches to conserve moisture. Consider using light-colored rocks to reflect sunlight and keep the soil cool. According to research from Arizona State University’s School of Earth and Space Exploration, light-colored rocks reduce soil temperature by up to 20% compared to dark-colored rocks.
8.2. Humid Climates
In humid climates, choose plants that can tolerate high humidity and well-drained soil. Avoid using rocks that retain moisture, as this can promote fungal growth.
8.3. Cold Climates
In cold climates, choose rocks that are resistant to freezing and thawing. Avoid using porous rocks that can crack when exposed to frost.
8.4. Coastal Climates
In coastal climates, choose rocks that are resistant to salt spray and wind. Consider using native plants that are adapted to the local environment.
9. Sustainable Rock Landscaping Practices
Sustainable landscaping practices can help you create a beautiful and eco-friendly rock landscape. Here are some tips for sustainable rock landscaping:
9.1. Use Locally Sourced Rocks
Using locally sourced rocks reduces transportation costs and supports the local economy.
9.2. Choose Recycled Materials
Consider using recycled materials like crushed concrete or recycled glass in your rock landscape.
9.3. Conserve Water
Use drought-tolerant plants and rock mulches to conserve water. Install a drip irrigation system to water plants efficiently.
9.4. Reduce Chemical Use
Avoid using herbicides and pesticides in your rock landscape. Instead, use natural methods to control weeds and pests.
9.5. Create Habitat
Provide habitat for wildlife by incorporating native plants, rocks, and water features into your rock landscape.
10. Frequently Asked Questions (FAQ)
10.1. How do I calculate how much rock I need?
Measure the area in square feet, determine the desired depth in inches, and use the formula: Tons of Rock = (Area in Square Feet x Depth in Inches) / (Coverage Factor x 12).
10.2. What is the best type of rock for a pathway?
Pea gravel, crushed stone, and flagstone are all good choices for pathways.
10.3. How do I prevent weeds from growing in my rock landscape?
Install a landscape fabric weed barrier before adding the rock.
10.4. How do I improve drainage in my rock landscape?
Grade the soil to slope away from your home and install drainage pipes if necessary.
10.5. How do I control erosion on a hillside?
Build retaining walls or terraces using large rocks or boulders.
10.6. What are some sustainable rock landscaping practices?
Use locally sourced rocks, choose recycled materials, conserve water, reduce chemical use, and create habitat.
10.7. How often should I replenish the rock in my landscape?
Replenish the rock as needed to maintain the desired depth, typically every 1-2 years.
10.8. Can I mix different types of rocks in my landscape?
Yes, mixing different types of rocks can add visual interest and texture to your landscape.
10.9. How do I clean the rocks in my landscape?
Wash the rocks with a garden hose to remove dirt and dust.
10.10. Where can I find design inspiration for rock landscapes?
Explore rockscapes.net for a variety of design ideas and inspiration for your rock landscape.
By following these tips and guidelines, you can create a stunning and functional rock landscape that will enhance the beauty and value of your home. For more information and expert advice, visit rockscapes.net today. Whether you’re looking for design inspiration, detailed product information, or expert tips on installation, rockscapes.net has everything you need to bring your vision to life. Contact us at Address: 1151 S Forest Ave, Tempe, AZ 85281, United States or Phone: +1 (480) 965-9011 to get started.