Applying Rustoleum Rock Solid can transform your worn-out surfaces into durable, attractive spaces. At rockscapes.net, we provide insights into using this polycuramine coating effectively for stunning results. Discover how to achieve a professional-looking finish with our expert tips, surface preparation advice, and application techniques, ensuring longevity and beauty for your floors.
1. What Is Rustoleum Rock Solid and Why Use It?
Rustoleum Rock Solid is a high-performance, two-part polycuramine coating designed to provide exceptional durability and a beautiful finish for various surfaces, especially floors.
Polycuramine coatings are renowned for their superior resistance to abrasion, chemicals, and impact, making them ideal for high-traffic areas like garages and workshops. According to research from Arizona State University’s School of Earth and Space Exploration, polycuramine coatings offer up to 20 times more durability than traditional epoxy coatings. This enhanced durability translates to a longer lifespan and reduced maintenance costs, providing a cost-effective solution for both residential and commercial applications.
Rustoleum Rock Solid offers several compelling benefits:
- Exceptional Durability: It is 20 times stronger than epoxy coatings, resisting wear and tear from heavy use.
- Chemical Resistance: It withstands spills of oil, gasoline, salt, and other common chemicals without damage.
- Easy Application: DIY-friendly, it can be applied with minimal professional assistance, saving on labor costs.
- Aesthetic Appeal: Provides a glossy, professional finish that enhances the look of any space.
- Quick Curing Time: Surfaces are ready for foot traffic within 8-10 hours and vehicles within 24 hours, minimizing downtime.
Rustoleum Rock Solid is a cost-effective and reliable option for anyone looking to enhance the durability and appearance of their floors. For homeowners, it offers a way to upgrade their garages, basements, or workshops with a finish that looks great and lasts for years. Professionals in construction and remodeling can use it to provide clients with a high-quality, durable flooring solution that enhances property value.
2. What Are the Key Features and Benefits of Rustoleum Rock Solid?
Rustoleum Rock Solid is packed with features that make it a superior choice for coating floors and other surfaces. It offers a blend of durability, ease of use, and aesthetic appeal that sets it apart from other coatings.
Here’s a detailed look at its key features and benefits:
2.1. Exceptional Durability
Rustoleum Rock Solid is formulated with polycuramine, which provides 20 times more strength than traditional epoxy coatings. This makes it highly resistant to scratches, impacts, and general wear and tear.
- High Impact Resistance: It can withstand heavy impacts without cracking or chipping, which is crucial for areas that see a lot of activity.
- Abrasion Resistance: Resists wear from foot traffic, vehicle tires, and other abrasive forces, maintaining its appearance over time.
- Long Lifespan: Due to its superior durability, Rustoleum Rock Solid extends the life of your floors, saving you money on frequent replacements or repairs.
2.2. Chemical Resistance
One of the standout features of Rustoleum Rock Solid is its resistance to a wide range of chemicals.
- Oil and Gasoline Resistance: Ideal for garage floors, it can withstand oil and gasoline spills without staining or degrading.
- Salt Resistance: Important for areas exposed to road salt, it prevents damage from salt intrusion, which can corrode concrete.
- General Chemical Resistance: It resists damage from common household and industrial chemicals, ensuring longevity in various environments.
2.3. Easy Application
Rustoleum Rock Solid is designed for easy, do-it-yourself application.
- Simple Mixing Process: The two-part system is easy to mix, ensuring a consistent and reliable coating.
- User-Friendly Application: It can be applied with standard tools like rollers and brushes, making it accessible for DIYers.
- Minimal Downtime: With a quick curing time, surfaces are ready for use sooner, minimizing disruption.
2.4. Aesthetic Appeal
Beyond its functional benefits, Rustoleum Rock Solid enhances the look of any space.
- Glossy Finish: Provides a high-gloss finish that enhances the appearance of floors, making them look clean and professional.
- Color Options: Available in various colors, allowing customization to match your aesthetic preferences.
- Decorative Flakes: Includes decorative flakes that can be sprinkled onto the surface for added texture and visual appeal.
2.5. Quick Curing Time
Rustoleum Rock Solid cures quickly, allowing you to use your space sooner.
- Fast Drying: Typically ready for foot traffic in 8-10 hours.
- Vehicle Ready: Ready for vehicle traffic within 24 hours.
- Reduced Disruption: Quick curing minimizes downtime, allowing you to get back to using your space quickly.
Rustoleum Rock Solid combines durability, chemical resistance, ease of application, aesthetic appeal, and quick curing time, making it an excellent choice for anyone looking to upgrade their floors. Whether you’re a homeowner or a professional, this coating provides a reliable and attractive solution for a variety of applications. For more ideas and inspiration, visit rockscapes.net.
3. What Tools and Materials Do You Need?
Before you start applying Rustoleum Rock Solid, gathering all the necessary tools and materials is important for a smooth and efficient process. Here’s a comprehensive checklist:
3.1. Rustoleum Rock Solid Kit
- Two-Part Coating: Contains the polycuramine coating components.
- Decorative Flakes: For adding texture and visual appeal (optional).
- Instruction Manual: Follow the manufacturer’s instructions carefully.
3.2. Surface Preparation
- Cleaner and Degreaser: Rust-Oleum Cleaner & Degreaser For Concrete or similar product.
- Stiff Brush: For scrubbing the concrete surface.
- Hose: For rinsing the cleaned surface.
- Concrete Primer: Rust-Oleum Concrete & Garage Recoat Primer (if required).
- Etching Solution: For bare concrete (if required).
- Sanding Equipment: For removing old coatings (if required).
3.3. Application Tools
- Mixing Tools:
- Scissors or utility knife for opening the coating pouch.
- Gloves to protect your hands from chemicals.
- Application Tools:
- Paint Brush: For cutting in around edges.
- Paint Roller: With a long handle for applying the coating to the main surface.
- Roller Extension Pole: To avoid bending and kneeling.
- Paint Tray: To hold the coating for easy rolling.
- Spiked Shoes (Optional): To walk on the wet coating while applying flakes.
3.4. Safety Gear
- Respirator: To protect against fumes.
- Safety Glasses: To protect your eyes from splashes.
- Gloves: Chemical-resistant gloves to protect your hands.
- Protective Clothing: To protect your skin from the coating.
3.5. Other Useful Items
- Measuring Tape: To calculate the area to be coated.
- Painter’s Tape: To protect adjacent surfaces.
- Drop Cloths: To protect surrounding areas from spills.
- Buckets: For mixing and rinsing.
- Shop Vacuum: To remove dust and debris.
- Scraper: For removing loose paint or debris.
Having all these tools and materials on hand before you begin ensures that you can complete the project efficiently and safely, achieving the best possible results with Rustoleum Rock Solid. For more tips and project ideas, visit rockscapes.net.
4. How to Prepare the Surface for Rustoleum Rock Solid?
Proper surface preparation is critical to ensuring the successful application and long-lasting durability of Rustoleum Rock Solid. This process involves cleaning, repairing, and priming the surface to create an ideal foundation for the coating.
4.1. Cleaning the Surface
Begin by thoroughly cleaning the surface to remove all dirt, oil, grease, and other contaminants.
- Sweep the Area: Remove loose debris and dirt with a broom or shop vacuum.
- Apply Cleaner and Degreaser: Use Rust-Oleum Cleaner & Degreaser For Concrete, or a similar product, mixed with water according to the manufacturer’s instructions.
- Scrub the Surface: Use a stiff brush to scrub the cleaner into the concrete, paying close attention to heavily soiled areas.
- Rinse Thoroughly: Rinse the surface with a hose to remove all traces of the cleaner. Ensure no soap residue remains.
- Dry the Surface: Allow the surface to dry completely before proceeding to the next step.
4.2. Repairing Cracks and Damage
Inspect the surface for cracks, holes, or other damage and make necessary repairs.
- Fill Cracks: Use a concrete crack filler to fill any cracks. Follow the product instructions for application and drying times.
- Patch Holes: Repair holes or damaged areas with a concrete patching compound. Ensure the patch is level with the surrounding surface.
- Allow to Cure: Allow the repair materials to cure completely before moving on.
4.3. Priming the Surface
Priming is essential for ensuring proper adhesion of Rustoleum Rock Solid, especially if the concrete has been previously sealed.
- Determine if Priming is Necessary: If your concrete has been sealed, priming is crucial. For bare concrete, etching or grinding might be required instead.
- Apply Concrete Primer: Use Rust-Oleum Concrete & Garage Recoat Primer, or a similar product.
- Cut In Edges: Use a brush to apply primer around the edges of the area.
- Roll the Main Surface: Use a roller with a long handle to apply primer to the main surface.
- Apply Evenly: Ensure an even coat of primer across the entire surface.
- Allow to Dry: Allow the primer to dry completely, following the manufacturer’s recommended drying time.
4.4. Etching or Grinding (For Bare Concrete)
If you have bare concrete, etching or grinding may be necessary to create a porous surface that allows the coating to adhere properly.
- Etching:
- Apply an etching solution to the concrete surface, following the manufacturer’s instructions.
- Scrub the surface with a stiff brush.
- Rinse thoroughly with water.
- Allow to dry completely.
- Grinding:
- Use a concrete grinder to grind the surface, creating a slightly rough texture.
- Vacuum the surface to remove all dust and debris.
By following these surface preparation steps, you can ensure that Rustoleum Rock Solid adheres properly and provides a durable, long-lasting finish. For more detailed instructions and tips, visit rockscapes.net.
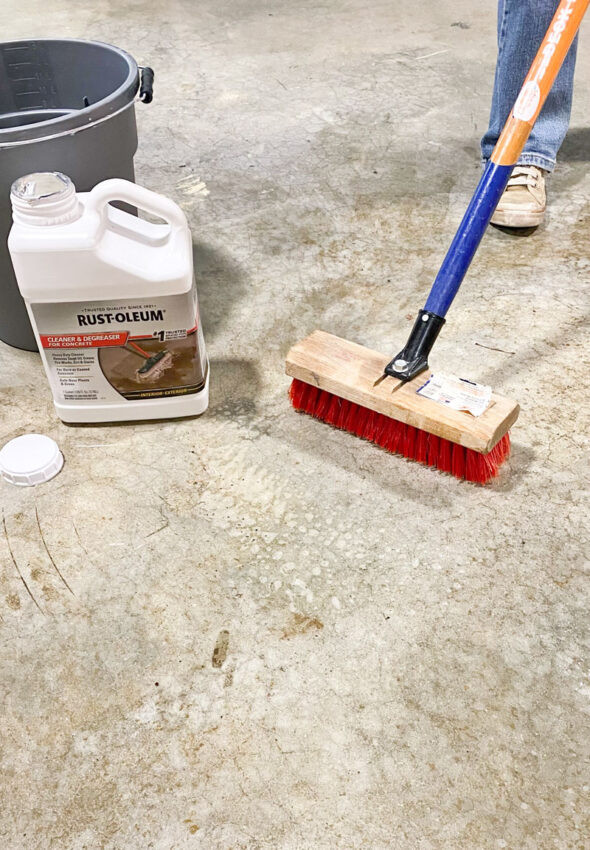 Garage floor preparation for Rustoleum RockSolid coating
5. How to Apply Rustoleum Rock Solid: A Step-by-Step Guide?
Applying Rustoleum Rock Solid requires careful attention to detail to ensure a smooth, durable, and attractive finish. Here’s a step-by-step guide to help you through the process:
5.1. Preparation
- Ensure Proper Ventilation: Open windows and doors to provide adequate ventilation.
- Protect Surrounding Areas: Use painter’s tape and drop cloths to protect walls, trim, and other surfaces from splashes.
- Gather Tools and Materials: Make sure you have all the necessary tools and materials within easy reach.
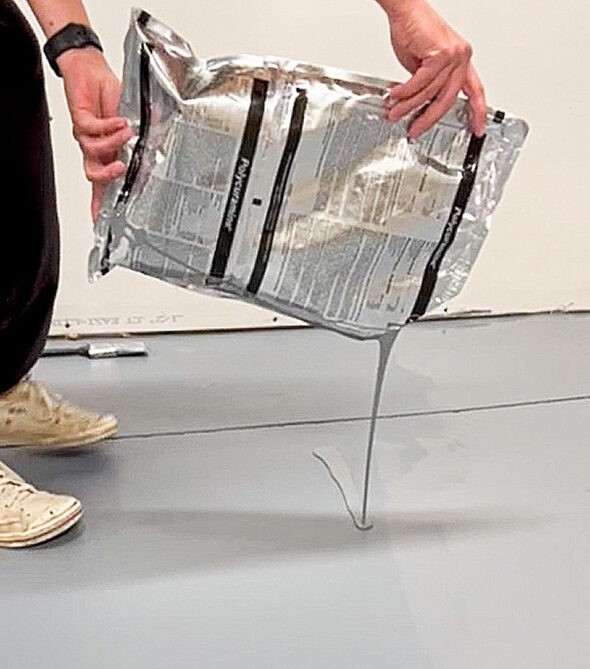
5.2. Mixing the Coating
- Open the Kit: Carefully open the Rustoleum Rock Solid kit and locate the two-part pouch.
- Activate the Coating: Roll the pouch from side A towards side B, squeezing it like a tube of toothpaste until the seam between the two bursts, following the manufacturer’s instructions.
- Mix Thoroughly: Stir, shake, knead, and flip the bag all around for 2-3 minutes to thoroughly mix the liquids inside. This ensures even color distribution and a good chemical mix.
- Create a Spout: Snip a corner off the bag with scissors to create a spout for pouring the coating.
5.3. Applying the Coating
- Work Quickly: Rustoleum Rock Solid starts to set up in under an hour, so work quickly and efficiently.
- Cut In Edges: Use a brush to cut in around the edges of the area. Apply a consistent and even coat.
- Pour the Coating: Pour a ribbon of coating onto the floor in a line, enough to cover a workable section.
- Roll the Coating: Use the roller to spread the coating evenly, pulling any excess towards you to avoid pooling. Work in small areas, maintaining a wet edge to ensure a seamless finish.
- Apply Decorative Flakes (Optional): Sprinkle decorative flakes over the wet coating. Toss them high into the air in tiny pinches for even distribution.
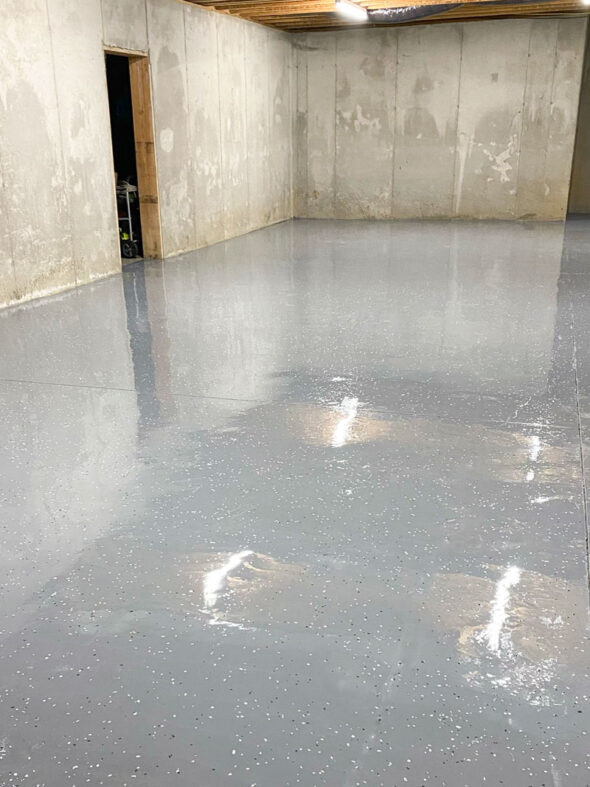
5.4. Curing
- Allow to Cure: Leave the wet coating to cure overnight. Curing typically takes 8-10 hours, depending on temperature.
- Check for Hardness: Ensure the floor has cured to a hard finish before allowing foot traffic.
- Full Cure Time: Allow 24 hours before exposing the floor to vehicle traffic.
5.5. Clean Up
- Dispose of Materials: Properly dispose of used rollers, brushes, and the empty coating pouch.
- Clean Tools: Clean any tools that you plan to reuse immediately after application.
By following these step-by-step instructions, you can achieve a professional-looking finish with Rustoleum Rock Solid, enhancing the durability and appearance of your floors. For additional tips and project inspiration, visit rockscapes.net.
 Applying Rustoleum RockSolid to garage floor
6. What Are Some Common Mistakes to Avoid When Applying Rustoleum Rock Solid?
While Rustoleum Rock Solid is designed for DIY application, there are several common mistakes that can compromise the quality and longevity of the finish. Avoiding these pitfalls can help ensure a successful project.
6.1. Inadequate Surface Preparation
- Mistake: Skipping thorough cleaning, repairing, or priming.
- Why It Matters: Contaminants, cracks, and improper adhesion can lead to coating failure.
- Solution: Follow the detailed surface preparation steps outlined earlier, ensuring the surface is clean, repaired, and properly primed or etched.
6.2. Insufficient Mixing
- Mistake: Not mixing the two-part coating thoroughly enough.
- Why It Matters: Incomplete mixing can result in uneven color distribution and compromised chemical properties.
- Solution: Mix the coating for the recommended 2-3 minutes, stirring, shaking, kneading, and flipping the bag to ensure a uniform mixture.
6.3. Working Too Slowly
- Mistake: Taking too long to apply the coating, exceeding the pot life.
- Why It Matters: Rustoleum Rock Solid starts to set up quickly, leading to a poor finish if not applied in time.
- Solution: Work quickly and efficiently, and consider having a helper to expedite the process.
6.4. Applying Too Thick or Too Thin
- Mistake: Applying the coating unevenly, resulting in thick or thin spots.
- Why It Matters: Thick spots can lead to uneven curing and potential cracking, while thin spots may not provide adequate protection.
- Solution: Use a consistent rolling technique to apply an even coat, avoiding excessive pooling or thin areas.
6.5. Incorrect Temperature and Humidity
- Mistake: Applying the coating in extreme temperatures or high humidity.
- Why It Matters: Temperature and humidity can affect the curing process, leading to adhesion problems or a poor finish.
- Solution: Apply the coating in moderate temperatures (60-80°F) and low humidity, following the manufacturer’s recommendations.
6.6. Walking on the Wet Coating
- Mistake: Walking on the wet coating without proper footwear.
- Why It Matters: Footprints and disturbances can ruin the smooth finish.
- Solution: Use spiked shoes if you need to walk on the wet coating to apply decorative flakes, or plan your application to minimize the need to walk on the coated surface.
6.7. Ignoring Manufacturer’s Instructions
- Mistake: Not reading and following the manufacturer’s instructions.
- Why It Matters: Deviating from the recommended procedures can lead to unpredictable results.
- Solution: Read the instruction manual carefully and follow all guidelines for preparation, mixing, application, and curing.
By avoiding these common mistakes, you can improve your chances of achieving a durable, attractive, and long-lasting finish with Rustoleum Rock Solid. For more expert advice and project ideas, visit rockscapes.net.
7. How Do You Maintain and Clean a Rustoleum Rock Solid Floor?
Maintaining and cleaning a Rustoleum Rock Solid floor is straightforward, helping to preserve its appearance and extend its lifespan. Regular maintenance involves simple cleaning practices and preventative measures to protect the coating from damage.
7.1. Regular Cleaning
- Sweep or Vacuum Regularly: Remove loose dirt, dust, and debris by sweeping or vacuuming the floor regularly. This prevents abrasive particles from scratching the surface.
- Mop with Mild Soap and Water: Clean the floor with a mild soap and water solution. Avoid harsh chemicals, abrasive cleaners, and solvents that can damage the coating.
- Use a Soft Mop: Use a soft mop or microfiber cloth to clean the floor. Avoid abrasive scrub brushes that can scratch the surface.
- Rinse Thoroughly: Rinse the floor with clean water to remove any soap residue.
- Dry the Floor: Allow the floor to air dry or use a clean, dry mop to dry the surface.
7.2. Stain Removal
- Act Quickly: Address spills and stains as soon as possible to prevent them from setting into the coating.
- Blot Spills: Blot spills with a clean cloth to absorb the liquid. Avoid rubbing, which can spread the stain.
- Use Mild Cleaners: For stubborn stains, use a mild cleaner specifically designed for coated floors. Test the cleaner in an inconspicuous area first to ensure it does not damage the finish.
- Avoid Harsh Chemicals: Avoid using harsh chemicals, solvents, or abrasive cleaners, which can damage the coating.
7.3. Preventative Measures
- Use Floor Mats: Place floor mats at entrances to trap dirt and debris before they are tracked onto the floor.
- Protect High-Traffic Areas: Use rugs or runners in high-traffic areas to protect the coating from wear and tear.
- Avoid Dragging Heavy Objects: Avoid dragging heavy objects across the floor, as this can scratch or damage the coating. Use furniture sliders or dollies when moving heavy items.
- Use Furniture Pads: Place felt pads under furniture legs to prevent scratches and dents.
- Clean Spills Immediately: Clean up spills immediately to prevent staining and damage from chemicals.
7.4. Periodic Inspection
- Inspect for Damage: Periodically inspect the floor for signs of wear, scratches, or damage.
- Address Issues Promptly: Address any issues promptly to prevent them from worsening. Small scratches can often be buffed out with a soft cloth and a mild polishing compound.
- Consider Recoating: If the coating becomes severely worn or damaged, consider recoating the floor to restore its appearance and protect the surface.
By following these maintenance and cleaning tips, you can keep your Rustoleum Rock Solid floor looking its best for years to come. Regular cleaning, prompt stain removal, and preventative measures will help preserve the coating and extend its lifespan. For more maintenance tips and product recommendations, visit rockscapes.net.
8. What Are the Design Ideas and Applications for Rustoleum Rock Solid?
Rustoleum Rock Solid is not only a durable and protective coating but also a versatile design element that can enhance the aesthetic appeal of various spaces. Its glossy finish and customizable options make it suitable for a wide range of applications.
8.1. Garage Floors
- Professional Look: Transform your garage floor into a professional-looking space with a glossy, easy-to-clean surface.
- Color Options: Choose from various colors to match your personal style or complement your home’s exterior.
- Decorative Flakes: Add decorative flakes for a textured, visually appealing finish that also helps hide dirt and imperfections.
8.2. Workshops
- Durable Work Surface: Create a durable and easy-to-clean work surface that can withstand heavy use and spills.
- Chemical Resistance: Protect your workshop floor from oil, grease, and other chemicals commonly used in automotive and DIY projects.
- Enhanced Lighting: The glossy finish reflects light, improving visibility and creating a brighter workspace.
8.3. Basements
- Moisture Resistance: Protect your basement floor from moisture and water damage with a waterproof coating.
- Mold Prevention: Prevent mold and mildew growth with a non-porous surface that is easy to clean and disinfect.
- Aesthetic Upgrade: Turn your basement into a more inviting and usable space with a clean, attractive floor.
8.4. Commercial Spaces
- Retail Stores: Enhance the appearance of retail spaces with a durable and easy-to-maintain floor coating that can withstand heavy foot traffic.
- Restaurants: Create a sanitary and easy-to-clean floor surface in kitchens and dining areas, resistant to spills and stains.
- Warehouses: Protect warehouse floors from heavy machinery and equipment with a durable coating that can withstand impacts and abrasions.
8.5. Other Applications
- Patios and Decks: Coat outdoor patios and decks with Rustoleum Rock Solid to protect them from the elements and enhance their appearance.
- Pool Decks: Create a slip-resistant and waterproof surface around swimming pools, resistant to chlorine and other pool chemicals.
- Laundry Rooms: Protect laundry room floors from water damage and create an easy-to-clean surface.
8.6. Design Ideas
- Solid Colors: Choose a solid color for a clean and modern look.
- Custom Patterns: Create custom patterns using painter’s tape and different colors of Rustoleum Rock Solid.
- Metallic Finishes: Add metallic pigments to the coating for a unique and stylish finish.
- Faux Stone: Use textured rollers or sponges to create a faux stone finish.
- Combination of Colors and Flakes: Combine different colors of Rustoleum Rock Solid with decorative flakes to create a custom look.
Rustoleum Rock Solid offers endless design possibilities and practical applications for a variety of spaces. Whether you’re looking to upgrade your garage floor, protect your basement from moisture, or enhance the appearance of a commercial space, this versatile coating provides a durable, attractive, and long-lasting solution. Explore more design ideas and applications at rockscapes.net.
 Rustoleum RockSolid design ideas
9. Comparing Rustoleum Rock Solid to Other Floor Coatings
When choosing a floor coating, it’s essential to compare Rustoleum Rock Solid with other options to determine which best suits your needs. This section provides a comparison of Rustoleum Rock Solid with epoxy, concrete paint, and other alternatives.
9.1. Rustoleum Rock Solid vs. Epoxy Coatings
- Durability: Rustoleum Rock Solid is 20 times stronger than epoxy coatings, providing superior resistance to impacts, scratches, and wear.
- Chemical Resistance: Both offer good chemical resistance, but Rustoleum Rock Solid generally withstands a broader range of chemicals.
- Application: Epoxy coatings often require more precise mixing and application techniques, while Rustoleum Rock Solid is more DIY-friendly.
- Curing Time: Rustoleum Rock Solid typically has a faster curing time than epoxy coatings, reducing downtime.
- Cost: Epoxy coatings can sometimes be more cost-effective upfront, but Rustoleum Rock Solid’s durability can lead to long-term savings.
9.2. Rustoleum Rock Solid vs. Concrete Paint
- Durability: Concrete paint is less durable than Rustoleum Rock Solid, offering minimal protection against wear and impacts.
- Appearance: Concrete paint provides a basic color coating, while Rustoleum Rock Solid offers a glossy, professional finish.
- Chemical Resistance: Concrete paint has limited chemical resistance and can easily stain or degrade when exposed to chemicals.
- Application: Concrete paint is easy to apply but requires frequent reapplication due to its lack of durability.
- Cost: Concrete paint is the most affordable option but has a shorter lifespan and requires more maintenance.
9.3. Rustoleum Rock Solid vs. Other Polyurethane Coatings
- Durability: Polyurethane coatings are generally durable, but Rustoleum Rock Solid’s polycuramine formulation offers superior strength and resistance.
- Flexibility: Polyurethane coatings are more flexible than Rustoleum Rock Solid, making them suitable for surfaces that experience movement or expansion.
- UV Resistance: Polyurethane coatings offer better UV resistance, making them ideal for outdoor applications.
- Cost: Polyurethane coatings can be more expensive than Rustoleum Rock Solid, depending on the specific formulation.
9.4. Summary Table
| Feature | Rustoleum Rock Solid | Epoxy Coatings | Concrete Paint | Polyurethane Coatings |
|---|---|---|---|---|
| Durability | Very High (20x stronger) | High | Low | High |
| Chemical Resistance | Excellent | Good | Limited | Good |
| Application | DIY-Friendly | Requires Precision | Easy | Moderate |
| Curing Time | Fast | Moderate | Fast | Moderate |
| Appearance | Glossy, Professional | Glossy | Basic Color | Glossy or Matte |
| Cost | Moderate | Moderate to High | Low | High |
| UV Resistance | Moderate | Moderate | Low | High |
| Best For | Garages, Workshops | Industrial, Commercial | Basements, Light Use | Outdoor Applications |
Rustoleum Rock Solid is a robust and versatile option for various flooring needs. While other coatings like epoxy, concrete paint, and polyurethane each have their strengths, Rustoleum Rock Solid stands out for its exceptional durability, ease of application, and attractive finish. Consider your specific requirements and compare these factors to make the best choice for your project. For more detailed comparisons and product recommendations, visit rockscapes.net.
10. Frequently Asked Questions (FAQ) About Applying Rustoleum Rock Solid
Here are some frequently asked questions about applying Rustoleum Rock Solid, providing quick answers to common concerns and queries.
Q1: What is Rustoleum Rock Solid?
Rustoleum Rock Solid is a two-part polycuramine coating designed to provide a durable, chemical-resistant, and attractive finish for floors and other surfaces.
Q2: How durable is Rustoleum Rock Solid compared to epoxy?
Rustoleum Rock Solid is 20 times stronger than traditional epoxy coatings, offering superior resistance to impacts, scratches, and wear.
Q3: What surfaces can I apply Rustoleum Rock Solid to?
Rustoleum Rock Solid can be applied to concrete, wood, and other properly prepared surfaces, making it suitable for garages, workshops, basements, and commercial spaces.
Q4: Do I need to prime the surface before applying Rustoleum Rock Solid?
Yes, priming is essential, especially if the concrete has been previously sealed. Use Rust-Oleum Concrete & Garage Recoat Primer for best results.
Q5: How long does it take for Rustoleum Rock Solid to cure?
Rustoleum Rock Solid typically cures in 8-10 hours for foot traffic and 24 hours for vehicle traffic, depending on temperature and humidity.
Q6: Can I add decorative flakes to Rustoleum Rock Solid?
Yes, decorative flakes can be added to the wet coating for a textured, visually appealing finish that helps hide dirt and imperfections.
Q7: How do I clean and maintain a Rustoleum Rock Solid floor?
Clean regularly with a mild soap and water solution, avoid harsh chemicals, and promptly address spills to maintain the floor’s appearance and longevity.
Q8: What are some common mistakes to avoid when applying Rustoleum Rock Solid?
Avoid inadequate surface preparation, insufficient mixing, working too slowly, applying too thick or too thin, and ignoring manufacturer’s instructions.
Q9: Can I apply Rustoleum Rock Solid outdoors?
While Rustoleum Rock Solid is primarily designed for indoor use, it can be used on covered patios and decks. Polyurethane coatings are generally better for full outdoor exposure due to their UV resistance.
Q10: Where can I find more design ideas and inspiration for using Rustoleum Rock Solid?
Explore various design ideas and applications at rockscapes.net for inspiration and expert tips.
Rustoleum Rock Solid is a versatile and durable coating that can transform various surfaces into attractive, long-lasting spaces. By following the proper application techniques and maintenance tips, you can achieve a professional-looking finish that enhances the appearance and value of your property.
Ready to transform your space with Rustoleum Rock Solid? Explore endless design possibilities, discover detailed information about various stone types, and get expert advice on application techniques at rockscapes.net. Contact us today at Address: 1151 S Forest Ave, Tempe, AZ 85281, United States or call us at Phone: +1 (480) 965-9011. Let rockscapes.net help you bring your vision to life!