Belaying rock climbing is the crucial technique of managing the rope to protect a climber from falling, ensuring their safety and allowing them to ascend with confidence, and at rockscapes.net, we’ll guide you through mastering this skill. Belaying involves understanding rope management, using belay devices, and communicating effectively with your climbing partner, with proper belaying skills, climbers can explore challenging routes with reduced risk, while also contributing to a safe and enjoyable climbing experience for everyone involved. Learn about belay techniques, safety guidelines, and the importance of a secure climbing environment.
1. Understanding the Fundamentals of How to Belay Rock Climbing
Belaying is the linchpin of safety in rock climbing. Without a proficient belayer, even the most skilled climber is at significant risk.
1.1. What Exactly is Belaying?
Belaying is the technique used to control the rope for a climber, preventing a fall from turning into a dangerous plummet. The belayer uses a belay device to create friction on the rope, allowing them to arrest a fall and lower the climber safely. The belayer’s role is not only to catch falls but also to provide a controlled ascent and descent, ensuring the climber’s movements are smooth and secure. This involves taking in slack as the climber moves upward and paying out rope as needed.
1.2. Why Is Belaying So Important in Rock Climbing?
Belaying is the cornerstone of rock climbing safety because it directly mitigates the risk of falls. According to the American Alpine Club, falls are the most common cause of injuries in rock climbing. A competent belayer can significantly reduce the impact force of a fall, preventing serious injuries. Belaying is also essential for building trust between climbing partners. When a climber knows they have a reliable belayer, they can focus on the climb without being paralyzed by fear. This trust allows climbers to push their limits and improve their skills safely.
1.3. Essential Equipment for Belaying
- Belay Device: A mechanical device used to create friction on the rope, allowing the belayer to control the climber’s ascent and descent. There are various types, including tube-style devices (ATC), assisted-braking devices (Petzl GriGri), and figure-eight devices.
- Carabiner: A metal loop with a spring-loaded gate, used to connect the belay device to the belayer’s harness. Locking carabiners are essential for belaying to prevent accidental opening.
- Harness: A system of straps worn around the waist and legs to distribute the force of a fall. Harnesses should fit snugly and comfortably.
- Climbing Rope: A dynamic rope designed to stretch and absorb the impact of a fall. Ropes come in various lengths and diameters, so choosing the right one for the type of climbing you’re doing is crucial.
- Belay Gloves: Optional but highly recommended, belay gloves protect the belayer’s hands from rope burn and provide a better grip.
1.4 Key Belaying Techniques Every Climber Should Master
Understanding How To Belay Rock Climbing is all about knowing the right techniques. Here’s a breakdown:
- Top-Rope Belaying: A belay system where the rope runs from the belayer, through a fixed anchor at the top of the climb, and back down to the climber. This is the most common and safest method for beginners.
- Lead Belaying: A belay system where the climber clips the rope into quickdraws as they ascend, with the belayer paying out rope to allow the climber to move upward. This method requires more skill and attention from the belayer.
- Lowering: The technique of safely lowering a climber from the top of the climb using the belay device. This requires smooth and controlled rope management to prevent jerky movements.
- Taking In Slack: The process of pulling the rope through the belay device to keep the rope taut as the climber ascends, preventing them from falling too far if they slip.
- Giving Slack: The opposite of taking in slack, giving slack involves paying out rope to allow the climber to move upward without resistance. This requires careful attention to the climber’s movements.
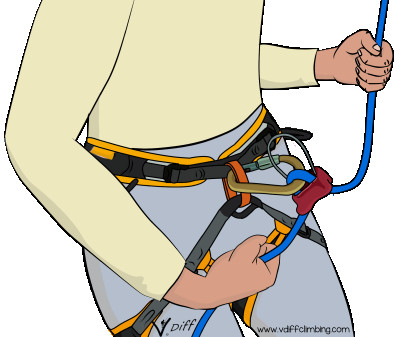
 Belaying rock climbing requires the right angle of separation for optimal friction and control
2. Step-by-Step Guide on How to Belay Rock Climbing
Let’s dive into a detailed, step-by-step guide on how to belay rock climbing safely and effectively, emphasizing the nuances and best practices at each stage.
2.1. Pre-Climb Checks: Ensuring a Safe Start
Before any climb begins, a series of checks are essential to ensure the safety of both the climber and the belayer.
- Harness Check: Ensure the harness is properly fitted, with the waist belt snug and the leg loops adjusted comfortably. Double-check that all buckles are correctly threaded and locked.
- Rope Check: Inspect the rope for any signs of damage, such as cuts, abrasions, or excessive wear. Ensure the rope is properly threaded through the belay device and carabiner.
- Belay Device Check: Verify that the belay device is correctly attached to the harness with a locking carabiner. The carabiner should be fully locked and properly oriented.
- Communication Check: Establish clear communication signals with your climbing partner. Common commands include “On belay?” “Belay on!” “Climbing!” and “Take!”
2.2. How to Belay: The PBUS Method
The PBUS (Pull, Brake, Under, Slide) method is a widely accepted technique for belaying. Here’s a detailed breakdown:
- Pull: With your guide hand (the hand on the climber’s side of the rope), pull the rope upward to take in slack as the climber ascends.
- Brake: Simultaneously, with your brake hand (the hand on the belayer’s side of the rope), grip the brake strand firmly and pull it downward. This engages the belay device and creates friction.
- Under: Bring your guide hand under the brake hand, maintaining a firm grip on the rope.
- Slide: Slide your brake hand back up the rope, ready to repeat the sequence.
It’s crucial to maintain constant vigilance and anticipation, always ready to engage the brake in case of a fall.
2.3. Locking Off: The Critical Safety Technique
Locking off the belay device is a critical skill that every belayer must master. It involves using both hands to firmly grip the brake strand, preventing any rope slippage.
- Grip the Brake Strand: Immediately after taking in slack or in response to a fall, grip the brake strand tightly with both hands.
- Pull Downward: Pull the brake strand downward, engaging the belay device fully.
- Maintain Position: Hold this locked-off position until the climber is ready to move again.
Practicing this technique repeatedly will build muscle memory and ensure a quick, effective response in an emergency.
2.4. Giving Slack: Providing Smooth Movement
Giving slack involves paying out rope to allow the climber to move upward without resistance. This requires careful attention to the climber’s movements and anticipation of their needs.
- Observe the Climber: Watch the climber closely to anticipate when they need more rope.
- Release the Brake: Slightly release the brake strand with your brake hand, allowing the rope to slide through the belay device.
- Control the Rope: Use your guide hand to control the amount of slack given, ensuring it’s not too much or too little.
Giving slack smoothly and efficiently will enhance the climber’s experience and prevent unnecessary strain on the belay system.
2.5. Lowering: Safely Descending the Climber
Lowering a climber safely requires smooth, controlled rope management.
- Communicate with the Climber: Ensure the climber is ready to be lowered and understands the process.
- Engage the Belay Device: Position your hands on the rope as if you were going to lock it off.
- Slowly Release the Brake: Gradually release the brake strand with your brake hand, allowing the rope to slide through the belay device in a controlled manner.
- Control the Speed: Regulate the speed of the descent by adjusting the amount of pressure on the brake strand. Lower the climber slowly and smoothly, avoiding jerky movements.
- Keep a Hand on the Brake Strand: Never let go of the brake strand completely. Always maintain a firm grip to prevent the climber from falling.
2.6 Responding to a Fall: The Ultimate Test
Knowing how to belay rock climbing also means knowing how to respond if things don’t go as planned. Here’s what you need to do if your climber falls:
- Anticipate the Fall: Always be prepared for a fall. Watch the climber closely and anticipate their movements.
- Lock Off Immediately: As soon as you see or feel a fall, lock off the belay device immediately.
- Maintain a Firm Grip: Hold the locked-off position until the climber has come to a complete stop.
- Communicate with the Climber: Ask the climber if they are okay and assess the situation.
- Prepare for Lowering: Once the climber is ready, prepare to lower them safely to the ground.
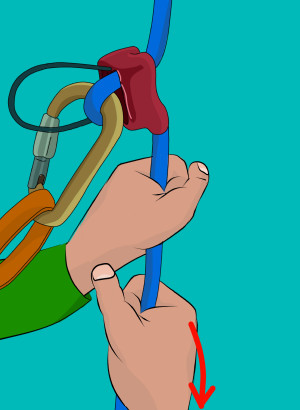
 Locking off the rope is a crucial belaying technique to hold a climber's weight
3. Advanced Belaying Techniques and Tips
Once you’ve mastered the basic belaying techniques, it’s time to explore some advanced tips and tricks that can enhance your belaying skills.
3.1. Dynamic Belaying: Softening the Catch
Dynamic belaying involves using a slight amount of movement to soften the impact of a fall, reducing the force on both the climber and the belayer.
- Anticipate the Fall: Watch the climber closely and anticipate when a fall is likely to occur.
- Move Upward: As the climber falls, move slightly upward to absorb some of the impact force.
- Maintain a Firm Grip: Keep a firm grip on the brake strand at all times.
Dynamic belaying requires practice and good judgment but can significantly improve the overall climbing experience.
3.2. Belaying with Different Belay Devices
Different belay devices have unique characteristics and require slightly different techniques. It’s essential to familiarize yourself with the specific device you’re using.
- ATC (Air Traffic Controller): A tube-style device that provides good control and is suitable for a wide range of climbing situations.
- GriGri: An assisted-braking device that automatically locks in the event of a fall, providing an extra layer of safety.
- Figure Eight: A simple device that is easy to use but requires more attention to maintain control.
Always read the manufacturer’s instructions and practice with each device before using it in a real climbing situation.
3.3. Managing Rope Slack Efficiently
Efficient rope management is crucial for smooth and safe belaying.
- Keep the Rope Tidy: Avoid letting the rope become tangled or knotted.
- Use a Rope Bag: Store the rope in a rope bag to keep it clean and organized.
- Flake the Rope: Before each climb, flake the rope to remove any twists or kinks.
- Communicate with the Climber: Let the climber know if you’re having trouble managing the rope.
Proper rope management will prevent accidents and enhance the overall climbing experience.
3.4. Belaying Heavier or Lighter Climbers
Belaying a climber who is significantly heavier or lighter than you requires some adjustments to your technique.
- Heavier Climber: Be prepared for a stronger pull in the event of a fall. Use a more secure stance and consider using a belay device with higher friction.
- Lighter Climber: Be careful not to pull the climber off balance when taking in slack. Use a more gentle approach and avoid sudden movements.
Adjusting your technique to suit the climber’s weight will ensure a safer and more comfortable climb for both of you.
3.5. Belaying in Different Environments
Belaying in different environments, such as indoors or outdoors, may require some adjustments to your technique.
- Indoors: Be aware of other climbers and obstacles in the area. Use clear communication signals and maintain a safe distance from the wall.
- Outdoors: Be prepared for uneven terrain and changing weather conditions. Use a more secure stance and consider using a belay device with higher friction.
Adapting to the environment will help you stay safe and focused on the climb.
4. Common Belaying Mistakes and How to Avoid Them
Even experienced belayers can make mistakes. Recognizing common errors and knowing how to avoid them is crucial for maintaining a safe climbing environment.
4.1. Taking Your Brake Hand Off the Rope
One of the most dangerous mistakes a belayer can make is taking their brake hand off the rope. This can lead to a catastrophic fall if the climber slips.
- Always Keep a Hand on the Rope: Never let go of the brake strand completely. Always maintain a firm grip.
- Use a Belay Device with Assisted Braking: Consider using a belay device with assisted braking for added safety.
- Practice Good Technique: Develop good belaying habits and practice them regularly.
4.2. Giving Too Much or Too Little Slack
Giving too much or too little slack can create problems for the climber. Too much slack can result in a longer fall, while too little slack can restrict the climber’s movements.
- Watch the Climber Closely: Pay attention to the climber’s movements and anticipate their needs.
- Communicate with the Climber: Ask the climber if they need more or less slack.
- Adjust Your Technique: Adjust your technique to suit the climber’s preferences.
4.3. Not Paying Attention to the Climber
Belaying requires constant vigilance and attention. Not paying attention to the climber can lead to missed signals and delayed reactions.
- Stay Focused: Avoid distractions and focus on the climber’s movements.
- Communicate with the Climber: Talk to the climber regularly to ensure they are okay.
- Take Breaks: If you’re feeling tired or distracted, take a break before continuing to belay.
4.4. Using the Wrong Belay Device
Using the wrong belay device can compromise safety. Each device has its specific strengths and weaknesses, and it’s essential to choose the right one for the situation.
- Research Different Devices: Learn about the different types of belay devices and their characteristics.
- Read the Manufacturer’s Instructions: Always read the manufacturer’s instructions before using a new device.
- Practice with the Device: Practice using the device in a controlled environment before using it in a real climbing situation.
4.5. Not Conducting Pre-Climb Checks
Skipping pre-climb checks can lead to overlooked hazards and potential accidents. Always take the time to inspect your equipment and communicate with your climbing partner before starting a climb.
- Establish a Routine: Develop a pre-climb checklist and follow it every time.
- Involve Your Partner: Encourage your climbing partner to participate in the checks.
- Take Your Time: Don’t rush the checks. Take your time to ensure everything is safe and secure.
 Proper belaying technique involves keeping your hands the correct distance from the belay device and maintaining a tight grip on the rope
5. The Importance of Communication in Belaying
Clear and effective communication between the climber and the belayer is essential for safety and success.
5.1. Standard Climbing Calls
Using standard climbing calls ensures that both the climber and the belayer understand each other’s intentions.
- “On Belay?”: The climber asks if the belayer is ready.
- “Belay On!”: The belayer confirms that they are ready.
- “Climbing!”: The climber announces that they are starting to climb.
- “Climb On!”: The belayer acknowledges that the climber is starting.
- “Take!”: The climber asks the belayer to take in slack and hold their weight.
- “Slack!”: The climber asks the belayer to give them some slack.
- “Lower Me!”: The climber asks the belayer to lower them to the ground.
- “Off Belay!”: The climber announces that they are no longer on belay.
- “Belay Off!”: The belayer confirms that they are no longer belaying.
5.2. Establishing Clear Signals
In addition to standard calls, it’s essential to establish clear signals for specific situations.
- Tapping the Rope: A signal that the climber needs more slack.
- Pulling the Rope: A signal that the climber needs less slack.
- Yelling “Rock!”: A warning that a rock is falling.
5.3. Communicating About Comfort and Safety
Encourage open communication about comfort and safety.
- Ask the Climber How They’re Feeling: Check in with the climber regularly to ensure they’re not feeling tired or uncomfortable.
- Discuss Any Concerns: Address any concerns or questions that either of you may have.
- Be Honest About Your Abilities: Don’t hesitate to admit if you’re feeling overwhelmed or unsure about something.
5.4. Non-Verbal Communication
Sometimes, verbal communication is not possible, such as in noisy environments or when the climber is too far away. In these situations, non-verbal communication can be invaluable.
- Eye Contact: Maintain eye contact with the climber to gauge their needs.
- Body Language: Pay attention to the climber’s body language to anticipate their movements.
- Hand Signals: Use pre-arranged hand signals to communicate specific messages.
6. Training and Practice for How to Belay Rock Climbing
Belaying is a skill that requires practice and training. Here are some tips for improving your belaying skills.
6.1. Taking a Belay Course
Taking a belay course from a certified instructor is the best way to learn the fundamentals of belaying.
- Find a Reputable Instructor: Look for an instructor who is certified by a recognized organization.
- Attend a Hands-On Course: Choose a course that includes plenty of hands-on practice.
- Ask Questions: Don’t hesitate to ask questions and seek clarification on anything you don’t understand.
6.2. Practicing in a Controlled Environment
Practice belaying in a controlled environment, such as a climbing gym, before venturing outdoors.
- Start with Easy Climbs: Begin with easy climbs to get comfortable with the techniques.
- Gradually Increase Difficulty: Gradually increase the difficulty of the climbs as your skills improve.
- Simulate Real-World Scenarios: Practice responding to falls and managing different types of terrain.
6.3. Using a Belay Simulator
A belay simulator can provide a realistic training experience without the risk of a real fall.
- Practice Responding to Falls: Simulate different types of falls and practice your response.
- Experiment with Different Techniques: Try out different belaying techniques and see what works best for you.
- Build Muscle Memory: Use the simulator to build muscle memory and improve your reaction time.
6.4. Seeking Feedback from Experienced Climbers
Ask experienced climbers to observe your belaying technique and provide feedback.
- Find a Mentor: Seek out an experienced climber who is willing to mentor you.
- Ask for Constructive Criticism: Encourage your mentor to provide honest and constructive criticism.
- Be Open to Suggestions: Be open to suggestions and willing to try new things.
6.5. Staying Up-to-Date with Best Practices
Belaying techniques and best practices are constantly evolving. Stay up-to-date by reading articles, watching videos, and attending workshops.
- Read Climbing Magazines and Websites: Stay informed about the latest developments in belaying techniques.
- Watch Instructional Videos: Learn from experienced climbers by watching instructional videos.
- Attend Climbing Workshops: Attend workshops and seminars to learn from experts in the field.
 Proper belaying technique is essential for safely lowering a climber on top rope
7. Top Rope Belaying on Overhangs: Special Considerations
When top roping on overhangs, it’s crucial to take extra precautions to ensure the climber’s safety. Climb on the rope which is clipped through the quickdraws. Then clip the rope back through the quickdraws on your way down. This prevents the climber from swinging into the wall if they fall.
8. The Dangers of Distraction: Why Focus is Key
Belaying demands complete focus. Distractions can lead to serious accidents. Always keep your eyes on the climber and avoid anything that might divert your attention. Your partner’s safety depends on your vigilance.
9. What To Do When You See Bad Belaying
It’s important to speak up if you witness unsafe belaying practices. Politely and respectfully approach the individuals involved and offer your assistance or advice. Safety should always be the top priority in the climbing community.
10. Where to Find More Resources on Rock Climbing and Belaying
- Rock Climbing: Mastering the Basic Skills – by Craig Luebben: A great resource for learning the fundamentals of rock climbing, including belaying techniques.
- Climbing Anchors – by John Long: Covers the principles of anchor systems and how to build reliable anchors for climbing.
- Self-Rescue – by David Fasulo: A comprehensive guide to self-rescue techniques for climbers, including rope ascension and rappelling.
- Accidents in North American Climbing: An annual publication by the American Alpine Club that analyzes climbing accidents and offers lessons for prevention.
- Mountaineering: The Freedom of the Hills: Considered the bible of mountaineering, this book covers a wide range of topics, including climbing techniques, safety, and rescue.
- Climbing Magazine: A popular magazine that features articles on climbing techniques, gear reviews, and safety advice.
- Rock and Ice Magazine: Another popular climbing magazine with articles on climbing techniques, gear reviews, and safety advice.
- American Alpine Club: A non-profit organization that promotes responsible climbing and provides resources for climbers.
- Access Fund: A non-profit organization that works to protect climbing areas and ensure access for climbers.
FAQ: How to Belay Rock Climbing
1. What is the first step in belaying a rock climber?
The first step in belaying a rock climber is to perform pre-climb checks on your harness, rope, and belay device. This ensures that all equipment is in good working order and properly connected.
2. How tight should the rope be when belaying?
The rope should be taut enough to prevent the climber from falling any significant distance, but slack enough so you don’t interfere with their movement. The goal is to strike a balance between safety and freedom of movement.
3. What is the PBUS method in belaying?
The PBUS method stands for Pull, Brake, Under, Slide. It is a technique for taking in slack while belaying, involving pulling the rope upward, braking with your brake hand, bringing your guide hand under the brake hand, and sliding your brake hand back up the rope.
4. How do you lock off the belay device?
To lock off the belay device, grip the brake strand tightly with both hands and pull it downward, engaging the device fully to prevent any rope slippage. This technique is crucial for holding a fall.
5. What should you do if the climber falls?
If the climber falls, immediately lock off the belay device by gripping the brake strand tightly with both hands and pulling it downward. Maintain this locked-off position until the climber has come to a complete stop.
6. How do you lower a climber safely?
To lower a climber safely, communicate with them, engage the belay device, and slowly release the brake strand with your brake hand, allowing the rope to slide through the device in a controlled manner.
7. What is dynamic belaying?
Dynamic belaying involves using a slight amount of movement to soften the impact of a fall, reducing the force on both the climber and the belayer. This technique requires practice and good judgment.
8. What are some common belaying mistakes to avoid?
Common belaying mistakes to avoid include taking your brake hand off the rope, giving too much or too little slack, not paying attention to the climber, using the wrong belay device, and not conducting pre-climb checks.
9. How important is communication in belaying?
Communication is essential in belaying, as it ensures that both the climber and the belayer understand each other’s intentions and can respond effectively to changing situations.
10. How can you improve your belaying skills?
You can improve your belaying skills by taking a belay course, practicing in a controlled environment, using a belay simulator, seeking feedback from experienced climbers, and staying up-to-date with best practices.
Mastering the art of how to belay rock climbing is essential for ensuring safety and fostering trust between climbers and belayers. Whether you’re a beginner or an experienced climber, the techniques and tips discussed here will help you enhance your belaying skills and create a safer and more enjoyable climbing experience, rockscapes.net is your go-to resource for all things climbing-related.
Ready to take your climbing skills to the next level? Visit rockscapes.net today to explore our comprehensive guides, expert tips, and a wide range of climbing resources. Contact us at Address: 1151 S Forest Ave, Tempe, AZ 85281, United States or Phone: +1 (480) 965-9011. Our team of experienced climbers and outdoor enthusiasts are here to help you discover the beauty and excitement of rock climbing in the USA.