Do you want to master the art of “How To Billet Rock Climbing” and ensure a safe and enjoyable experience? At rockscapes.net, we provide expert guidance and techniques to help you become a proficient and confident belayer. Learn about belaying techniques, safety measures, and essential equipment for a secure climbing adventure.
1. Understanding How To Billet Rock Climbing
How do you define “billet” in the context of rock climbing?
“Billet” in rock climbing isn’t a standard term. The correct term is “belay,” which involves using a friction device to manage the rope and protect a climber from falling. Belaying is a critical skill that allows a belayer to arrest a fall and lower the climber safely. Mastering belaying techniques is crucial for anyone participating in rock climbing, whether indoors or outdoors. It involves understanding the belay device, maintaining proper stance, and communicating effectively with the climber.
1.1. The Role of a Belayer
Why is the belayer’s role essential in rock climbing?
The belayer is the climber’s lifeline, responsible for managing the rope to prevent or minimize the impact of a fall. A skilled belayer ensures the rope is neither too slack, which could cause a longer fall, nor too tight, which can hinder the climber’s progress. The belayer must also be vigilant, anticipating the climber’s moves and being ready to react instantly. Effective belaying requires focus, good communication, and a solid understanding of the equipment and techniques involved.
1.2. Types of Belaying
What are the different types of belaying techniques?
There are several belaying techniques, each suited to different climbing situations. The most common include:
- Top-rope belaying: Used when the rope runs from the belayer to the climber, through an anchor at the top of the climb, and back to the climber. It’s the safest and most straightforward method, ideal for beginners.
- Lead belaying: Employed when the climber ascends, clipping the rope into protection points along the way. This technique requires more skill and attention from the belayer to manage slack and prevent long falls.
- Auto-belaying: Utilizes mechanical devices that automatically take up slack and arrest falls. While convenient, it’s essential to understand the specific device and its limitations.
Each technique demands specific skills and awareness, and choosing the right one depends on the climbing environment and the climber’s experience level.
2. Essential Equipment for Belaying
What gear do you need to safely belay a rock climber?
Safe and effective belaying requires specific equipment designed to handle the forces involved in a fall. Essential gear includes:
- Belay Device: A mechanical device that increases friction on the rope, allowing the belayer to easily hold the climber’s weight.
- Carabiner: A metal loop with a gate, used to connect the belay device to the belayer’s harness. It must be a locking carabiner for added safety.
- Harness: A secure and comfortable harness is essential for both the climber and the belayer, distributing the load evenly.
- Climbing Rope: Dynamic ropes are designed to stretch under load, absorbing the impact of a fall.
- Belay Gloves: Optional but recommended, belay gloves protect the hands from rope burn and provide a better grip.
Using high-quality, well-maintained equipment is paramount for safety in rock climbing. Always inspect your gear before each use to ensure it’s in good condition.
2.1. Choosing the Right Belay Device
How do you select the best belay device for your needs?
Selecting the right belay device depends on your experience level, the type of climbing you’ll be doing, and your personal preferences. Common types of belay devices include:
- Tube-style devices: Versatile and widely used, these devices offer good control and are suitable for various rope diameters.
- Assisted-braking devices: These devices provide an additional level of security by automatically engaging when a fall occurs, reducing the effort required by the belayer.
- Figure-eight devices: Simple and durable, but less common due to the lack of assisted braking.
Consider factors like ease of use, rope compatibility, and braking power when choosing a belay device. It’s also beneficial to seek advice from experienced climbers or climbing instructors.
2.2. Importance of a Locking Carabiner
Why is a locking carabiner essential for belaying?
A locking carabiner is crucial for belaying because it prevents accidental opening during use, ensuring a secure connection between the belay device and the harness. These carabiners feature a locking mechanism, such as a screw gate or twist-lock, that must be intentionally opened. This added security measure minimizes the risk of the belay device detaching during a fall, which could have catastrophic consequences. Always use a locking carabiner specifically designed for belaying.
3. Mastering Belaying Techniques
What are the fundamental techniques for safe belaying?
Mastering belaying techniques involves several key steps to ensure the safety of both the climber and the belayer. Here are the fundamental techniques:
3.1. Setting Up the Belay System
How do you correctly set up a belay system?
Setting up the belay system correctly is the first and most crucial step in belaying. Here’s how:
- Inspect the Equipment: Check the belay device, carabiner, and harness for any signs of wear or damage.
- Attach the Belay Device: Connect the belay device to the belay loop of your harness using a locking carabiner. Ensure the carabiner is locked securely.
- Thread the Rope: Follow the manufacturer’s instructions to properly thread the rope through the belay device.
- Double-Check: Have your partner double-check the setup to ensure everything is correctly assembled.
A properly set-up belay system is the foundation of safe climbing. Don’t rush this step, and always verify each component.
3.2. The Belay Stance
What is the proper stance for belaying?
Maintaining a stable and balanced stance is essential for effective belaying. Here are some key points:
- Position: Stand close to the wall, directly below the first piece of protection or the anchor point for top-roping.
- Foot Placement: Keep your feet shoulder-width apart for a stable base.
- Knees: Maintain a slight bend in your knees to absorb any sudden forces.
- Grip: Keep a firm grip on the brake strand of the rope with your dominant hand.
- Attention: Focus on the climber and be ready to react to their movements.
A solid belay stance allows you to respond quickly and efficiently to the climber’s needs, whether it’s taking in slack or arresting a fall.
3.3. Feeding Slack
How do you efficiently feed slack to the climber?
Feeding slack involves giving the climber enough rope to move freely without creating excessive slack that could result in a longer fall. Here’s how to do it:
- Watch the Climber: Pay close attention to the climber’s movements and anticipate when they need more rope.
- Hand Position: Use your non-dominant hand to gently pull the rope upwards, creating a loop of slack.
- Feed Smoothly: Allow the rope to slide smoothly through the belay device, avoiding jerky movements.
- Maintain Control: Always keep your dominant hand firmly on the brake strand to maintain control of the rope.
The key is to find a balance between providing enough slack for the climber to move comfortably and minimizing the amount of slack that could lead to a dangerous fall.
3.4. Taking In Slack
How do you take in slack effectively while belaying?
Taking in slack is crucial for keeping the rope tight enough to prevent long falls. Here’s how to do it effectively:
- Anticipate: Watch the climber closely and anticipate when they move upwards.
- Grip: Keep a firm grip on the brake strand with your dominant hand.
- Pull and Slide: Use your non-dominant hand to pull the rope through the belay device while simultaneously sliding your dominant hand down the brake strand.
- Lock Off: After taking in the slack, lock off the belay device by bringing your dominant hand down and holding the brake strand firmly.
Taking in slack requires coordination and practice to ensure the rope remains taut without hindering the climber’s progress.
3.5. Locking Off
What is “locking off,” and why is it important in belaying?
Locking off is the technique of securing the rope to hold the climber’s weight, especially in the event of a fall. Here’s how:
- Grip: Maintain a firm grip on the brake strand with your dominant hand.
- Position: Bring your dominant hand down towards your hip, creating a strong angle in the rope.
- Hold Tight: Hold the rope tightly, using your body weight to increase friction on the belay device.
- Communicate: Clearly communicate with the climber to let them know you have them secure.
Locking off is a critical skill that can prevent a fall from becoming a serious accident. Practice this technique until it becomes second nature.
3.6. Catching a Fall
How do you effectively catch a fall while belaying?
Catching a fall requires quick reaction and proper technique to minimize the impact on both the climber and the belayer. Here’s how to do it:
- React Quickly: As soon as you see or hear the climber falling, react immediately.
- Lock Off: Lock off the belay device as described above.
- Give a Dynamic Belay: Instead of holding the rope rigidly, give a slight amount of slack to soften the impact of the fall.
- Brace Yourself: Brace yourself for the force of the fall, using your legs to absorb the impact.
- Communicate: After the fall, communicate with the climber to ensure they are okay.
Catching a fall can be intense, but with practice and proper technique, you can protect the climber from injury.
3.7. Lowering the Climber
How do you lower a climber safely and smoothly?
Lowering the climber involves controlling the descent in a smooth and safe manner. Here’s how:
- Take in Slack: Take in any excess slack in the rope.
- Communicate: Confirm with the climber that they are ready to be lowered.
- Control the Rope: Gradually release the brake strand, allowing the rope to slide through the belay device at a controlled rate.
- Maintain a Steady Pace: Lower the climber at a consistent pace, avoiding jerky movements.
- Watch for Obstacles: Keep an eye out for any obstacles or hazards on the wall.
- Soft Landing: Slow down as the climber approaches the ground to ensure a soft landing.
Lowering the climber requires finesse and attention to detail. Practice this technique to develop a smooth and controlled descent.
4. Safety Measures and Best Practices
What safety measures should be followed during belaying?
Belaying demands strict adherence to safety protocols to minimize risks. Key measures include:
4.1. Pre-Climb Checks
What checks should you perform before each climb?
Before each climb, conduct thorough checks to ensure the safety of both the climber and the belayer. These include:
- Partner Check: Verify that your partner’s harness is properly fitted and buckled.
- Equipment Check: Inspect all equipment, including the rope, belay device, carabiner, and harness, for any signs of wear or damage.
- Communication Check: Establish clear communication signals and commands with your partner.
- Knot Check: Ensure the climber’s knot is correctly tied and securely attached to the harness.
Pre-climb checks are a critical part of the safety routine. Never skip this step.
4.2. Communication Signals
What standard communication signals should climbers and belayers use?
Clear and consistent communication is essential for safe climbing. Standard signals include:
- “On Belay?” – Climber asking if the belayer is ready.
- “Belay On” – Belayer confirming they are ready.
- “Climbing!” – Climber announcing they are about to start.
- “Climb On!” – Belayer acknowledging the climber and confirming they are paying attention.
- “Take!” – Climber asking the belayer to take in slack and hold their weight.
- “Slack!” – Climber asking the belayer to give them more slack.
- “Lowering!” – Climber informing the belayer they are ready to be lowered.
Using these signals consistently ensures that both partners are on the same page and can react effectively to any situation.
4.3. Avoiding Common Mistakes
What are common belaying mistakes and how can you avoid them?
Several common mistakes can compromise safety during belaying. These include:
- Distraction: Losing focus on the climber.
- Incorrect Setup: Improperly setting up the belay device or harness.
- Gripping Too Tightly: Gripping the rope too tightly, which can lead to fatigue.
- Taking Too Much Slack: Allowing too much slack in the rope, which can result in a longer fall.
- Not Locking Off: Failing to lock off the belay device when needed.
Avoiding these mistakes requires constant vigilance, practice, and a commitment to following safety protocols.
4.4. Staying Focused
How can you maintain focus while belaying?
Maintaining focus is crucial for effective belaying. Here are some tips:
- Minimize Distractions: Avoid talking to others or using electronic devices while belaying.
- Watch the Climber: Keep your eyes on the climber at all times, anticipating their movements.
- Stay Engaged: Actively participate in the climb by providing encouragement and feedback.
- Take Breaks: If you start to feel fatigued, take a break to rest and refocus.
Staying focused ensures that you are ready to react quickly and effectively to any situation that may arise.
5. Advanced Belaying Techniques
What are some advanced techniques for experienced belayers?
Experienced belayers can enhance their skills with advanced techniques that provide greater control and safety.
5.1. Dynamic Belaying
What is dynamic belaying, and when should you use it?
Dynamic belaying involves giving a small amount of slack when catching a fall to soften the impact. This technique is particularly useful for lead climbing, where falls can be longer and more jarring. By allowing the rope to slide through the belay device slightly, you can reduce the force on the climber and the anchor points. However, dynamic belaying requires practice and good judgment to avoid giving too much slack.
5.2. Using Assisted-Braking Devices
How do assisted-braking belay devices enhance safety?
Assisted-braking belay devices, such as the Petzl GriGri, provide an additional level of security by automatically engaging when a fall occurs. These devices reduce the effort required by the belayer to hold the rope, making it easier to catch and hold a fall. However, it’s essential to understand how these devices work and to practice using them properly. Assisted-braking devices are not foolproof and still require the belayer to maintain a firm grip on the brake strand.
5.3. Belaying Heavier Climbers
What adjustments should you make when belaying a heavier climber?
Belaying a heavier climber requires additional attention to technique and positioning. Key adjustments include:
- Stance: Maintain a wider and more stable stance to handle the increased force.
- Friction: Use a belay device that provides ample friction.
- Positioning: Position yourself closer to the wall to minimize the distance you could be pulled.
- Communication: Communicate clearly with the climber to ensure they are aware of your positioning.
Proper technique and awareness are crucial when belaying a heavier climber to ensure both partners remain safe.
5.4. Belaying on Multi-Pitch Climbs
What specific considerations are necessary for multi-pitch belaying?
Multi-pitch climbing involves climbing a route in multiple stages, with belay stations at each pitch. Specific considerations for multi-pitch belaying include:
- Anchor Setup: Create a secure and redundant anchor system at each belay station.
- Communication: Maintain clear communication with the climber, especially when out of sight.
- Rope Management: Manage the rope carefully to avoid tangles and ensure smooth feeding.
- Belay Stance: Choose a comfortable and stable belay stance that allows you to belay for extended periods.
Multi-pitch climbing requires advanced belaying skills and a thorough understanding of rope management and anchor systems.
6. Training and Practice
How do you become a proficient and confident belayer?
Proficiency in belaying comes from consistent training and practice. Here are some effective strategies:
6.1. Taking a Belay Course
Why is taking a professional belay course beneficial?
A professional belay course provides structured instruction and hands-on practice under the guidance of experienced instructors. These courses cover essential techniques, safety protocols, and problem-solving skills. Taking a course can help you build a solid foundation in belaying and develop the confidence to handle various climbing situations.
6.2. Practicing Regularly
How often should you practice belaying to maintain proficiency?
Regular practice is essential for maintaining and improving your belaying skills. Aim to practice at least once a week, focusing on different techniques and scenarios. Practice can include mock falls, rope management drills, and belaying with climbers of varying weights and experience levels.
6.3. Mock Falls
Why are mock falls important for belay training?
Practicing mock falls simulates real-world scenarios and helps you develop the muscle memory and reaction time needed to catch a fall effectively. To practice mock falls:
- Setup: Ensure you are in a safe and controlled environment.
- Communication: Communicate clearly with your partner about the drill.
- Execution: Have the climber intentionally fall while you practice locking off and giving a dynamic belay.
- Feedback: Discuss the experience with your partner and identify areas for improvement.
Mock falls are a valuable tool for building confidence and refining your belaying skills.
6.4. Seeking Feedback
How can you get constructive feedback on your belaying technique?
Seeking feedback from experienced climbers or instructors can provide valuable insights and help you identify areas for improvement. Ask them to observe your belaying technique and provide constructive criticism. You can also record videos of yourself belaying and review them to identify any flaws in your technique.
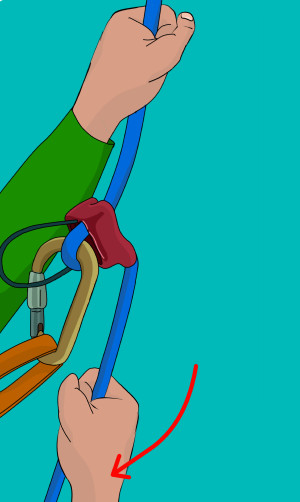 Rock climbing belaying locking off the rope tight
7. Belaying in Different Environments
How does belaying change in different climbing environments?
Belaying techniques may need to be adapted based on the climbing environment, whether indoors or outdoors.
7.1. Indoor Belaying
What are the specific considerations for belaying in a climbing gym?
Indoor belaying in a climbing gym offers a controlled environment with well-maintained equipment and established safety protocols. Specific considerations include:
- Gym Rules: Adhere to all gym rules and regulations.
- Equipment: Use gym-provided equipment or your own gear, ensuring it meets safety standards.
- Awareness: Be aware of other climbers and belayers in the area.
- Communication: Communicate clearly with your climbing partner.
Indoor belaying provides a safe and convenient way to practice and refine your skills.
7.2. Outdoor Belaying
What are the additional safety concerns when belaying outdoors?
Outdoor belaying presents additional challenges and safety concerns compared to indoor climbing. These include:
- Environmental Factors: Be aware of weather conditions, such as rain, wind, and temperature.
- Terrain: Choose a stable and comfortable belay stance.
- Rock Quality: Inspect the rock for loose holds or hazards.
- Protection: Ensure adequate protection is in place.
- Communication: Maintain clear communication with your partner, especially in noisy environments.
Outdoor belaying requires greater awareness and adaptability to ensure safety.
7.3. Belaying on Trad Climbs
How does belaying differ on traditional (trad) climbs?
Traditional climbing involves placing your own protection as you ascend, which requires specific belaying considerations:
- Dynamic Belaying: Use dynamic belaying techniques to soften the impact of falls.
- Rope Management: Manage the rope carefully to avoid rope drag.
- Anchor Building: Build solid and redundant anchors at each belay station.
- Communication: Maintain clear communication with your partner, especially when placing protection.
Trad climbing demands advanced belaying skills and a thorough understanding of protection placement and anchor building.
7.4. Belaying on Sport Climbs
What are the key aspects of belaying on sport climbs?
Sport climbing involves climbing routes with pre-placed bolts, which simplifies protection but still requires careful belaying:
- Quickdraw Placement: Ensure quickdraws are properly placed and oriented.
- Clipping: Watch the climber carefully as they clip the rope into the quickdraws.
- Slack Management: Manage slack to minimize the potential fall distance.
- Communication: Maintain clear communication with your partner.
Sport climbing requires attentive belaying to ensure the climber is protected from potential falls.
8. Common Belaying Mistakes and How to Avoid Them
What are the typical errors made during belaying and their prevention?
Even experienced belayers can fall into common traps. Here are some frequent mistakes and how to avoid them:
8.1. Not Paying Attention
Why is attentiveness crucial, and how can you stay focused?
Lapses in attention are one of the leading causes of belaying accidents. Staying focused involves:
- Avoiding Distractions: Keep your phone away and avoid conversations.
- Scanning the Route: Know the route the climber is taking to anticipate their moves.
- Staying Engaged: Actively watch and listen to your climber, offering encouragement and feedback.
Attentiveness can be the difference between a safe climb and a serious incident.
8.2. Holding the Rope Incorrectly
What’s the right way to hold the brake rope, and why does it matter?
Holding the brake rope correctly is vital for effectively stopping a fall. Always:
- Grip Firmly: Keep a firm grip on the brake rope with your dominant hand.
- Never Let Go: Never remove your hand from the brake rope.
- Position Properly: Keep your hand positioned low, near your hip, to maximize leverage.
Proper hand positioning allows you to lock off the belay device quickly and securely.
8.3. Standing Too Far from the Wall
How does proximity to the wall affect belaying effectiveness?
Standing too far from the wall can reduce your ability to react quickly and efficiently to a fall. Always:
- Position Close: Stand close enough to the wall that you can easily step forward to take in slack or lock off the belay device.
- Maintain Balance: Ensure you have a stable stance that allows you to react quickly.
Proximity to the wall enables you to maintain better control and respond more effectively to the climber’s movements.
8.4. Not Communicating Clearly
Why are communication signals important, and how should you use them?
Clear communication is essential for coordinating movements and ensuring safety. Always:
- Use Standard Signals: Employ standard climbing commands, such as “On belay?”, “Belay on,” “Climbing,” and “Take.”
- Confirm Understanding: Ensure your partner understands your commands before proceeding.
- Communicate Changes: If anything changes, such as needing to adjust the belay, communicate clearly with your partner.
Effective communication minimizes misunderstandings and enhances safety.
8.5. Using Worn-Out Equipment
How can you identify worn-out equipment, and why should you replace it?
Using worn-out equipment can compromise safety and increase the risk of accidents. Regularly inspect your gear for:
- Rope Wear: Check for cuts, abrasions, and excessive fuzziness.
- Carabiner Damage: Look for cracks, sharp edges, and gate malfunctions.
- Harness Wear: Inspect for frayed webbing, damaged buckles, and worn-out stitching.
- Belay Device Condition: Ensure the belay device is free from cracks, sharp edges, and corrosion.
Replace any worn-out equipment immediately to maintain safety and prevent accidents.
9. The Future of Belaying
What innovations and trends are shaping the future of belaying?
Belaying technology and techniques continue to evolve, offering new possibilities for enhancing safety and efficiency.
9.1. Technological Advancements
What new technologies are being developed for belaying?
Several technological advancements are transforming belaying, including:
- Smart Belay Devices: Devices equipped with sensors and algorithms that automatically adjust friction based on the climber’s weight and the force of the fall.
- Auto-Belay Systems: Automated systems that allow climbers to climb without a belayer, ideal for solo training and recreational climbing.
- Enhanced Communication Systems: Wearable devices that facilitate clear and reliable communication between climbers and belayers.
These technologies promise to make belaying safer and more accessible.
9.2. Training Innovations
How are training methods evolving to improve belaying skills?
Innovative training methods are enhancing belaying skills, including:
- Virtual Reality (VR) Training: VR simulations that allow climbers and belayers to practice in realistic and risk-free environments.
- AI-Powered Feedback: AI algorithms that analyze belaying technique and provide personalized feedback.
- Scenario-Based Training: Training programs that simulate real-world climbing scenarios, helping belayers develop problem-solving skills.
These innovations are helping climbers and belayers develop advanced skills more quickly and effectively.
10. Resources for Learning More
Where can you find more information and training on belaying?
Numerous resources are available to help you learn more about belaying and enhance your skills.
10.1. Online Resources
What are some reputable websites and online communities for belaying information?
Online resources offer a wealth of information on belaying, including:
- RockClimbing.com: Provides articles, forums, and videos on various climbing topics, including belaying.
- Mountain Project: Offers detailed route information, gear reviews, and community discussions.
- REI Expert Advice: Features articles and guides on climbing techniques and safety.
- American Alpine Club (AAC): Provides resources on climbing education and safety.
These online resources can help you stay informed and connected with the climbing community.
10.2. Books and Guides
What are some recommended books and guides on belaying techniques?
Several excellent books and guides cover belaying techniques in detail, including:
- “Mountaineering: The Freedom of the Hills”: A comprehensive guide to all aspects of mountaineering, including belaying.
- “Climbing: The Complete Reference” by Craig Luebben: Offers in-depth information on climbing techniques and safety.
- “Rock Climbing: Mastering the Basic Skills” by Craig Luebben: Provides step-by-step instructions on belaying and other essential skills.
These books and guides can serve as valuable resources for learning and refining your belaying skills.
10.3. Climbing Gyms and Instructors
How can local climbing gyms and instructors support your belaying education?
Local climbing gyms and instructors offer hands-on training and personalized feedback to help you improve your belaying skills. They can provide:
- Belay Courses: Structured courses that cover essential techniques and safety protocols.
- Private Instruction: One-on-one coaching to address your specific needs and goals.
- Practice Opportunities: Opportunities to practice belaying with climbers of varying weights and experience levels.
Local climbing gyms and instructors can provide the support and guidance you need to become a proficient and confident belayer.
FAQ: Mastering How To Billet Rock Climbing
Q1: What is the most important thing to remember when learning how to belay?
The most critical aspect of learning to belay is to prioritize safety above all else by maintaining constant focus, adhering to proper techniques, and consistently checking equipment. Your attentiveness and adherence to safety protocols directly impact the climber’s well-being.
Q2: Can I belay with any type of belay device?
No, not all belay devices are suitable for every situation. Choose a belay device that matches your experience level, the type of climbing you are doing, and the diameter of your rope, and ensure you are trained in its proper use.
Q3: How tight should the rope be when belaying a top-rope climber?
The rope should be tight enough to prevent the climber from falling any significant distance, but not so tight that it interferes with their movement. The ideal tension allows the climber to move freely while minimizing potential fall distance.
Q4: What should I do if I drop the brake rope while belaying?
Never drop the brake rope. If you lose control, immediately try to regain your grip. If the climber falls, lock off the belay device as quickly as possible and call for help.
Q5: How can I prevent rope burn while belaying?
Use belay gloves to protect your hands from rope burn, and ensure you are using proper belaying techniques to control the rope smoothly. Rockscapes.net offers a selection of belay gloves designed for comfort and protection.
Q6: Is it okay to use an auto-belay system instead of a human belayer?
Auto-belay systems are convenient but should not replace human belayers entirely. They are best used for solo training or recreational climbing. Always follow the manufacturer’s instructions and inspect the system before each use.
Q7: How often should I replace my climbing rope?
Replace your climbing rope based on the frequency of use and condition. Inspect it regularly for damage, and retire it if you notice any cuts, abrasions, or excessive wear.
Q8: What are the best practices for belaying a heavier climber?
When belaying a heavier climber, maintain a stable stance, use a belay device that provides ample friction, and position yourself closer to the wall to minimize the distance you could be pulled.
Q9: Can I belay with a non-locking carabiner?
Never use a non-locking carabiner for belaying. A locking carabiner is essential to prevent accidental opening during use, ensuring a secure connection between the belay device and the harness.
Q10: How do I give a dynamic belay?
To give a dynamic belay, allow a small amount of slack when catching a fall to soften the impact. This requires practice and good judgment to avoid giving too much slack. Consider taking a course from experienced climbers or instructors.
Ready to take your rock climbing skills to the next level? Visit rockscapes.net for inspiration, in-depth information on rock types, and practical tips for integrating natural stone into your projects.