Breaking open a geode rock reveals a hidden world of stunning crystals, making it a thrilling experience. At rockscapes.net, we’re passionate about helping you safely and effectively unlock these geological treasures. Let’s explore the various methods and essential safety practices for a successful geode-cracking adventure, revealing the sparkling mineral formations within and exploring the fascinating world of landscape rocks. Discover the secrets hidden inside each geological formation and find inspiration for incorporating these natural wonders into your landscape design, enhancing your outdoor space with unique rock features.
1. Understanding Geodes: Nature’s Crystalline Surprise
Geodes, seemingly ordinary rocks on the outside, conceal breathtaking crystals and minerals within. These geological wonders form over thousands to millions of years through a fascinating natural process.
1.1 What is a Geode?
A geode is a hollow rock formation containing minerals such as quartz crystals, calcite, and more. They are essentially mineral-lined cavities within a host rock, offering a glimpse into the Earth’s geological processes.
1.2 How do Geodes Form?
Geodes form through several processes, typically involving volcanic or sedimentary rocks. The process generally involves:
- Cavity Formation: Gas bubbles in lava or dissolved nodules in sedimentary rock leave hollow spaces.
- Mineral-Rich Water Seepage: Water containing dissolved minerals seeps into these cavities.
- Crystal Growth: Over time, the minerals precipitate out of the water and crystallize on the inner walls of the cavity, forming the beautiful crystals we see when we break them open.
1.3 Types of Geodes
Geodes vary widely based on their mineral content and formation. Some common types include:
- Quartz Geodes: Lined with quartz crystals, often clear or milky white.
- Amethyst Geodes: Contain amethyst crystals, varying in shades of purple.
- Calcite Geodes: Lined with calcite crystals, which can be various colors.
- Agate Geodes: Feature banded agate layers, creating intricate patterns.
- Druzy Geodes: Lined with tiny, sparkling crystals, often quartz.
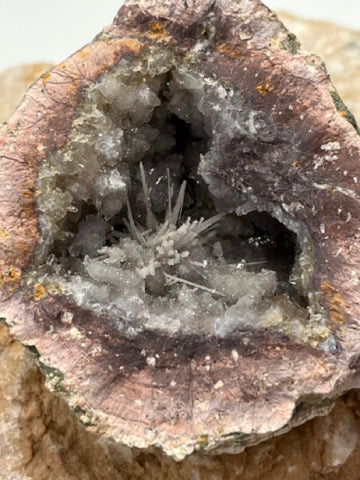 Quartz geode interior with sparkling crystal formations
2. Safety First: Preparing to Crack Open a Geode Rock
Before diving into the exciting task of cracking open a geode, prioritize safety. Protecting yourself and your surroundings is essential for an enjoyable experience.
2.1 Essential Safety Gear
- Safety Goggles: Protect your eyes from flying rock fragments.
- Gloves: Shield your hands from sharp edges.
- Dust Mask: Avoid inhaling fine particles, especially if working indoors.
- Sturdy Work Surface: Use a stable surface to prevent accidents.
2.2 Choosing a Safe Environment
- Well-Ventilated Area: Work outdoors or in a space with good ventilation to minimize dust inhalation.
- Clear Surroundings: Ensure no obstructions or hazards in your workspace.
- Protective Covering: Consider using a tarp or cloth to contain rock fragments.
2.3 Understanding the Risks
- Flying Debris: Geodes can shatter unexpectedly, sending rock fragments in various directions.
- Sharp Edges: Broken geodes can have sharp edges, posing a risk of cuts.
- Dust Inhalation: Fine particles released during cracking can irritate the respiratory system.
3. Methods for Breaking Open a Geode Rock
Several methods can be employed to crack open geodes, each with its advantages and disadvantages. Here are some popular techniques:
3.1 Geode Cracker (Soil Pipe Cutter)
A geode cracker, also known as a soil pipe cutter, is designed to break through the outer layer of a geode without damaging the crystals inside.
- How it Works: The tool uses a chain with cutting wheels to apply even pressure around the geode, creating a clean break.
- Ideal Geodes: Best for harder geodes like Druzy mist, Las Choyas/Coconut, or Ojo de Sonora geodes.
- Pros: Provides a clean break, reduces crystal damage, and requires less physical effort.
- Cons: More expensive than other methods.
3.2 Hammer and Stone Chisel
A classic and straightforward method for cracking geodes involves using a hammer and a stone chisel.
- How it Works: Place the chisel on the geode’s surface and gently tap it with a hammer to create a notch or crack.
- Ideal Geodes: Suitable for most geodes, especially those with visible weak points.
- Pros: Cost-effective, readily available tools, and provides good control over the cracking process.
- Cons: Requires more physical effort, and there’s a higher risk of damaging crystals.
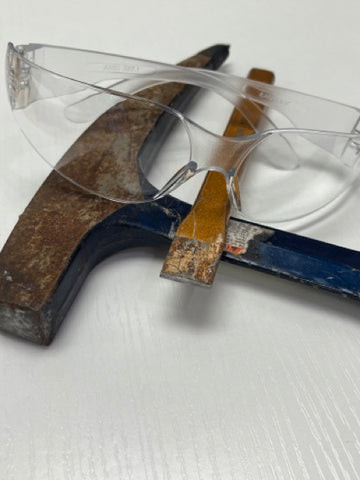 Tools for cracking geodes, including a hammer and stone chisel
3.3 Hammer and Screwdriver
A budget-friendly approach involves using a hammer and screwdriver to crack open geodes.
- How it Works: Carefully tap the screwdriver along the geode’s surface until it begins to crack.
- Ideal Geodes: Best for smaller, more fragile geodes.
- Pros: Inexpensive, uses commonly available tools, and good for controlled cracking.
- Cons: Less precise than a chisel, with a higher risk of shattering the geode.
3.4 Slab Saw
For those with access to specialized lapidary equipment, a slab saw offers a precise and controlled method for cutting geodes.
- How it Works: The saw uses a thin, diamond-coated blade to make clean cuts through the geode.
- Ideal Geodes: Perfect for geodes you plan to polish, creating a flat, display-worthy surface.
- Pros: Creates clean cuts, preserves crystal integrity, and allows for polishing.
- Cons: Requires specialized equipment and expertise.
3.5 Wet Tile Saw
A wet tile saw, commonly used in construction, can also be repurposed for cutting geodes and other stones.
- How it Works: The water-cooled blade minimizes dust and heat, providing a smoother cut.
- Ideal Geodes: Suitable for smaller geodes, given the limited cutting depth of a tile saw.
- Pros: Minimizes dust, provides a smoother cut, and more accessible than a slab saw.
- Cons: Limited cutting depth and requires careful handling.
4. Step-by-Step Guides for Each Method
To ensure a safe and successful geode-cracking experience, follow these detailed step-by-step guides for each method.
4.1 Using a Geode Cracker
- Prepare the Geode: Clean the geode’s surface and identify the best point for cracking.
- Position the Geode: Place the geode in the chain jaws of the geode cracker.
- Tighten the Cutter: Gradually tighten the cutter until the geode breaks open.
- Inspect the Interior: Carefully remove the cracked geode and admire the crystals inside.
4.2 Using a Hammer and Stone Chisel
- Prepare the Geode: Place the geode on a flat, stable surface.
- Position the Chisel: Place the chisel on the geode’s surface where you want to create a crack.
- Tap Gently: Gently tap the chisel with a hammer to create a notch or crack.
- Increase Force Gradually: Increase the force until the geode splits open.
- Inspect the Interior: Carefully separate the halves to reveal the crystals.
4.3 Using a Hammer and Screwdriver
- Prepare the Geode: Place the geode on a stable surface and cover it with a towel or rag for safety.
- Position the Screwdriver: Place the screwdriver on the geode’s surface at the desired cracking point.
- Tap Carefully: Tap the screwdriver with a hammer, applying steady pressure.
- Crack Open Gently: Continue tapping until the geode cracks open.
- Inspect the Interior: Carefully remove the towel and admire the crystals.
4.4 Using a Slab Saw
- Prepare the Geode: Secure the geode in the saw’s holding mechanism.
- Adjust the Saw: Set the desired cutting depth and speed.
- Begin Cutting: Slowly guide the geode through the saw blade, allowing the blade to do the work.
- Complete the Cut: Once the cut is complete, turn off the saw and carefully remove the geode.
- Inspect the Interior: Separate the halves and examine the crystals.
4.5 Using a Wet Tile Saw
- Prepare the Saw: Fill the saw’s water reservoir and ensure the blade is sharp and clean.
- Secure the Geode: Hold the geode firmly and guide it slowly through the blade.
- Cut Gradually: Make shallow cuts, allowing the water to cool the blade and minimize dust.
- Complete the Cut: Once the geode is cut through, turn off the saw and remove the geode.
- Inspect the Interior: Carefully separate the halves and admire the crystals.
5. Tips for a Clean Break and Crystal Preservation
Achieving a clean break and preserving the integrity of the crystals inside requires patience and attention to detail.
5.1 Identifying Weak Points
- Visual Inspection: Look for cracks or natural lines on the geode’s surface.
- Sound Test: Tap the geode gently; hollow sounds may indicate weaker areas.
5.2 Applying Even Pressure
- Geode Cracker: Ensure the chain is evenly tightened around the geode.
- Hammer and Chisel: Distribute force evenly along the intended cracking line.
5.3 Slow and Steady Approach
- Avoid Rushing: Take your time and apply gradual force.
- Listen for Cracks: Pay attention to the sounds the geode makes as it begins to crack.
6. Cleaning and Preserving Your Geode Crystals
Once you’ve cracked open your geode, cleaning and preserving the crystals will enhance their beauty and longevity.
6.1 Gentle Cleaning Techniques
- Soft Brush: Use a soft-bristled brush to remove loose dirt and debris.
- Mild Soap and Water: Gently wash the crystals with a mild soap solution.
- Rinse Thoroughly: Rinse the geode thoroughly with clean water to remove any soap residue.
6.2 Avoiding Harsh Chemicals
- No Abrasives: Avoid using abrasive cleaners that can scratch the crystals.
- No Strong Acids: Do not use strong acids or chemicals that can damage the minerals.
6.3 Drying and Storage
- Air Dry: Allow the geode to air dry completely before storing.
- Protective Display: Store the geode in a display case or on a soft cloth to protect it from dust and damage.
7. Creative Uses for Cracked Geodes in Landscaping
Cracked geodes can add unique and stunning elements to your landscape design.
7.1 Decorative Accents
- Garden Beds: Place geodes among plants in garden beds for a touch of sparkle.
- Pathways: Incorporate geodes into pathways for added visual interest.
- Water Features: Add geodes around ponds or fountains for a natural, elegant look.
7.2 Focal Points
- Rock Gardens: Create a rock garden featuring geodes as focal points.
- Entryways: Use geodes to decorate entryways, creating a welcoming atmosphere.
7.3 DIY Projects
- Geode Planters: Hollow out geodes to create unique planters for small plants.
- Geode Mosaics: Use geode fragments to create mosaics on walls or garden art.
/geode-cluster-155840584-57279b105f9b589279533551.jpg)
8. The Science Behind Geodes: A Geological Perspective
Understanding the science behind geodes can deepen your appreciation for these natural wonders.
8.1 Mineral Composition
- Quartz: The most common mineral found in geodes, often forming clear or milky crystals.
- Calcite: A carbonate mineral that can form various crystal shapes and colors.
- Amethyst: A purple variety of quartz, colored by trace amounts of iron.
- Agate: A banded form of chalcedony, often found in geodes.
8.2 Geological Formation Processes
- Volcanic Activity: Gas bubbles in lava create cavities that later fill with minerals.
- Sedimentary Deposits: Dissolved nodules in sedimentary rock leave hollow spaces for crystal growth.
- Hydrothermal Activity: Hot, mineral-rich water seeps into cavities, depositing minerals over time.
8.3 Notable Geode Locations in the USA
- Iowa: Known for Keokuk geodes, which often contain quartz, calcite, and other minerals.
- California: Home to various geodes, including agate and jasper-filled varieties.
- Arizona: Famous for amethyst geodes and other crystal formations.
According to research from Arizona State University’s School of Earth and Space Exploration, in July 2025, Arizona is a popular site for amethyst geodes, attracting both amateur collectors and professional geologists due to its unique geological conditions.
9. Finding Geodes: Where to Look and What to Expect
Embarking on a geode-hunting adventure can be a rewarding experience. Knowing where to look and what to expect can increase your chances of success.
9.1 Researching Local Geode Hotspots
- Geological Surveys: Consult geological surveys and maps to identify areas known for geode formations.
- Rock and Mineral Clubs: Join local rock and mineral clubs for insider tips and group expeditions.
9.2 Tips for Identifying Geode-Bearing Areas
- Volcanic Rock Formations: Look for areas with basalt or rhyolite rock formations.
- Sedimentary Rock Outcrops: Explore areas with limestone or shale outcrops.
- Stream Beds: Search along stream beds where erosion may have exposed geodes.
9.3 What to Bring on a Geode Hunting Trip
- Rock Hammer: For breaking open rocks and exposing potential geodes.
- Chisel: For carefully extracting geodes from rock formations.
- Safety Goggles: To protect your eyes from flying debris.
- Gloves: To protect your hands from sharp rocks.
- Backpack: To carry your finds and supplies.
10. Frequently Asked Questions About Breaking Open Geodes
Here are some frequently asked questions to help you better understand the process of breaking open geodes.
10.1 What is the best way to break open a geode without damaging the crystals?
Using a geode cracker or soil pipe cutter is the best way to break open a geode without damaging the crystals, as this tool applies even pressure around the geode, creating a clean break. Geode crackers also reduce the risk of shattering the geode and damaging its contents.
10.2 Can I use a regular hammer instead of a stone chisel?
While you can use a regular hammer, a stone chisel provides better control and precision, reducing the risk of shattering the geode and damaging the crystals inside. A stone chisel is specifically designed for breaking rocks and minerals, offering a more controlled and safer method compared to using just a hammer.
10.3 Is it safe to break open geodes indoors?
It is generally not recommended to break open geodes indoors due to the potential for flying rock fragments and dust. If you must do it indoors, ensure you have adequate ventilation, wear safety goggles and a dust mask, and cover your work area with a protective tarp.
10.4 How do I clean the crystals inside a geode?
Clean the crystals inside a geode using a soft brush, mild soap, and water. Gently scrub the crystals to remove any dirt and debris, then rinse thoroughly with clean water and allow the geode to air dry completely.
10.5 What type of geodes are most valuable?
Amethyst geodes, agate geodes with intricate banding, and geodes containing rare minerals are often considered the most valuable. The value also depends on the size, quality, and overall aesthetic appeal of the geode and its crystal formations.
10.6 Where can I find geodes to crack open?
You can find geodes in geological areas known for volcanic or sedimentary rock formations, such as Iowa, California, and Arizona. You can also purchase geodes from rock and mineral shops, online retailers, or at gem and mineral shows.
10.7 What safety precautions should I take when cracking open a geode?
Always wear safety goggles and gloves to protect your eyes and hands from flying rock fragments and sharp edges. Work in a well-ventilated area or wear a dust mask to avoid inhaling fine particles, and use a sturdy work surface to prevent accidents.
10.8 Can I polish the inside of a geode after cracking it open?
Yes, you can polish the inside of a geode after cracking it open using lapidary equipment such as a slab saw and polishing tools. Polishing the face of the cracked geode enhances the crystal’s luster and brings out its natural beauty.
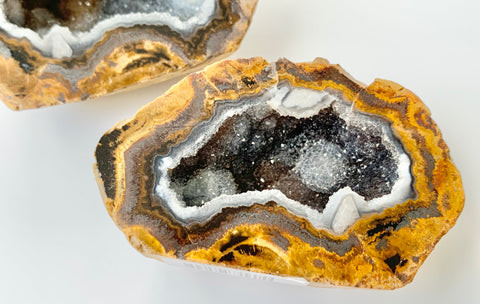 Geode cut open with a slab saw and polished to reveal the crystal structure
10.9 What tools do I need to crack open a geode?
The tools you need to crack open a geode include a geode cracker (soil pipe cutter), hammer and stone chisel, hammer and screwdriver, slab saw, or wet tile saw. Additionally, you will need safety goggles, gloves, and a dust mask for protection.
10.10 How long does it take for a geode to form?
Geodes take thousands to millions of years to form through a complex geological process involving cavity formation, mineral-rich water seepage, and crystal growth. The exact time frame varies depending on the specific geological conditions and mineral composition.
Conclusion: Unearth the Beauty Within
Cracking open a geode is a thrilling and rewarding endeavor that allows you to uncover the beauty hidden within these geological wonders. Whether you choose a geode cracker, hammer and chisel, or another method, practicing safety is paramount to ensure a successful and enjoyable cracking experience. So, gear up, follow the guidelines, and embark on a journey to reveal the breathtaking crystals concealed within geodes.
Ready to explore the world of landscape rocks and design your dream outdoor space? Visit rockscapes.net today for inspiration, detailed information on various rock types, and expert tips for incorporating these natural wonders into your landscape. Contact us at 1151 S Forest Ave, Tempe, AZ 85281, United States, Phone: +1 (480) 965-9011, or visit our website at rockscapes.net to discover the perfect stones for your next project. Let rockscapes.net help you bring the beauty of nature to your doorstep!