Building a rock chimney can transform your home with natural beauty and rustic charm. At rockscapes.net, we provide the expertise and inspiration to help you master this craft, ensuring your chimney is not only functional but also a stunning landscape feature. Discover the art of rock chimneys and learn how to create one that stands the test of time.
1. What Are The Key Considerations When Planning To Build A Rock Chimney?
When planning to build a rock chimney, key considerations include structural integrity, aesthetic design, material selection, and local building codes. The chimney must safely vent smoke and gases, complement the home’s architecture, use appropriate stone types, and comply with regulations, making planning essential for a successful and compliant build.
- Structural Integrity: The chimney must be structurally sound to withstand the elements and safely vent smoke and gases. Proper foundation, mortar, and construction techniques are crucial.
- Aesthetic Design: The chimney should complement the home’s architecture and landscape. Consider the style, size, and shape of the chimney to ensure it enhances the overall aesthetic.
- Material Selection: Choosing the right type of stone is essential for both appearance and durability. Different stones have varying properties, such as resistance to heat, moisture, and weathering.
- Local Building Codes: Ensure the chimney complies with all local building codes and regulations. This may include permits, inspections, and specific requirements for chimney height, flue size, and ventilation.
2. What Types Of Rocks Are Best Suited For Building A Rock Chimney?
The best types of rocks for building a rock chimney are durable, heat-resistant, and aesthetically pleasing natural stones such as granite, sandstone, and limestone. These stones offer both structural integrity and visual appeal, ensuring the chimney is both safe and attractive.
- Granite: Known for its exceptional durability and resistance to heat, granite is an excellent choice for the firebox and lower sections of the chimney. It can withstand high temperatures without cracking or deteriorating.
- Sandstone: Sandstone is easier to shape and work with compared to granite, making it a popular choice for the chimney’s exterior. Its natural color variations add a unique aesthetic appeal.
- Limestone: Limestone is a sedimentary rock that offers a classic, timeless look. It’s relatively soft, making it easy to carve and shape for decorative elements.
- Fieldstone: Fieldstone, gathered from fields and quarries, offers a rustic, natural appearance. Its irregular shapes and sizes create a unique, textured look.
- Slate: Slate is a fine-grained metamorphic rock known for its durability and water resistance. It’s an excellent choice for chimney caps and decorative accents.
 Close-up of different types of stones used in rock chimney construction
3. How Do You Prepare The Foundation For A Rock Chimney?
To prepare the foundation for a rock chimney, excavation, pouring a reinforced concrete slab, and ensuring proper curing are critical steps. A solid, level foundation is crucial for the chimney’s stability and longevity, ensuring it can support the weight of the stone structure.
- Excavation:
- Begin by excavating the area where the chimney will be built. The depth of the excavation depends on local building codes and soil conditions but typically ranges from 12 to 24 inches.
- Ensure the excavated area is wider than the base of the chimney to allow for a stable foundation.
- Reinforced Concrete Slab:
- Pour a reinforced concrete slab into the excavated area. Use a concrete mix with a high compressive strength, typically around 3000 psi.
- Reinforce the concrete with steel rebar to provide additional strength and prevent cracking. The rebar should be spaced according to local building codes, usually around 12 inches apart.
- Leveling and Curing:
- Ensure the concrete slab is level using a spirit level. A level foundation is crucial for the stability of the chimney.
- Allow the concrete to cure for at least 7 days before beginning construction. Keep the concrete moist during the curing process to prevent cracking.
- Drainage:
- Consider adding a layer of gravel beneath the concrete slab to improve drainage and prevent water from undermining the foundation.
4. What Mortar Should I Use For A Rock Chimney?
For a rock chimney, use Type N or Type S mortar, as they provide the necessary strength and flexibility to withstand temperature changes and weather conditions. Type N mortar is suitable for general use, while Type S is recommended for structures exposed to severe weather.
| Mortar Type | Description | Application |
|---|---|---|
| Type N | A general-purpose mortar with a good balance of strength and flexibility. | Ideal for above-grade exterior and interior walls, including chimneys in areas with moderate weather conditions. |
| Type S | A high-strength mortar with excellent bonding properties and resistance to moisture. | Recommended for structures exposed to severe weather, such as chimneys in regions with heavy rainfall, freeze-thaw cycles, or high winds. Also suitable for below-grade applications. |
| Type O | A low-strength mortar suitable for non-load-bearing interior applications. | Not recommended for chimney construction due to its low strength and weather resistance. |
| Type M | A high-strength mortar designed for heavy loads and severe weather conditions. | Can be used for chimney foundations or in areas where extremely high compressive strength is required, but typically not necessary for the entire chimney structure. |
| Pre-mixed | Convenience, consistent mix ratios, often enhanced with polymers for better adhesion and crack resistance. | Suitable for both DIYers and professionals. Ensure the product meets ASTM standards for Type N or Type S mortar. |
5. How To Lay The First Course Of Stones For A Rock Chimney?
Laying the first course of stones for a rock chimney involves carefully selecting and positioning the stones on the foundation, ensuring they are level and properly mortared. This initial course sets the foundation for the entire chimney’s stability and appearance.
- Stone Selection:
- Choose the largest and flattest stones for the first course. These stones will provide a stable base for the rest of the chimney.
- Ensure the stones are clean and free from dirt, moss, or loose particles. Use a wire brush to scrub the stones if necessary.
- Mortar Bed Preparation:
- Apply a thick, even layer of mortar to the concrete foundation where the first course of stones will be placed. The mortar bed should be about 1-2 inches thick.
- Use a trowel to create furrows in the mortar bed. This will help the stones grip the mortar more effectively.
- Stone Placement:
- Carefully place each stone onto the mortar bed, ensuring it is level and properly aligned. Use a spirit level to check the level of each stone.
- Leave a consistent mortar joint between each stone, typically around 1/2 to 1 inch. These joints will be filled with mortar later.
- Adjustments:
- Use a rubber mallet to gently tap the stones into place. This will help them settle into the mortar bed and ensure they are properly aligned.
- Remove any excess mortar that squeezes out from between the stones. Use a trowel to scrape away the excess mortar and keep the joints clean.
- Curing:
- Keep the mortar moist for at least 24-48 hours after laying the first course. This will help the mortar cure properly and prevent cracking.
- Cover the first course with plastic sheeting to protect it from rain or direct sunlight.
6. What Techniques Can Be Used To Ensure A Rock Chimney Is Plumb And Square?
To ensure a rock chimney is plumb and square, employ the plumb bob, level, and square techniques throughout the construction process. Regularly checking these aspects ensures the chimney is structurally sound and visually appealing.
- Plumb Bob:
- A plumb bob is a simple tool consisting of a weight attached to a string. It is used to establish a vertical reference line.
- Hang the plumb bob from the top of the chimney and check if the string aligns with the base. Adjust the stones as needed to ensure the chimney is perfectly vertical.
- Check the plumb on all four sides of the chimney to ensure consistent vertical alignment.
- Level:
- A level is used to ensure that each course of stones is horizontal.
- Place the level on top of each stone as it is laid. Adjust the mortar bed beneath the stone until the bubble in the level is centered.
- Regularly check the level of each course to prevent the chimney from leaning or tilting.
- Square:
- A square is used to ensure that the corners of the chimney are 90 degrees.
- Place the square against the corners of the chimney to check the angle. Adjust the stones as needed to create a perfect right angle.
- Use the 3-4-5 rule to verify the squareness of the chimney. Measure 3 feet along one side, 4 feet along the adjacent side, and ensure the diagonal distance between these points is exactly 5 feet.
7. How High Should A Rock Chimney Be To Ensure Proper Draft?
A rock chimney should typically extend at least 3 feet above the highest point of the roof and 2 feet above any structure within a 10-foot radius to ensure proper draft. This height helps prevent downdrafts and ensures efficient smoke and gas ventilation.
- Minimum Height Above Roof:
- The chimney should extend at least 3 feet above the highest point of the roof. This height ensures that the chimney is tall enough to catch the wind and create a natural draft.
- In areas with heavy snowfall, consider increasing the height of the chimney to prevent it from being blocked by snow.
- Distance from Nearby Structures:
- The chimney should extend at least 2 feet above any structure within a 10-foot radius. This includes parts of the roof, dormers, trees, or other buildings.
- If the chimney is located near a taller structure, it may need to be even taller to ensure proper draft.
- Local Building Codes:
- Consult local building codes for specific requirements regarding chimney height. Some areas may have stricter regulations than others.
- Professional Consultation:
- Consider consulting with a professional chimney contractor or building inspector to determine the optimal height for your chimney. They can assess your specific situation and provide expert advice.
- Draft Testing:
- After the chimney is built, perform a draft test to ensure it is functioning properly. This involves lighting a small fire and observing the smoke to see if it is being drawn up the chimney.
8. What Is The Best Way To Create A Smoke Chamber In A Rock Chimney?
The best way to create a smoke chamber in a rock chimney involves gradually narrowing the chimney above the firebox to create a smooth, cone-shaped transition. This design facilitates efficient smoke flow and prevents dangerous backdrafts.
- Smooth Transition:
- The smoke chamber should have a smooth, continuous transition from the firebox to the flue. Avoid any sharp angles or abrupt changes in size or shape.
- Use a refractory mortar to create a smooth interior surface. This will help reduce turbulence and ensure efficient smoke flow.
- Insulation:
- Insulate the smoke chamber to maintain a consistent temperature and prevent condensation. This can be done by applying a layer of refractory insulation to the exterior of the smoke chamber.
- Cleanout Door:
- Install a cleanout door at the base of the smoke chamber to allow for easy removal of soot and debris.
- The cleanout door should be airtight to prevent air leaks that could affect the chimney’s draft.
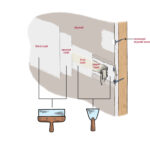
9. How Do You Install A Flue Liner In A Rock Chimney?
Installing a flue liner in a rock chimney involves measuring the chimney, selecting the appropriate liner material (stainless steel or clay), and carefully lowering the liner into the chimney. The liner protects the chimney from heat and corrosion, ensuring safe and efficient venting.
- Measurement:
- Measure the height and width of the chimney to determine the correct size and length of the flue liner.
- Ensure the liner is long enough to extend from the smoke chamber to the top of the chimney, with a few inches protruding above the crown.
- Liner Selection:
- Choose a flue liner made of either stainless steel or clay. Stainless steel liners are more durable and resistant to corrosion, while clay liners are more traditional and cost-effective.
- Consider using an insulated liner to improve the chimney’s thermal performance and reduce the risk of condensation.
- Installation:
- Clean the inside of the chimney to remove any loose debris or obstructions.
- Lower the flue liner into the chimney from the top. Use ropes and pulleys to carefully guide the liner down the chimney.
- Ensure the liner is centered in the chimney and that there is adequate space between the liner and the chimney walls.
- Sealing:
- Seal the space between the liner and the chimney walls with a high-temperature sealant. This will prevent air leaks and ensure that all combustion gases are vented through the liner.
- Apply a chimney cap to the top of the liner to prevent rain, snow, and debris from entering the chimney.
- Inspection:
- After the liner is installed, have it inspected by a professional chimney sweep or building inspector to ensure it is properly installed and meets all safety requirements.
- Regularly inspect the liner for signs of damage or deterioration and replace it as needed.
10. What Are Some Decorative Finishes For A Rock Chimney?
Decorative finishes for a rock chimney include stone caps, decorative patterns, and unique stone arrangements, which enhance the chimney’s aesthetic appeal and complement the home’s overall design. These finishes add personality and visual interest to the structure.
- Stone Caps:
- A stone cap is a decorative element placed on top of the chimney to protect it from the elements and add visual interest.
- Choose a stone cap that complements the style and color of the chimney. Granite, limestone, and sandstone are popular choices.
- Consider adding decorative carvings or engravings to the stone cap to personalize it.
- Decorative Patterns:
- Incorporate decorative patterns into the chimney by arranging the stones in unique and interesting ways.
- Create patterns using different sizes, shapes, and colors of stones.
- Consider adding bands of contrasting stones to create a visually striking effect.
- Unique Stone Arrangements:
- Use unique stone arrangements to create a one-of-a-kind chimney.
- Arrange the stones in a random, organic pattern to create a natural look.
- Mortar Techniques:
- Use different mortar techniques to add texture and visual interest to the chimney.
- Consider using a raised mortar joint to create a rustic, textured look.
- Lighting:
- Install lighting fixtures to highlight the chimney’s decorative features.
- Use spotlights to illuminate the chimney from the ground, or install sconces on the chimney itself.
11. How To Maintain A Rock Chimney To Ensure Longevity?
Maintaining a rock chimney for longevity involves regular inspections, cleaning, and prompt repairs to address any issues such as cracks or loose stones. Proper maintenance ensures the chimney remains safe and functional for years to come.
- Regular Inspections:
- Inspect the chimney at least once a year, preferably in the fall before the heating season begins.
- Check for cracks, loose stones, or damaged mortar joints.
- Examine the chimney cap and flue liner for signs of damage or deterioration.
- Cleaning:
- Clean the chimney regularly to remove soot, creosote, and other debris.
- Hire a professional chimney sweep to clean the chimney at least once a year, or more often if you use your fireplace frequently.
- Remove any debris that has accumulated on the chimney cap or in the smoke chamber.
- Repairs:
- Repair any cracks or loose stones as soon as possible to prevent further damage.
- Use a high-quality mortar to repair damaged mortar joints.
- Replace damaged flue liners or chimney caps to ensure the chimney is functioning properly.
- Waterproofing:
- Apply a waterproof sealant to the chimney to protect it from moisture damage.
- Ensure the sealant is specifically designed for use on stone and masonry.
- Vegetation Control:
- Keep vegetation trimmed away from the chimney to prevent it from growing into the mortar joints and causing damage.
- Remove any moss or lichen that has grown on the chimney using a wire brush and a mild detergent.
12. How Do You Address Cracks In A Rock Chimney?
Addressing cracks in a rock chimney involves assessing the severity of the cracks, cleaning out loose debris, and applying appropriate mortar for repairs. Addressing cracks promptly prevents further damage and maintains the chimney’s structural integrity.
- Severity Assessment:
- Determine the severity of the cracks. Hairline cracks may be cosmetic, while larger cracks can indicate structural issues.
- Check if the cracks are expanding over time, which could indicate a more serious problem.
- Cleaning:
- Clean out any loose debris from the cracks using a wire brush or a chisel.
- Ensure the cracks are free from dirt, moss, or other materials that could interfere with the repair.
- Mortar Application:
- Apply a high-quality mortar to fill the cracks. Use a trowel or putty knife to force the mortar into the cracks.
- Ensure the mortar is flush with the surrounding stone and mortar joints.
- Sealing:
- Apply a waterproof sealant to the repaired area to protect it from moisture damage.
- Use a sealant that is specifically designed for use on stone and masonry.
- Professional Inspection:
- If the cracks are large or appear to be structural, consult with a professional chimney contractor or structural engineer.
- They can assess the damage and recommend the appropriate repairs to ensure the chimney is safe and structurally sound.
13. What Safety Precautions Should Be Taken When Building A Rock Chimney?
Safety precautions when building a rock chimney include wearing protective gear, using proper scaffolding, and following safe lifting techniques. Prioritizing safety minimizes the risk of accidents and injuries during construction.
- Protective Gear:
- Wear appropriate protective gear, including safety glasses, gloves, and a hard hat.
- Use a dust mask or respirator to protect yourself from dust and debris.
- Scaffolding:
- Use sturdy and properly constructed scaffolding to reach high areas of the chimney.
- Ensure the scaffolding is level and stable before climbing on it.
- Follow all safety guidelines for working on scaffolding.
- Lifting Techniques:
- Use proper lifting techniques to avoid back injuries.
- Lift with your legs, not your back.
- Get help when lifting heavy stones.
- Mortar Safety:
- Wear gloves and eye protection when working with mortar.
- Avoid getting mortar on your skin or in your eyes.
- If mortar gets on your skin, wash it off immediately with soap and water.
- Electrical Safety:
- If using power tools, ensure they are properly grounded and in good working condition.
- Avoid working in wet or damp conditions.
- Use ground fault circuit interrupters (GFCIs) to protect against electrical shock.
- Weather Conditions:
- Avoid working in extreme weather conditions, such as high winds, heavy rain, or extreme heat.
- Take breaks to stay hydrated and avoid heat exhaustion.
14. How Can Rockscapes.net Help With My Rock Chimney Project?
Rockscapes.net offers a wealth of resources to assist with your rock chimney project, including design inspiration, stone selection guidance, and expert advice. Whether you’re a DIY enthusiast or seeking professional installation, Rockscapes.net is your trusted partner for creating stunning rock features.
At rockscapes.net, we understand the unique challenges and rewards of building a rock chimney. Here’s how we can help:
- Design Inspiration:
- Explore our extensive gallery of rock chimney designs to find inspiration for your project.
- Discover various styles, stone types, and decorative finishes to create a chimney that complements your home.
- Stone Selection:
- Get expert guidance on selecting the right type of stone for your chimney.
- Learn about the properties of different stones, such as granite, sandstone, and limestone, and how they perform in different climates.
- Expert Advice:
- Access our team of experienced professionals who can provide advice on all aspects of your rock chimney project.
- Get answers to your questions about foundation preparation, mortar selection, flue liner installation, and more.
- DIY Guides:
- Follow our step-by-step DIY guides to learn How To Build A Rock Chimney yourself.
- Get detailed instructions on each stage of the process, from planning to finishing.
- Professional Installation:
- If you prefer to leave the construction to the professionals, we can connect you with qualified contractors in your area.
- Ensure your rock chimney is built to the highest standards of quality and safety.
15. What Are The Benefits Of Building A Rock Chimney?
Building a rock chimney offers several benefits, including enhanced aesthetic appeal, increased property value, and improved energy efficiency. A well-designed and constructed rock chimney is a valuable addition to any home.
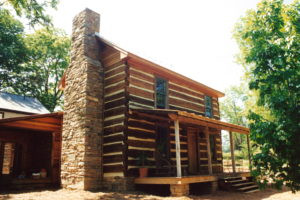
- Enhanced Aesthetic Appeal:
- A rock chimney adds a touch of natural beauty and rustic charm to your home.
- It can be customized to complement the architectural style of your house and the surrounding landscape.
- Increased Property Value:
- A well-built rock chimney can increase the value of your property.
- It is a desirable feature that can attract potential buyers and set your home apart from others.
- Improved Energy Efficiency:
- A properly insulated rock chimney can improve the energy efficiency of your home.
- It can help reduce heat loss and prevent cold drafts, saving you money on heating bills.
- Durability and Longevity:
- Rock chimneys are incredibly durable and can last for many years with proper maintenance.
- They are resistant to fire, wind, and other environmental factors.
- Environmental Benefits:
- Using natural stone for your chimney is an environmentally friendly choice.
- Stone is a sustainable material that can be sourced locally, reducing transportation costs and carbon emissions.
Address: 1151 S Forest Ave, Tempe, AZ 85281, United States. Phone: +1 (480) 965-9011. Website: rockscapes.net.
Ready to elevate your home with a stunning rock chimney? Visit rockscapes.net today for design inspiration, expert advice, and all the resources you need to bring your vision to life. Let us help you create a timeless masterpiece that enhances your property’s beauty and value.
FAQ About Building Rock Chimneys
1. What tools are essential for building a rock chimney?
Essential tools include a trowel, level, square, plumb bob, chisel, rubber mallet, safety glasses, gloves, and a hard hat. These tools ensure precision, safety, and efficiency during construction.
2. How do I choose the right size flue liner for my rock chimney?
Measure the chimney’s height and width, and consult local building codes to determine the appropriate flue liner size. Ensure the liner fits snugly and extends from the smoke chamber to the top of the chimney.
3. Can I build a rock chimney myself, or should I hire a professional?
Building a rock chimney is possible for experienced DIYers, but professional installation is recommended for ensuring safety and compliance with building codes. Assess your skills and consider the complexity of the project.
4. What are the common mistakes to avoid when building a rock chimney?
Common mistakes include improper foundation preparation, using the wrong mortar, neglecting to install a flue liner, and ignoring local building codes. Careful planning and attention to detail can prevent these issues.
5. How often should I clean my rock chimney?
Clean your rock chimney at least once a year, or more often if you frequently use your fireplace, to remove soot and creosote buildup. Regular cleaning prevents chimney fires and ensures efficient venting.
6. What type of mortar is best for repairing cracks in a rock chimney?
Use Type N or Type S mortar for repairing cracks in a rock chimney, as they provide the necessary strength and flexibility to withstand temperature changes. Ensure the mortar matches the existing mortar in color and texture.
7. How do I prevent water damage to my rock chimney?
Apply a waterproof sealant to the chimney, ensure proper drainage around the base, and maintain the chimney cap to prevent water from entering. Regular inspections and prompt repairs are essential.
8. What are the signs that my rock chimney needs repair?
Signs include cracks, loose stones, damaged mortar joints, water leaks, and excessive soot buildup. Addressing these issues promptly prevents further damage and ensures safety.
9. How do I ensure proper ventilation in my rock chimney?
Ensure the chimney extends at least 3 feet above the roof and 2 feet above any nearby structure, and install a properly sized flue liner to ensure efficient ventilation. Regular inspections and cleaning are also important.
10. What are the benefits of using natural stone for my rock chimney?
Natural stone offers durability, aesthetic appeal, increased property value, and environmental benefits. It is a sustainable material that can be sourced locally and customized to complement your home’s style.