How To Build A Rock Dam is a question many landowners and landscape enthusiasts ask, and at rockscapes.net, we’re here to provide the answers. Building a rock dam is an effective and eco-friendly way to manage water flow, prevent erosion, and create beautiful water features in your landscape. With the right knowledge and materials, you can transform your property into a sustainable and visually stunning environment by building a rock dam or other rock structures.
1. What Is a Rock Dam and Why Build One?
A rock dam, also known as a one-rock dam or a low-impact dam, is a simple structure made of rocks designed to slow down water flow, control erosion, and promote water infiltration into the soil. Building one can be a beneficial addition to any landscape by slowing down water runoff.
1.1. Benefits of Rock Dams
- Erosion Control: Rock dams effectively reduce soil erosion by slowing down the velocity of water flow, preventing the displacement of soil particles.
- Water Conservation: By slowing down water flow, rock dams allow more water to infiltrate into the soil, replenishing groundwater reserves and promoting healthy vegetation growth.
- Habitat Creation: Rock dams can create small pools and wetlands, providing habitats for various aquatic and terrestrial species, enhancing biodiversity.
- Aesthetic Appeal: A well-constructed rock dam can add a natural and visually appealing element to your landscape, enhancing its overall beauty and value.
- Flood Mitigation: Rock dams help reduce the risk of flooding by slowing down stormwater runoff and increasing water infiltration into the ground.
- Cost-Effective: Compared to concrete dams or other engineered structures, rock dams are relatively inexpensive to build, using locally sourced materials and requiring minimal equipment.
- Sustainable: Rock dams are environmentally friendly, using natural materials and promoting ecological balance in the landscape.
- Easy to Install: With proper planning and guidance, rock dams can be installed by homeowners or landowners with minimal experience in construction or engineering.
- Versatile: Rock dams can be adapted to various landscape settings, from small streams and gullies to larger waterways, making them a versatile solution for water management and erosion control.
- Low Maintenance: Once installed, rock dams require minimal maintenance, as they are designed to withstand natural weathering and erosion processes.
1.2. Identifying the Right Location
Choosing the right location for your rock dam is crucial for its effectiveness and longevity.
- Consider the Water Flow: Select a site where water flow is concentrated, such as a gully, small stream, or drainage ditch.
- Assess the Soil Type: Ensure the soil at the site is stable and can support the weight of the rocks. Avoid areas with loose or sandy soil.
- Evaluate the Slope: The slope of the site should be gentle enough to allow water to pool behind the dam, but steep enough to ensure proper drainage.
- Check for Vegetation: Remove any vegetation that may obstruct water flow or compromise the stability of the dam.
- Consider Environmental Impact: Avoid building rock dams in sensitive areas, such as wetlands or riparian habitats, without proper permits and approvals.
1.3. Understanding Your Watershed
To effectively intervene in a damaged waterway, it’s essential to understand your watershed. This involves assessing water flow patterns and identifying areas prone to erosion.
- Water Flow Patterns: Observe how water moves across the landscape during rain events to identify areas where water flow is concentrated and erosion is likely to occur.
- Erosion-Prone Areas: Look for signs of erosion, such as gullies, exposed soil, and sediment deposits, to identify areas where rock dams can be most effective in preventing further damage.
- Vegetation Cover: Assess the density and type of vegetation cover in the watershed, as vegetation plays a crucial role in stabilizing soil and reducing erosion.
- Land Use Practices: Consider how land use practices, such as agriculture, forestry, and urban development, may be impacting water quality and erosion rates in the watershed.
- Water Quality Monitoring: Monitor water quality parameters, such as turbidity, sediment load, and nutrient levels, to assess the effectiveness of rock dams in improving water quality over time.
- Topographic Analysis: Use topographic maps and aerial imagery to analyze the slope, elevation, and drainage patterns of the watershed, which can help in identifying suitable locations for rock dams.
- Hydrological Modeling: Employ hydrological models to simulate water flow and predict the impact of rock dams on water availability, flood control, and sediment transport in the watershed.
- Community Engagement: Engage with local communities, landowners, and stakeholders to gather local knowledge and support for watershed restoration and management efforts.
- Adaptive Management: Adopt an adaptive management approach, continuously monitoring and evaluating the effectiveness of rock dams and adjusting management strategies as needed to achieve desired outcomes.
- Regulatory Compliance: Ensure compliance with all applicable environmental regulations and permitting requirements when planning and implementing rock dam projects in the watershed.
2. Materials and Tools You’ll Need
Gathering the necessary materials and tools will streamline the construction process.
- Rocks: Use a variety of sizes, from small pebbles to large boulders, to create a stable and permeable dam structure.
- Shovel: Essential for digging and moving soil and rocks.
- Level: Ensures the dam is built evenly and water flows correctly.
- Gloves: Protect your hands from sharp rocks and soil.
- Measuring Tape: Helps accurately measure the dimensions of the dam and the surrounding area.
- Wheelbarrow: Useful for transporting rocks and soil to the construction site.
- Pickaxe: For breaking up hard soil and dislodging large rocks.
- Safety Glasses: Protect your eyes from flying debris while working with rocks and tools.
- Landscape Fabric (Optional): Can be used to line the bottom of the dam to prevent soil erosion.
- Compactor (Optional): For compacting soil around the dam to increase stability.
2.1. Choosing the Right Rocks
The type of rock you select is a crucial factor in ensuring the dam’s durability and effectiveness.
- Durability: Opt for rocks that are resistant to weathering and erosion, such as granite, basalt, or sandstone.
- Size and Shape: Use a mix of sizes and shapes to create a stable and interlocking structure.
- Local Availability: Sourcing rocks locally reduces transportation costs and minimizes environmental impact.
- Aesthetics: Consider the color and texture of the rocks to ensure they blend harmoniously with the surrounding landscape.
- Permeability: Choose rocks that allow some water to pass through, preventing excessive pooling and pressure buildup behind the dam.
- Weight: Select rocks that are heavy enough to withstand the force of water flow, but manageable to handle and maneuver during construction.
- Cost: Compare the cost of different types of rocks and choose the most cost-effective option that meets your project requirements.
- Environmental Impact: Avoid using rocks from protected areas or sensitive habitats, and ensure that rock extraction practices are sustainable and environmentally responsible.
- Accessibility: Consider the accessibility of the rock source and the ease of transporting rocks to the construction site.
- Regulatory Compliance: Ensure compliance with all applicable regulations and permitting requirements related to rock extraction and use in construction projects.
2.2. Tool Safety
Prioritize safety when using tools to prevent accidents and injuries.
- Wear Protective Gear: Always wear gloves and safety glasses when handling rocks and using tools.
- Use Tools Correctly: Follow the manufacturer’s instructions for using each tool, and avoid using tools for purposes they were not designed for.
- Maintain Tools Properly: Keep tools clean and in good working condition, and replace any damaged or worn parts.
- Work in a Safe Area: Clear the work area of any obstacles or hazards, and ensure there is enough space to move around safely.
- Take Breaks: Avoid fatigue by taking regular breaks and staying hydrated.
- Be Aware of Surroundings: Pay attention to your surroundings and be aware of any potential hazards, such as slippery surfaces, falling rocks, or wildlife.
- Lift Properly: Use proper lifting techniques to avoid back injuries, and ask for help when lifting heavy objects.
- Store Tools Safely: Store tools in a secure location when not in use, and keep them out of reach of children.
- First Aid Kit: Keep a well-stocked first aid kit on hand and know how to use it in case of an injury.
- Emergency Plan: Have an emergency plan in place in case of a serious accident, including contact information for emergency services and a designated meeting point.
3. Step-by-Step Guide to Building a Rock Dam
Building a rock dam requires careful planning and execution.
3.1. Preparing the Site
Prepare the site by clearing vegetation, removing debris, and leveling the ground.
- Vegetation Removal: Remove any vegetation, such as grass, weeds, and shrubs, from the construction site to prevent roots from undermining the dam structure.
- Debris Removal: Clear the site of any debris, such as rocks, branches, and litter, that may interfere with the construction process or compromise the stability of the dam.
- Ground Leveling: Level the ground at the construction site to create a stable foundation for the dam. This may involve filling in low spots and removing high spots.
- Soil Compaction: Compact the soil at the base of the dam to increase its stability and prevent erosion. This can be done using a hand tamper or a mechanical compactor.
- Bank Stabilization: Stabilize the banks of the waterway at the dam site to prevent erosion and ensure the dam is properly anchored. This may involve using geotextile fabric, rocks, or vegetation.
- Sediment Removal: Remove any accumulated sediment or silt from the waterway at the dam site to improve water flow and prevent the dam from becoming clogged.
- Water Diversion: Divert water flow away from the construction site during the preparation phase to allow for easier and safer working conditions.
- Erosion Control Measures: Implement erosion control measures, such as silt fences or straw wattles, to prevent sediment from leaving the construction site and polluting nearby waterways.
- Site Drainage: Ensure proper drainage at the construction site to prevent water from accumulating and creating muddy or unstable conditions.
- Safety Considerations: Take all necessary safety precautions during site preparation, such as wearing appropriate personal protective equipment and following safe work practices.
3.2. Building the Foundation
Create a solid foundation for the dam by placing large rocks at the base.
- Rock Placement: Position the largest rocks at the base of the dam, ensuring they are firmly embedded in the soil.
- Interlocking: Arrange the rocks in an interlocking pattern to create a stable and cohesive structure.
- Leveling: Use a level to ensure the foundation is even and consistent across the width of the waterway.
- Backfilling: Fill in any gaps or voids between the rocks with smaller stones and soil to provide additional support and prevent water from seeping through.
- Compaction: Compact the soil around the foundation to increase its stability and prevent erosion.
- Geotextile Fabric (Optional): Line the foundation with geotextile fabric to prevent soil erosion and provide additional support.
- Keying In: Key the foundation into the banks of the waterway to prevent water from flowing around the dam.
- Slope Angle: Ensure the slope angle of the foundation is appropriate for the type of rock being used and the expected water flow conditions.
- Foundation Depth: Dig the foundation deep enough to provide adequate support for the dam and prevent it from being undermined by erosion.
- Safety Precautions: Take all necessary safety precautions during foundation construction, such as wearing appropriate personal protective equipment and following safe work practices.
3.3. Constructing the Dam Wall
Stack rocks carefully to build the dam wall, ensuring stability and permeability.
- Rock Selection: Choose rocks of various sizes and shapes to create a stable and interlocking structure.
- Layering: Build the dam wall in layers, starting from the bottom and working your way up.
- Overlapping: Overlap the rocks in each layer to create a strong and cohesive structure.
- Interlocking: Interlock the rocks in each layer to prevent them from shifting or dislodging.
- Angle of Repose: Maintain a stable angle of repose for the dam wall to prevent it from collapsing.
- Permeability: Leave small gaps between the rocks to allow water to flow through the dam, preventing excessive pooling and pressure buildup.
- Height and Width: Ensure the height and width of the dam wall are appropriate for the size of the waterway and the expected water flow conditions.
- Spillway (Optional): Create a spillway to allow excess water to flow over the dam without damaging the structure.
- Backfilling: Fill in any gaps or voids between the rocks with smaller stones and soil to provide additional support and prevent water from seeping through.
- Safety Precautions: Take all necessary safety precautions during dam wall construction, such as wearing appropriate personal protective equipment and following safe work practices.
3.4. Ensuring Stability and Permeability
Proper construction techniques are crucial for the dam’s long-term functionality.
- Interlocking Rocks: Ensure rocks are tightly interlocked to provide structural integrity.
- Gravel Fill: Fill gaps with gravel to allow water to pass through while maintaining stability.
- Compacted Soil: Compact soil around the base to prevent water from undermining the dam.
- Vegetation Planting: Plant vegetation around the dam to further stabilize the soil and enhance the natural appearance.
- Regular Inspections: Conduct regular inspections of the dam to identify and address any potential problems, such as erosion or settling.
- Maintenance: Perform regular maintenance, such as removing debris and repairing any damage, to ensure the dam continues to function properly.
- Adjustments: Make adjustments to the dam as needed to accommodate changes in water flow or environmental conditions.
- Adaptive Management: Adopt an adaptive management approach, continuously monitoring and evaluating the effectiveness of the dam and adjusting management strategies as needed to achieve desired outcomes.
- Professional Consultation: Consult with a qualified engineer or hydrologist for guidance on dam design and construction, especially for larger or more complex projects.
- Safety Precautions: Take all necessary safety precautions during dam construction and maintenance, such as wearing appropriate personal protective equipment and following safe work practices.
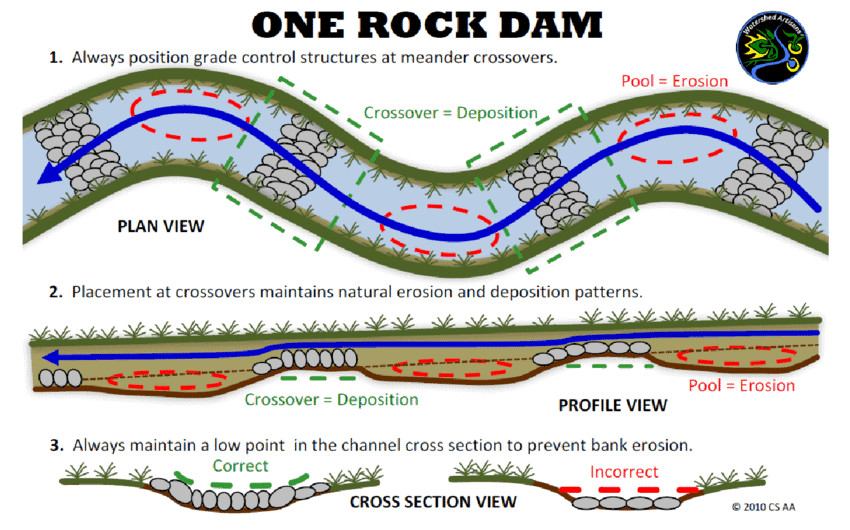 Rock dam plan profile and cross sectional views Sponholtz and Anderson 2013
4. Adding Finishing Touches
Enhance the aesthetic and functional aspects of your rock dam.
4.1. Landscaping Around the Dam
Enhance the area around the dam to blend it seamlessly with the natural environment.
- Native Plants: Use native plants to create a natural and sustainable landscape that supports local ecosystems.
- Rock Placement: Arrange rocks strategically to create visual interest and provide habitat for wildlife.
- Pathways: Create pathways to allow access to the dam for maintenance and enjoyment.
- Seating Areas: Add seating areas to create a relaxing space to enjoy the beauty of the dam and the surrounding landscape.
- Water Features: Incorporate water features, such as waterfalls or ponds, to enhance the aesthetic appeal of the dam.
- Lighting: Install lighting to highlight the dam and the surrounding landscape at night.
- Mulching: Mulch the area around the dam to suppress weeds and retain moisture in the soil.
- Erosion Control: Implement erosion control measures, such as terracing or retaining walls, to prevent soil erosion and protect the landscape.
- Irrigation: Install an irrigation system to ensure the plants around the dam receive adequate water.
- Maintenance: Regularly maintain the landscape around the dam to keep it looking its best.
4.2. Integrating with Existing Landscape
Integrate the dam into the existing landscape to create a cohesive and harmonious design.
- Color Palette: Choose rocks and plants that complement the existing color palette of the landscape.
- Texture: Use a variety of textures to create visual interest and add depth to the landscape.
- Scale: Ensure the scale of the dam and the surrounding landscape is appropriate for the overall size of the property.
- Form: Use form and shape to create a sense of balance and harmony in the landscape.
- Functionality: Design the landscape to be functional and practical, as well as aesthetically pleasing.
- Sustainability: Use sustainable landscaping practices to minimize environmental impact and create a healthy ecosystem.
- Native Materials: Incorporate native materials, such as rocks and plants, to create a landscape that is in harmony with its surroundings.
- Wildlife Habitat: Design the landscape to provide habitat for wildlife, such as birds, butterflies, and other beneficial insects.
- Water Conservation: Use water-wise landscaping practices to conserve water and reduce irrigation needs.
- Maintenance: Regularly maintain the landscape to keep it looking its best and ensure it continues to function properly.
5. Maintenance and Long-Term Care
Regular maintenance ensures the rock dam remains effective and aesthetically pleasing.
5.1. Regular Inspections
Conduct routine inspections to identify potential issues early.
- Frequency: Inspect the dam at least once a month, and more frequently after heavy rain events.
- Erosion: Look for signs of erosion around the base and banks of the dam.
- Rock Displacement: Check for any rocks that have shifted or become dislodged.
- Debris Accumulation: Remove any debris, such as leaves, branches, and sediment, that has accumulated in the dam.
- Water Flow: Observe the water flow to ensure it is not being obstructed or diverted.
- Vegetation Growth: Monitor vegetation growth around the dam and remove any plants that may be compromising its stability.
- Structural Integrity: Check for any cracks, settling, or other signs of structural damage.
- Wildlife Activity: Look for signs of wildlife activity that may be affecting the dam or the surrounding landscape.
- Documentation: Document any findings and take photos to track changes over time.
- Corrective Actions: Implement corrective actions promptly to address any issues identified during the inspection.
5.2. Preventing Erosion
Implement measures to prevent erosion around the dam.
- Vegetation Planting: Plant vegetation around the dam to stabilize the soil and prevent erosion.
- Rock Placement: Strategically place rocks to protect vulnerable areas from erosion.
- Geotextile Fabric: Use geotextile fabric to reinforce the soil and prevent erosion.
- Terracing: Create terraces to slow down water flow and reduce erosion.
- Retaining Walls: Build retaining walls to support unstable slopes and prevent erosion.
- Drainage Systems: Install drainage systems to divert water away from vulnerable areas.
- Mulching: Mulch the area around the dam to protect the soil and retain moisture.
- Sediment Traps: Install sediment traps to capture sediment before it reaches the dam.
- Regular Maintenance: Regularly maintain the area around the dam to prevent erosion.
- Adaptive Management: Adapt management strategies as needed to address changing environmental conditions and prevent erosion.
5.3. Repairing Damage
Address any damage promptly to prevent further issues.
- Rock Replacement: Replace any rocks that have been dislodged or damaged.
- Soil Stabilization: Stabilize any eroded soil with vegetation or geotextile fabric.
- Structural Repairs: Repair any cracks, settling, or other structural damage.
- Drainage Improvements: Improve drainage to prevent water from undermining the dam.
- Debris Removal: Remove any debris that may be contributing to the damage.
- Professional Assistance: Seek professional assistance for complex or extensive repairs.
- Safety Precautions: Take all necessary safety precautions when performing repairs.
- Regular Inspections: Conduct regular inspections to identify and address any potential problems early.
- Preventive Maintenance: Implement preventive maintenance measures to minimize the risk of damage.
- Documentation: Document all repairs and maintenance activities.
6. Rock Dams and the Environment
Rock dams offer environmental benefits, making them a sustainable choice for water management.
6.1. Promoting Biodiversity
Rock dams enhance biodiversity by creating diverse habitats.
- Habitat Creation: Rock dams create pools and wetlands that provide habitat for aquatic and terrestrial species.
- Water Source: Rock dams provide a reliable water source for wildlife, especially in arid environments.
- Vegetation Support: Rock dams promote vegetation growth, which provides food and shelter for wildlife.
- Microclimates: Rock dams create microclimates that support a variety of plant and animal species.
- Connectivity: Rock dams can connect fragmented habitats, allowing wildlife to move more freely.
- Erosion Control: Rock dams prevent erosion, which protects water quality and supports aquatic life.
- Water Infiltration: Rock dams increase water infiltration, which replenishes groundwater and supports vegetation growth.
- Nutrient Cycling: Rock dams facilitate nutrient cycling, which supports a healthy ecosystem.
- Carbon Sequestration: Rock dams promote carbon sequestration, which helps to mitigate climate change.
- Aesthetic Value: Rock dams enhance the aesthetic value of the landscape, which can increase property values and attract tourism.
6.2. Sustainable Water Management
Rock dams support sustainable water management practices.
- Water Conservation: Rock dams conserve water by slowing down runoff and increasing infiltration.
- Erosion Control: Rock dams control erosion by stabilizing soil and preventing sediment from entering waterways.
- Flood Mitigation: Rock dams mitigate flooding by reducing peak flows and increasing water storage capacity.
- Water Quality Improvement: Rock dams improve water quality by filtering pollutants and reducing sediment load.
- Groundwater Recharge: Rock dams recharge groundwater by increasing infiltration and replenishing aquifers.
- Habitat Enhancement: Rock dams enhance habitat by creating pools and wetlands that support aquatic and terrestrial species.
- Climate Change Adaptation: Rock dams help adapt to climate change by increasing water availability and reducing the risk of drought and flooding.
- Cost-Effectiveness: Rock dams are a cost-effective solution for water management compared to engineered structures.
- Community Involvement: Rock dams can be built and maintained by local communities, promoting stewardship and sustainability.
- Long-Term Benefits: Rock dams provide long-term benefits for water resources and ecosystems.
7. Common Mistakes to Avoid
Avoid these common pitfalls when building a rock dam.
7.1. Poor Site Selection
Choosing the wrong location can lead to dam failure or ineffectiveness.
- Unstable Soil: Avoid building dams on unstable soil that is prone to erosion or settling.
- Excessive Slope: Avoid building dams on slopes that are too steep, as this can increase the risk of failure.
- Inadequate Water Flow: Avoid building dams in areas with insufficient water flow, as this can lead to stagnation and water quality problems.
- Sensitive Habitats: Avoid building dams in sensitive habitats, such as wetlands or riparian areas, without proper permits and approvals.
- Conflicting Uses: Avoid building dams in areas where they may conflict with other land uses, such as agriculture or recreation.
- Accessibility Issues: Avoid building dams in areas that are difficult to access for maintenance and repairs.
- Lack of Planning: Avoid building dams without proper planning and assessment of site conditions.
- Regulatory Compliance: Avoid building dams without complying with all applicable regulations and permitting requirements.
- Community Input: Avoid building dams without seeking input from local communities and stakeholders.
- Long-Term Monitoring: Avoid building dams without a plan for long-term monitoring and maintenance.
7.2. Improper Rock Placement
Incorrect rock placement can compromise the dam’s stability.
- Unstable Foundation: Ensure the foundation is stable and level before placing rocks.
- Lack of Interlocking: Interlock rocks to create a strong and cohesive structure.
- Insufficient Size: Use rocks of sufficient size to withstand the force of water flow.
- Poor Distribution: Distribute rocks evenly to prevent stress concentrations.
- Inadequate Compaction: Compact soil around the rocks to increase stability.
- Improper Angle: Maintain a stable angle of repose to prevent the dam from collapsing.
- Lack of Drainage: Provide adequate drainage to prevent water from building up behind the dam.
- Erosion Prevention: Implement erosion control measures to protect the dam from erosion.
- Regular Inspections: Conduct regular inspections to identify and address any potential problems.
- Professional Guidance: Seek professional guidance on rock placement techniques.
7.3. Neglecting Maintenance
Failing to maintain the dam can lead to deterioration and failure.
- Lack of Inspections: Conduct regular inspections to identify potential problems early.
- Debris Accumulation: Remove debris regularly to prevent clogs and water quality problems.
- Erosion Control: Maintain erosion control measures to protect the dam from erosion.
- Vegetation Management: Manage vegetation growth to prevent roots from undermining the dam.
- Repairing Damage: Repair any damage promptly to prevent further deterioration.
- Monitoring Water Flow: Monitor water flow to ensure it is not being obstructed or diverted.
- Sediment Removal: Remove sediment buildup to maintain water storage capacity.
- Adaptive Management: Adapt management strategies as needed to address changing environmental conditions.
- Community Involvement: Engage local communities in dam maintenance efforts.
- Long-Term Planning: Develop a long-term maintenance plan to ensure the dam continues to function properly.
8. Seeking Professional Advice
When in doubt, consult with experts for guidance.
8.1. Landscape Architects
Landscape architects can provide valuable insights into design and integration.
- Site Assessment: Landscape architects can assess the site and identify potential challenges and opportunities.
- Design Expertise: Landscape architects can provide design expertise to ensure the dam is aesthetically pleasing and functional.
- Permitting Assistance: Landscape architects can assist with obtaining necessary permits and approvals.
- Construction Oversight: Landscape architects can oversee the construction process to ensure the dam is built properly.
- Planting Design: Landscape architects can create planting designs that enhance the dam and the surrounding landscape.
- Sustainable Design: Landscape architects can incorporate sustainable design principles into the dam project.
- Project Management: Landscape architects can manage the dam project from start to finish.
- Cost Estimation: Landscape architects can provide accurate cost estimates for the dam project.
- Client Representation: Landscape architects can represent the client’s interests throughout the dam project.
- Problem Solving: Landscape architects can provide creative solutions to any challenges that may arise during the dam project.
8.2. Hydrologists
Hydrologists can assess water flow and ensure the dam’s effectiveness.
- Water Flow Analysis: Hydrologists can analyze water flow patterns and predict the impact of the dam on water resources.
- Flood Risk Assessment: Hydrologists can assess the flood risk associated with the dam and recommend mitigation measures.
- Dam Safety Inspection: Hydrologists can conduct dam safety inspections to ensure the dam is structurally sound.
- Water Quality Monitoring: Hydrologists can monitor water quality to ensure the dam is not adversely affecting water resources.
- Sediment Transport Analysis: Hydrologists can analyze sediment transport patterns and recommend measures to prevent sediment buildup in the dam.
- Groundwater Assessment: Hydrologists can assess the impact of the dam on groundwater resources.
- Permitting Assistance: Hydrologists can assist with obtaining necessary permits and approvals for the dam project.
- Expert Testimony: Hydrologists can provide expert testimony in legal proceedings related to the dam project.
- Research and Development: Hydrologists can conduct research and development to improve dam design and management practices.
- Training and Education: Hydrologists can provide training and education to dam owners and operators.
9. Rockscapes.net: Your Partner in Landscape Design
At rockscapes.net, we offer a wide range of resources to help you create stunning and sustainable landscapes.
9.1. Design Inspiration
Find inspiration for your rock dam project with our extensive photo gallery and design ideas.
- Diverse Styles: Explore a variety of rock dam designs, from rustic to modern, to find the perfect style for your landscape.
- Real-World Examples: View photos of completed rock dam projects to see how they can be integrated into different landscape settings.
- Creative Ideas: Discover creative ideas for incorporating rock dams into water features, gardens, and other outdoor spaces.
- Seasonal Inspiration: Get inspiration for rock dam designs that are tailored to different seasons and climates.
- Small Space Solutions: Find design ideas for rock dams that are suitable for small spaces, such as urban gardens and courtyards.
- DIY Projects: Explore DIY rock dam projects that you can build yourself with our step-by-step instructions.
- Professional Designs: View rock dam designs created by professional landscape architects and designers.
- Themed Collections: Discover themed collections of rock dam designs, such as naturalistic, contemporary, and formal.
- User Submissions: See rock dam designs submitted by other users and share your own creations with the community.
- Expert Advice: Get expert advice from landscape professionals on how to design and build a rock dam that meets your needs and budget.
9.2. Expert Advice and Resources
Access expert advice and resources to guide you through every step of the process.
- Step-by-Step Guides: Follow our step-by-step guides to build a rock dam from start to finish.
- Material Selection: Learn how to select the right materials for your rock dam project.
- Tool Recommendations: Get recommendations for the best tools to use for building a rock dam.
- Safety Tips: Follow our safety tips to prevent accidents and injuries during construction.
- Maintenance Advice: Get advice on how to maintain your rock dam to keep it looking its best.
- Troubleshooting Tips: Find solutions to common problems that may arise during construction or maintenance.
- Expert Consultations: Consult with our team of landscape professionals for personalized advice and guidance.
- Online Forums: Join our online forums to connect with other rock dam enthusiasts and ask questions.
- Educational Workshops: Attend our educational workshops to learn more about rock dam design and construction.
- Resource Library: Access our extensive resource library for articles, videos, and other helpful materials.
Are you ready to enhance your landscape with a beautiful and functional rock dam? Visit rockscapes.net today for inspiration, expert advice, and all the resources you need to get started. Whether you’re looking for design ideas, material selection tips, or step-by-step construction guides, we’ve got you covered. Transform your property into a sustainable and visually stunning environment by building a rock dam with rockscapes.net. Contact us at Address: 1151 S Forest Ave, Tempe, AZ 85281, United States. Phone: +1 (480) 965-9011 or visit our website: rockscapes.net.
10. Frequently Asked Questions (FAQ)
10.1. What is the primary purpose of a rock dam?
The primary purpose of a rock dam is to slow down water flow, control erosion, and promote water infiltration into the soil.
10.2. What types of rocks are best for building a rock dam?
Rocks that are durable and resistant to weathering and erosion, such as granite, basalt, or sandstone, are best for building a rock dam.
10.3. How do I choose the right location for a rock dam?
Choose a location where water flow is concentrated, the soil is stable, the slope is gentle, and vegetation is minimal.
10.4. What tools are essential for building a rock dam?
Essential tools include a shovel, level, gloves, measuring tape, wheelbarrow, and pickaxe.
10.5. How do I ensure the stability of a rock dam?
Ensure stability by using a mix of rock sizes and shapes, interlocking the rocks, compacting the soil around the base, and planting vegetation.
10.6. How often should I inspect a rock dam?
Inspect the dam at least once a month, and more frequently after heavy rain events.
10.7. What are some common mistakes to avoid when building a rock dam?
Common mistakes include poor site selection, improper rock placement, and neglecting maintenance.
10.8. How does a rock dam promote biodiversity?
A rock dam promotes biodiversity by creating diverse habitats, providing a reliable water source for wildlife, and supporting vegetation growth.
10.9. What are the environmental benefits of using rock dams?
Environmental benefits include erosion control, water conservation, habitat creation, and sustainable water management.
10.10. Where can I find inspiration and resources for building a rock dam?
You can find inspiration and resources at rockscapes.net, which offers design ideas, expert advice, and step-by-step guides.