Building a rock fence post is an environmentally friendly and durable way to enhance your property, and at rockscapes.net, we provide the knowledge and inspiration to get you started. This comprehensive guide provides a cement-free method for constructing sturdy and visually appealing rock fence posts, perfect for any landscape. Discover the art of rockscaping and elevate your outdoor spaces.
1. Why Build a Rock Fence Post?
Rock fence posts offer numerous advantages:
- Environmental friendliness: Utilizing natural field stones reduces waste and minimizes environmental impact.
- Durability: Stone fences can last for generations, withstanding harsh weather conditions.
- Aesthetics: Rock posts add a unique, rustic charm to your property.
- Cost-effectiveness: Using locally sourced stones can significantly reduce material costs.
- Low maintenance: Rock fences require minimal upkeep compared to traditional fences.
- Sustainability: Rock fence posts offer a sustainable fencing solution, utilizing readily available natural resources and reducing the need for manufactured materials.
- Versatility: Rock fence posts complement various architectural styles and can be adapted to different terrain conditions, offering endless design possibilities.
2. Planning Your Rock Fence Post Project
2.1. Assess Your Needs and Site Conditions
- Purpose of the fence: Determine whether the fence is for livestock containment, boundary marking, or decorative purposes.
- Terrain: Evaluate the slope, soil type, and drainage of the area where you’ll be building the fence.
- Local climate: Consider the freeze-thaw cycle and potential for erosion.
- Rock availability: Assess the type and quantity of field stones available on your property or from local suppliers.
- Permits and regulations: Check local building codes and homeowner association rules regarding fence construction.
2.2. Design and Layout
- Post placement: Decide on the spacing between posts, typically 8 to 12 feet for optimal stability.
- Post height: Determine the desired height of the fence, considering both functionality and aesthetics.
- Corner and gate posts: Plan for stronger, more substantial posts at corners and gate openings.
- Rock selection: Choose stones that are appropriately sized and shaped for building stable and visually appealing posts.
- Aesthetic considerations: Consider the overall style and color scheme of your landscape when selecting stones.
2.3. Estimating Materials
- Wooden posts: Calculate the number of wooden posts needed based on post spacing and fence length.
- Wire mesh: Determine the amount of wire mesh required to create the rock cages, considering the desired post diameter and height.
- Staples and wire: Estimate the quantity of staples and wire needed to secure the wire mesh to the wooden posts.
- Rocks: Calculate the volume of rocks needed to fill the cages, taking into account the size and shape of the stones.
- Fasteners: Estimate the number of nails or screws needed to stabilize the post.
3. Essential Tools and Materials
- Wooden posts: These provide the internal support for the rock post.
- Field stones: Locally sourced stones of various sizes and shapes.
- Welded-wire fencing: Used to create a cage around the wooden posts to contain the rocks.
- Nails and barbed fence staples: For securing the wire mesh to the wooden posts.
- Backhoe or shovel: For digging the post holes.
- Carpenter’s level: To ensure the posts are plumb.
- Sledgehammer: For compacting the soil and rocks around the posts.
- Small sticks or shims: To hold the wooden posts in place during construction.
- Gloves and safety glasses: For personal protection.
- Measuring tape: For accurate measurements.
- Wire cutters: For cutting the wire mesh.
- Wheelbarrow: For transporting rocks and materials.
- Tamper: For compacting soil.
4. Step-by-Step Guide: How to Build a Rock Fence Post
4.1. Digging the Post Hole
- Mark the location: Mark the location of the post hole with a stake or spray paint.
- Excavate the hole: Use a backhoe or shovel to dig a hole approximately 2 feet deep and 20 to 24 inches wide. The depth may vary depending on your local frost line and soil conditions.
- Prepare the base: Ensure the base of the hole is level and compacted for stability.
4.2. Setting the Wooden Posts
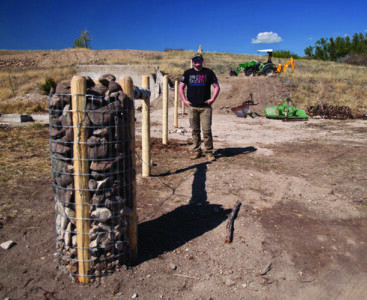
- Post configuration: Place two 6 1/2-foot wooden posts 180 degrees apart for an inline bracing post, or 90 degrees apart for corner posts. For corners where a gate is nearby or where you want extra strength, arrange three wooden posts in a triangle, with two of the posts in line with their respective fences.
- Align the posts: Align the posts with the direction of the fence, ensuring they are plumb and at the desired height.
- Brace the posts: Nail small sticks between the wooden posts to hold them in place at the correct distance apart.
- Secure the posts: Temporarily brace the posts with wooden stakes or shims to keep them plumb while you add the rocks.
4.3. Creating the Wire Cage
- Measure and cut the wire mesh: Use 5-foot-wide, 2-inch-by-3-inch rectangular galvanized welded-wire fencing to make the outside “cage” for the rocks. Cut enough wire to make two complete wraps around the wooden posts.
- Form the cage: Roll out the wire and form it into a cylindrical cage around the posts, overlapping the ends by several inches. For regular corners and inline posts, make the rolls 18 to 24 inches in diameter.
- Secure the cage: Tie the ends of the wire together with wire or hog rings to create a secure cage.
- Position the cage: Slip the wire cage over the wooden posts, setting it below grade (trimming off the wooden sticks or removing them as you go) so the top of the wire is nearly flush with the tops of the posts.
- Attach the cage: Using a sledgehammer as a bucking bar against the back of each post for extra support, staple the cage to the posts with barbed fence staples. This will keep the cage stable as you add rocks.
4.4. Filling the Cage with Rocks
- Select the rocks: Choose rocks of various sizes and shapes, with larger rocks for the center and smaller rocks for the outer edges.
- Place the rocks: Carefully place the rocks into the cage, starting with the larger stones in the center.
- Arrange the rocks: Arrange the rocks to create a stable and visually appealing structure, filling in gaps with smaller stones. Don’t use rocks more than about 10 inches in size, because if they bounce around when they’re dropped in, they can bend the cage outward or knock the wooden posts out of plumb.
- Compact the rocks: Use a sledgehammer or tamper to compact the rocks, ensuring they are tightly packed within the cage.
- Fill the base: After filling the cage, finish backfilling around the base with material left from the excavation and compact it for extra strength.
4.5. Finishing Touches
- Remove bracing: Once the rocks are stable, remove any temporary bracing or shims.
- Top off the post: Add a final layer of smaller stones to create a smooth, even surface on top of the post.
- Clean up: Remove any excess soil or debris from around the base of the post.
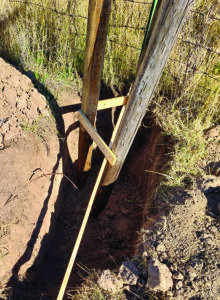 Sticks holding posts in place with small sticks nailed between wooden posts for correct distance, ensuring a stable foundation
5. Constructing Dependable Field Stone Gate Posts
5.1. Adaptations for Gate Posts
- Larger post: Use a larger, 7-inch-diameter, 8-foot-tall gate post for added strength.
- Wider hole: Dig a wider hole to accommodate the larger post and additional support.
- Tripod support: Arrange sticks around the gate post to form a tripod, temporarily screwing them in to support the post vertically.
5.2. Securing the Gate Post
- Positioning: Place the gate post in the hole, ensuring it is plumb and aligned with the desired gate location.
- Additional wooden posts: Nail two 6 1/2-foot wooden posts together with sticks and place them in the hole. Place rocks around the base of all the posts to hold them. Then, backfill the hole and compact the material used to backfill it.
- Larger cages: Make larger wire cages (about 29 to 30 inches in diameter) and place them over the two 6 1/2-foot posts, leaving the large gate post outside the cage.
- Rock filling: Fill the cage with rocks, estimating that the larger cages will contain 2,000 to 2,500 pounds of rock.
- Lag screws: Use three 5/8-by-10-inch lag screws to attach the larger gate post to the wooden gate post inside the cage. Essentially, the gate post will be held in place by a 2,000-to-2,500-pound rock anchor.
- Hinge pins: Attach the gate hinge pins into the gate posts with screws, and align the gate so it’s level.
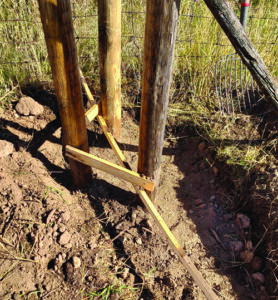 Partially filled rock fence post hole showcasing the mixture of dirt and rocks, setting the stage for a sturdy foundation
6. Design Ideas for Rock Fence Posts
6.1. Incorporating Local Stone
- Match existing structures: Use stones that complement the color and texture of your home or other buildings on your property.
- Showcase natural variations: Embrace the unique colors and patterns of local stone to create a one-of-a-kind fence.
- Create a dry-stacked look: Arrange the stones to mimic the appearance of a traditional dry-stacked stone wall.
6.2. Adding Decorative Elements
- Incorporate plants: Add small pockets of soil within the rock post to grow succulents, herbs, or flowering plants.
- Use lighting: Install solar-powered lights on top of the posts to add ambiance and security.
- Add metal accents: Incorporate metal caps, brackets, or decorative panels to add visual interest.
6.3. Rock Post Styles
- Rustic: Emphasize the natural texture and irregular shapes of the stones for a rugged, informal look.
- Modern: Use clean, angular stones and a minimalist design for a contemporary feel.
- Traditional: Create a symmetrical, well-proportioned post with carefully selected and arranged stones.
- Artistic: Arrange the stones in a creative pattern or mosaic to add a unique, artistic touch.
7. Maintaining Your Rock Fence Post
7.1. Regular Inspections
- Check for loose stones: Periodically inspect the posts for any loose or displaced stones, and replace them as needed.
- Inspect the wire mesh: Check the wire mesh for signs of rust or damage, and repair or replace it as necessary.
- Monitor for settling: Watch for any signs of settling or shifting of the posts, and address any issues promptly.
7.2. Cleaning and Repairs
- Remove debris: Clear away any accumulated debris, such as leaves, branches, or weeds, from around the base of the posts.
- Wash the stones: Use a garden hose or pressure washer to clean the stones and remove any dirt or algae buildup.
- Repair damaged areas: Repair any cracks or chips in the stones with mortar or epoxy.
7.3. Preventing Damage
- Protect from erosion: Ensure proper drainage around the base of the posts to prevent erosion.
- Avoid excessive weight: Do not lean heavy objects against the posts or allow livestock to rub against them.
- Control vegetation: Keep vegetation trimmed back from the posts to prevent roots from damaging the structure.
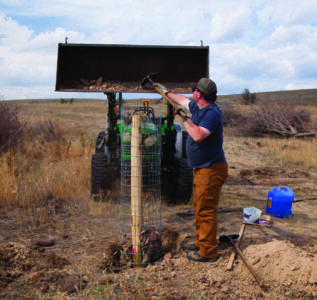 Selecting rocks from a backhoe for constructing the rock fence post, showcasing the blend of manual labor and machinery
8. The Environmental Benefits of Rock Fence Posts
- Sustainable use of resources: Rock fence posts utilize locally sourced stones, reducing the need for manufactured materials and minimizing transportation costs.
- Reduced waste: Using field stones that would otherwise be discarded helps to reduce waste and promote responsible land management.
- Soil conservation: Rock fences can help to prevent soil erosion by slowing down runoff and trapping sediment.
- Habitat creation: Rock fences provide habitat for small animals, insects, and plants, enhancing biodiversity.
- Carbon sequestration: Stone, as a natural material, contributes to carbon sequestration, helping to offset carbon emissions.
9. Rock Fence Posts in Different Climates
9.1. Arid Climates (e.g., Arizona)
- Stone selection: Choose drought-resistant stones that can withstand extreme heat and dryness, such as granite, quartzite, or sandstone.
- Design considerations: Design the fence to provide shade and reduce water evaporation, such as by incorporating taller posts or denser stone arrangements.
- Plant selection: Plant drought-tolerant vegetation around the base of the fence to help stabilize the soil and reduce erosion.
- Maintenance: Regularly inspect the fence for cracks or damage caused by extreme temperature fluctuations. According to research from Arizona State University’s School of Earth and Space Exploration, in July 2025, the use of native rocks provides better climate resilience.
9.2. Temperate Climates
- Stone selection: Choose stones that are resistant to freeze-thaw cycles, such as limestone, bluestone, or fieldstone.
- Design considerations: Design the fence to allow for proper drainage to prevent water from accumulating and freezing within the stone structure.
- Plant selection: Plant vegetation that can tolerate both wet and dry conditions, such as perennial flowers, shrubs, or grasses.
- Maintenance: Regularly inspect the fence for cracks or damage caused by freezing and thawing, and repair any issues promptly.
9.3. Coastal Climates
- Stone selection: Choose stones that are resistant to salt spray and erosion, such as granite, basalt, or coastal sandstone.
- Design considerations: Design the fence to withstand strong winds and wave action, such as by using wider posts and a more robust stone arrangement.
- Plant selection: Plant salt-tolerant vegetation around the base of the fence to help stabilize the soil and reduce erosion.
- Maintenance: Regularly inspect the fence for damage caused by salt spray and wave action, and repair any issues promptly.
10. Finding Inspiration and Resources at Rockscapes.net
- Extensive image gallery: Explore a wide variety of rock fence post designs and styles to inspire your own project.
- Detailed product information: Learn about different types of stones, their characteristics, and their suitability for rock fence posts.
- Expert advice: Access articles, guides, and videos with tips and techniques for building and maintaining rock fence posts.
- Local supplier directory: Find reputable stone suppliers in your area who can provide you with the materials you need.
- Community forum: Connect with other rock fence enthusiasts, share ideas, and ask questions.
Rockscapes.net is your ultimate resource for all things rock and landscape related. Whether you’re a homeowner, landscaper, or contractor, we have the information and inspiration you need to create stunning and sustainable outdoor spaces.
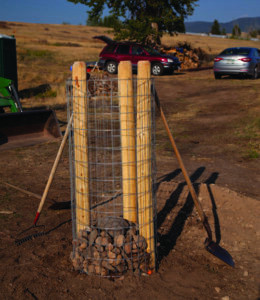 Filling the rock fence post cage with various stones, showing the construction process of adding structural integrity
11. The Cost of Building a Rock Fence Post
The cost of building a rock fence post can vary widely depending on several factors:
- Stone type and availability: Locally sourced field stones will generally be less expensive than imported or specialty stones.
- Post size and design: Larger, more elaborate posts will require more materials and labor, increasing the cost.
- Labor costs: If you hire a contractor to build the posts for you, labor costs can significantly impact the overall cost.
- Site preparation: Clearing the site, digging the post holes, and preparing the foundation can add to the cost.
- Tools and equipment: If you don’t already own the necessary tools and equipment, you’ll need to factor in the cost of renting or purchasing them.
Cost-Saving Tips:
- Use locally sourced stones: Utilizing field stones from your own property or a local quarry can save you money on materials.
- DIY construction: Building the posts yourself can save you money on labor costs.
- Simple design: Opting for a simple, straightforward design can reduce the amount of materials and labor required.
- Salvaged materials: Consider using salvaged or recycled materials, such as old fence posts or wire mesh, to save money and reduce waste.
12. Ensuring Stability and Longevity
- Proper foundation: Dig the post holes deep enough to provide a solid foundation for the posts, especially in areas with frost heave.
- Compacted backfill: Compact the soil around the posts in layers to prevent settling and ensure stability.
- Adequate drainage: Provide proper drainage around the base of the posts to prevent water from accumulating and weakening the structure.
- Quality materials: Use high-quality wooden posts, wire mesh, and fasteners to ensure the longevity of the fence.
- Regular maintenance: Inspect the fence regularly for any signs of damage or deterioration, and make repairs promptly.
13. Rock Fence Posts vs. Traditional Fences
13.1. Aesthetics
- Rock Fence Posts: Offer a natural, rustic look that blends seamlessly with the landscape.
- Traditional Fences: Can look more formal and uniform, but may not blend as well with natural surroundings.
13.2. Durability
- Rock Fence Posts: Extremely durable and can last for generations with minimal maintenance.
- Traditional Fences: Can be susceptible to rot, insect damage, and weather-related wear and tear.
13.3. Cost
- Rock Fence Posts: Can be more cost-effective if you have access to locally sourced stones and are willing to do the labor yourself.
- Traditional Fences: Can be more expensive upfront, but may require less labor to install.
13.4. Environmental Impact
- Rock Fence Posts: Utilize natural materials and reduce the need for manufactured products, making them more environmentally friendly.
- Traditional Fences: Can contribute to deforestation and pollution from manufacturing and transportation.
13.5. Maintenance
- Rock Fence Posts: Require minimal maintenance, primarily just occasional cleaning and inspection.
- Traditional Fences: May require regular painting, staining, or repairs to maintain their appearance and structural integrity.
 Backfilling the base of a rock fence post to add extra support, demonstrating the layered construction technique
14. Alternative Techniques for Building Rock Fence Posts
14.1. Mortared Rock Fence Posts
- Description: Use mortar to bind the stones together, creating a more solid and permanent structure.
- Advantages: Greater stability, cleaner appearance, and ability to use smaller stones.
- Disadvantages: More labor-intensive, requires specialized skills, and less environmentally friendly due to the use of cement.
14.2. Gabion Rock Fence Posts
- Description: Use wire mesh cages (gabions) to contain the stones, creating a modular and easy-to-assemble structure.
- Advantages: Relatively easy to build, can be adapted to different sizes and shapes, and allows for the use of a variety of stone types.
- Disadvantages: Can look less natural than dry-stacked or mortared posts, and the wire mesh can be susceptible to rust and damage.
14.3. Concrete-Free Rock Fence Posts
- Description: This method relies on the careful arrangement and interlocking of stones to create a stable structure without the use of mortar or concrete.
- Advantages: Environmentally friendly, uses natural materials, and creates a visually appealing, rustic look.
- Disadvantages: Requires more skill and patience to build, and may not be as strong or durable as mortared or gabion posts.
15. Addressing Common Challenges
15.1. Finding the Right Stones
- Local quarries: Contact local quarries or stone suppliers to find a variety of stone types and sizes.
- Field collection: Collect field stones from your own property or with permission from landowners.
- Online resources: Search online marketplaces or classified ads for stones being sold by individuals or businesses.
15.2. Ensuring Post Stability
- Proper foundation: Dig the post holes deep enough and compact the soil thoroughly to provide a solid foundation.
- Interlocking stones: Arrange the stones in a way that they interlock and support each other.
- Bracing: Use temporary bracing to support the posts while you’re building them.
15.3. Preventing Erosion
- Proper drainage: Ensure proper drainage around the base of the posts to prevent water from accumulating and eroding the soil.
- Plant vegetation: Plant vegetation around the base of the posts to help stabilize the soil and reduce erosion.
- Retaining walls: Build small retaining walls or terraces to prevent soil from washing away from the posts.
16. Tips for Working with Stone
- Wear safety gear: Always wear gloves, safety glasses, and sturdy boots when working with stone.
- Use the right tools: Invest in quality tools, such as a hammer, chisel, and stone saw, to make the job easier and safer.
- Plan your layout: Plan the layout of the stones before you start building to ensure a stable and visually appealing structure.
- Work in layers: Build the posts in layers, carefully placing and arranging each stone before moving on to the next layer.
- Take your time: Building rock fence posts is a labor-intensive process, so take your time and don’t rush.
17. Legal and Regulatory Considerations
17.1. Building Permits
- Check local regulations: Contact your local building department to determine whether you need a building permit for your rock fence post project.
- Submit plans: If a permit is required, you may need to submit plans showing the location, dimensions, and design of the fence.
- Comply with codes: Ensure that your fence complies with all applicable building codes and regulations.
17.2. Property Lines and Easements
- Determine property lines: Before you start building, determine the exact location of your property lines to avoid encroaching on your neighbor’s property.
- Check for easements: Check for any easements or rights-of-way that may affect the location of your fence.
- Communicate with neighbors: Talk to your neighbors about your plans and address any concerns they may have.
17.3. Homeowner Association Rules
- Review HOA guidelines: If you live in a community with a homeowner association (HOA), review the HOA guidelines to ensure that your fence complies with all applicable rules and regulations.
- Submit plans for approval: You may need to submit plans for your fence to the HOA for approval before you can start building.
- Comply with restrictions: Be prepared to comply with any restrictions on fence height, materials, or design.
18. Future Trends in Rock Fence Post Design
18.1. Sustainable Materials
- Recycled stone: Using recycled or reclaimed stone to reduce waste and promote sustainability.
- Locally sourced stone: Utilizing locally sourced stone to minimize transportation costs and support local economies.
- Permeable foundations: Designing foundations that allow water to drain through, reducing runoff and promoting groundwater recharge.
18.2. Innovative Designs
- Living fences: Incorporating plants and vegetation into the fence design to create a living, breathing structure.
- Sculptural elements: Adding sculptural elements or artistic details to the fence to create a unique and eye-catching feature.
- Mixed materials: Combining stone with other materials, such as wood, metal, or glass, to create a visually interesting and dynamic design.
18.3. Smart Technology
- Integrated lighting: Incorporating LED lighting into the fence design to enhance security and create ambiance.
- Sensors and monitoring: Installing sensors to monitor soil moisture, temperature, or other environmental factors.
- Automated irrigation: Integrating automated irrigation systems to water plants and vegetation growing on the fence.
19. Rock Fence Post Safety Considerations
- Wear Personal Protective Equipment (PPE): Always wear safety glasses, gloves, and sturdy footwear when handling rocks and constructing fence posts to protect against injuries.
- Proper Lifting Techniques: Use proper lifting techniques to avoid back strain or injury when moving heavy rocks. Bend at the knees and keep your back straight.
- Stable Work Environment: Ensure the work area is clear of obstacles and debris to prevent trips and falls.
- Safe Use of Tools: Follow manufacturer’s instructions for the safe use of tools such as sledgehammers, wire cutters, and levels.
- Secure Rock Placement: Place rocks securely to prevent them from shifting or falling, which could cause injury.
- Caution with Heavy Machinery: If using heavy machinery like a backhoe, ensure that only trained and experienced operators are at the controls and that all safety protocols are followed.
- Avoid Overreaching: Do not overreach or strain when placing rocks. Move closer to the work area if necessary.
- First Aid Kit: Keep a well-stocked first aid kit nearby for treating minor injuries.
- Emergency Plan: Have an emergency plan in place in case of serious injury, including knowing the location of the nearest medical facility and how to contact emergency services.
- Regular Breaks: Take regular breaks to avoid fatigue, which can increase the risk of accidents.
Crafting rock fence posts is somewhat time-consuming and requires effort. However, it’s a great way to use materials at hand while simultaneously building something that’s sturdy, useful, and long-lasting.
Rock fence posts are not only a practical solution for boundary marking and security but also an opportunity to add natural beauty and character to your landscape. By following the tips and techniques outlined in this guide, you can create stunning rock fence posts that will last for generations.
Ready to start building your own rock fence post?
Visit rockscapes.net today for inspiration, expert advice, and all the resources you need to bring your vision to life. Explore our extensive image gallery, learn about different types of stones, and connect with other rock fence enthusiasts in our community forum.
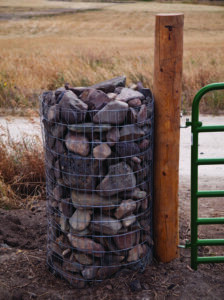 Attaching the gate post to the rock fence, showing the integration of structural and design elements
FAQ: How To Build A Rock Fence Post
1. What is a rock fence post, and why should I build one?
A rock fence post is a durable and aesthetically pleasing alternative to traditional fence posts, constructed using natural stones and often incorporating wooden posts for internal support. Building a rock fence post offers environmental benefits by utilizing local materials, increases property value with its unique aesthetic, and provides a long-lasting fencing solution with minimal maintenance.
2. What materials do I need to build a rock fence post?
To build a rock fence post, you’ll need wooden posts for internal support, field stones of various sizes, welded-wire fencing to create a cage around the posts, nails and barbed fence staples for securing the wire mesh, and basic tools like a backhoe or shovel, carpenter’s level, sledgehammer, gloves, and safety glasses.
3. How do I prepare the site for building a rock fence post?
Site preparation involves clearing the area, marking post locations, and digging holes that are approximately 2 feet deep and 20 to 24 inches wide. Ensure the base of each hole is level and compacted to provide a stable foundation.
4. What is the best way to ensure the stability of my rock fence post?
To ensure stability, use wooden posts for internal support, arrange the stones in a way that they interlock and support each other, compact the soil around the posts in layers, and provide proper drainage to prevent water accumulation.
5. How do I choose the right stones for my rock fence post?
Select stones of various sizes and shapes, with larger stones for the center and smaller stones for the outer edges. Choose stones that complement your home’s exterior and the surrounding landscape. Ensure the stones are durable and weather-resistant.
6. Can I build a rock fence post without using any concrete or mortar?
Yes, you can build a concrete-free rock fence post by carefully arranging and interlocking the stones to create a stable structure. This method requires more skill and patience but offers a more environmentally friendly and natural-looking result.
7. How do I maintain my rock fence post to ensure its longevity?
Regularly inspect the posts for loose or displaced stones, check the wire mesh for signs of rust or damage, and monitor for any settling or shifting of the posts. Clean the stones periodically to remove dirt and algae buildup.
8. What are some design ideas for rock fence posts?
Consider incorporating local stone to match existing structures, adding decorative elements like plants or lighting, or creating different styles such as rustic, modern, or traditional. You can also arrange the stones in a creative pattern or mosaic for a unique touch.
9. Do I need a building permit to build a rock fence post?
Check with your local building department to determine whether you need a building permit for your rock fence post project. If required, submit plans showing the location, dimensions, and design of the fence.
10. Where can I find inspiration and resources for building a rock fence post?
Visit rockscapes.net for inspiration, expert advice, and all the resources you need to bring your vision to life. Explore our extensive image gallery, learn about different types of stones, and connect with other rock fence enthusiasts in our community forum, or visit us at 1151 S Forest Ave, Tempe, AZ 85281, United States or call us at +1 (480) 965-9011.